When I was young, my father would tell me, “If you’re going to do something, you better know all the facts”. Overclocking your CPU is no different.
From cooling solution to power supply, each component of your computer needs to be taken into account when overclocking. It’s very important to know what kind of heatsink you’re going to be using during this process, as some will be better for this process than others.
The stock heatsink for the 1500x is the Wraith Spire, which is a 95 watt cooler compared to previous Ryzen models, which only provided a 65 watt cooler. The Spire will allow us to overclock to the recommended maximum and perhaps more. Let’s begin.
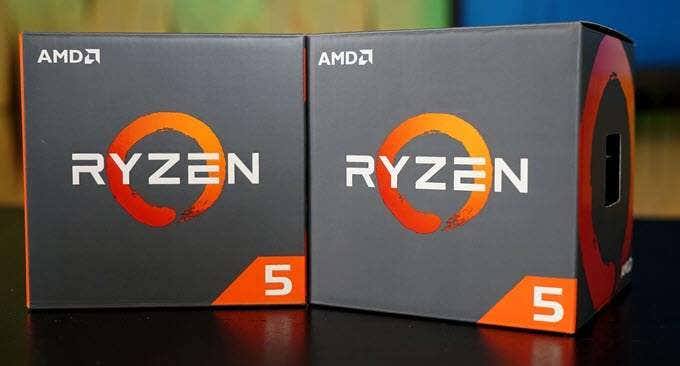
Before we start overclocking, it’s important to install CPU-Z and Cinebench. This will show us if our overclock is actually stable at the selected clock ratio and will show the relative CPU performance increase.
Run benchmarks initially to see the default state of your CPU and compare those values to subsequent benchmarks. Also, use a tool to monitor the temperature of your CPU throughout.
Overclock AMD Ryzen CPU
The first thing we’re going to do is boot up the BIOS by pressing F2 when the computer starts up. After loading into the BIOS, you will see a screen similar to this:
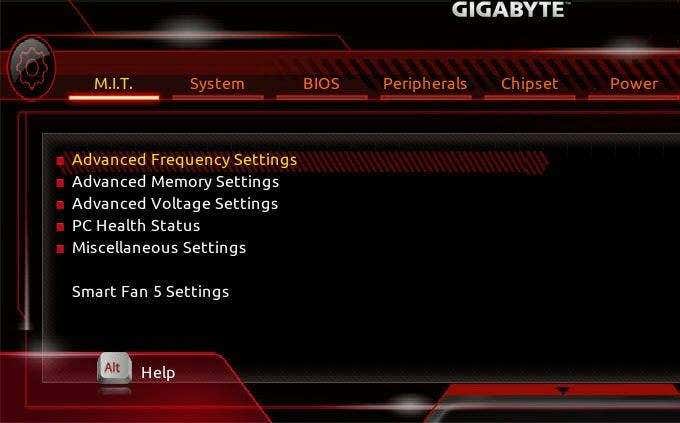
The only tab that we need to focus on is the M.I.T (Motherboard Intelligent Tweaker) tab. Within this tab, we are primarily going to be working in Advanced Frequency Settings, Advanced Voltage Settings and Smart Fan 5 Settings.
Clicking on Advanced Frequency Settings will bring you to this screen:
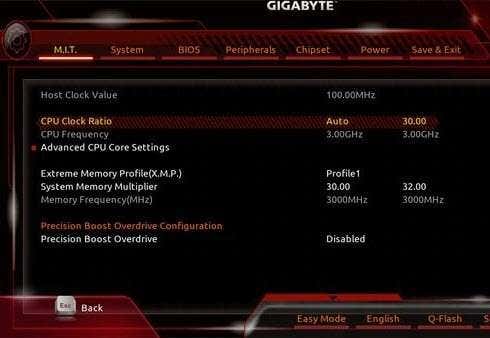
This point depends on your configuration, but AMD has stated that the recommended clock ratio for overclocking is 3.70 GHz, so we’re going to set it to this clock rate.
To do so select CPU Clock Ratio and change it from Auto to 37.00 (for my build I have set this to 39.00 because that’s the highest stable clock rate I’m able to run). After adjusting the clock ratio, you’ll see that the BIOS multiplier automatically changes the CPU Frequency to 3.7 GHz.
Before booting, go into Advanced CPU Core Settings (right under CPU Frequency). Your screen should look something like this:
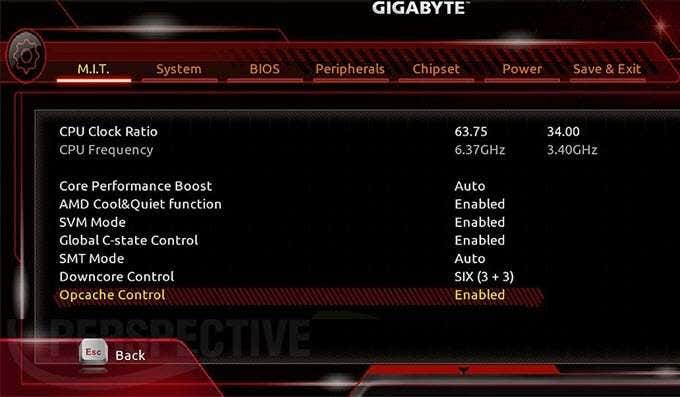
Under this setting we’re going to set Core Performance Boost to Disabled. This will prevent the frequency from fluctuating, ensuring that it stays at a constant 3.7 GHz. Next, we’re going to Disable the AMD Cool&Quiet function and Disable the Global C-state Control.
Next, we’re going to Disable the AMD Cool&Quiet function and Disable the Global C-state Control. Cool&Quiet simply limits fan speed and C-state Control basically sends a command to your CPU to use less power when it thinks the processor is idle, since we don’t want to limit the power or fan speed, we’re going to disable them. Leave SMT Mode, Downcore Control and Opcache Control at their Default settings.
Hit F10 to save settings and quit to boot your computer back into Windows and run your benchmarks. NOTE: Your motherboard might cycle on and off a few times after modifying settings, this is normal. If it shuts on and off more than six times, it will prompt you with a message that the overclock failed and will direct you back to the BIOS.
If your computer failed to start at the 3.7 GHz clock ratio or if you’ve gone to a higher frequency (3.9 GHz), you’re going to have to increase the CPU core voltages. To modify voltages, go to the Advanced Voltage Settings, which can be found under the Advanced Frequency Settings tab. Your screen should look something like this:
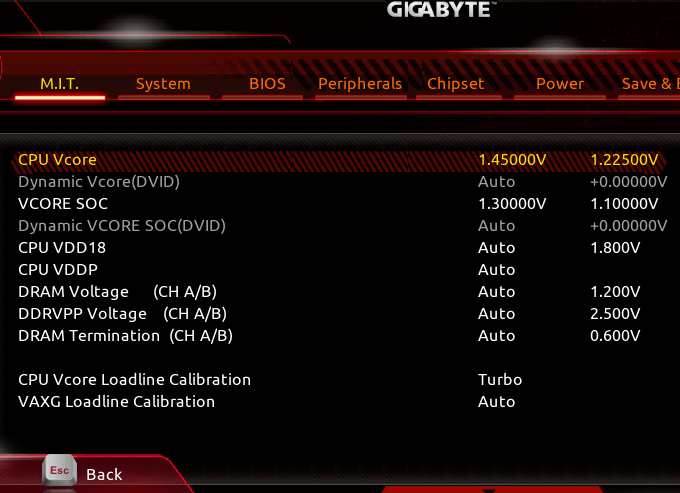
The Advanced Voltage Settings will allow us to keep the CPU stable at higher frequencies but we’re only going to adjust these settings if we need to. Increasing the voltage will also increase the heat that the CPU will produce so we’re going to do this last and only if the overclock doesn’t work at the default voltage.
At 3.7 GHZ, you probably will not need to increase the voltages, but if you do, go into the CPU Vcore settings. AMD has stated the maximum recommended CPU core voltage is 1.4250 V,but for my build I am trying to keep my CPU as cool as possible. Setting this to 1.4000 V will do the trick just fine.
I personally recommend keeping all of the other voltages on Auto but if you need to increase yours, you should match the voltages on the right side of the screen. Here’s an Example:
- VCORE SOC no higher than 1.10000V
- CPU VDD18 no higher than 1.800V
- CPU VDDP set to Normal
- DRAM Voltage no higher than 1.200V
- DDRVPP Voltage no higher than 2.500V
- DRAM Termination no higher than 0.600V
- CPU Vcore Loadline Calibration no higher than Turbo
- VAXG Loadline Calibration no higher than Turbo
Reboot and run benchmarks.
At this point you will have a stable overclock for your machine, but your CPU might be running a little hot. Remember, increasing core voltages will increase the amount of heat produced.
This is where the fan speed comes into play. After selecting Smart Fan 5 Settings at the bottom of the M.I.T tab, your screen should look like this:
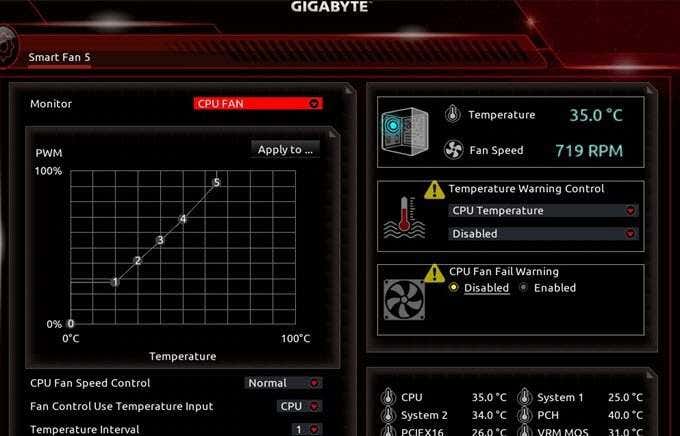
If your processor is running too hot at this point, select the CPU Fan Speed Control and set it to Full Speed. Save your settings and run benchmarks.
After running all of my benchmarks, my CPU saw an 12% performance increase, which may seem insignificant, but can make or break the performance of some applications. Your CPU is now ready for use. If you have any questions, feel free to ask!
Also, be sure to check out our post on how to overclock your GPU too.
Image credits:https://www.guru3d.com/articles-pages/gigabyte-aorus-z370-gaming-7-review,6.html
Related Posts
- Microsoft Is Shutting Down NTLM After 30 Years: Here’s Why Kerberos Replaced It
- Protect Office from Actively Exploited Zero-Day (CVE-2026-21509): Step-by-step Guide
- How to Fix Windows 11 Boot Loops After Jan 2026 Update
- How to Remove Copilot AI in Window 11? New Update Available in Beta
- January 2026 Patch Tuesday: 7 Things Windows Users Should Do Before and After Updating
Writer for Switching to Mac, Online Tech Tips, and Help Desk Geek blogs. With a background in IT and Physics, Christian has experience with computers, music, photography, and augmented reality technologies. Read Christian’s Full Bio
