How does Windows know which app or program to use to open all the different kinds of files on your computer? It comes down to file associations. Windows associates each file type with a program capable of opening that kind of file, but you have some choice in the matter, too!
Imagine, for example, you just installed Adobe Photoshop on your PC. From now on, you want Windows to use Photoshop to open .jpg files, but currently Windows always opens .jpg files with the default Photos app included in Windows 10.
Below we’ll show you several methods of changing file associations in Windows 10 so that your files open with the application you prefer.
How to Change Windows 10 File Associations in File Explorer
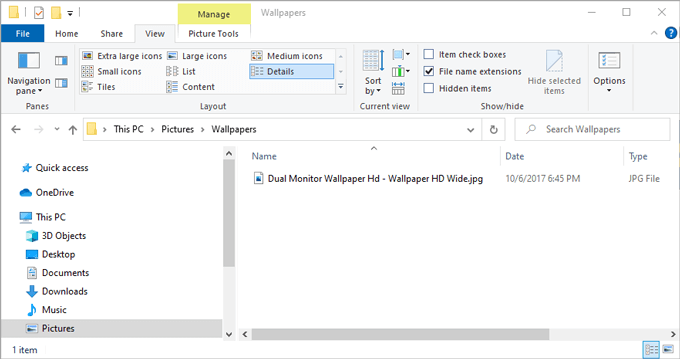
One way to tell Windows which application should open a particular kind of file is through the File Explorer. In the example below, JPG files open in Microsoft Photos, and we will change the file association so that JPG files open in Adobe Photoshop.
- Open File Explorer. An easy way to do that is to press Win+E.
- Navigate to a folder containing a file whose association you want to change.
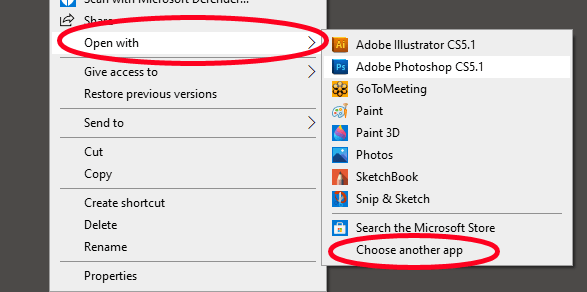
- Right-click the file and select Open with. (Note: If you don’t see Open with, hold down the Shift key and then right-click the file.)
- Even if you see the program you want to associate with that file type in the list, select Choose another app. (If you just select the program from the list displayed, the file will open in that app this time, but the default file association will remain unchanged.
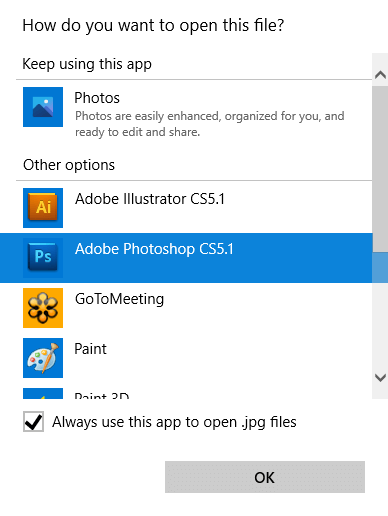
- A popup will appear asking you how you want to open this file. Select the application you want to associate with your file type and check the box next to Always use this app to open [filetype].
- Note: If you don’t see the app you want to associate with this file type in the Other options list, scroll down and select Look for an app in the Microsoft Store. Alternative, if you already have a program installed that doesn’t appear in the list, then select More apps and navigate to the application you want.
- Once you’ve selected the program you want to associate with this file type, select OK. From now on, files of that type will automatically open in the app you selected.
Another Way to Change Windows 10 File Associations in the File Explorer
Windows File Explorer offers a second way to designate which program should open files of a certain type. This technique works just as well as the method above. It’s up to you to pick which way you want to do it.
- Open File Explorer and navigate to a folder containing a file whose association you want to change.
- Select the file and make sure the Home menu tab is active. On the toolbar ribbon, select Properties. (Alternatively, right-click on the file and select Properties.)
- In the Properties panel, select the Change button.
- Continue from Step 5 in Method A above.
Change File Associations via the Control Panel
You can also use the Control Panel to change file associations in Windows 10. Here’s how.
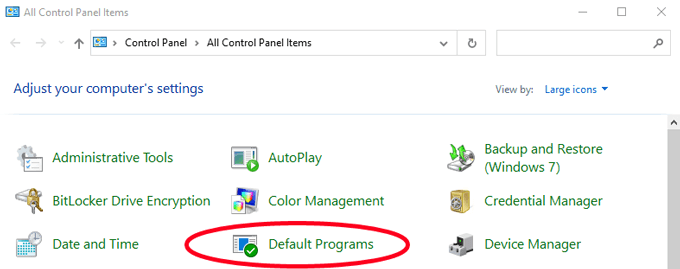
- Open the Control Panel. An easy way to do this is by pressing Win + R, typing control and then selecting OK.
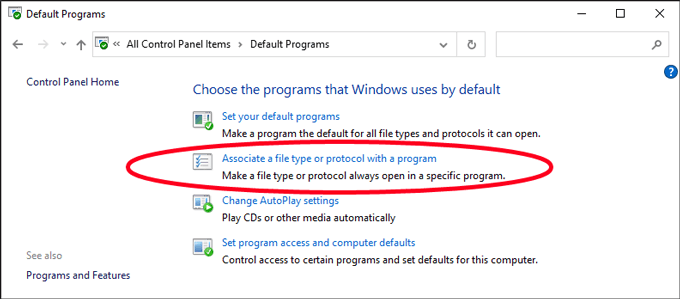
- Select Default Programs.
- Next, select Associate a file type or protocol with a program.
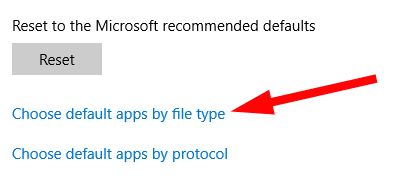
- In the Default apps window that displays, select Choose default apps by file type.
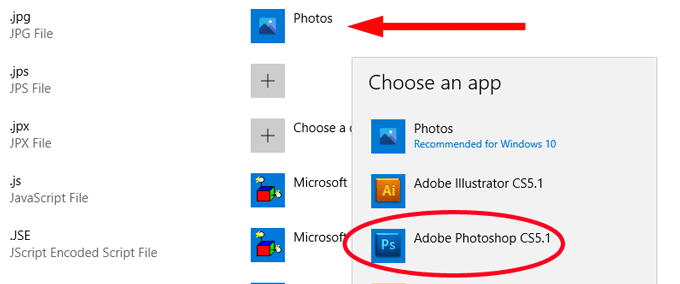
- Next, find the file type in the list on the left under Name. In our example, we’ll look for .jpg.
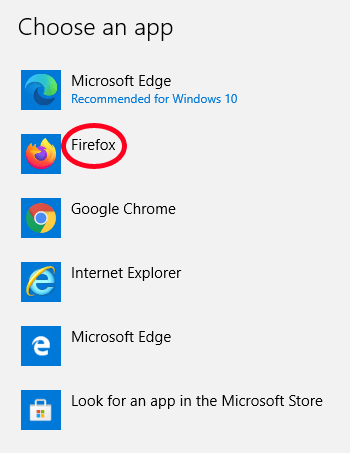
- Select the default program to the right of the file type association you want to change. The Choose an app panel will appear. Select the app you want to associate with the file type, and you’re done!
Changing File Associations in Windows Settings
Sometimes you might want an application to open every kind of file it can. In that case, rather than associating file types with the application one by one, you can tell Windows to use that application to open any kind of file it can handle.
For example, you might want your favorite web browser to open web pages, no matter what file type they are. Here’s how to do that.
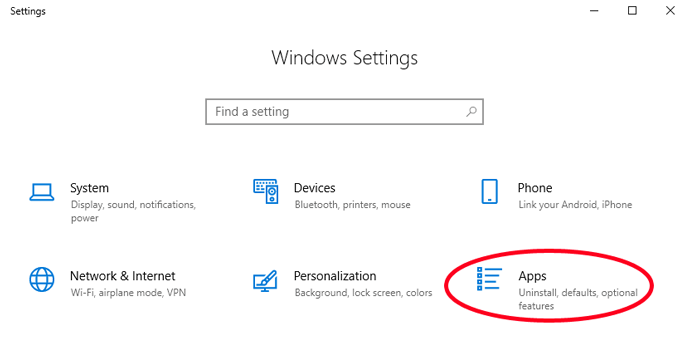
- Open Windows Settings by pressing Win+I.
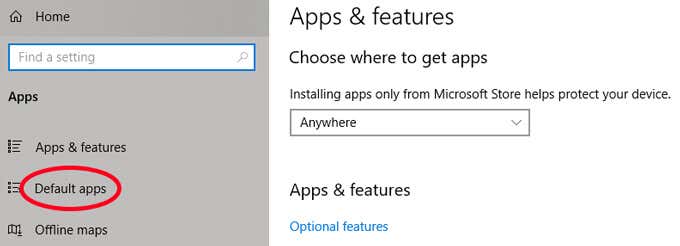
- Select Apps.
- In the list on the left, select Default apps.
- Now you can choose the default apps for things like email, maps, music, photos, videos, or web browser. Let’s change the default web browser from Google Chrome so that all web page file types are associated with Firefox instead. Under Web browser, select the default app that is listed. In this case, it’s Google Chrome.
- Next, select the app you want from the list. We’ll choose Firefox.
That’s it! Now Firefox has an association with all the file types it can handle.
Bonus: How to View File Extensions in Windows 10 File Explorer
In a previous section, we searched for file extensions in a list. If you use that method, you’ll need to know the file extension you want to associate with a particular app.
Configuring Windows File Explorer to display file extensions in file names is quick and easy. Just open the file explorer by pressing Win+E. Then select the View tab on the menu ribbon. Lastly, check the box next to File name extensions.
Now you’ll be able to see the file extension for any file in that folder.
Save Yourself Some Time
By following one of the methods above, you’ll save yourself some extra time and irritation. Taking a moment to change your file associations so your files open in the applications you want is a gift you can give your future self!
Related Posts
- Preparing for Windows 10 End of Support: Upgrading to Windows 11
- How to Fix a “This file does not have an app associated with it” Error on Windows
- How to Fix an Update Error 0x800705b4 on Windows
- How to Resolve “A JavaScript error occured in the main process” Error on Windows
- How to Fix the Network Discovery Is Turned Off Error on Windows
Maggie Marystone is a freelance technology writer, human rights worker, and storyteller based in Chicago. Read Maggie’s Full Bio
