
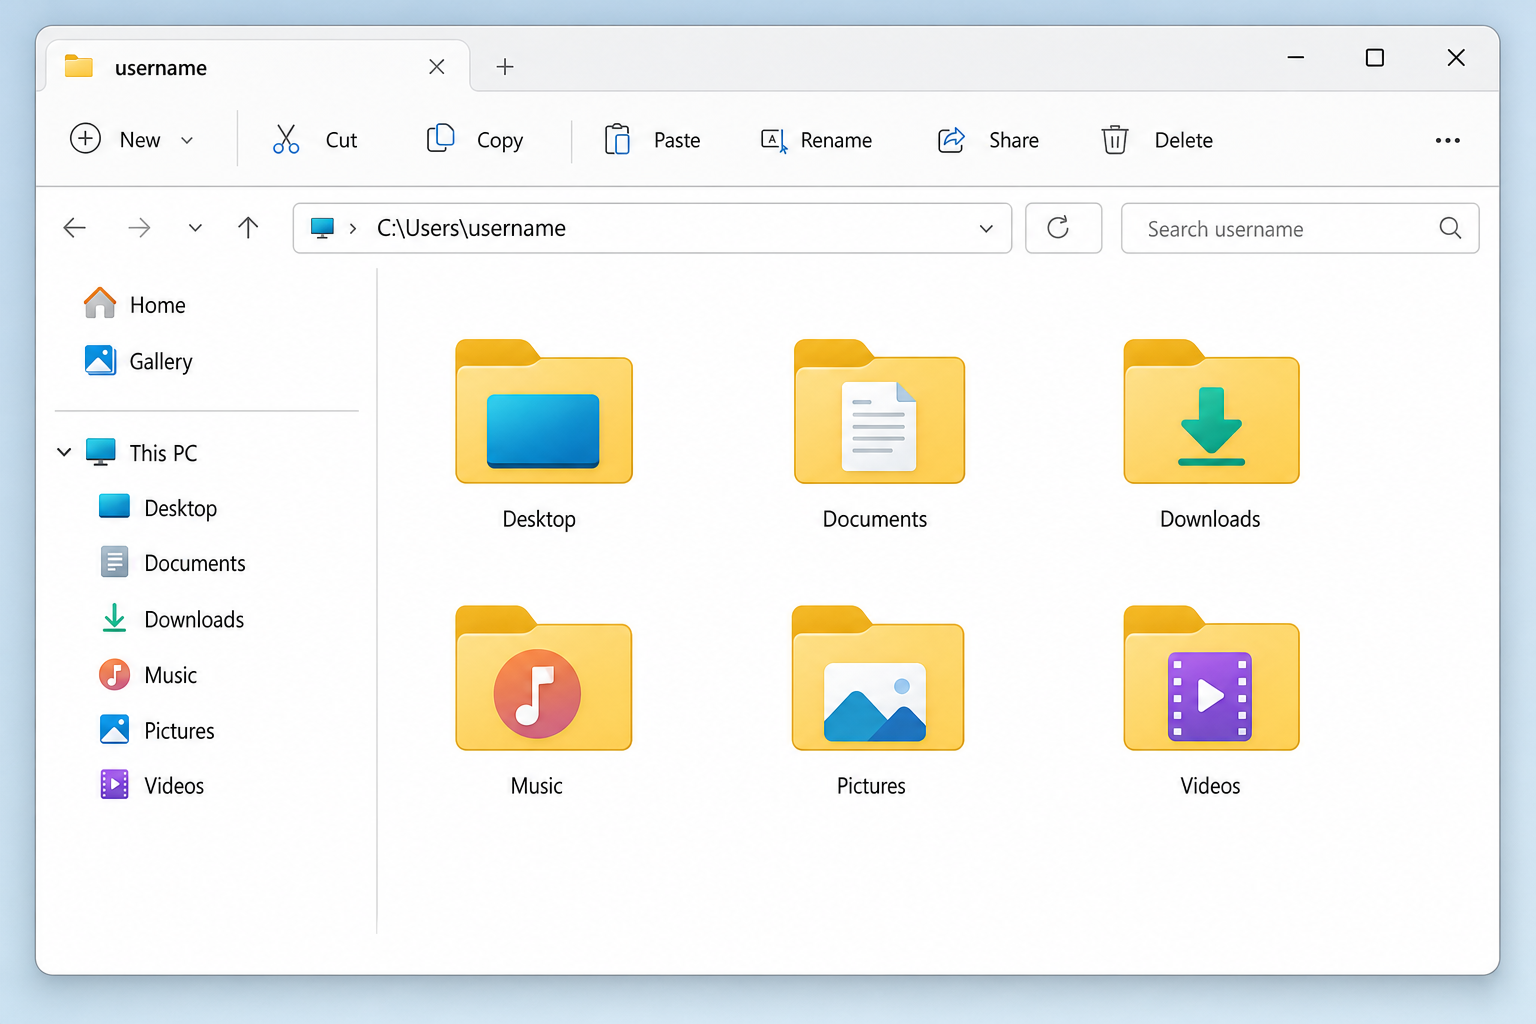
Your C: drive is filling up and the culprit is usually C:\Users\username\ Documents, Downloads, Videos, and the rest of the default user folders quietly accumulating gigabytes over time. Moving them to a second drive takes about two minutes per folder and Windows handles the redirect automatically.
What You Should (and Shouldn’t) Move
The folders below have a built-in Location tab that makes moving them safe and reversible:
- Documents
- Downloads
- Desktop
- Pictures
- Music
- Videos
Don’t move the entire C:\Users\username folder or the C:\Users tree. Doing so is unsupported, frequently breaks Windows Update and Store apps, and isn’t worth the risk for the space you’d save. Stick to individual folders.
Also avoid pointing any user folder at the root of a drive (e.g., D:\). Always create a dedicated subfolder first. For example, D:\Documents or Windows will throw an “Access is denied” error.
Before You Start
- You need a second internal drive (e.g., D:) or a partition that’s always connected. External USB drives are risky and generally not recommended — if the drive disconnects even briefly, apps will fail to save and Windows may recreate the folders on C: without warning. An external or docked drive may be acceptable only if it is truly permanent and always connected (for example, a desktop dock that is never unplugged), but an internal drive is strongly preferred.
- If your Documents or Desktop folder already lives inside OneDrive (you’ll see a path like
C:\Users\username\OneDrive\Documents), disable OneDrive backup for that folder first: right-click the OneDrive tray icon > Settings > Sync and backup > Manage backup, then turn off the folder. Otherwise the Location tab may not behave as expected. - Create a System Restore point before making any registry changes (covered in Fix #3 below).
How to Move a User Folder
Fix #1: Use the Location tab (recommended)
This is the supported, reversible method. It works on Windows 10 and Windows 11. The screenshots look slightly different between versions, but every step is identical.
- Press
Win + R, type%HOMEPATH%, and press Enter. File Explorer opens directly to your user folder (C:\Users\username).
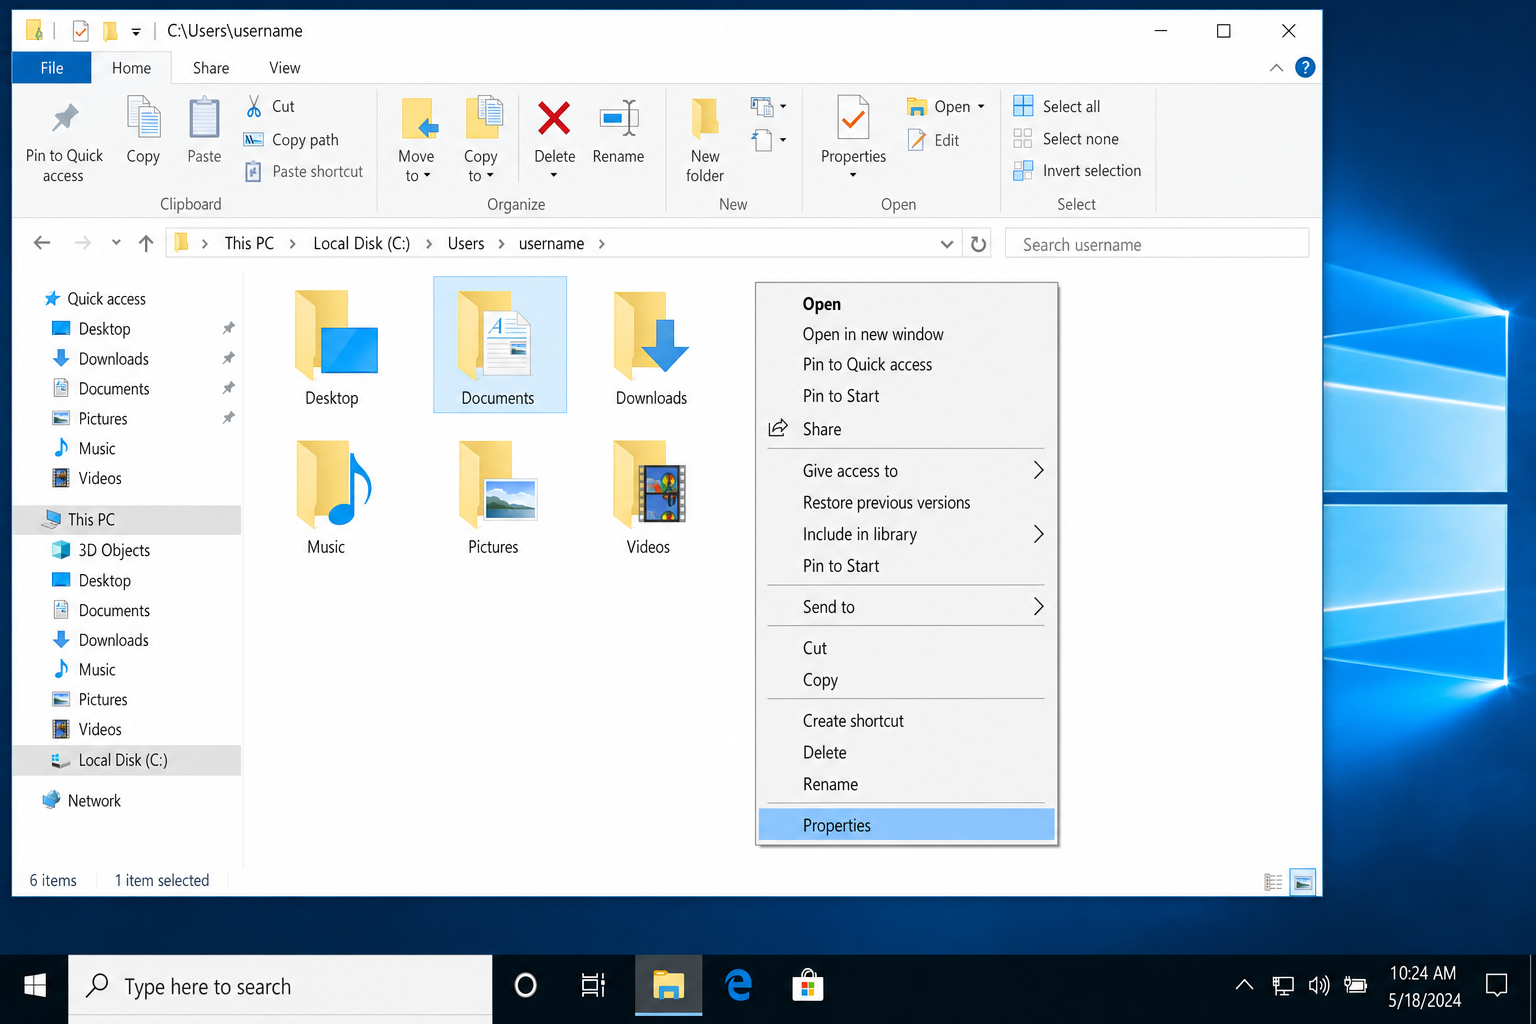
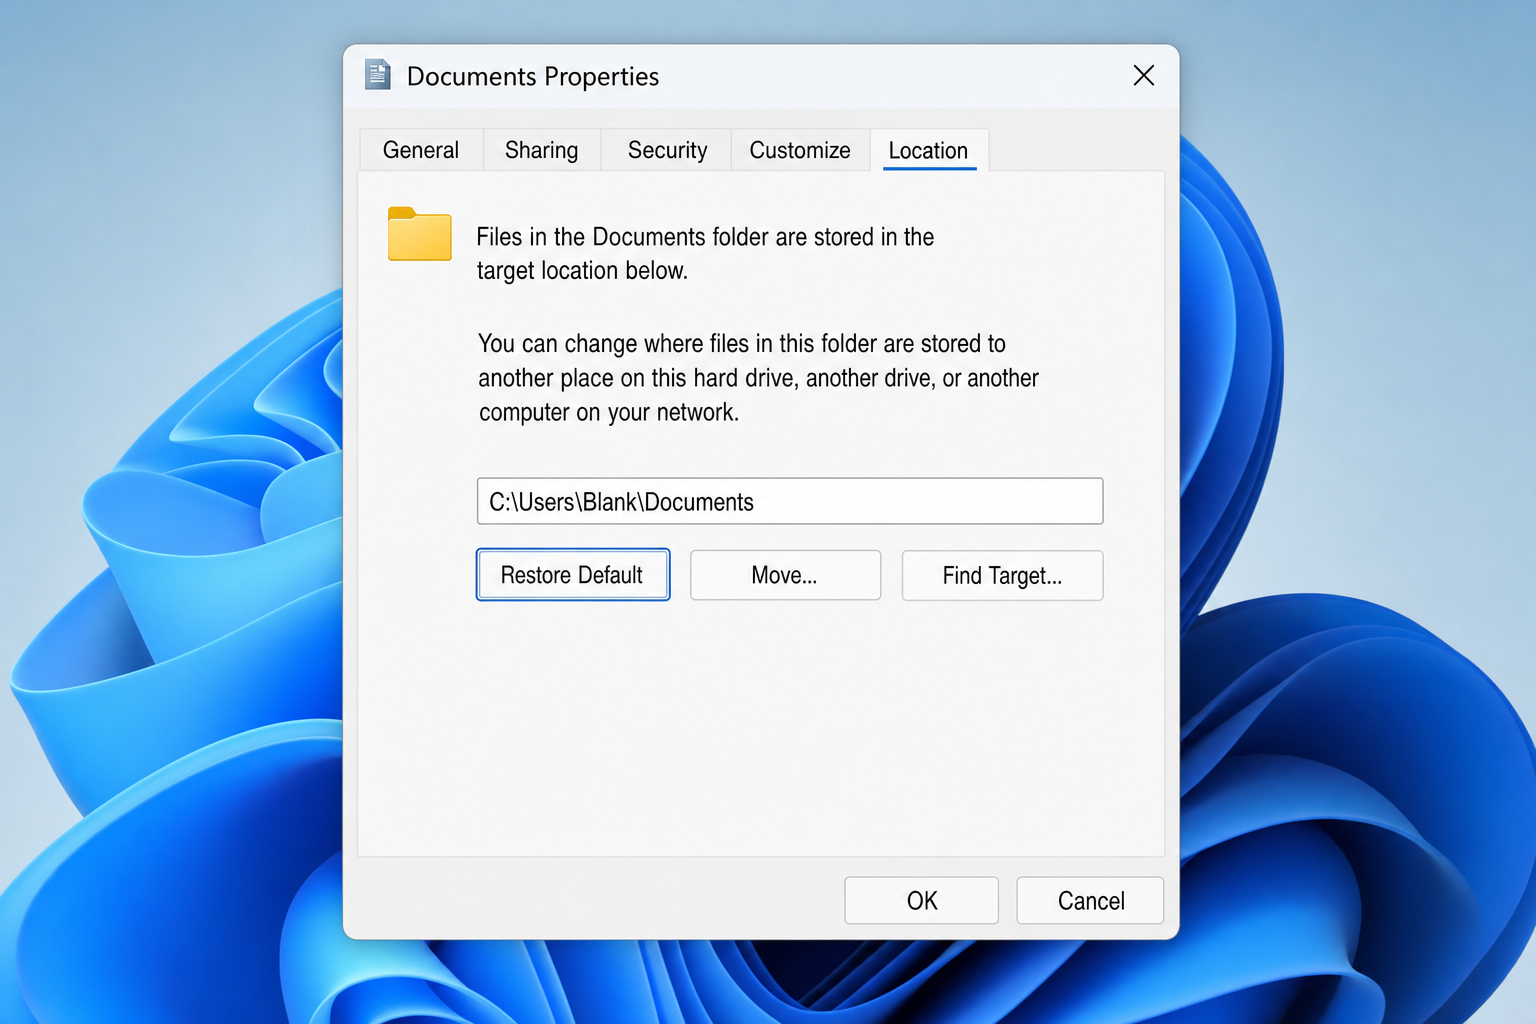
- Right-click the folder you want to move, for example Documents, and select Properties.
- Click the Location tab. You’ll see the current path in a text box.
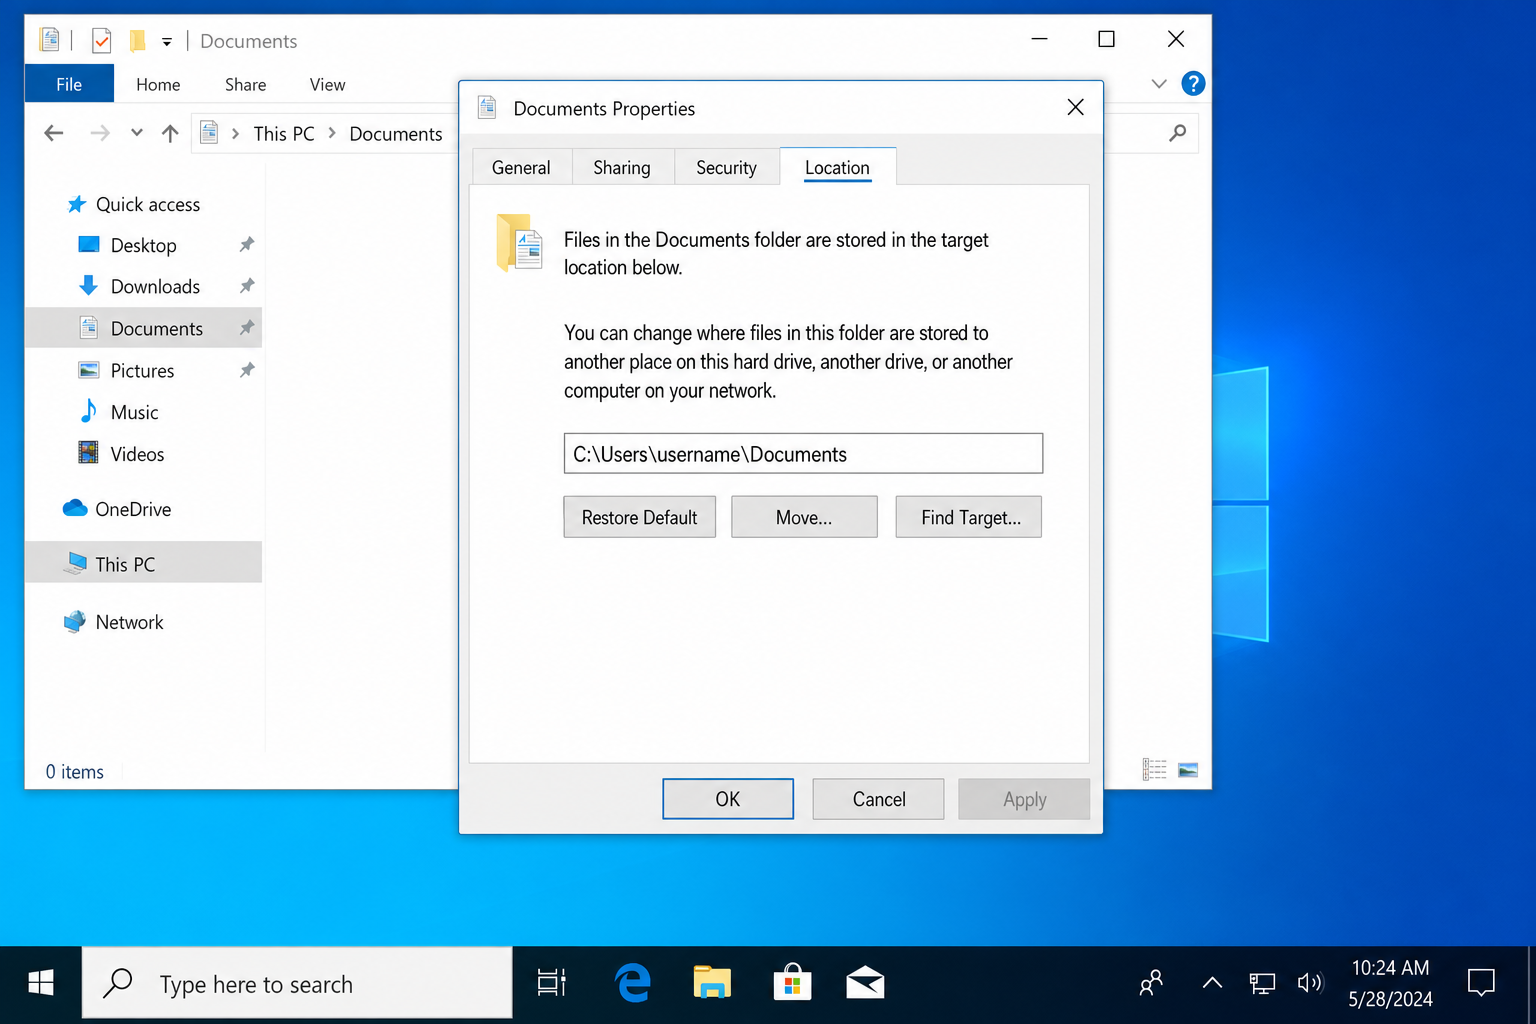
- Click Move…
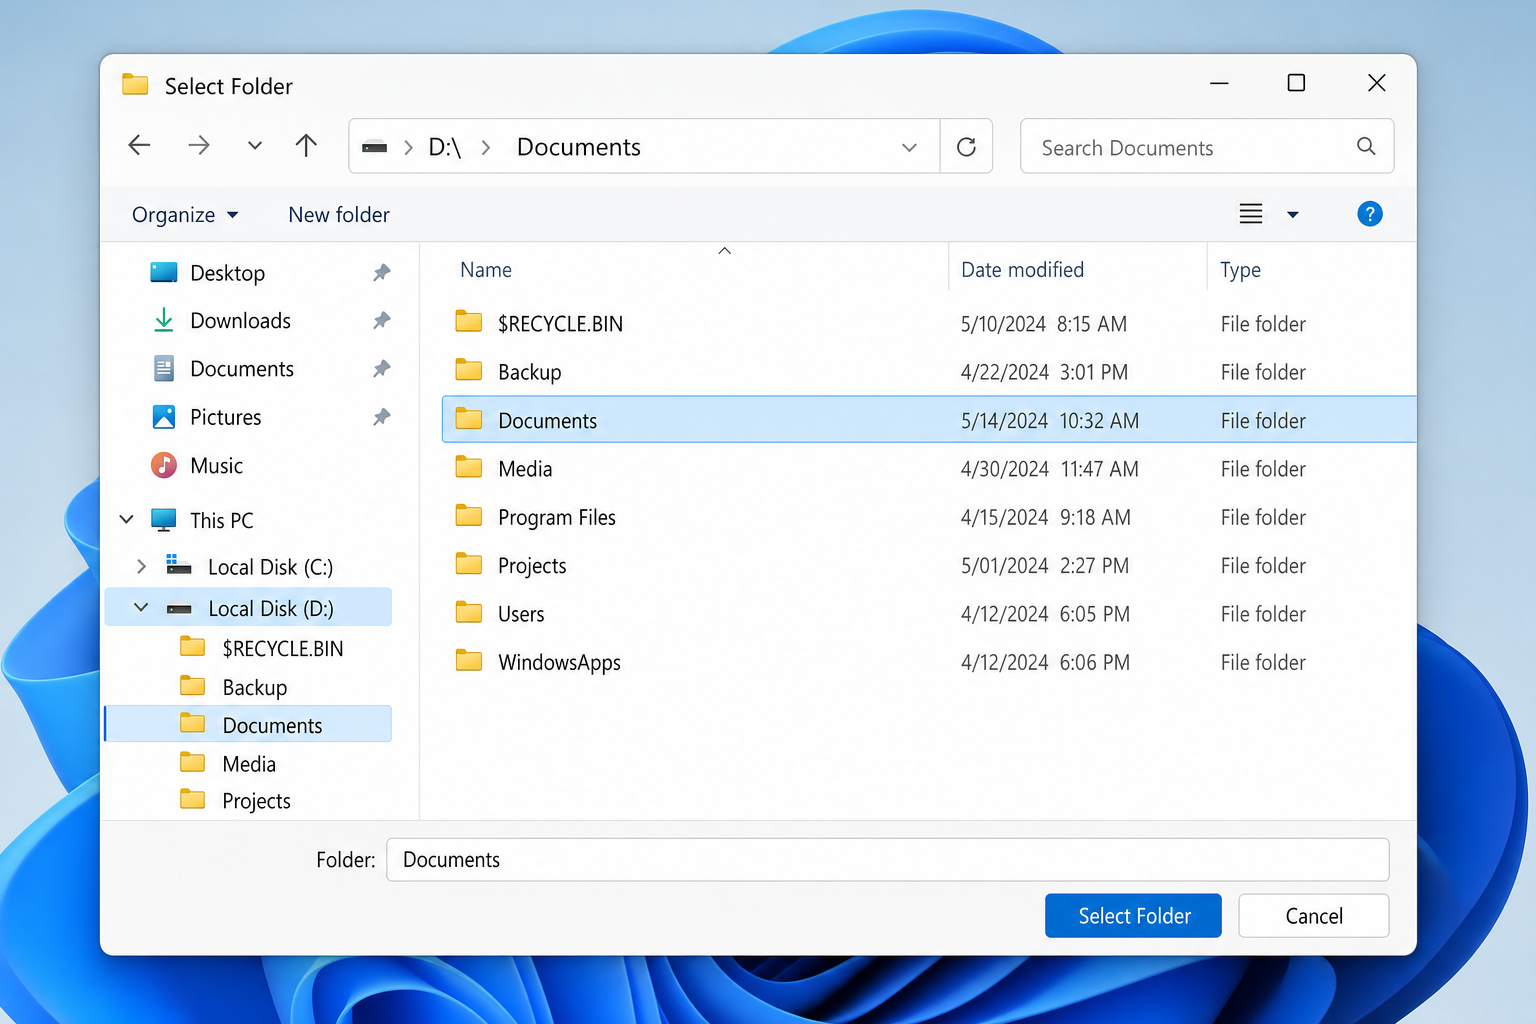
- In the folder picker, browse to your target drive and create or select a dedicated folder. For example,
D:\Documents. Click Select Folder.
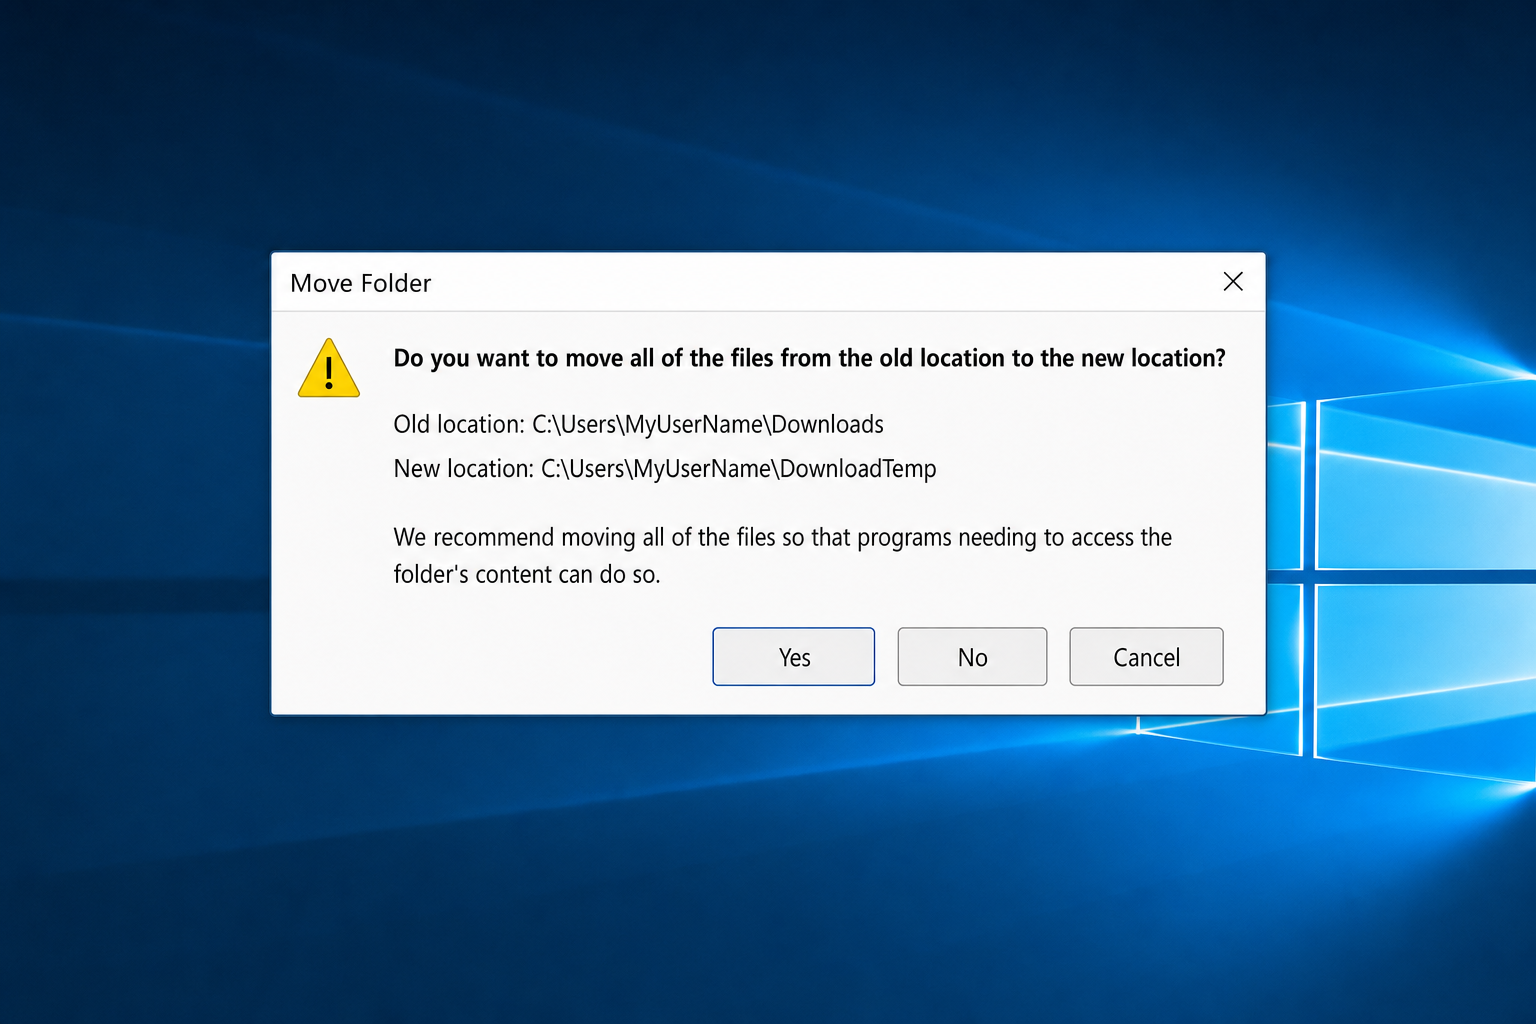
- Click Apply. Windows prompts: “Do you want to move all of the files from the old location to the new location?” Click Yes.
- Click OK to close Properties.
Repeat for each folder you want to move. After this, any app that saves to Documents, including Office, browsers, and save dialogs, will automatically use the new location on D: without any extra configuration.
Fix #2: Restore a folder to its default location
If a move went wrong or you want to undo it, use this before reaching for the registry.
- Press
Win + R, type%HOMEPATH%, and press Enter. - Right-click the affected folder and select Properties.
- Go to the Location tab and click Restore Default.
- Click Apply, then click Yes when prompted to move files back to the default location.
- Click OK.
Fix #3: Fix a broken folder location via the registry (advanced)
Use this only if the Location tab is missing, points somewhere invalid, or you see the error “Can’t move the folder because there is a folder in the same location that can’t be redirected. Access is denied.” If you haven’t already, create a System Restore point before continuing — registry edits can cause serious problems if something goes wrong and you’ll want a way back.
- Press
Win + R, typeregedit, and press Enter. Approve the UAC prompt. - Navigate to:
HKEY_CURRENT_USER\Software\Microsoft\Windows\CurrentVersion\Explorer\User Shell Folders
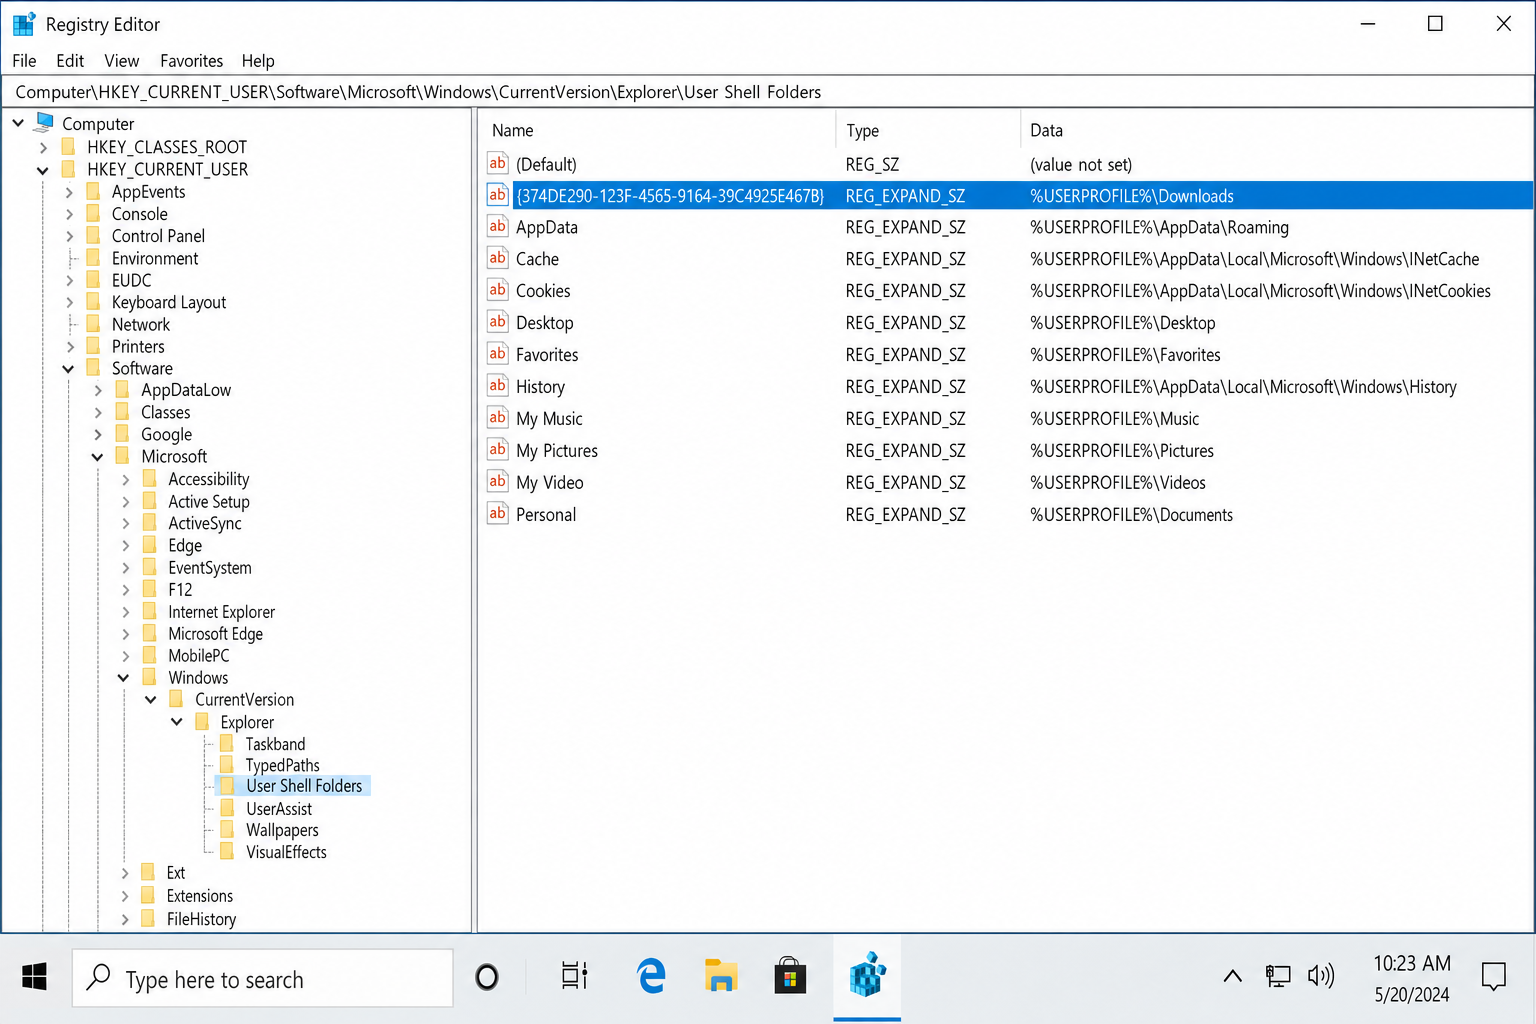
- In the right pane, find the value for the folder you need to fix. Common entries and their default values:
| Registry value name | Folder | Default value data |
|---|---|---|
Desktop | Desktop | %USERPROFILE%\Desktop |
Personal | Documents | %USERPROFILE%\Documents |
{374DE290-123F-4565-9164-39C4925E467B} | Downloads | %USERPROFILE%\Downloads |
My Music | Music | %USERPROFILE%\Music |
My Pictures | Pictures | %USERPROFILE%\Pictures |
My Video | Videos | %USERPROFILE%\Videos |
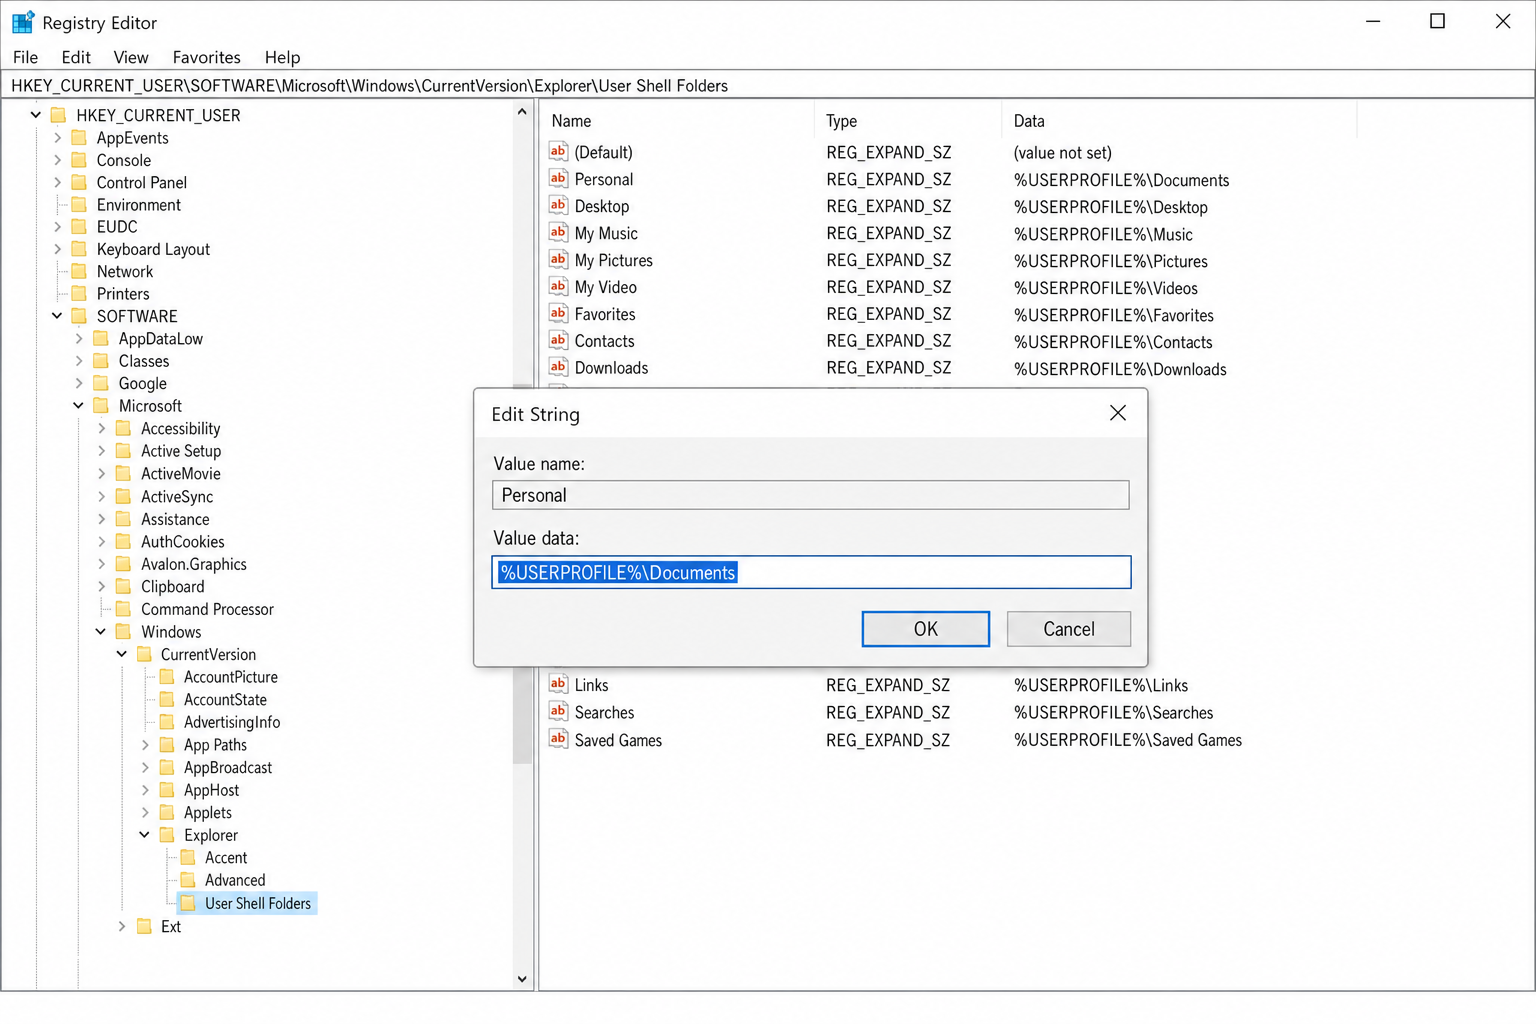
- Double-click the value you need to correct and update the Value data field. To restore the default, enter the path from the table above (e.g.,
%USERPROFILE%\Documents). To redirect to another drive, enter the full path (e.g.,D:\Documents). - Click OK and close Registry Editor.
- Sign out and sign back in (or restart) to apply the change.
Alternative: Use OneDrive Known Folder Move
If your goal is freeing up C: drive space rather than moving data to a local drive, OneDrive’s Known Folder Move redirects Desktop, Documents, and Pictures into your OneDrive folder and syncs them to the cloud. Combined with Files On-Demand, files you haven’t opened recently are stored online-only and take up almost no local space.
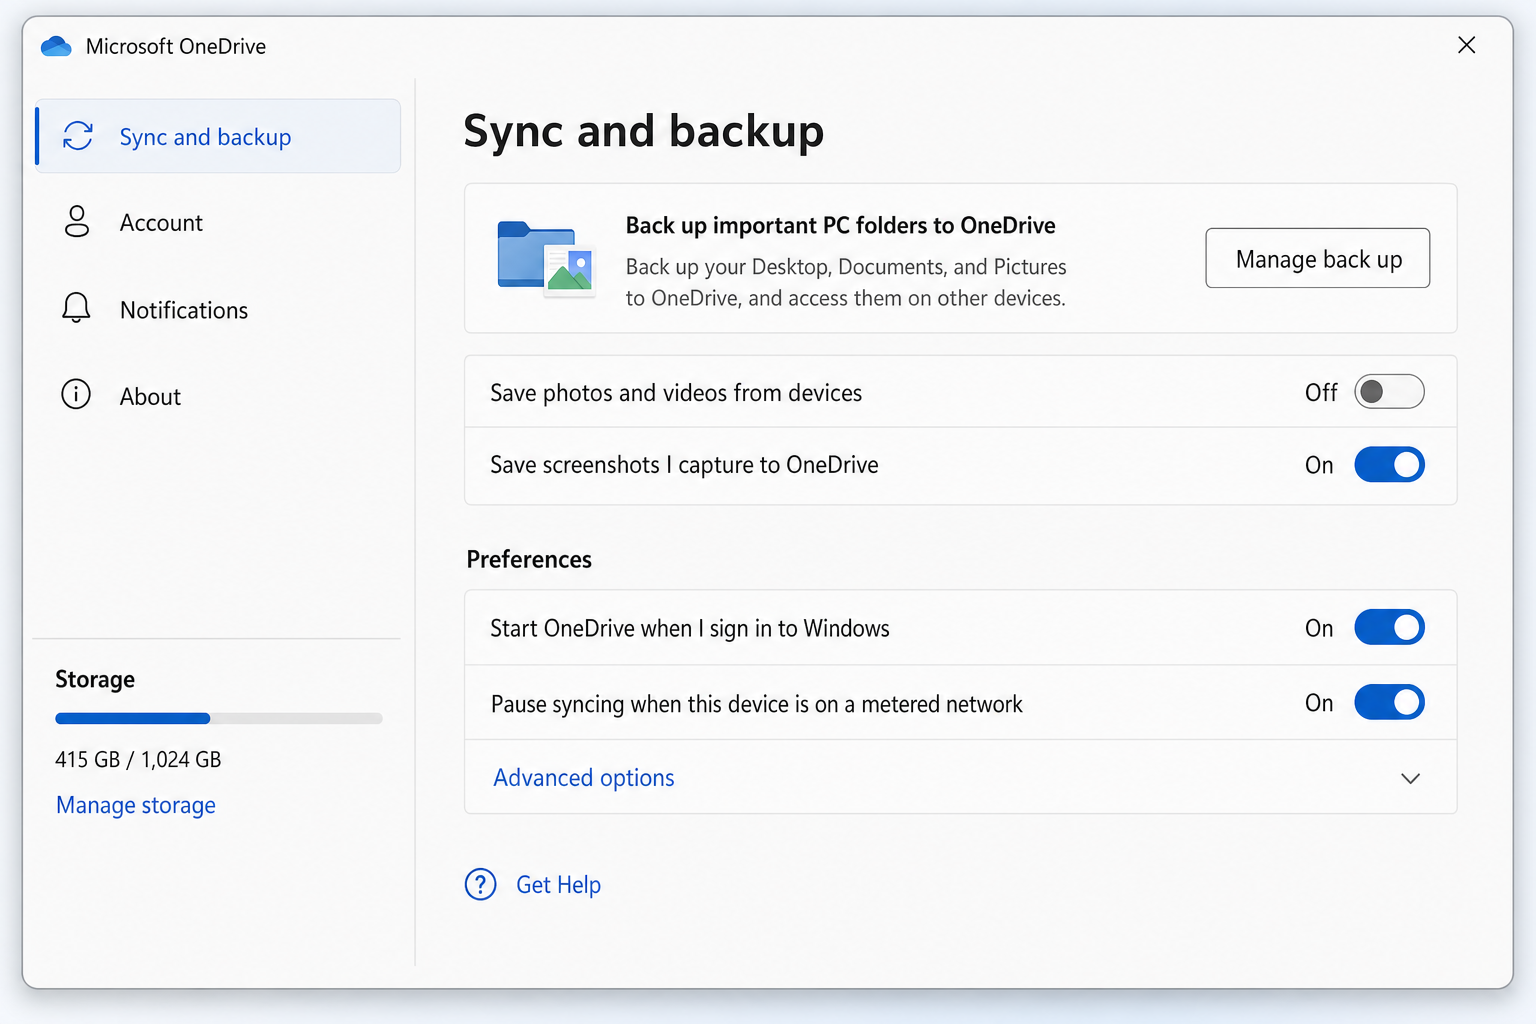
- Right-click the OneDrive icon in the system tray and select Settings.
- Go to Sync and backup and click Manage backup.
- Toggle on the folders you want OneDrive to back up: Desktop, Documents, Pictures.
- Click Start backup.
Keep in mind this uses your OneDrive storage quota and requires an internet connection to open files marked as online-only. It won’t help with Downloads or Videos, which you’d still need to move manually using Fix #1.
Common Problems and How to Avoid Them
“Access is denied” when moving a folder
You’ve pointed the folder at the root of a drive (e.g., D:\). Go back to the Location tab, click Move…, create a named subfolder on D: (e.g., D:\Documents), and select that instead.
The Location tab is missing
You’re right-clicking a regular folder, not the special user folder. Make sure you’re navigating to %HOMEPATH% and right-clicking the folder directly inside your user profile. If the tab is genuinely missing, the folder’s registry entry is broken. Use Fix #3 to restore it.
Folder points to OneDrive instead of a local path
OneDrive’s Known Folder Move is active for that folder. Disable it in OneDrive Settings > Sync and backup > Manage backup, then use Fix #2 (Restore Default) before redirecting to a local drive.
Multiple folders pointing to the same location
Usually happens when a move was cancelled partway through or a folder was accidentally set to the wrong path. Use Restore Default on each affected folder (Fix #2), then redo the moves one at a time.
The destination drive isn’t always connected
If you move a user folder to an external USB drive and then unplug it, apps will throw errors when trying to save, and Windows may recreate empty versions of the folders on C:. External drives are not recommended for this purpose unless the drive is truly permanent and never disconnected (such as a drive in a desktop dock that stays plugged in). An internal drive is always the safer choice.
When Nothing Works
If the Location tab is consistently broken across multiple folders and the registry fix doesn’t resolve it, your user profile may be corrupted. The cleanest fix is to create a new local user account, copy your data across, and use the new profile going forward. Microsoft’s support page on personal folder location failures covers edge cases if you need to go deeper.
Wrapping Up
Fix #1 (the Location tab method) handles this cleanly for most people. Move Documents and Downloads first, since those two folders account for the majority of user-generated data on most systems. If you keep running out of space even after moving your user folders, the real culprit is usually Windows Update cache or app data in C:\Windows\Temp and C:\Users\username\AppData, both of which need a different approach to clean safely. See our guide on freeing up disk space in Windows for step-by-step instructions on tackling those locations without breaking anything.