

Realtek audio crackling, popping, or static on Windows 10 or 11 is almost never a hardware failure. It’s usually a driver, power management, or audio enhancement issue that software can fix. Work through these fixes in order and test your audio after each one.
Fix #1: Disable Audio Enhancements and Spatial Sound
Windows 10 and 11 layer audio processing on top of Realtek’s own driver, and the combination frequently causes crackling. Turning it off takes about 30 seconds.
- Right-click the speaker icon in the taskbar and select Sound settings.
- Under Output, click your Speakers (Realtek Audio) device to open its properties.
- Set Audio enhancements to Off.
- Set Spatial sound to Off.
- Test your audio.

If you still see a Disable all enhancements checkbox in the classic Sound control panel (Control Panel > Hardware and Sound > Sound > Playback tab > Properties > Enhancements), check that too.
Fix #2: Set a Stable Audio Format (Sample Rate and Bit Depth)
A mismatched or overly high sample rate can cause buffer issues that show up as crackling. Locking it to a known-stable format often clears it up.
- Open Control Panel > Hardware and Sound > Sound.
- On the Playback tab, select your Realtek device and click Properties.
- Click the Advanced tab.
- Under Default Format, select 16 bit, 44100 Hz (CD Quality) or 16 bit, 48000 Hz. Both are stable choices.
- Click Test, then Apply and OK.
Fix #3: Disable Unused Recording Devices (Line In / S/PDIF)
An enabled but unused Line In or S/PDIF input can feed noise back into your audio output. Disabling it removes that path entirely.
- Open Control Panel > Hardware and Sound > Sound.
- Click the Recording tab.
- Right-click any unused Line In, S/PDIF In, or Digital Audio In device and select Disable.
- Click Apply and OK, then test your audio.
Fix #4: Reinstall the Realtek Audio Driver
A corrupted or outdated driver is one of the most common causes of crackling. Uninstalling it forces Windows to lay down a clean copy.
- Press
Windows + Xand select Device Manager. - Expand Sound, video and game controllers.
- Right-click Realtek(R) Audio and select Uninstall device.
- Check Attempt to remove the driver for this device if the option appears, then click Uninstall.
- Restart your PC. Windows will automatically install a fresh Realtek driver on reboot.
- Re-apply the enhancements and sample rate settings from Fixes #1 and #2, then test.
If the auto-installed driver still crackles, visit your motherboard or laptop manufacturer’s support page (Dell, HP, ASUS, Lenovo, etc.) and download the latest Realtek audio driver for your exact model and Windows version. Install it and restart.
Fix #5: Switch to the Microsoft High Definition Audio Driver
This is the fix that surprises most people. Replacing Realtek’s driver with Windows’ own generic High Definition Audio Device driver eliminates crackling for a huge number of users. You lose some OEM-specific features, but audio quality stays the same for everyday use.
- Open Device Manager and expand Sound, video and game controllers.
- Right-click Realtek(R) Audio and select Update driver.
- Choose Browse my computer for drivers.
- Choose Let me pick from a list of available drivers on my computer.
- If Show compatible hardware is checked, uncheck it.
- In the manufacturer list, select Microsoft. In the right-hand list, select High Definition Audio Device (pick the most recent version if there are multiple).
- Click Next, accept any compatibility warning, and click Finish.
- Restart your PC and test.
If this clears up the crackling, you’re done and you don’t need to go back to the Realtek driver.
Fix #6: Adjust Power Plan and PCIe Power Management
Aggressive power saving causes the CPU or PCIe bus to drop into low-power states mid-audio, creating buffer underruns that sound like crackling. This is especially common on laptops and on Windows 11 systems after a feature update.
- Open Settings > System > Power & battery (Windows 11) or Settings > System > Power & sleep (Windows 10).
- Set Power mode to Best performance.
- Open Control Panel > Hardware and Sound > Power Options.
- Click Change plan settings next to your active plan, then Change advanced power settings.
- Under Processor power management, set Minimum processor state to 100% for both On battery and Plugged in.
- Under PCI Express, set Link State Power Management to Off.
- Under USB settings, set USB selective suspend setting to Disabled.
- Click Apply and OK, then test audio.
Fix #7: Disable Third-Party Audio Software (Nahimic, Waves MaxxAudio, ASUS Sonic Master)
OEM audio suites like Nahimic, Waves MaxxAudio, ASUS Sonic Master, and ASUS ASIO run as background services and frequently conflict with Realtek, causing crackling. Disabling or uninstalling them is a clean fix.
- Press
Windows + R, typeservices.msc, and press Enter. - Look for services named Nahimic service, Waves Audio Services, ASUS Audio Service, or similar OEM audio entries.
- Right-click each one and select Stop, then set Startup type to Disabled.
- Test audio. If crackling is gone, uninstall the associated application via Settings > Apps > Installed apps to make the fix permanent.
If you have an ASUS machine, uninstalling Sonic Master and ASUS ASIO directly from Installed apps often clears crackling without any further steps needed.
Fix #8: Use LatencyMon to Find the Problematic Driver
If crackling only happens during gaming, GPU-heavy tasks, or file transfers, the culprit is probably not the audio driver at all. It’s likely another driver causing high DPC latency (Deferred Procedure Call), which interrupts the audio stream. LatencyMon identifies exactly which driver is to blame.
- Download and install LatencyMon from Resplendence (free).
- Open LatencyMon and click the green Play button to start monitoring.
- Reproduce the crackling, play audio while doing whatever triggers it (gaming, browsing, file copy).
- After a few minutes, click the Drivers tab and look for the driver with the highest Highest execution (ms) value.
Common high-latency culprits:
- nvlddmkm.sys, NVIDIA GPU driver. Roll back or reinstall using Display Driver Uninstaller (DDU) and a known-stable GPU driver version.
- Wi-Fi or LAN driver, Update from your motherboard or laptop manufacturer’s support page.
- ACPI.sys or storport.sys, Often improved by a BIOS/firmware update from your manufacturer.
Once you identify and update or roll back the offending driver, crackling caused by DPC latency usually disappears entirely.
Advanced Fix: Disable Realtek Idle Power Management via Registry
If you get a pop or click specifically at the start or end of audio playback, when the system wakes the audio device from idle, this registry tweak disables that idle behavior. Only attempt this after completing Fix #5 (switching to the Microsoft HDA driver).
Back up your registry before making any changes: open Registry Editor, click File > Export, and save a backup file somewhere safe.
- Open Device Manager > Sound, video and game controllers.
- Right-click High Definition Audio Device > Properties > Details tab.
- From the Property dropdown, select Class GUID and copy the value (typically
{4d36e96c-e325-11ce-bfc1-08002be10318}). - Press
Windows + R, typeregedit, and press Enter. - Navigate to:
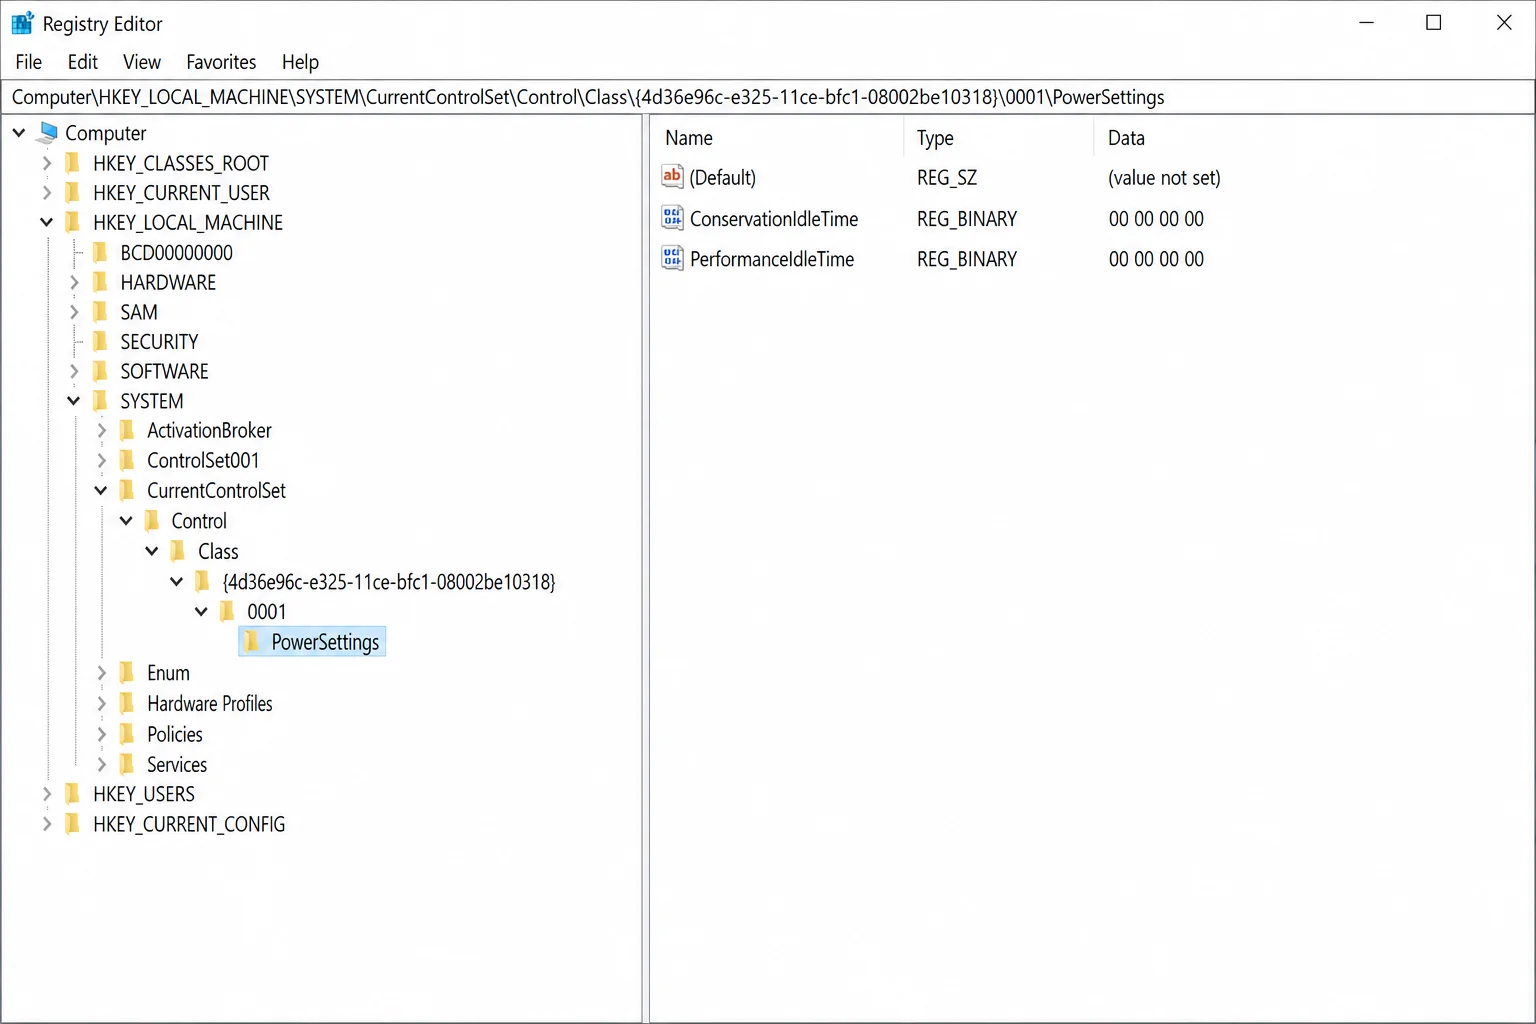
HKEY_LOCAL_MACHINE\SYSTEM\CurrentControlSet\Control\Class\{GUID you copied} - Open each numbered subkey (e.g.,
0000,0001) and check the DriverDesc value until you find the one that says High Definition Audio Device. - Open the PowerSettings subkey inside it.
- Set both ConservationIdleTime and PerformanceIdleTime to
00 00 00 00(double-click each, select Hexadecimal, type00000000). - Reboot and test.
If Nothing Works: Try a USB Audio Adapter
If every fix above has failed, your onboard Realtek audio path may have a hardware-level issue such as physical damage, a noisy motherboard trace, or a bad capacitor. A USB audio adapter bypasses the onboard chip entirely and costs under $15. Plug it in, set it as your default output device in Settings > System > Sound, and crackling caused by the onboard hardware disappears immediately.
Before concluding it’s hardware, confirm the crackling also happens in your PC’s BIOS/UEFI audio test or on a different OS. If it does, that points firmly to physical damage rather than a driver issue.
Conclusion
Fix #5, switching to the Microsoft High Definition Audio driver, resolves Realtek crackling for the majority of Windows 10 and 11 users, and it’s worth jumping straight to it if Fixes #1 through #4 don’t help. If your crackling only happens under GPU load, LatencyMon (Fix #8) will point you at the real culprit in minutes. Persistent crackling that survives every software fix almost always means the onboard audio hardware itself is the problem, and a USB audio adapter is the cleanest solution at that point.