You’ve paid for a fast-speed internet connection and you’re entitled to a decent connection speed. However, the problem could be with your home network, so it’s not something your ISP can fix. If you’re on a low-speed plan, though, there are still a few ways to increase your internet speed.
In this guide, we’re going to show you how to increase Wi-Fi speed. Before we get down to business, check if the issue is device-specific. If the Wi-Fi speed is slow only on one of your devices, the problem could be with your device rather than the network. If the Wi-Fi speed is slow across all your devices, try the following fixes.
Also, we created a short video going over some other reasons and fixes for slow internet, so be sure to check it out here on our YouTube channel:
1. Reboot the Modem
Most modern routers don’t require regular reboots. However, a reboot could give the router a chance to cool off and start afresh. This is why this is the first solution you should try to increase Wi-Fi speed on your home network.
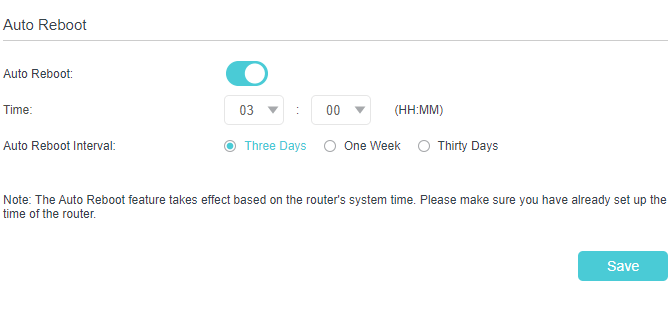
Some routers come with a built-in reboot scheduler. Plus, both Tomato and DD-WRT allow you to set automatic reboots. Schedule a reboot for the middle of the night so your internet connectivity isn’t disrupted during the day.
2. Enable Quality of Service (QoS) on Your Router
Bandwidth intensive activities can slow down your Wi-Fi speed. For instance, have you tried to download the Windows 10 ISO or any other large files?
When the download is running, it leaves less bandwidth for other tasks, effectively slowing down your Wi-Fi. Often, it could be other network users that are running some bandwidth-heavy tasks. Check with your siblings or roommate if they’re streaming Netflix or gaming.
If they are, you don’t have to be at their mercy to get some decent Wi-Fi speed. You have the option to enable Quality of Service (QoS) from your router’s firmware and prioritize the network’s traffic.
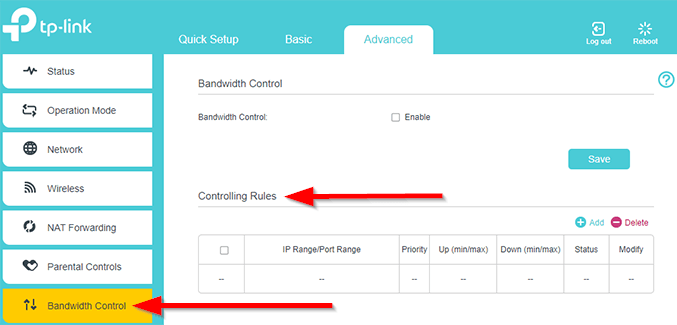
If someone on your network frequently downloads movies, sparing you little bandwidth, go to your router’s firmware and set up QoS. Most routers have QoS under advanced settings, but some may use a different name for it.
TP-Link, for example, calls it Bandwidth Control where you can add Controlling Rules. This is essentially QoS, but with a different name.
3. Scan Background Programs Network Usage
If you don’t think other users are hogging any of your Wi-Fi bandwidth, see if any programs are running in the background on your PC. A lot of programs frequently check for updates or perform other network-oriented tasks.
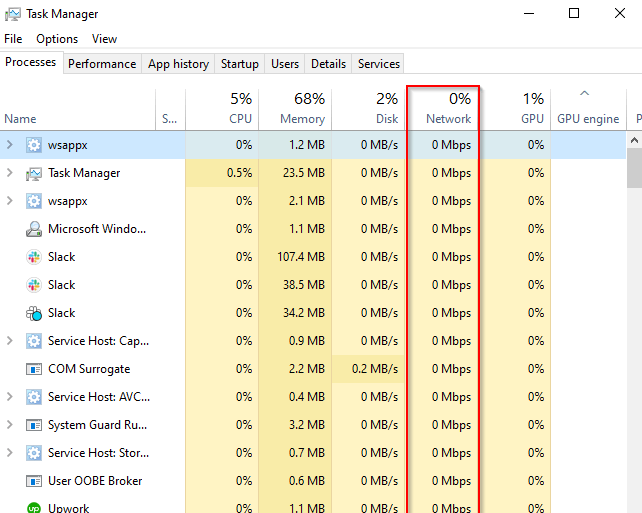
Open the Task Manager and switch to the Processes tab. Check the Network column and look for processes that have been taking up an unexpected volume of bandwidth. Stop those processes and see if the Wi-Fi speed improves.
There are, of course, more ways to check which programs are using your bandwidth.
4. Change the Router’s Position
The router’s position plays a significant role in your Wi-Fi network’s performance. When you buy a router, you probably set it up wherever you found the closest power outlet near your desk. However, positioning your router warrants some extra thought if you’ve been experiencing slow Wi-Fi speeds.
As a rule of thumb, always place your router up high and at the center of your home. Wi-Fi signals are broadcasted in all directions, so it doesn’t make sense to tuck the router away in a corner. Even worse is to put the router closer to the ground. Instead, place the router closer to the ceiling to minimize interference from household objects and extend the router’s range.
If your home is rather large, consider investing in an antenna or powerline adapters. Recently, though, it has become increasingly common for home users to set up mesh networks instead of powerline adapters or access points.
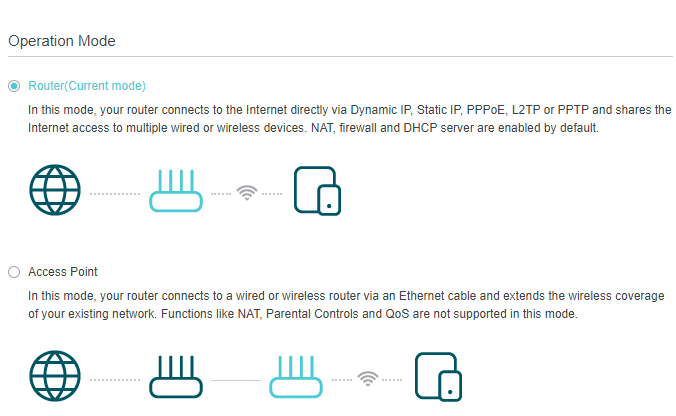
You could also use an old router as a repeater to extend the Wi-Fi range. On a TP-Link router, you can change your router settings to make it function as an Access Point from Advanced > Operation Mode.
5. Change Your Router Band
If you’re like most users, you unboxed your router, installed it, and never looked back. This means you probably didn’t notice that you have the option to change your router’s broadcast frequency bands. Unless you own an ancient router, you have the option to choose between 2.4GHz and 5GHz channels.
Most household electronics use the 2.4GHz spectrum which can lead to a lot of crowding. For instance, your Microwave oven operates at a 2.45GHz frequency. A 2.4GHz channel on your router broadcasts between 2.412GHz and 2.472GHz, which means the Microwave oven could disrupt your connection.
It isn’t just microwave ovens, though. Everything from a cordless phone to other Wi-Fi routers, and even your Christmas lights, can interfere with the 2.4GHz Wi-Fi band.
This interference can cause your Wi-Fi speeds to slow down. If your router has the 5GHz band, make the switch to see if it increases your Wi-Fi speed. If you have a 2.4GHz-only router, try the next fix.
6. Switch to a Different Channel
Almost every house has a Wi-Fi network. This means whether you like it or not, your neighbors are sharing your signal space. Crowded channels are particularly an issue in crowded neighborhoods with plenty of routers around.
However, crowded channels are mostly a 2.4GHz phenomenon. If your router can broadcast or receive only a 2.4GHz signal, this can be a problem because your router only has 14 channels for transmission.
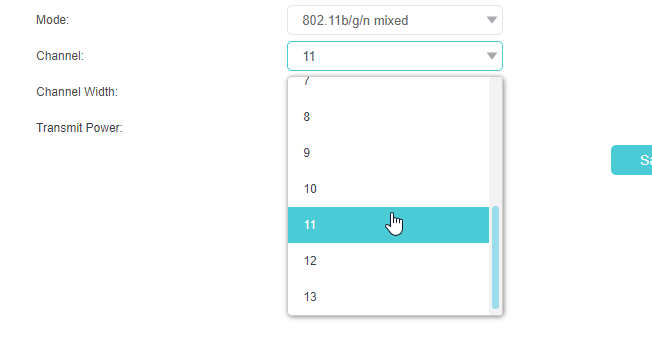
Change the channel to 1, 6, or 11 if your router uses a 2.4GHz band. They are your best bet since they don’t overlap. If your router can broadcast a 5GHz wireless signal, you have a lot more channels to choose from.
Channel selection isn’t something you will need to spend a lot of time on if your router uses the 5GHz band. Any channel on a 5GHz band should work well, except DFS (Dynamic Frequency Selection).
7. Update Router Firmware
Many newer routers update automatically. If yours doesn’t, it would be worth your while to go to the updates page and see if an update is due.
A firmware update probably won’t have a monumental impact on your Wi-Fi speed. However, if you haven’t run an update in a while, you may see a noticeable improvement in your Wi-Fi speed after the update. Plus, you also make your router more secure if the manufacturer has rolled out security updates.
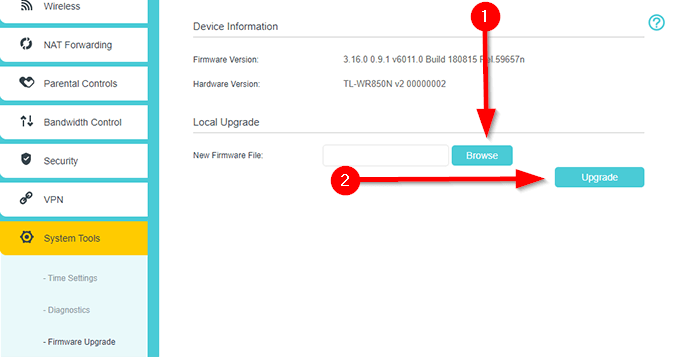
You may even choose to flash custom firmware such as DD-WRT or Tomato. Go to either DD-WRT or Tomato’s website and search for your router’s model number. Download the .bin file and look for a section called Firmware Upgrade or something similar. Browse the .bin file and upgrade.
8. Purchase and Install a New Router
If none of these fixes could increase slow Wi-Fi speed on your home network, now is a good time to bring home a new router. A lot of home users never bother much with routers. They continue to use the one provided by their ISP for years.
ISPs focus on cost minimization rather than performance. This is why ISP-provided routers are generally basic. Bring home a modern router to not just increase your Wi-Fi speed, but also improve overall performance.
Did You Fix Your Slow Wi-Fi?
Hopefully, one of these fixes helped you improve slow Wi-Fi on your home network. If you’ve signed up for a high-speed internet plan with your ISP, in most cases, the Wi-Fi speed is slow because of your router.
While these fixes should work well enough, wired connections are more stable and faster. If you’re going to jump on an extremely important video call, it’s smart to use a wired connection.


