After upgrading an older Lenovo laptop to Windows 10 recently, I ran into a very annoying problem. For whatever reason, the ability to adjust the brightness stopped working. Pressing the brightness keys on the keyboard would show that the brightness level was going up or down, but nothing actually changed on the screen! It was the weirdest thing I had ever seen.
The first thing I thought was maybe there was some hardware issue and Windows 10 was not recognizing the key press properly. I decided to try to change the brightness level in the OS itself. I opened Action Center and clicked on Expand and then tried to adjust the brightness there, but again nothing happened! Now I was really confused.
I also tried to go to Power Options and change the brightness there, but again it didn’t make any difference on the actual display. The second thought that popped into my head was that it was a driver issue. I went to the Lenovo website and downloaded the latest driver I could find for the machine. I was hoping that would fix the problem, but it didn’t!

At this point, I figured it could be that the latest driver doesn’t yet support Windows 8.1 properly and therefore I need to try out the standard or basic Windows graphics driver instead. In the end, this is what fixed the problem. Now I just have to wait till Lenovo releases an updated driver for my older Lenovo laptop. Here’s how to fix the issue temporarily.
First, open the Control Panel and click on Device Manager:

Next, expand Display Adapters and then right-click on the graphics card installed on your system and choose Properties. It could be something like Intel HD Graphics, etc. It’ll depend on what kind of graphics card you have installed, but there really should only be one or two listed max.

Now go ahead and click on the Driver tab and then click on the Update driver button.

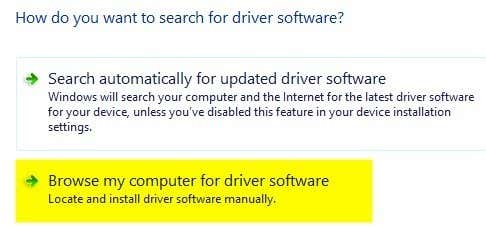
Next you’ll have two options. You want to choose the Browse my computer for driver software option.
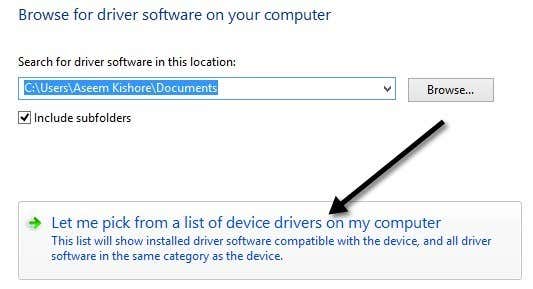
We’re almost done, so keep going! Now go ahead and click on the Let me pick from a list of device drivers on my computer button at the bottom.
Now you want to choose a different driver for the graphics card. You might have play around and pick a different ones and see which works for you, but the safest will always be Microsoft Basic Display Adapter.

Depending on your system, you may see several drivers listed in the box, even the same driver listed multiple times. You can try some of the other ones, but if nothing works, just use the basic driver. Unfortunately, you won’t be able to run the OS at the highest resolution or frame rate if you use the basic driver, but at least you can adjust the brightness.
In my case, I simply switched to the basic driver, adjusted the brightness to where I needed it and then switched back to the original manufacturer driver. The brightness level remained at the level I had set it, so that was good. Then just check every so often to see if there is a new driver and install that when it becomes available.
However, sometimes an older driver works better. I had the same issue on a Lenovo IdeaPad P400 and I had to install an older driver in order to make the screen brighter. Otherwise, the screen was always dim, even with the brightness turned all the way up.
If you’re still having trouble adjusting the brightness on your Windows 10 machine, post a comment here and let us know the details. Enjoy!