Getting on a virtual call with your colleagues has become a new normal. More and more teams are hopping on video calls for meetings with MS Teams. Unfortunately, even Microsoft isn’t immune from simple bugs. So, what do you do when your camera isn’t working on MS Teams in Windows 10?
Don’t give up and bring your computer to a repair shop! There’s a huge chance that this is a software error, either from a bug or an outdated driver. In this article, we’ll be going over everything you need to know to fix your webcam and get it working with MS Teams again.
Open Your Default Camera App
Let’s start by figuring out if this is a Microsoft Team’s problem or a problem with your computer. Opening your default camera app will run your camera. Whether it’s a built-in camera or an external webcam, it should display any form of recording through the camera app.
This lets us know if there’s a problem with your camera, a problem with MS Teams, or maybe if your camera is currently being used by a different program altogether.
You can easily open up your camera app through these steps.
- Press the Windows key button on your computer and type in ‘Camera’.
- Click on the default Camera app that appears from your search.
If the Camera app does show the live feed from your camera, then MS Teams is most likely the problem. Refer to the next three methods to solve this problem. Alternatively, if you don’t see anything streaming, then there’s something wrong with your camera. Go ahead to the fourth solution if that’s the case.
Lastly, if you get an error that says something along the lines of “Your Camera is busy.” then another application is probably using your webcam. Simply look for that program and close it or disable the camera there. Once done, you can try a test call through MS Teams to see if the problem has been fixed.
Give Microsoft Teams Access to Your Camera
Teams should have access to your camera by default. Unfortunately, there’s probably a chance that your Teams app is having trouble accessing your camera. This is a problem with your video settings and how they’re configured on startup.
The steps below only apply to those of you who are using the MS Teams desktop application. We’ve included steps for MS Teams on browsers too, in the next method.
- Open up your MS Teams application.
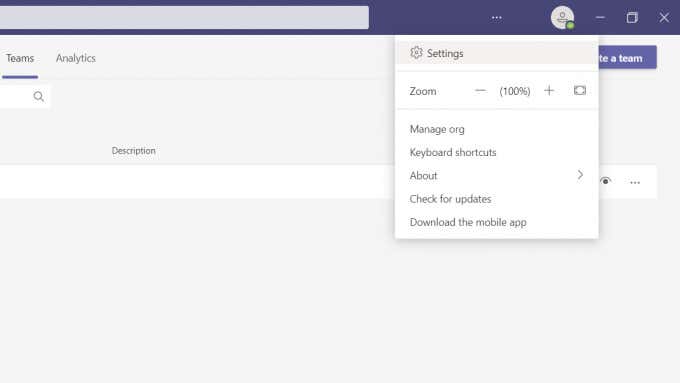
- On the top-right corner of your screen, click on your Profile icon.
- Navigate to Settings.
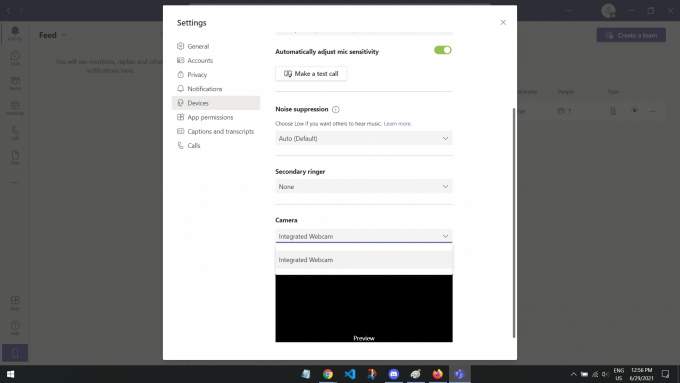
- Look for and click on Devices.
- Under the Camera tab, expand the drop-down menu and select the camera you want to use.
There should be a preview there that shows you what the camera is recording. If you can see your face or your camera’s recording, then the problem should be fixed and ready for video calls.
Allow Browser Access to Your Camera
For those of you using MS Teams on a browser, Teams might not have access to your camera. This is a common problem since websites don’t have access to your camera and microphone by default. Normally, websites like MS Teams would ask for your permission. But, if you’ve denied or closed it by accident, then it can be hard to find the settings for that again.
The steps below will be different depending on your browser. We’ve written out the steps for Google Chrome and Mozilla Firefox. If you’re using a different browser, a quick Google search about “how to allow browser access to camera for (browser name)” will serve you just as well.
On Google Chrome
- Open up the MS Teams website.
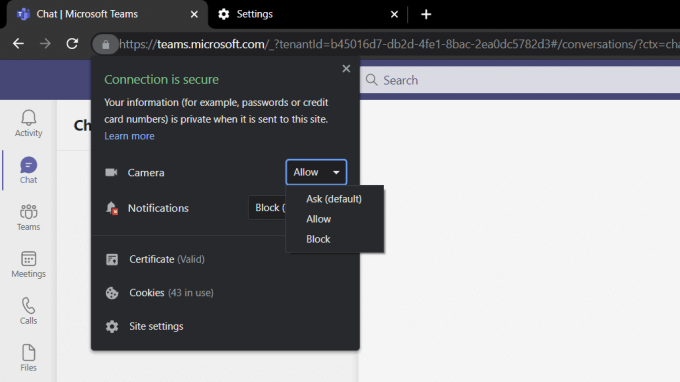
- Click on the lock icon at the top-left corner of your screen, right next to the URL.
- Look for the Camera settings and open up the drop-down menu. Select Allow.
On Mozilla Firefox
- Click on the hamburger icon (☰) at the top-right corner of your browser.
- From the quick access menu, click on Settings.
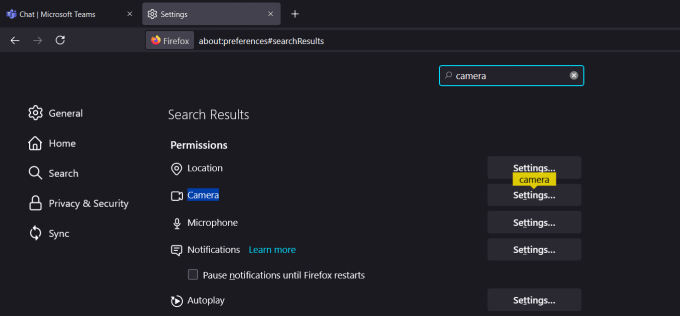
- On the search bar at the top, type in ‘Camera’ and click on Settings again.
- That should open a pop-up display of all the websites that have access to your camera. Look for MS Teams and change the status to Allow.
- Save your changes and go back to MS Teams to see if that fixed your problem.
Websites aren’t allowed to access your camera and microphone by default for your protection. Allowing Teams to access your camera should fix your issue!
Check Your Privacy Camera Privacy Settings
Another possible reason why Teams can’t access your camera might be because of your privacy settings. This setting is built into your Windows computer as a security feature.
For Windows computers
- Press the Windows key to open up the Start menu on your screen.
- Type in ‘Privacy settings’ and click on the System Settings that appear on your search result.
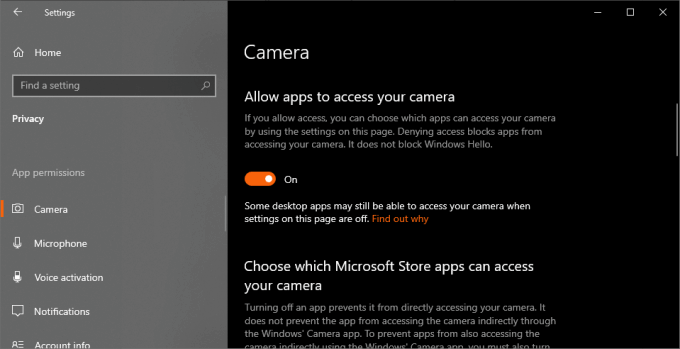
- That should open up a new window on your computer. From the left-hand side, scroll down and navigate to Camera.
- Enable the Allow apps to access your camera option.
- Scroll down and enable the Allow desktop apps to access your camera option as well.
- Finally, there’s a list of apps that use your camera. Look for MS Teams and make sure that it’s enabled,
These are the three simple permission-related solutions to help fix your camera not working on MS Teams in Windows 10. The next solutions will focus more on your operating system.
Restart Your Camera
Turning your device off and on is always a great troubleshooting method. Restarting your device irons out any software issues and bugs that are currently running with your camera.
If you’re using an external camera, simply unplug it and plug it in again after several seconds. That should be more than enough, but feel free to proceed with the steps below to give your computer a good refresh anyway.
- Click on the Windows key and type in ‘Device Manager’. Open the first result that’s returned from your search.
- Select your desktop or computer model at the top-left corner of the window.
- After that, click on the Action tab at the top-left corner of the window.
- Navigate to and select Scan for hardware changes.
This method restarts all your devices, like your mouse and keyboard. So, if you were experiencing any other issues, this is a great way to refresh your computer.
Update All Your Drivers
Drivers are software programs that make sure your devices are working optimally. There’s a driver for everything, keyboards, mouse, monitors, even your graphics card. If your camera doesn’t show or record anything at all, there’s a chance that this error is related to an outdated or faulty driver.
Updating your drivers should fix any software-related issues with your camera, especially if you’re using an external webcam.
Disclaimer: This step can take a couple of minutes, depending on the speed of your internet and the size of the update of your camera driver.
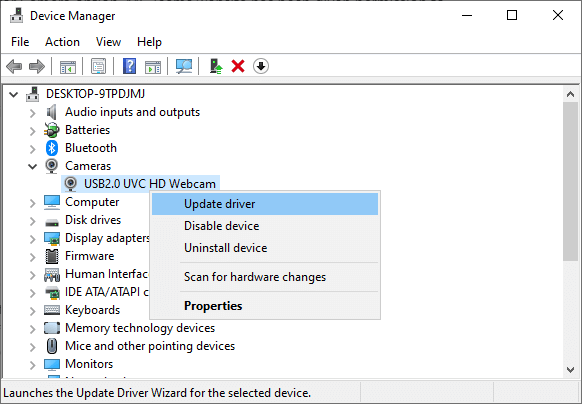
- Open up the Start menu by pressing on the Windows key and type in ‘Device Manager’. Select the first result that appears from your search.
- Look for Cameras and open up the dropdown options.
- Locate the webcam you’re using and right-click the device. Select Update driver.
- A prompt will ask you about how you want to search for drivers. Simply click the Search automatically for drivers option.
- If an update is available, it should download automatically.
For those of you who did get an update, we suggest restarting your computer just for full effect. Hopefully, this solves your problem with the camera not working on MS Teams on Windows 10.
Disable Your Default Camera
If you’re using an external webcam, then perhaps your default camera is the problem. The default camera can often overrule the external webcam. This results in a lot of errors, like a blank recording or making your external camera undiscoverable.
To fix this, we’ll be disabling your default camera completely. That way, only your external camera will be picked up and used by your computer.
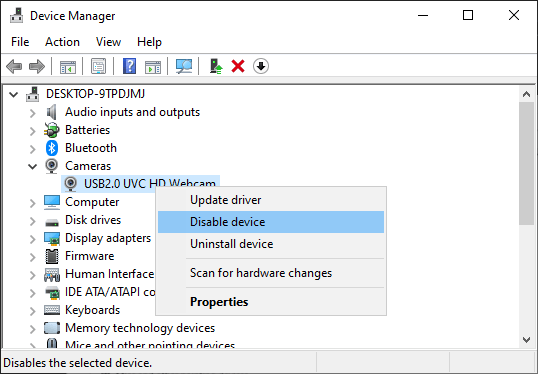
- Open the Device Manager on your computer.
- Go to the Cameras device and right-click your default camera.
- Select Disable device.
- A prompt will ask you if you want to disable your camera. Click Yes.
If you want to enable your default camera again, just repeat the first two steps and then click on Enable device.
Check for Windows Updates
An outdated version of Windows can easily cause this problem too, especially for external cameras. Thankfully, updating your Windows version is fairly simple.
Disclaimer: This method to install Windows updates can take a couple of minutes to possibly an hour, depending on the size of the update and your internet speed.
- Press the Windows key to open up the Start menu.
- Look for and click on Check for updates.
- If you have an update available, simply click on Download and Install.
Windows should automatically restart your computer once everything has been downloaded and installed. If it doesn’t do so automatically, we suggest restarting your computer yourself just for good measure.
Related Posts
- Preparing for Windows 10 End of Support: Upgrading to Windows 11
- How to Fix a “This file does not have an app associated with it” Error on Windows
- How to Fix an Update Error 0x800705b4 on Windows
- How to Resolve “A JavaScript error occured in the main process” Error on Windows
- How to Fix the Network Discovery Is Turned Off Error on Windows


