
The C:\Windows\WinSxS folder can show 10 GB or more in File Explorer, but that number is misleading, and manually deleting files from it can break Windows Update and future servicing. The methods below safely reclaim the real wasted space, from a two-click Disk Cleanup run to a more aggressive DISM reset.
What Is WinSxS?
WinSxS (short for Windows Side by Side) is Windows’ component store, the folder Windows uses to manage updates, install or uninstall roles and features, and roll back changes. It holds multiple versions of DLLs, drivers, and manifests so Windows can safely replace or restore system components during servicing.
The folder almost always looks larger than it really is. File Explorer counts hard links multiple times, a single file stored once on disk can appear in several folders simultaneously, so a 10 GB WinSxS reading might represent only 2–3 GB of unique data. The cleanup methods below remove superseded components: old file versions replaced by newer updates that are no longer needed for rollback.
⚠️ Never delete files from WinSxS manually. Doing so can corrupt Windows Update, break
sfc /scannow, and leave Windows unable to install future updates. Use only the supported tools below.
| Method | Works on | Difficulty | Removes rollback? |
|---|---|---|---|
| Disk Cleanup (Fix #1) | Windows 7 SP1, 8.1, 10, 11 | Easy | No |
| Storage Sense (Fix #2) | Windows 10, 11 | Easy | Optional |
| DISM /StartComponentCleanup (Fix #3) | Windows 8.1, 10, 11 | Medium | No (30-day grace) |
| DISM /ResetBase (Fix #4) | Windows 8.1, 10, 11 | Medium | Yes, permanent |
| Remove Windows Features (Fix #5) | Windows 7, 8.1, 10, 11 | Medium | Partial |
Fix #1: Run Disk Cleanup with Windows Update Cleanup
Disk Cleanup is the safest and simplest option. It works on Windows 7 SP1, 8.1, 10, and 11 without touching the command line.
- Press
Windows + R, typecleanmgr, and press Enter. - Select your system drive (usually C:) and click OK.
- After the initial scan finishes, click Clean up system files.
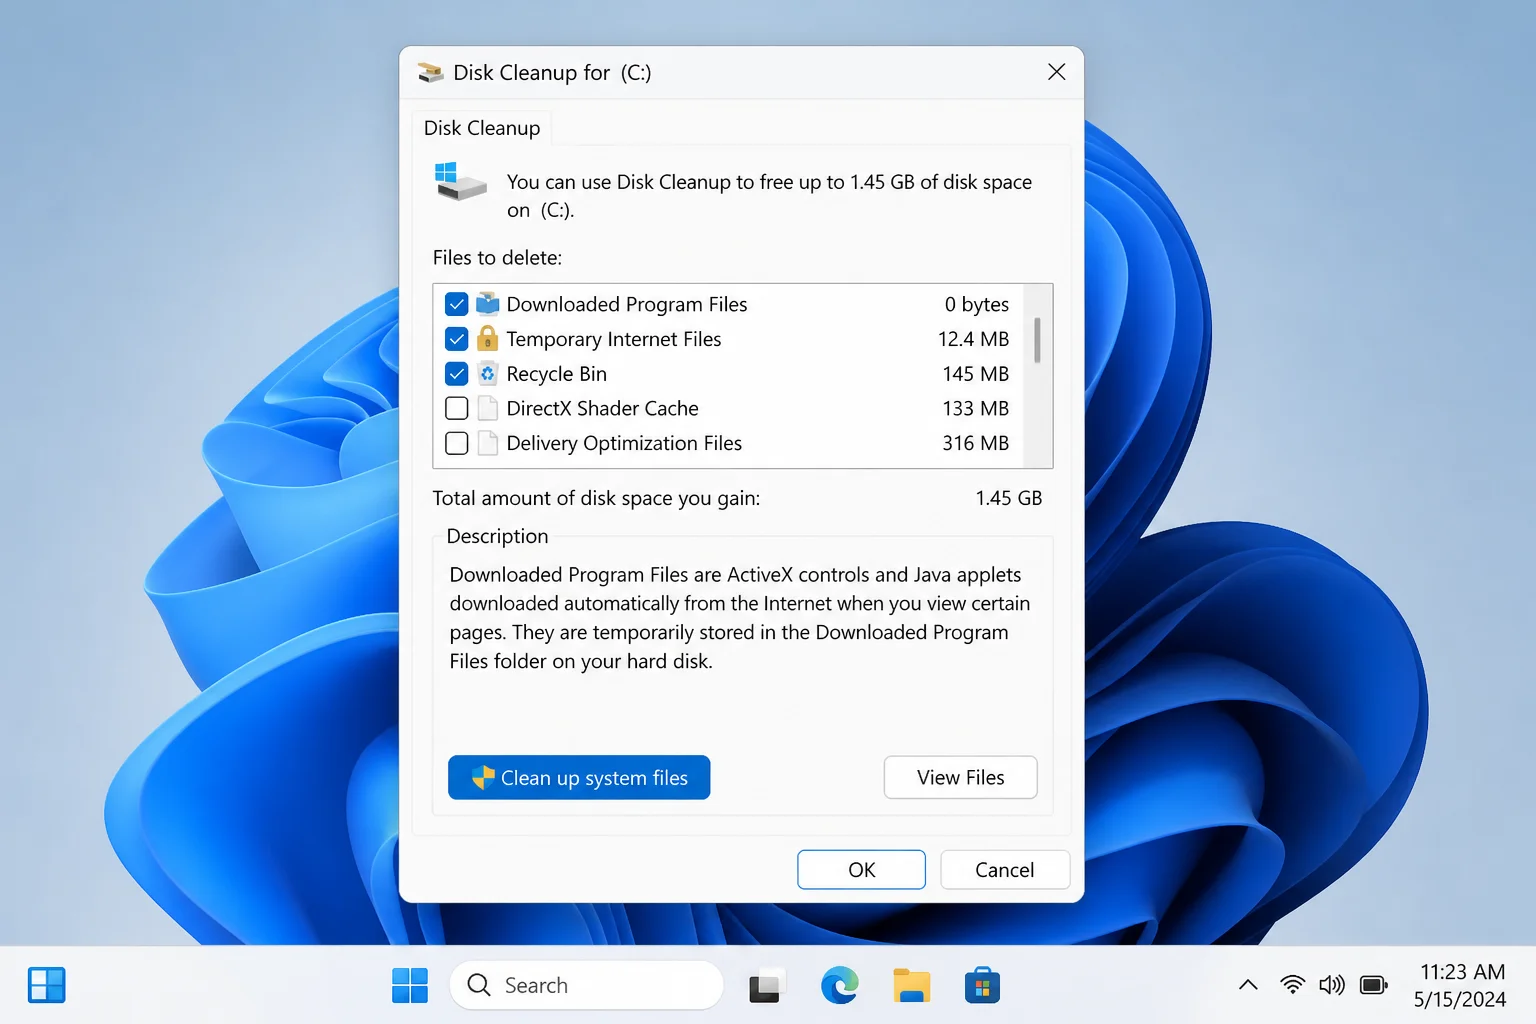
- Disk Cleanup rescans with elevated privileges. When the list reloads, check Windows Update Cleanup.
- If present, also check Previous Windows installation(s) and Temporary Windows installation files.
- Click OK, then Delete Files to confirm.
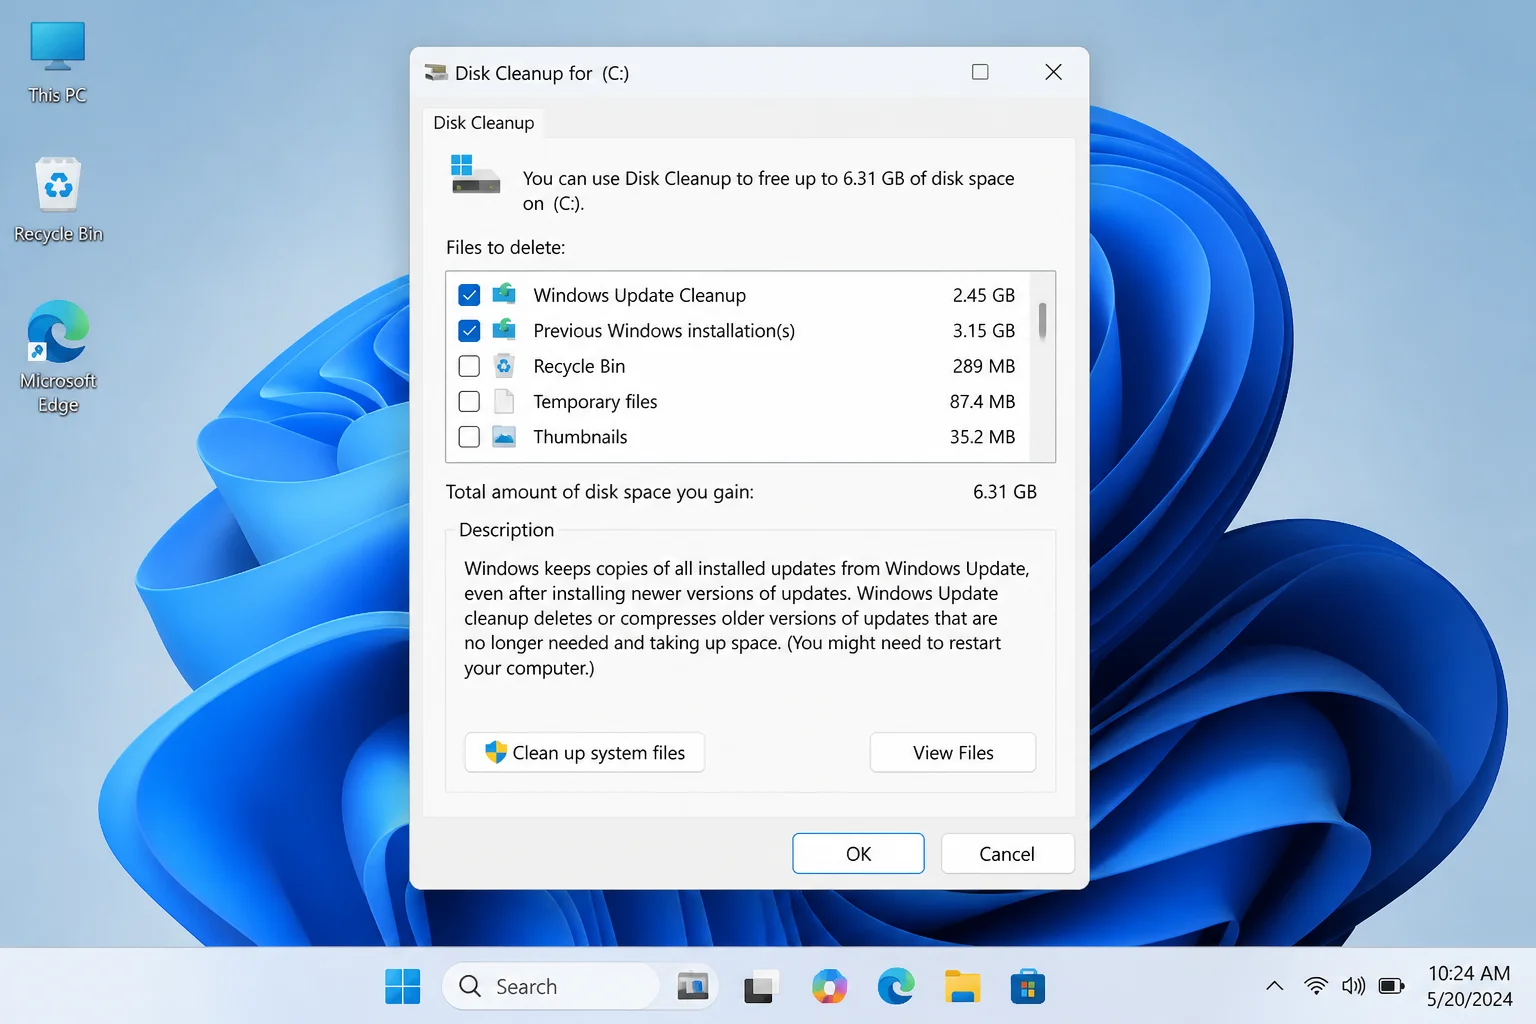
This typically frees several gigabytes on systems that have been running for a while or recently received a major Windows feature update.
Windows 7 note: Windows 7 reached end of extended support in January 2020 and no longer receives security updates. Disk Cleanup still works on Windows 7 SP1, but upgrading is strongly recommended if your hardware supports it — keep in mind Windows 10 itself reached end of support on October 14, 2025, so Windows 11 is the only option still receiving free security updates.
Fix #2: Use Storage Sense (Windows 10 and 11)
Storage Sense is the modern alternative to Disk Cleanup built into Settings. It removes old update and installation files using the same underlying servicing logic, without requiring a command prompt or the legacy Disk Cleanup tool.
- Go to Settings > System > Storage.
- Click Storage Sense to open its configuration page.
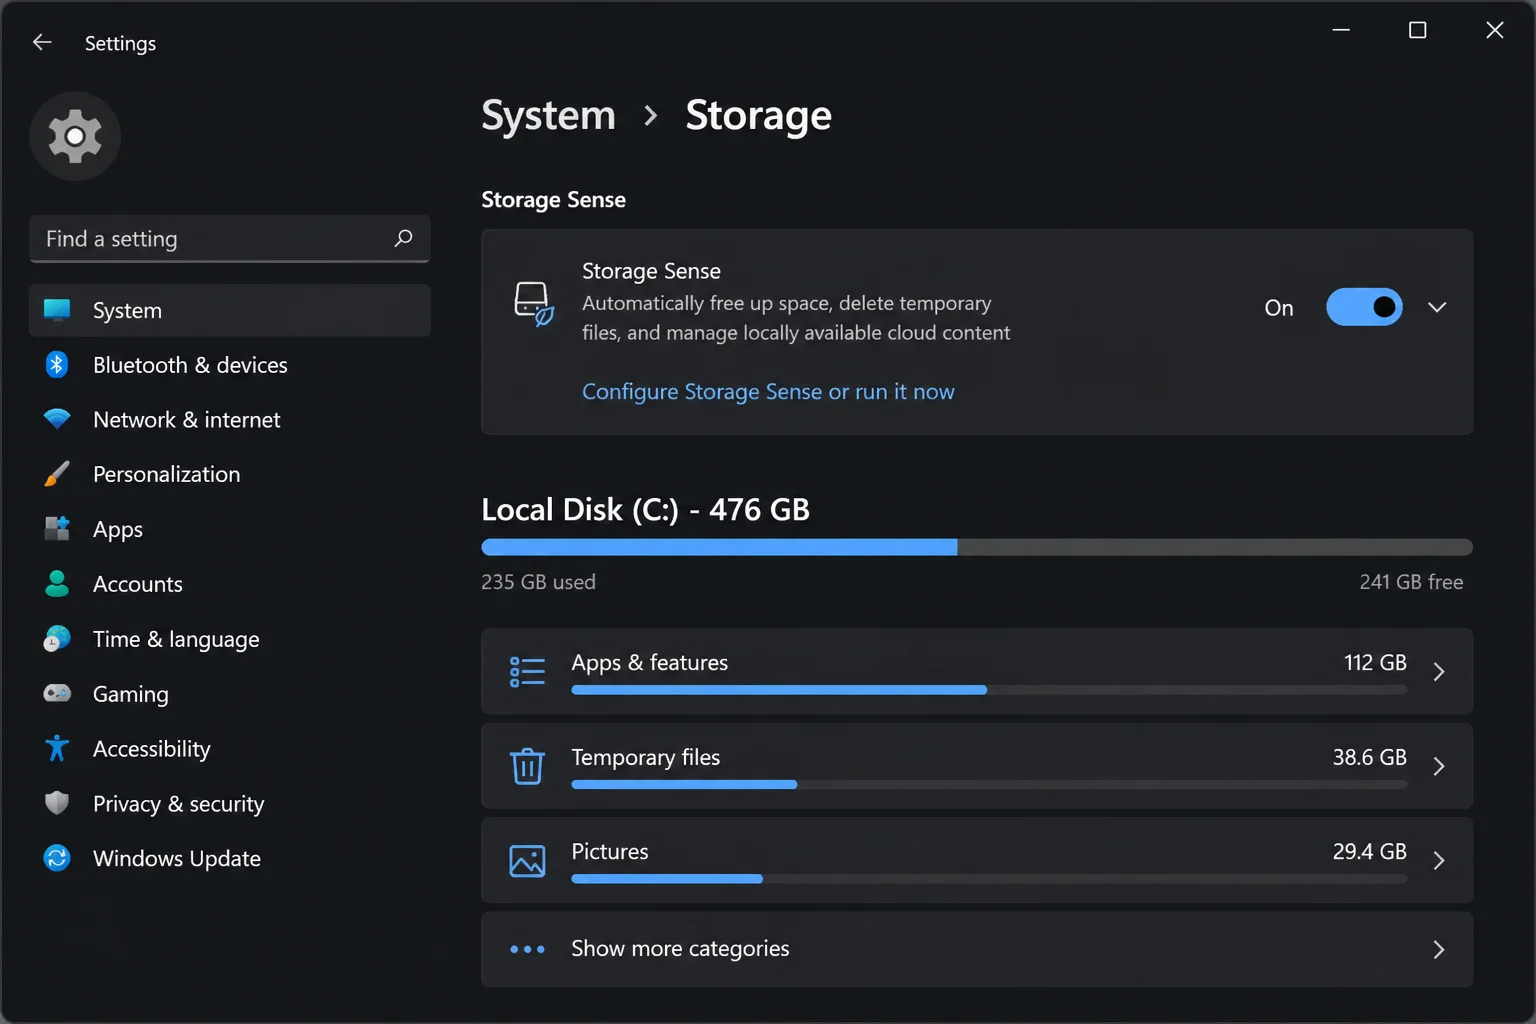
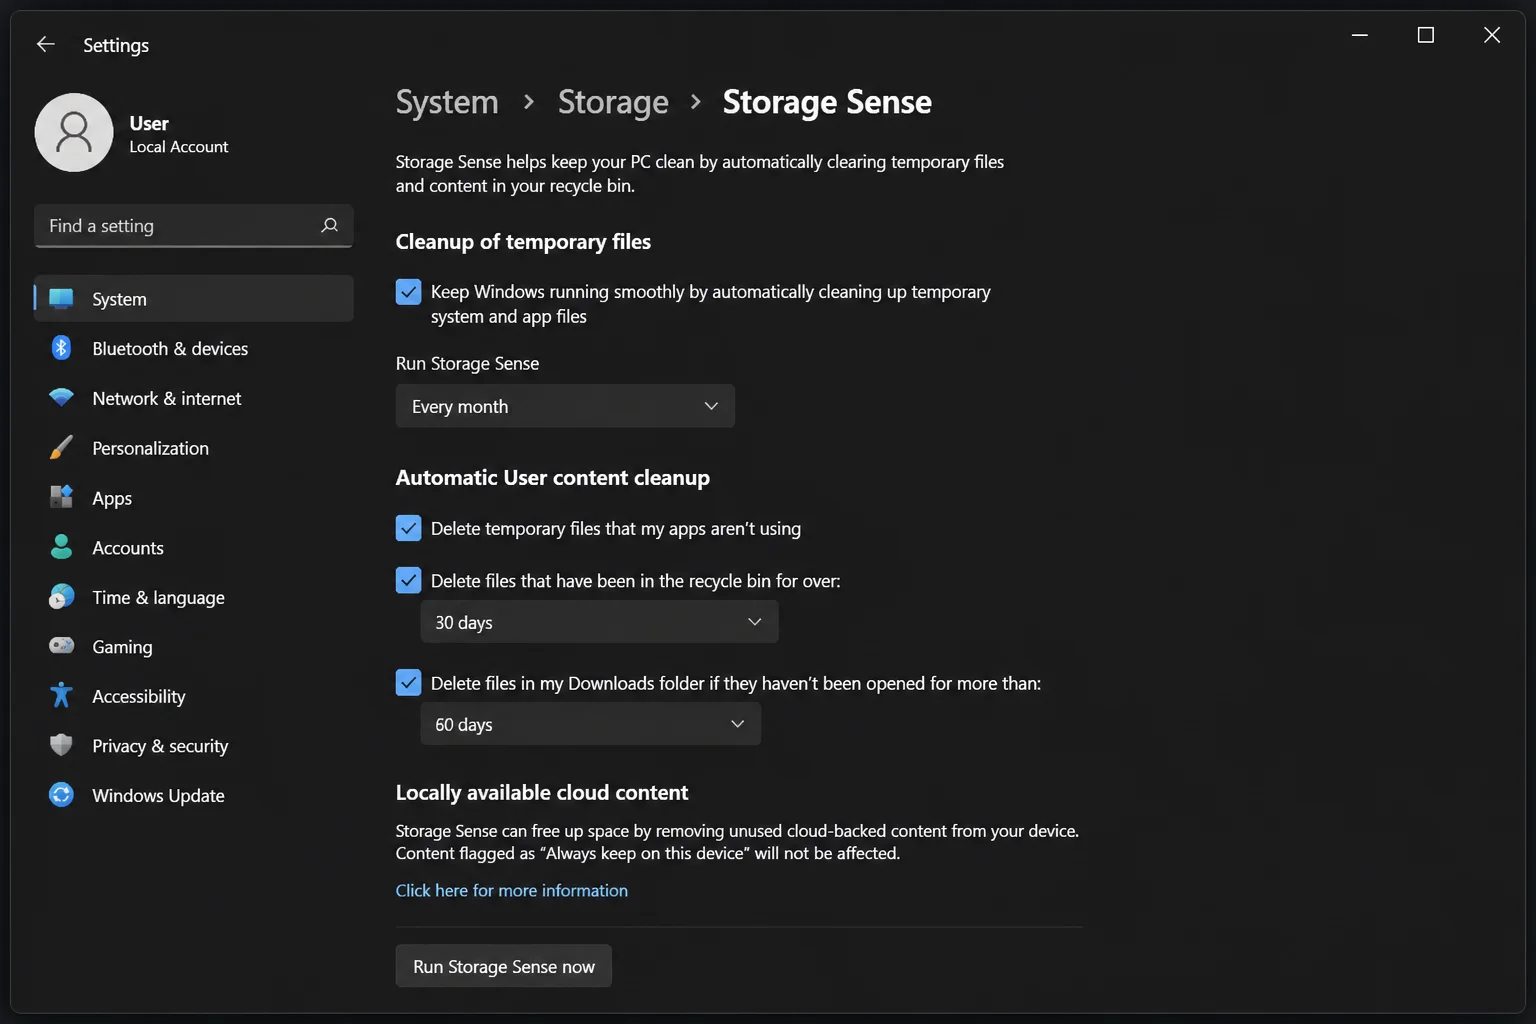
- Toggle Storage Sense on if it isn’t already.
- If available, enable Delete previous versions of Windows.
- Scroll to the bottom of the page and click Run Storage Sense now.
Fix #3: Run DISM /StartComponentCleanup (Windows 8.1, 10, and 11)
The DISM command gives you more precise control over component store cleanup. It removes superseded component versions while preserving a 30-day grace period so you can still uninstall recently installed updates if something breaks afterward.
- Click Start, search for Command Prompt, right-click it, and select Run as administrator.
- Run this command:
DISM.exe /Online /Cleanup-Image /StartComponentCleanup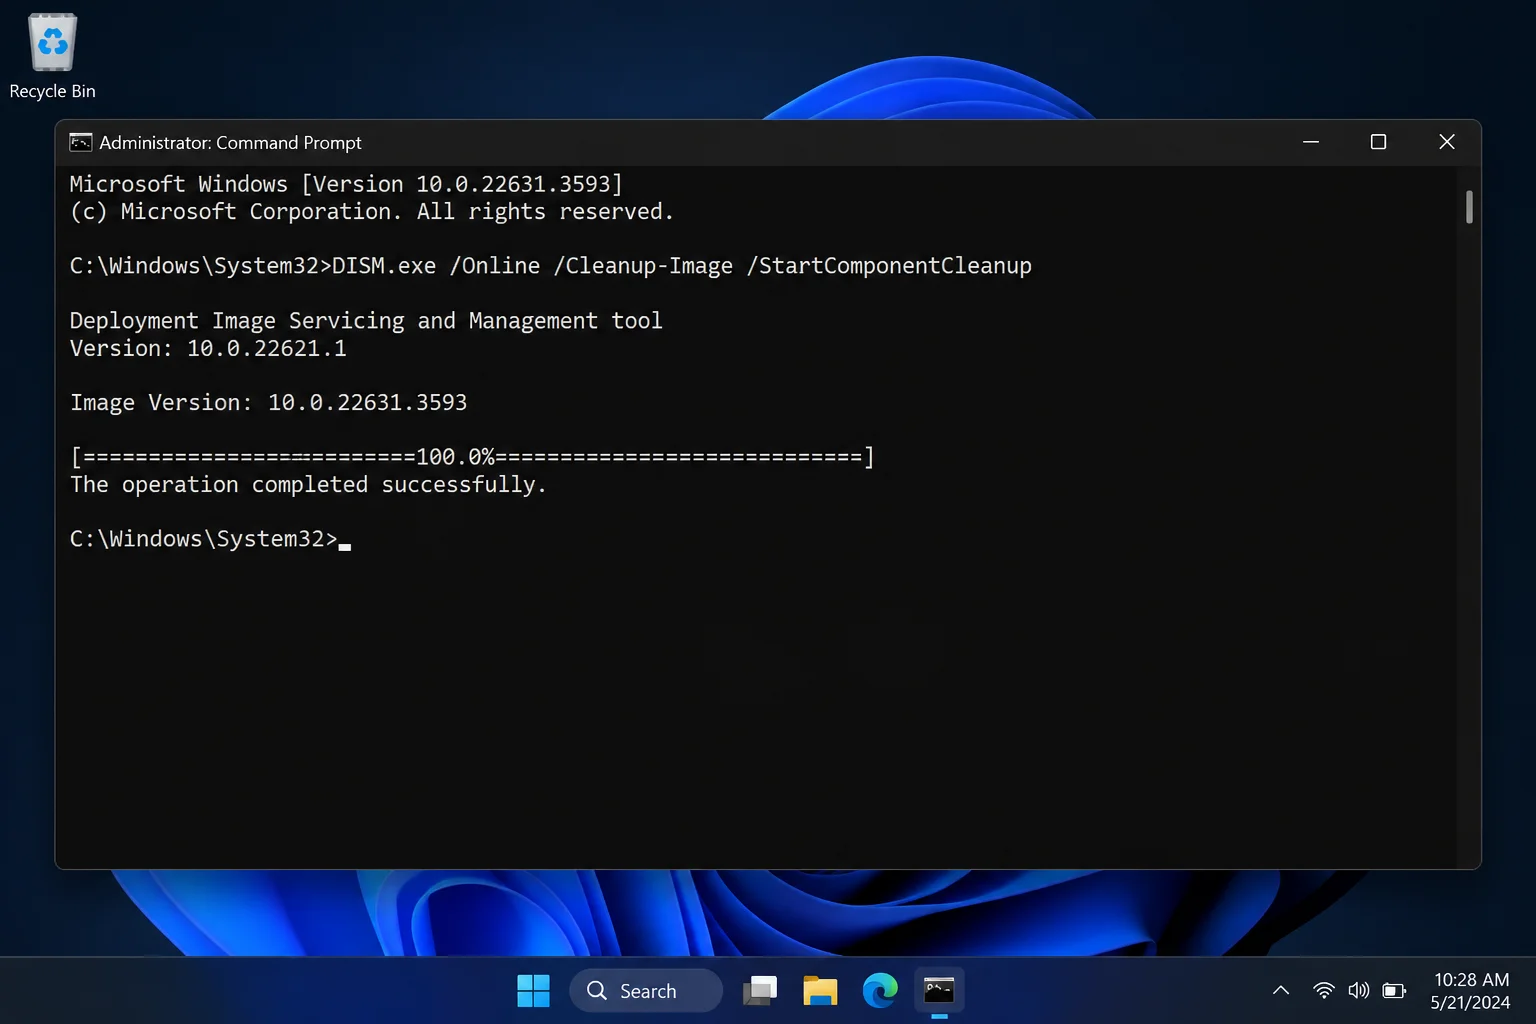
- Wait for completion; it can take several minutes on systems with large update histories.
- Restart your PC.
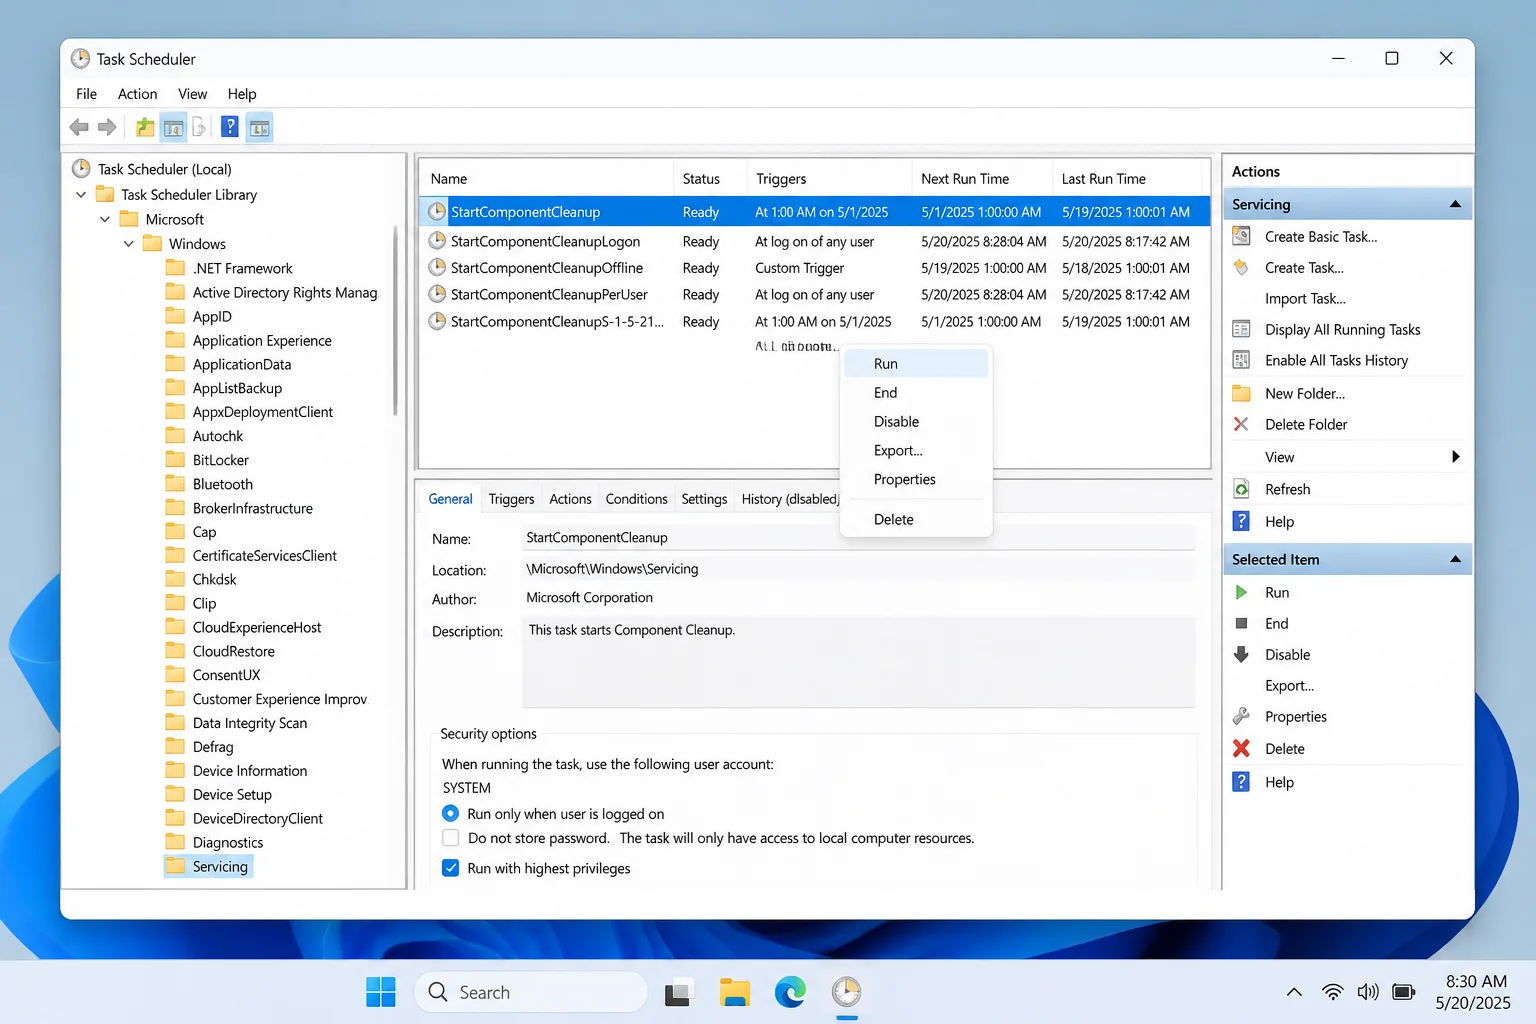
If you’d rather not use a command prompt, you can trigger the same operation through Task Scheduler:
- Press
Windows + R, typetaskschd.msc, and press Enter. - Navigate to Task Scheduler Library > Microsoft > Windows > Servicing.
- Right-click StartComponentCleanup and choose Run.
Fix #4: Use DISM /ResetBase to Remove All Rollback Files
Adding /ResetBase removes all superseded component versions, including the rollback data for every currently installed update. This gets you the most disk space back, but it’s a one-way door.
⚠️ Warning: After running
/ResetBase, you cannot uninstall any currently installed Windows updates or service packs. Only use this on a system you’ve confirmed is stable and fully up to date.
- Open Command Prompt as administrator (see Fix #3, step 1).
- Run this command:
DISM.exe /Online /Cleanup-Image /StartComponentCleanup /ResetBase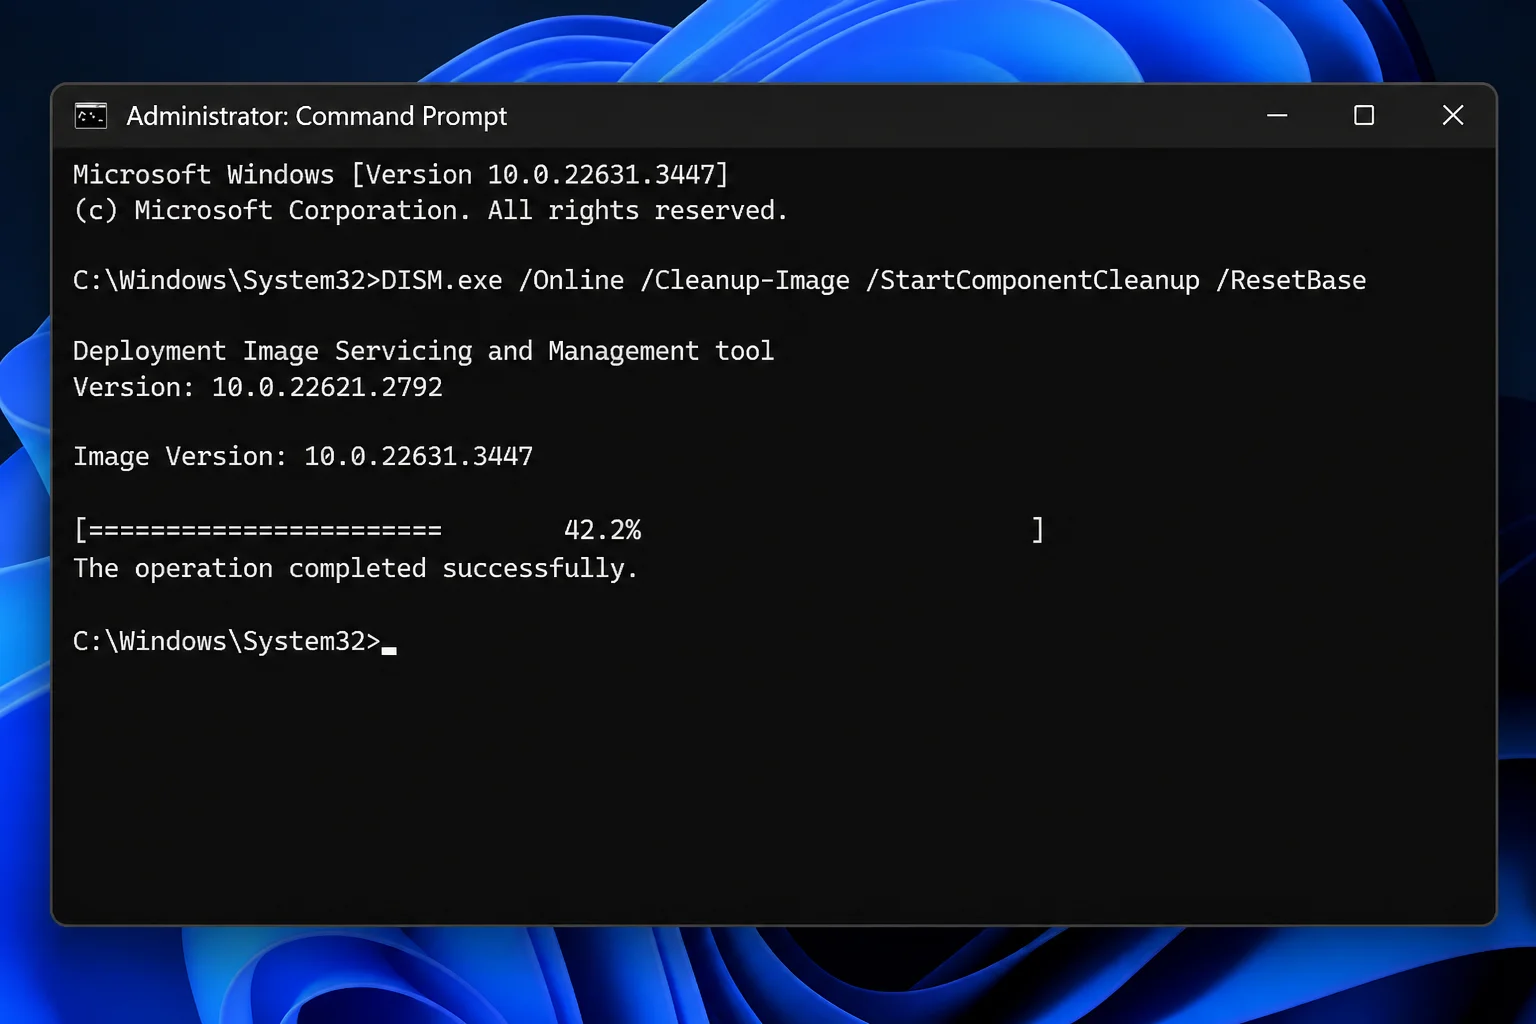
- Wait for completion, then restart your PC.
Windows 7 SP1 only: To remove Service Pack backup files and permanently commit SP1 (it cannot be uninstalled afterward), run this command instead:
DISM /Online /Cleanup-Image /SPSupersededThis frees several gigabytes on systems where SP1 was recently installed, but the trade-off is the same: SP1 becomes permanent and cannot be removed.
Fix #5: Remove Unused Windows Features
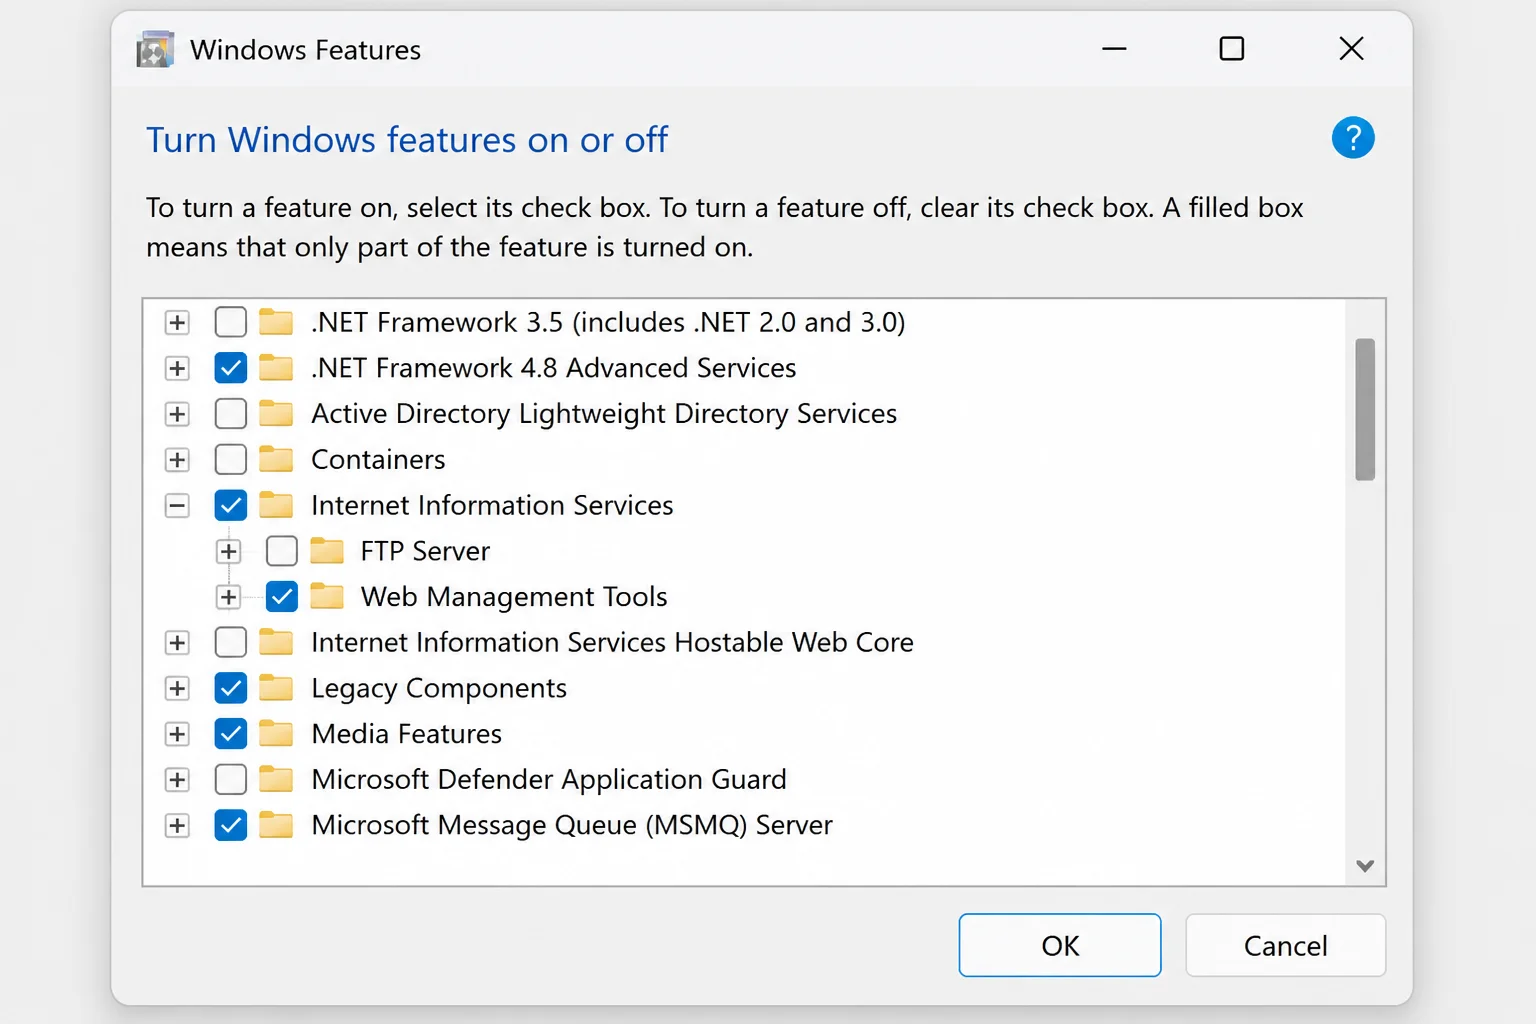
Disabling built-in Windows features you don’t use removes their component files from the store. You can do this through a GUI or the command line.
Using the GUI:
- Press
Windows + R, typeoptionalfeatures, and press Enter. - Uncheck any features you don’t need, then click OK. Windows will prompt you to restart.
Using DISM (command line):
- Open Command Prompt as administrator.
- Run this command to list all features and their current state:
DISM.exe /Online /English /Get-Features /Format:Table- To disable and permanently remove a feature, run the command below, replacing
<FeatureName>with the exact name from the list:
DISM.exe /Online /Disable-Feature /Featurename:<FeatureName> /Remove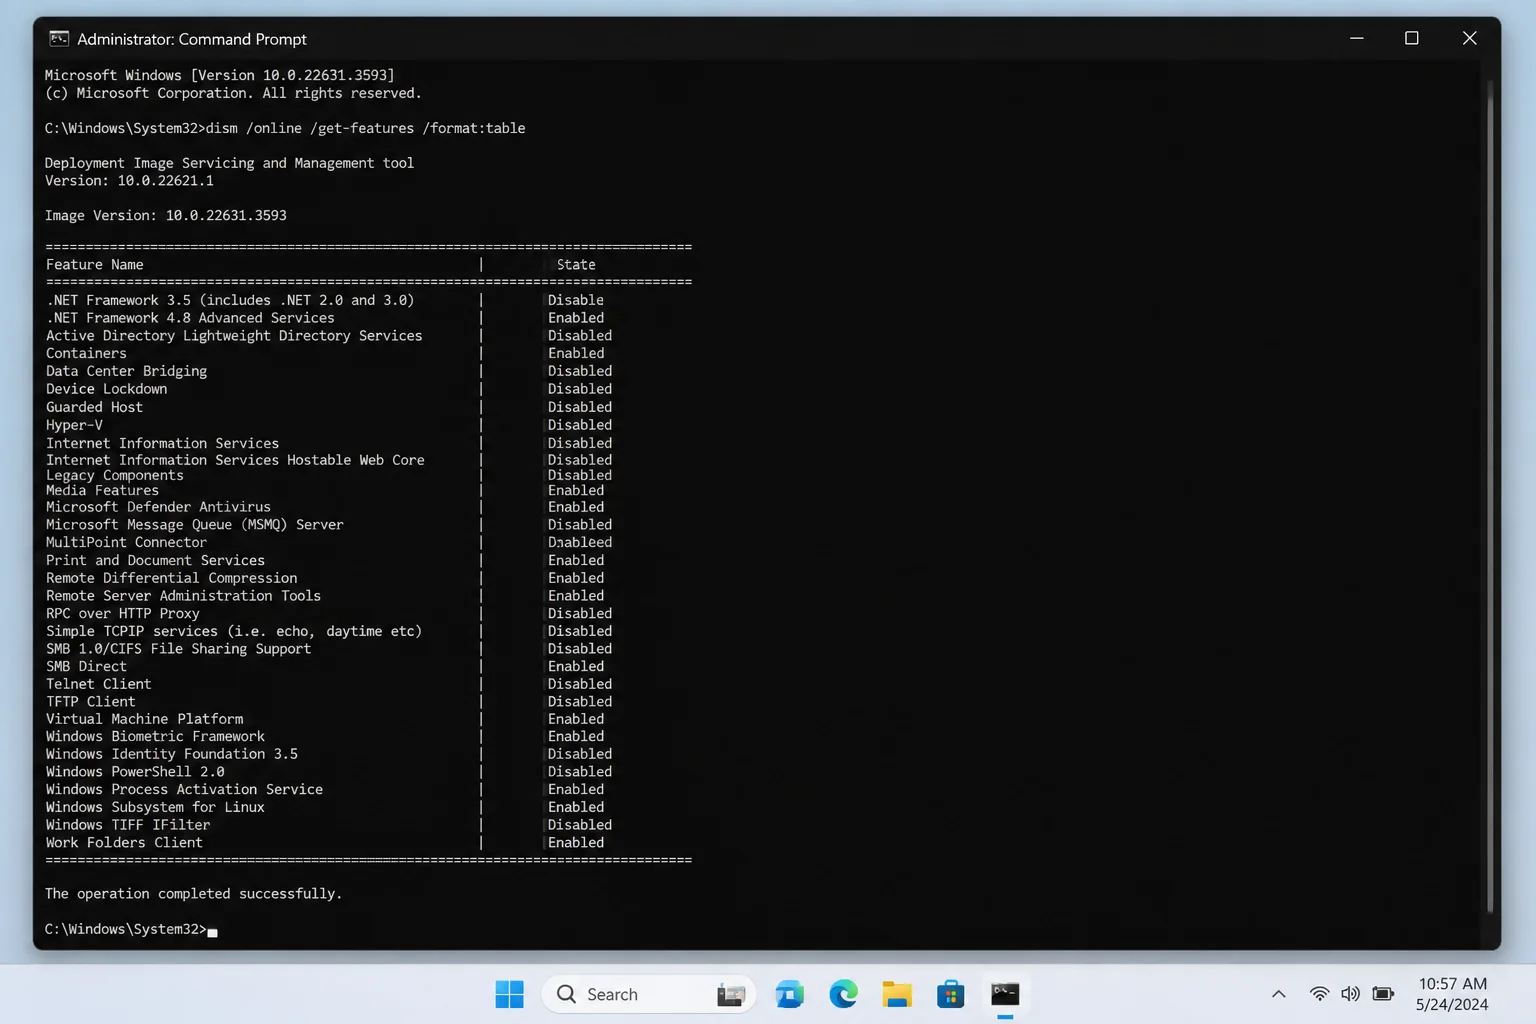
The /Remove flag permanently strips the feature’s payload from the component store. To re-enable that feature later, Windows will need to download it from Windows Update or ask for installation media.
When the Fixes Don’t Work
If DISM returns an error like “The component store has been corrupted,” cleanup isn’t your immediate problem, the store needs repair first. Run DISM /Online /Cleanup-Image /RestoreHealth to let Windows download and replace damaged files from Windows Update, then attempt the cleanup commands again. If that also fails because Windows Update itself is broken, you’re dealing with a deeper system integrity issue that goes beyond standard WinSxS maintenance and may require a repair install.
Conclusion
Fix #1, Disk Cleanup with Windows Update Cleanup checked, is the right starting point for most people: no command line, no rollback trade-offs, and typically several gigabytes freed in a few clicks. If you’re comfortable at an elevated command prompt and need to squeeze out every bit of space, Fix #4 (/ResetBase) delivers the biggest gains, just go in knowing you’re permanently giving up the ability to uninstall current updates. Fix #3 (/StartComponentCleanup without /ResetBase) is the balanced middle ground: meaningful cleanup while the 30-day update uninstall window stays intact.