If you’re witnessing error messages such as “Print Spooler Error” or “Printer Connection Failed”, you may want to disable the Print Spooler service and re-enable it to see if that fixes the issue. For now, though, Windows users have another reason to disable the Print Spooler service because of the “PrintNightmare” vulnerability.
What is PrintNightmare?
Last month, Microsoft acknowledged that all versions of Windows may be affected by the “PrintNightmare” vulnerability. However, there’s an easy way to protect your system against this vulnerability.
Microsoft released an update on August 10th to fix it. However, soon after, it was discovered that attackers could still exploit the Print Spooler service to execute codes for installing apps, manipulating your data, or creating accounts with SYSTEM privileges.
Microsoft confirmed this claim and said, “A remote code execution vulnerability exists when the Windows Print Spooler service improperly performs privileged file operations.”
It makes sense to disable Print Spooler until Microsoft releases a proper fix. In this guide, we’ll walk you through the steps and show you how to disable Print Spooler so you can protect your system against the new PrintNightmare CVE-2021-36598 vulnerability.
The latest fix was released on September 14th, so make sure to install the latest Windows updates to get this patch installed.
Note: You will not be able to print or fax anything from your Windows PC if you disable this service.
Disable Print Spooler Using Group Policy Editor
If you have Windows 10 Pro or Windows 10 Enterprise, you have the option to change the Print Spooler service policy from the Group Policy Editor. If you’re on Windows 10 Home, skip to the next method.
Once you’ve disabled the Print Spooler service policy, the vulnerability can’t be exploited.
- Press Win + R and type gpedit.msc. Press Enter to launch the Local Group Policy Editor.
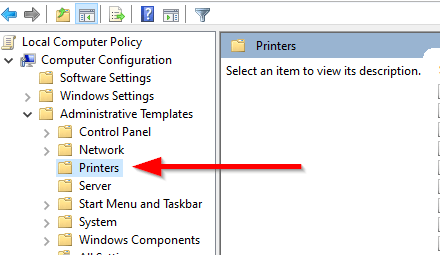
- Use the left pane to navigate to Computer Configuration > Administrative Templates > Printers.
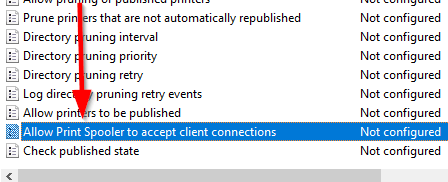
- On the right pane, look for Allow Print Spooler to accept client connections.
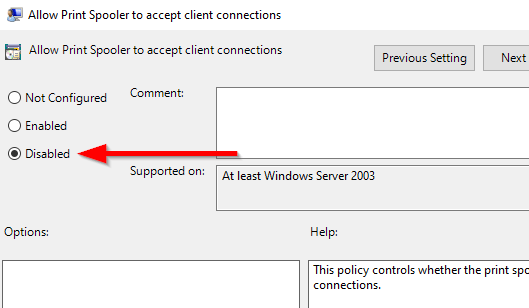
- Double-click on the setting. Change the state from Not configured to Disabled.
- Select Apply and OK to save changes and exit.
Disable Print Spooler From the Services App
Before you disable the Print Spooler service, note that you can’t print or fax using your PC with the Print Spooler service disabled. If you need to print or fax something, you will need to re-enable the service.
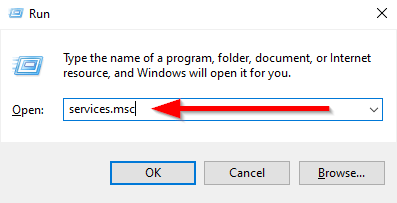
- Press Win + R and type services.msc. Press Enter and this should launch the Services panel.
- Scroll through the list of services and search for “Print Spooler”.
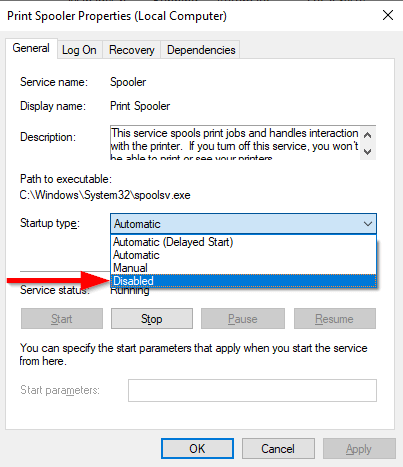
- Double-click on Print Spooler and change the Startup type to Disabled.
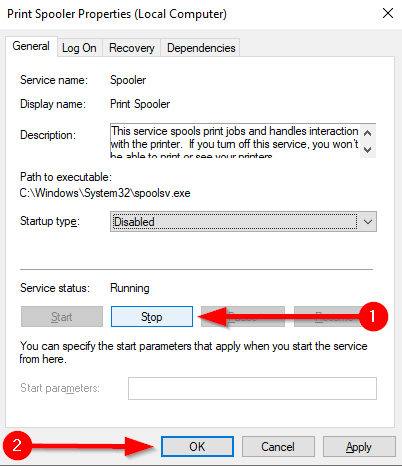
- Next, the service may already be running on your system so you’ll need to stop it. Select Stop to terminate the service and select OK to save changes and exit.
Disable Print Spooler from System Configuration
You can disable the Print Spooler service using System Configuration. However, this method accomplishes the same thing as the previous method, but in a different way. You will not be able to print or fax on your Windows PC after you’ve disabled the service using this method.
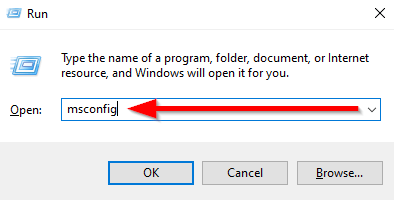
- Press Win + R and type msconfig. Press Enter to launch System Configuration.
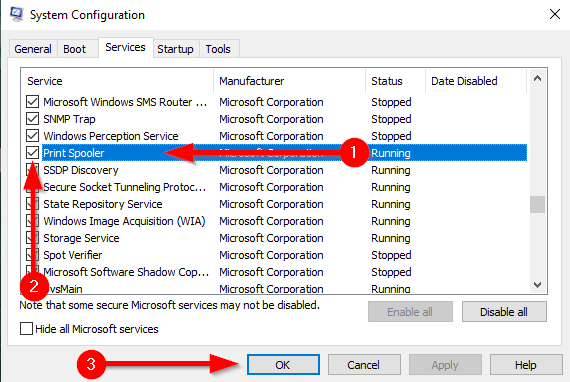
- Navigate to the Services tab and look for Print Spooler.
- Uncheck the box next to the Print Spooler service to disable it. Press OK to save changes and exit.
- This process will disable the service, but it doesn’t stop the service if it’s already running on the system, so you’ll need to restart the computer to complete the process.
Disable Print Spooler Using PowerShell
The PowerShell method disables the service the same way as the previous two methods. You won’t be able to print or fax after disabling the service with this method.
- Press Win + X and select Windows PowerShell (Admin).
- Execute the following commands:
Stop-Service -Name Spooler -Force
Set-Service -Name Spooler -StartupType Disabled
The first command stops the Print Spooler service if it’s already running on your system. The next command disables the service so it doesn’t start automatically in the future.
- Exit PowerShell.
Your System is Now Secure
Once you’ve disabled Print Spooler, you don’t need to worry about PrintNightmare. However, make sure that automatic updates are turned on so you can get the fix once Microsoft releases it (the final fix was hopefully released 3 days ago). At that point, you can enable Print Spooler again so that you can print normally from your machine.
Related Posts
- Preparing for Windows 10 End of Support: Upgrading to Windows 11
- How to Fix a “This file does not have an app associated with it” Error on Windows
- How to Fix an Update Error 0x800705b4 on Windows
- How to Resolve “A JavaScript error occured in the main process” Error on Windows
- How to Fix the Network Discovery Is Turned Off Error on Windows


