Chromebooks are cheap, convenient, and free from the trappings of many other laptops. Chrome OS is loved by writers and developers alike for their long battery lives and compatibility with Android and Linux apps.
Unlike most other laptops, you don’t need to completely reinstall the operating system to perform a factory reset (sometimes known as Powerwash). If you buy a Chromebook second hand, or if something goes wrong with yours, it’s a quick and easy process to powerwash a Chromebook.

Powerwash a Chromebook: Things To Check First
If you get a Chromebook secondhand, you should always do a full reset to ensure nothing remains from the previous owner. If you already own the Chromebook and are trying to fix crashes or strange behavior with it, there are a few steps you can take first before you powerwash a Chromebook:
Perform a hardware reset:
- Turn the Chromebook off
- Hold the Refresh (🔃) button and turn it on
- Let go of the Refresh button
Disable Chrome Extensions:
- Open Chrome
- Click the three dots at the top right of the screen
- Under More tools click Extensions
- Switch off all of your extensions
- If this fixes the problem, turn extensions back on one by one until you find the extension that was causing errors

Confirm you are in ‘Stable Mode’:
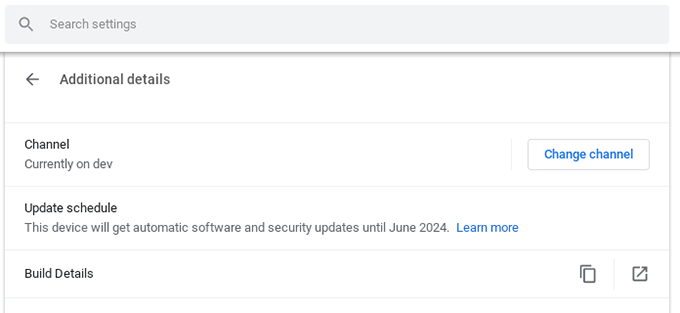
- Open Settings > About Chrome OS
- Open Additional details
- Click Change Channel
- Ensure you are using the Stable channel
- Restart your device
These three methods, separately or in combination, solve most Chrome OS problems.
When To Powerwash a Chromebook?
Alongside buying a used machine, there are several reasons you should powerwash your Chromebook. The clearest indication that you need to perform a factory reset is an on-screen message reading “Reset this Chrome device.”

Persistent problems that don’t go away after rebooting, which cannot be fixed by the steps outlined above, are another good sign that it’s time to Powerwash your Chromebook and restore its factory settings.
How To Powerwash Your Chromebook
Before taking the next steps, make sure you back up any data via Google Drive or using an external hard drive. Performing a factory reset completely wipes the hard drive.
To powerwash your Chromebook, take the following steps:
- Sign out of your Chromebook user account
- Press and hold Ctrl + Alt + Shift + R
- Click Restart
- When Prompted, select Powerwash > Continue
- Follow the on-screen steps to create a new user account
After a factory reset, you’ll need to set up your Chromebook again, as you lose your user preferences along with your data. If you are a Google Chrome Sync user, you’ll find that your browser will already be customized. Any hardware preferences like local language or keyboard layouts will need changing in the Chrome OS Settings.
What To Do When a Chromebook Won’t Boot
Sometimes, a Chromebook can get so corrupted that it won’t boot at all. If you turn on your device to see a warning reading ‘Chrome OS is missing or damaged,’ you’ll need to recover the operating system.
Before starting, you’ll need a USB drive that can hold a minimum of 8 GB, that you are happy wiping. If your Chromebook has an SD or microSD slot, you can use that instead. You’ll also need another computer running the Chrome browser, with the Chromebook Recovery Utility installed via the Chrome Web Store.

Beginning on the functional computer, take the following steps:
- Open the Chromebook Recovery Utility
- Click Get Started
- Select a model from the list, or enter the model number of your Chromebook (you can find this on the ‘Chrome OS is missing or damaged’ error screen)
- Click Continue
- Enter your USB drive, microSD or SD card, and select it from the dropdown menu
- Click Continue > Create Now
- When the recovery media is ready, remove it from the Chromebook
Now move over to the Chromebook with the error message and follow these steps:
- Remove any attached peripherals like USB hard drives, keyboards, or mice
- Press and hold Esc + Refresh (🔃) and press the Power button
- When prompted, enter the recovery USB stick or SD/microSD card
- Follow the on-screen instructions to recover your Chromebook’s operating system
A New Lease On Life
When you powerwash a Chromebook, it’s a great feeling. Chrome OS devices are designed with frequent resets in mind. Chromebook power users take full advantage of an ‘online-only’ mentality, meaning their data is protected no matter what happens to their local device.
Knowing how to save a damaged system is an important skill, and each operating system requires different tools. Creating recovery media, or even booting from an external drive, can get you out of some tricky situations.
