You’ve taken the plunge and bought a Raspberry Pi. Congratulations! If you don’t have a keyboard and monitor connected to your Pi, you’ll need to remotely connect to it from another computer on your network. Moreover, depending on how you plan to use your Pi, it might be placed in a difficult-to-reach place, so even if you have a keyboard and monitor attached now, that might not always be the case. You need some way to remotely connect to your Pi.
In this article, we’ll show you how to use SSH and SFTP into your Pi, execute commands, and transfer files. We’ll assume that your Raspberry Pi is on the same network as the computer you’re using to connect to it.
What Is SSH?
SSH stands for Secure Shell. It’s a standard network protocol that gives you a secure way to send text back and forth between your Pi and the computer you’re using to remotely connect to your Pi. You’ll use the SSH protocol for all kinds of things like entering your password to log into your Pi and executing commands.
SSH was designed as a replacement for Telnet, which sends commands in plain text over the network. In contrast, SSH encrypts those commands. Any network service can use SSH, which operates over TCP port 22.
What Is SFTP?
SFTP is short for Secure File Transfer Protocol. SFTP is a fast and convenient way to transfer files between your Pi and another computer on your network. SFTP is more secure than FTP because, just like with SSH, all your data is encrypted while it’s traveling from one computer to another.
You don’t want all your data to be transferred in plain text, do you? Certainly not! Stay safe, kids.
How to SSH Into a Raspberry Pi
We’ll start with how to use SSH to connect to your Raspberry Pi from a Windows PC on your network using PuTTY. PuTTY is one of several SSH clients that are freely available. We like PuTTY because it’s open source software that’s completely developed and supported by a team of volunteers. You can use whatever SSH client you want. Just be sure to download and install it before you begin.
- Make sure SSH is enabled on your Pi. If you’re starting from scratch with a Raspberry Pi 4, this getting started guide includes instructions on how to enable SSH by creating a text file on the SD card within your Raspberry Pi.
- Assuming you’re certain that SSH is enabled on your Pi, next you’ll need to find your Pi’s IP address in order to connect to it with an SSH client like PuTTY. If you don’t already know it, you can follow this guide which details several methods of determining your Pi’s IP address.
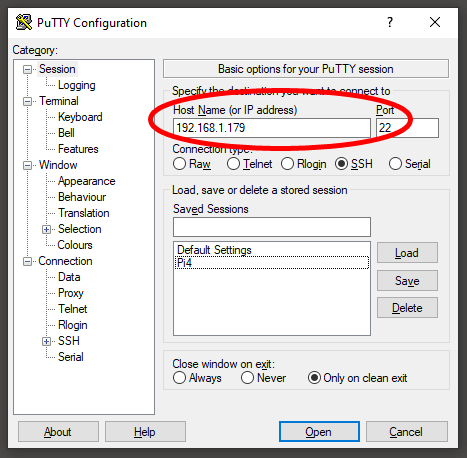
- Launch PuTTY (or another SSH client) on your Windows PC and enter your Pi’s IP address. The SSH port is 22. Most SSH clients will have the port number filled in already.
- Select Open to connect to your Pi.
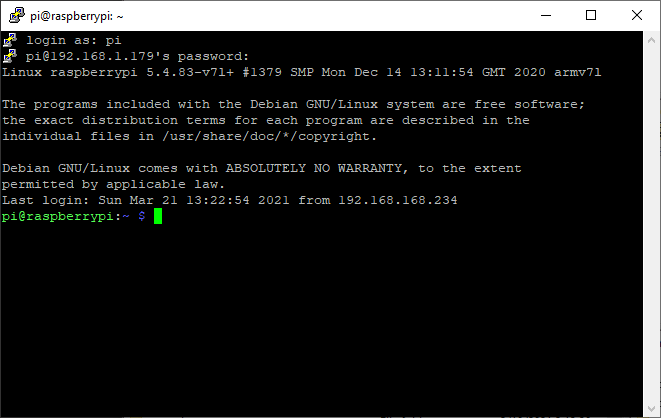
- This will launch a terminal window where you’ll be asked to login. Enter your username and press Enter. (The default username for most Pis is pi.)
- Next, type your password or copy it to the clipboard on your PC and single-right-click in the terminal window to paste it. Note that your password will not be displayed as you type. Press Enter.
You are now connected to your Pi via SSH and can use the terminal to execute commands. If you haven’t changed your Pi’s default password yet, this is a great time to do that. Since SSH is enabled, if your Raspberry Pi is using the default password, it would be very easy for someone to break in!
How to SFTP Into a Raspberry Pi
Above, we walked you through how to use an SSH client to securely connect to a Pi on your network and execute commands. For transferring files, we’ll use an SFTP client. Technically, it is possible to transfer files with PuTTY, but it’s cumbersome. It’s much nicer to have a file browser you can use to move files in bulk when you need to.
FileZilla is a popular FTP client that supports SFTP. If you can connect with SSH, then you can connect with SFTP as well. Convenient, isn’t it?
Prepare by downloading and installing FileZilla or your SFTP client of choice on the computer you’re using to remotely connect to your Pi. WinSCP is another popular SFTP client. Remember, you don’t need an SFTP server, just an SFTP client.
Pro Tip: If you install FileZilla, watch out for when it asks you to install McAfee and WinZip. Select Decline if you don’t want to install those programs on your computer.
- Launch FileZilla or another SFTP client.
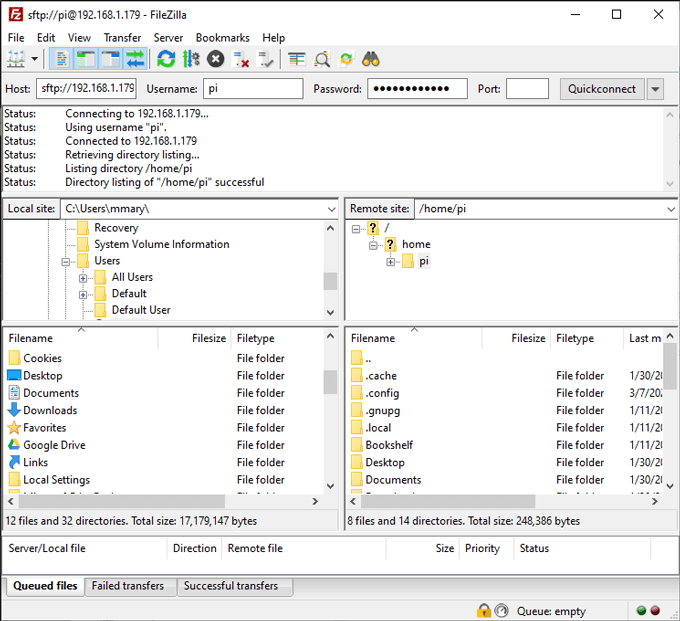
- In the field marked Host, enter your Pi’s IP address.
- Enter your Username and Password.
- Select Quickconnect. Your SFTP client might display an option to save your password, but we don’t recommend it because some clients save that password in an unsecure text file.
- Once connected, you can navigate through the folder structure on your Pi and copy files back and forth between the Pi and other computers on your network. The left side of the FileZilla window displays local files, and the right side displays files on the computer you connected to—in this case, your Pi.
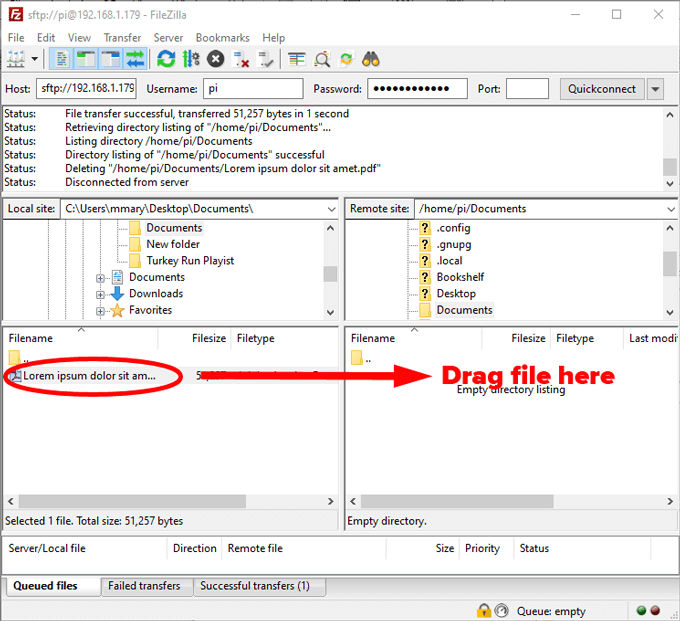
If, for example, you wanted to copy a file from your local computer to your Pi, you’d navigate to the source folder on the left and the destination folder on the right. FileZilla’s file manager allows you to drag and drop files between local and remote sites.
Finding Pi Projects
Once you get comfortable with executing commands and transferring files to and from your Pi, you’ll start to realize just how many different ways you can put your Pi to work. Don’t give in to analysis paralysis, though—just pick a project and dive in! It really is the best way to learn.
Related Posts
- How to Repair a Corrupted User Profile in Windows 11
- Preparing for Windows 10 End of Support: Upgrading to Windows 11
- How to Access and Change Your WiFi Router Settings (2025 Edition)
- How to Install the Latest Large Language Models (LLMs) Locally on Your Mac
- How to Find Circular References in Microsoft Excel
