For added security, I wanted to restrict access to my Cisco SG300-10 switch to only one IP address in my local subnet. After initially configuring my new switch a few weeks backs, I wasn’t happy knowing that anyone connected to my LAN or WLAN could get to the login page by just knowing the IP address for the device.
I ended up sifting through the 500-page manual to figure out how to go about blocking all IP addresses except the ones that I wanted for management access. After a lot of testing and several posts to the Cisco forums, I figured it out! In this article, I’ll walk you through the steps to configure access profiles and profiles rules for your Cisco switch.
Note: The following method I am going to describe also allows you to restrict access to any number of enabled services on your switch. For example, you can restrict access to SSH, HTTP, HTTPS, Telnet, or all of these services by IP address.
Create Management Access Profile & Rules
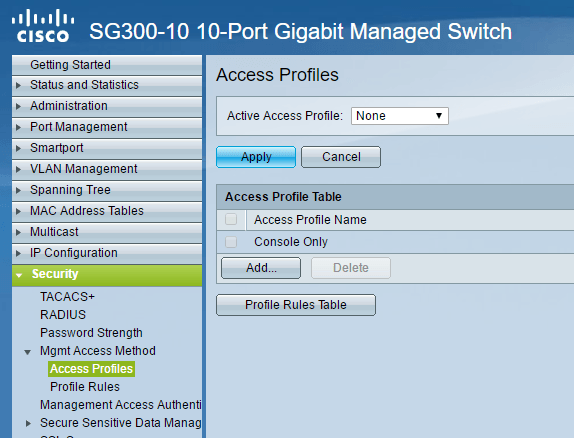
To get started, log into the web interface for your switch and expand Security and then expand Mgmt Access Method. Go ahead and click on Access Profiles.
The first thing we need to do is create a new access profile. By default, you should only see the Console Only profile. Also, you’ll notice at the top that None is selected next to Active Access Profile. Once we have created our profile and rules, we’ll have to select the name of the profile here in order to activate it.
Now click on the Add button and this should bring up a dialog box where you’ll be able to name your new profile and also add the first rule for the new profile.
At the top, give your new profile a name. All the other fields relate to the first rule that will be added to the new profile. For Rule Priority, you have to choose a value between 1 and 65535. The way Cisco works is that the rule with the lowest priority is applied first. If it doesn’t match, then the next rule with the lowest priority is applied.
In my example, I chose a priority of 1 because I want this rule to be processed first. This rule will be the one that allows the IP address that I want to give access to the switch. Under Management Method, you can either choose a specific service or choose all, which will restrict everything. In my case, I chose all because I only have SSH and HTTPS enabled anyway and I manage both services from one computer.
Note that if you want to secure only SSH and HTTPS, then you’ll need to create two separate rules. The Action can only be Deny or Permit. For my example, I chose Permit since this will be for the allowed IP. Next, you can apply the rule to a specific interface on the device or you can just leave it at All so that it applies to all ports.
Under Applies to Source IP Address, we have to choose User Defined here and then choose Version 4, unless you are working in an IPv6 environment in which case you would choose Version 6. Now type in the IP address that will be allowed access and type in a network mask that matches all the relevant bits to be looked at.
For example, since my IP address is 192.168.1.233, the whole IP address needs to be examined and hence I need a network mask of 255.255.255.255. If I wanted the rule to apply to everyone on the entire subnet, then I would use a mask of 255.255.255.0. That would mean anyone with a 192.168.1.x address would be permitted. That’s not what I want to do, obviously, but hopefully that explains how to use the network mask. Note that the network mask is not the subnet mask for your network. The network mask simply says which bits Cisco should look at when applying the rule.
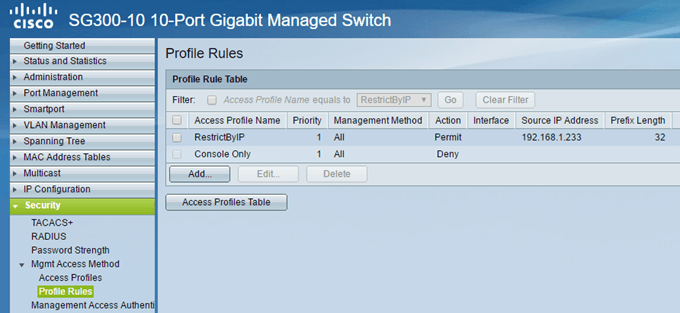
Click Apply and you should now have a new access profile and rule! Click on Profile Rules in the left-hand menu and you should see the new rule listed at the top.
Now we need to add our second rule. To do this, click on the Add button shown under the Profile Rule Table.
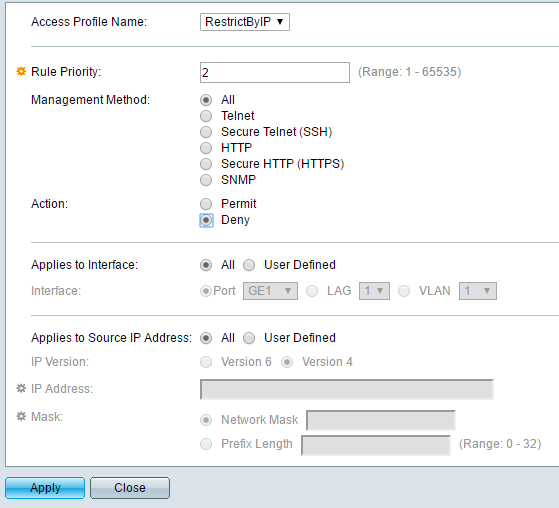
The second rule is really simple. Firstly, make sure that the Access Profile Name is the same one we just created. Now, we just give the rule a priority of 2 and choose Deny for the Action. Make sure everything else is set to All. This means that all IP addresses will be blocked. However, since our first rule will be processed first, that IP address will be permitted. Once a rule is matched, the other rules are ignored. If an IP address doesn’t match the first rule, it’ll come to this second rule, where it will match and be blocked. Nice!
Finally, we have to activate the new access profile. To do that, go back to Access Profiles and select the new profile from the drop down list at the top (next to Active Access Profile). Make sure to click Apply and you should be good to go.
Remember that the configuration is currently only saved in the running config. Make sure you go to Administration – File Management – Copy/Save Configuration to copy the running config to the startup config.
If you want to allow more than one IP address access to the switch, just create another rule like the first one, but give it a higher priority. You’ll also have to make sure that you change the priority for the Deny rule so that it has a higher priority than all of the Permit rules. If you run into any problems or can’t get this to work, feel free to post in the comments and I’ll try to help. Enjoy!
Related Posts
- How to Repair a Corrupted User Profile in Windows 11
- Preparing for Windows 10 End of Support: Upgrading to Windows 11
- How to Access and Change Your WiFi Router Settings (2025 Edition)
- How to Install the Latest Large Language Models (LLMs) Locally on Your Mac
- How to Find Circular References in Microsoft Excel


