
So you just downloaded some pictures from your new fancy Canon or Nikon camera? Well, get ready for some huge pictures with lots of resolution! You’re talking about 20+ megapixels and extremely high resolutions! The prices are always coming down and the quality is always going up. For most people, it’s overkill.
Additionally, it’s sometimes hard to manage all that extra quality in terms of size, storing and sharing your pictures with others. Of course, if you use a service like Google Photos, you can upload all your photos in their native resolution and share albums with others that way, bypassing the need to scale down your images.
However, there are times when you will need to scale an image down, such as putting it up on a website or inserting it into a Word document or PowerPoint presentation. Adding it at full resolution will provide no additional benefit and will only slow down your webpage or make your Word or PowerPoint document huge.
Scale Down Image in Windows
For Windows, I like to use Paint. If you don’t need to resize hundreds of photos, then Paint works just fine. Open Paint with the photo and you’ll see a Resize button in the ribbon.

Click on that and you can resize by percentage or by pixels. You can also automatically maintain the aspect ratio or not.

If you want a little fancier program for resizing images, you can use a program called the Gimp. It’s free and it has some nice tools for scaling images. You can download it here:
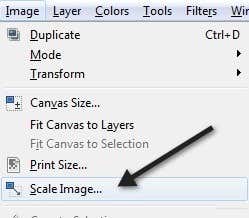
Once you have it installed, open your image and then click on Image and Scale Image.
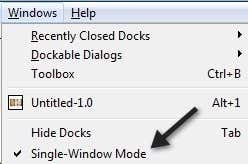
Note that in Gimp 2.8, you can combine all the windows into a single window instead of everything floating around all over the place. You can do that by going to Windows and clicking on Single Window Mode.
If find this way easier to work with. Anyway, once the scale image dialog appears, you’ll see a couple of options:
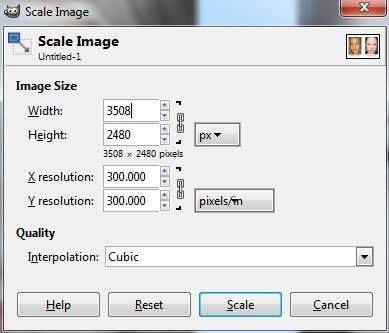
You can change the image size directly by adjusting the width and the height. This is the most common way to scale an image. You can also adjust the resolution, which will allow you to view the image in its original size online, but reduce the print quality. The spatial resolution most screens can show is 72 or 100 (PPI or pixels/in). This means you can reduce the resolution to 72 or 100 ppi without any noticeable difference in the image on a computer screen and it will reduce your image size significantly.
Note that the most common resolution for computer screens a couple of years ago was 1024×768. Even if you take a higher resolution like 1600×1200, you can still reduce the width of these really huge images under 1000 pixels and still it will take up the entire screen.
Also note that when changing the width or height, the aspect ratio will be maintained by default. If you click on the little chain to the right, it will “unlink” and you can then change the width or the height independently, which will stretch your image. If you don’t want it to stretch, then you have to crop the image, which is kind of like scaling, but not the same since you’re removing parts of the image. When scaling, the whole image is always maintained.
Lastly, you can choose the Interpolation method, which determines the quality of the scaling. By default, it’s set to Cubic. Here is the difference between the different options:
None – The color of a pixel is determined by its closest neighbor in the picture. It’s the fastest method, but can result in a coarse image.
Linear – The color of a pixel is determined by the average color of the four closest pixels in the picture. This makes the picture look smoother than the previous option.
Cubic – The color of a pixel is determined by the average color of the eight closest pixels in the picture. Pretty much the same, but again, the scaled down image is smoother and this option will give the best result.
Sinc (Lanczos3) – This method uses a mathematical formula called Sinc and does a high quality interpolation.
That’s about it for scaling images in Windows.
Scale Down Image in OS X
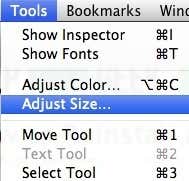
If you want to scale an image in OS X, you don’t have to install any additional software. You can use the built-in Preview program. When you open your image, click on Tools and then Adjust Size.
This will bring up the size adjust dialog where you pretty much have the same options as I showed you in GIMP:

You can adjust the width and height and change the resolution also if you like. It also tells you what the resulting size will be before you actually make the change, which is nice.
Scale Down Image in iOS
If you are working from your iPhone or iPad and want a quick way to scale down an image to a specific size, you can try out a free program called Image Size. It seems to get the job done for most people.
It’s worth noting that the default Photos app in iOS can now do some simple scaling, but only with preset options. Tap on the photo and then tap on Edit at the top right. A few small icons appear at the bottom of the screen. Go ahead and tap on the rotate/crop icon at the far left.
![]()
Next, you will see a new icon appear a little higher up at the far right. This icon is for changing the dimensions of the photo.

Now you’ll get to choose from a set of preset ratios. This includes square, 2:3, 3:5, 3:4, etc.

For most people, this will be enough if they just want to post to Instagram, etc., so you really don’t need an app.
Scale Down Image in Android
Lastly, let’s not forget about those Android users. Photo & Picture Resizer is a free app that lets you adjust the size and quality of an image.

That’s about it! Hopefully, that covers the most common operating systems and platforms that people will use to scale images. Any questions or comments? Post them here. Enjoy!