Linux Mint is generally regarded as the easiest way to get away from Windows and Mac and enter the wonderful world of open-source operating systems. With a simple installation process, great interface and a lot of ease-of-life features, there’s nothing stopping you from trying out this great version of Linux, especially if you want to avoid Windows 11. We’ll show you the ropes in this guide to Linux Mint.
Note that this is a guide to installing Mint from scratch. If you’re already a Mint user, we have a guide to reinstalling Mint without losing any of your preferences.
How to Install Linux Mint
To get started with Linux Mint, you first need to download the installation file and transfer it onto a USB drive or other form of removable storage.
Downloading Mint
- Visit linuxmint.com and click on the download button you see toward the upper half of the screen. The file is about 2GB, though Mint will need around 12GB to install.
- The next screen has you pick from three editions of Mint. This may seem confusing, but it’s pretty much the choice between which type of interface you get. If you’re coming from Windows, pick Cinnamon (the top one). If you’re coming from Ubuntu, MATE is probably the right pick. The last pick, Xfce, is probably left to Linux veterans as it relies heavily on use of the terminal.
- The next screen gives you a summary of what you’re about to download, but no download button. To download, scroll down a bit to the list of mirrors and pick the location nearest to you, or a country close to you. Once you’ve picked a location, wait for the file to download.
A Quick Note About Linux Mint Versions
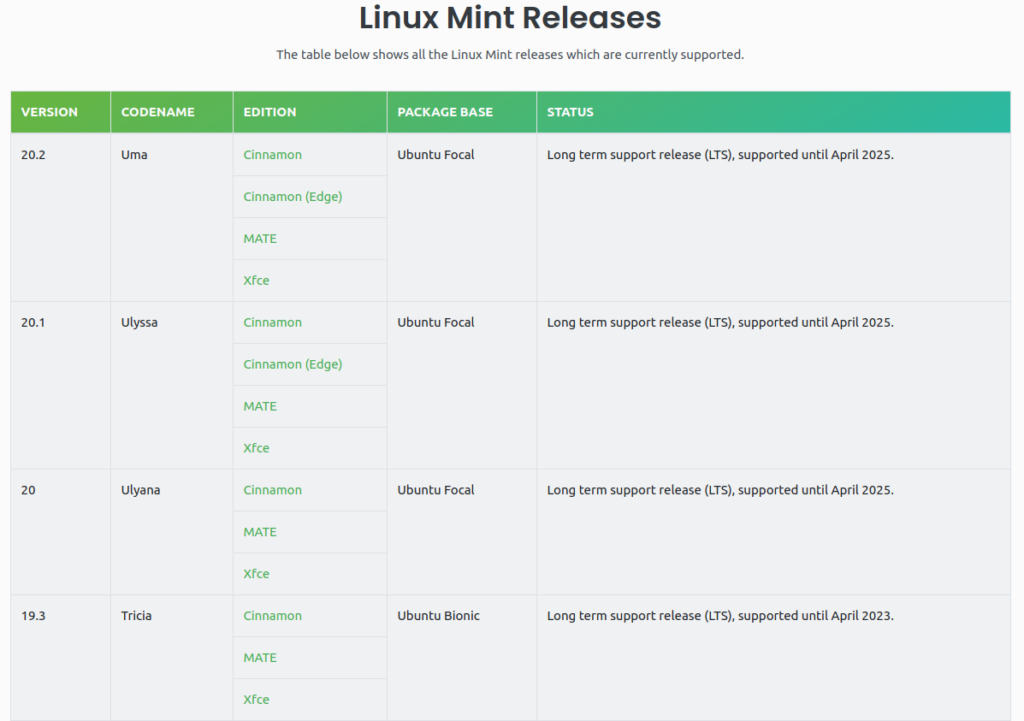
If you go the above route, you’ll always get the latest version of Linux Mint. In our case, in early October 2021, it’s version 20.2, called Uma — each version of Linux gets a female name. It’s a handy way to remember them.
In some cases, though, it could be that the new version is a bit too new and has some teething issues, or maybe doesn’t work too well with your hardware. If that happens, you may want to download an earlier version. To do so, click on the download tab at the top right of the screen and select all versions.
That will take you to a new screen with all the available versions of Linux Mint. If you’re having any issues with Mint, just go back one or two versions and that should fix any issues you may have.
Installing Linux Mint
- To install Mint, you first need to get the .iso file you downloaded and put that on a removable storage device, like a thumbdrive. For Windows, we have a handy how-to on creating bootable USB drives. If you’re already on Linux, you can use a Linux program called USB Image Writer for this task.
- Once that’s sorted, you need to change your device’s boot order in the BIOS (we have a guide for that). Once that’s done, insert the USB, then restart your computer. If you set the USB stick as the first boot option, Mint will automatically boot up. If you just want to install Mint, pick the top option
- Next, you’ll be brought to Mint’s desktop. It’s important to understand that this does not mean Mint has been installed, it’s just been live-booted from the thumbdrive. It’s like a trial to get to know Mint a bit before deciding to install. If you’ve decided to proceed, just click on the disk icon named install Linux Mint.
- If you’ve ever installed Windows or even Mac, the next few screens should at least feel familiar: you pick your language and keyboard layout.
- Once those two are done, the third screen will have you choose whether or not to install multimedia codecs. We recommend checking the box, as all this does is save you some busywork later — you’re going to need those codecs in most cases anyway. Only leave it unchecked if you’re very particular about codecs.
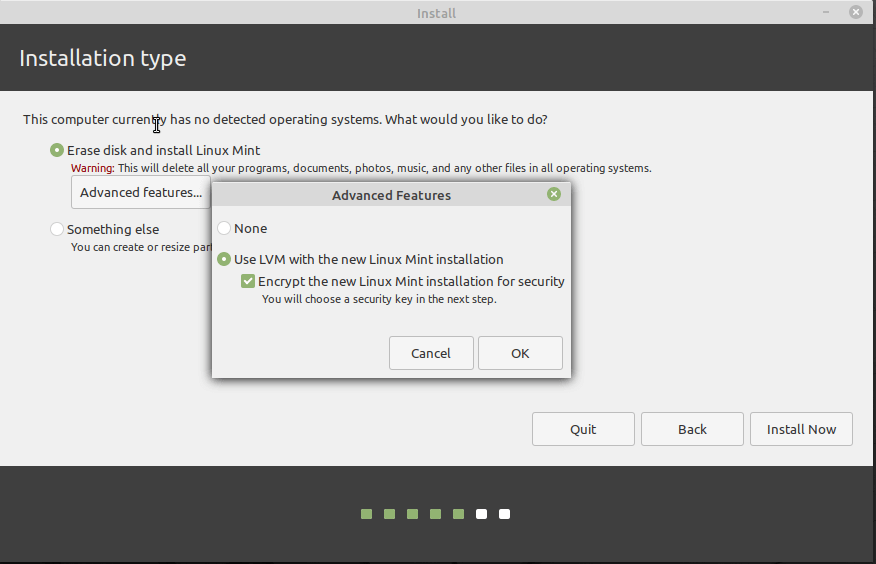
- The next step is a little more complicated: you can either choose to completely wipe your current install (it shows up as blank in the below image because we’re using a virtual machine) or create your own partitions and the like. We’re going with the top option here, check out our guide on how to dual-boot Windows and Linux Mint for more information on the second option.
6a. If you want some added performance, we recommend you click advanced features and select the use of Linux’s logical volume management (LVM). It makes it easier to mess around with partitions later on if you so choose. As an extra option, you can also add a password to your hard drive if you like the extra security — it’s a smart thing to do, especially on laptops.
- With all that done, just select Install Now.
- Next you need to select your timezone.
- The final step before installation starts is picking a username and password. The password can’t be retrieved after you set it, so make sure you can remember it or write it down somewhere nobody else can find it. Alternatively, you can set Linux to log in automatically, though we don’t recommend that for laptops. If you select Encrypt My Home Folder, you’ll be prompted to enter your password every time you access the file system, which adds some security, but also hassle.
- With that, you’re done: just select continue and Linux Mint will install on your computer. It all pretty much runs itself from here, so just sit back and enjoy the slideshow for a bit (about 10-15 minutes depending on your system). Whatever you do, do NOT hit the Skip button.
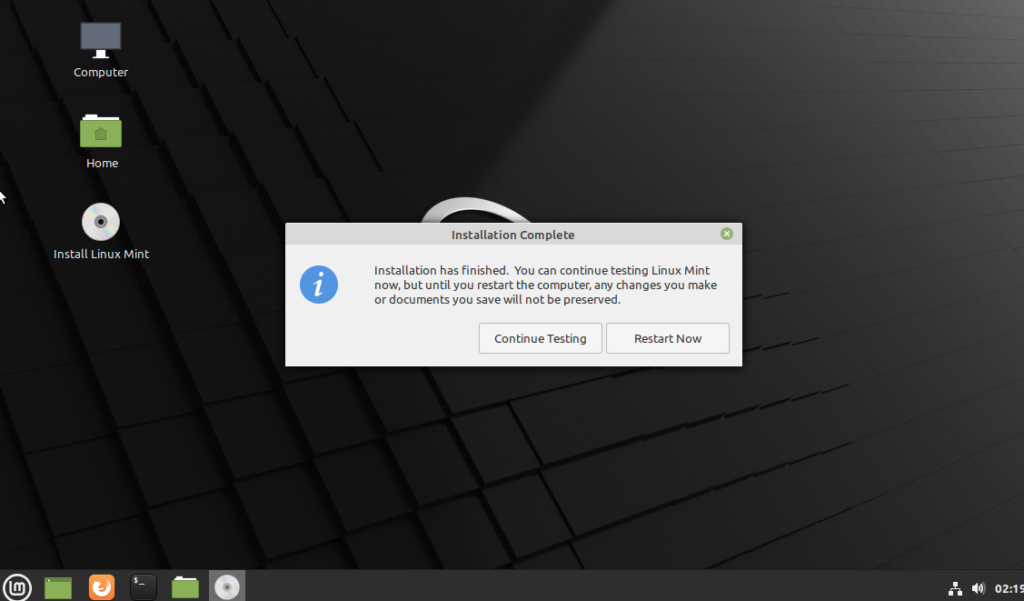
- When Linux has worked its magic, you’ll be brought back to your desktop and given the choice of either continuing with the testing session, or restarting into Linux Mint proper. Pick Restart Now and let the computer reboot. You’re all done with the installation, it’s time to see what your new operating system can do.
Familiarizing Yourself With Linux Mint
Once Linux has restarted, you’ll see the desktop — this time without the option to install — and the welcome to Mint program will be running.
We definitely recommend that you walk yourself through the first steps as outlined in this program and also rifle through the documentation and other resources provided. This is because Linux Mint requires you to authorize certain steps to make it run smoothly, unlike Windows which often runs many steps automatically without your permission.
You can either open these apps through the welcome screen, or via the menu, which works just like the Windows Start button of yesteryear. Just click the Linux system button in the bottom left of the screen by default, or the Windows key on your keyboard, if you have one.
Most of the programs you’ll need are under the Administration tab, but you can also find them by entering their name in the search bar at the top of the menu. We’ll go over the most important ones here.
Note that when messing around with these advanced systems, you will be prompted to enter your password time and again. This is how Linux makes sure nobody tampers with the system unless they know what they’re doing.
Mint Update Manager
One of the oddest experiences if you’re coming from Windows is the Update Manager, which gives you a list of apps, programs and OS parts that have updates available, and lets you decide whether or not you want to update them. With Linux, gone are the days of system upgrades being shoved down your throat.
That said, unless you know what you’re doing, we recommend you just leave everything checked and select Install Updates. This counts double for any updates to the Linux kernel as it often contains important system-level upgrades.
Installing Software in Linux Mint
Installing new programs — or deleting them — is done via the Software Manager. It’s a huge collection of apps and programs designed to run on Linux Mint. All you need to do is click once to install them. It’s a pretty good collection, and we recommend you browse through it a bit to see what’s available.
For example, most major browsers are available, as are a whole bunch of open-source alternatives to well-known programs, like GIMP for Adobe Photoshop. There are even some cool games to mess around with. Everything here is free, so there’s no harm in trying things out.
However, there are plenty of programs that don’t have an entry in this database. In that case, there are a few different ways to get your hands on them. The easiest, and the one we’ll go over here, is to simply go to the website of the program you want and download it from there. The only trick here is to make sure that you’re downloading the Debian package (with the .deb file extension) as that plays nice with Mint.
Once it’s downloaded, just go to your Downloads folder — which you can access through the Computer icon on your desktop — and click on the file there. A dialog box will open; click Install Package and the installer should take it from there. Although if it needs any extra files to install the program — called “dependencies” — you’ll have to okay that.
The other way to install files is where things get tricky, which we’ll talk about next.
The Linux Terminal
Linux has a reputation for being hard to use and, well, it kinda deserves it, or at least most distros other than Mint and Ubuntu do. This is thanks to them relying on the terminal, which is how most computers were operated until about the mid-90s.
Once you learn how to operate the terminal, it’s not too bad, though. It just takes some getting used to. However, Mint is a great way to get started with Linux because there’s a good chance you’ll never need to use the terminal, except for some troubleshooting.
Thankfully, there’s a good way to get around the terminal. Your fellow Linux users are a helpful lot and most problems you’re having should have been solved before, all you need to do is Google the issue.
Once you’ve found a solution, all you need to do is copy the necessary code from the web page with Ctrl + C, then paste it into the terminal with Ctrl + Shift + V. Let the program run, and that should be the end of your issues.
A Beginner’s Guide to Mint
Hopefully, this guide will get you well on your way to using Linux Mint, a user-friendly and free alternative to Microsoft. Though it’s not perfect, you’ll quickly grow to love its versatility, speed and power.


