If you’re in a small business environment, it can become really annoying if you have to walk out to each computer that you need to fix. Instead, if you can remotely connect and fix problems or adjust settings, it makes things a lot more convenient.
Though it’s less common, there are times when you might need to connect to another computer to change, delete or add registry keys and values. Obviously, you could remote desktop into the computer and do this, but if you’re reading this article, you aren’t going that route.
In this article, I’m going to talk about the remote registry service in Windows that allows you to connect directly to the registry hives on another computer using regedit. However, in order for this to work, there are several prerequisites.
Remote Registry Requirements
If you’re hoping to connect to a remote computer that you don’t have access to, then you’re out of luck. In order to use Remote Registry, you basically need administrator access to both computers. So, this is basically for convenience and can’t be used to hack into someone else’s registry.
There are a couple of things that have to be in place before remote registry will even work:
- The computer you are connecting to has to have a username and password. The password cannot be blank.
- Both computers need to have Remote Administration enabled in the firewall.
- Both computers need to have the Remote Registry service running.
The first requirement is easy to fulfill. Just go add a password to your account, if it doesn’t already have one. The second requirement can be fixed using the command prompt. To open an administrator command prompt, click on Start, type cmd and right-click on cmd and choose Run as Administrator.
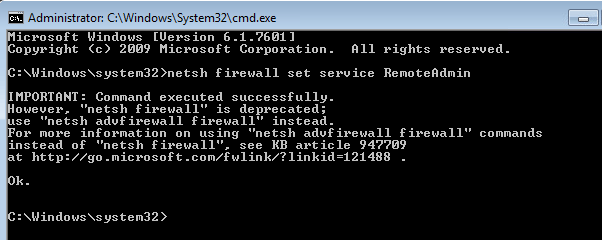
Now copy and paste the following command into the command prompt window and press Enter.
netsh firewall set service RemoteAdmin
You’ll get a warning message that the command executed successfully, but the netsh firewall command is deprecated. You will get this message on Windows 7, Windows 8 or Windows 10. It’s not a problem as long as it completed successfully. Note that you have to run this command on both machines.
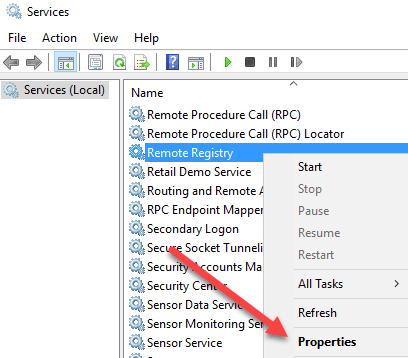
For the third requirement, you need to click on Start, type in services and then click on just Services with the two gear icons.
Scroll down till you see Remote Registry and it should not be running by default. On Windows 10, it’ll actually be disabled by default. On Windows 7, you can just right-click on it and choose Start. On Windows 10, you’ll have to right-click and choose Properties first.
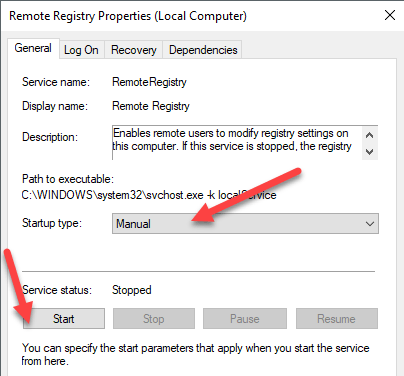
In the properties dialog, you need to change the Startup type to something other than Disabled. If you need to do this only one time, change it to Manual. If you need to access the remote registry often, choose Automatic.
After you select the startup type, click the Apply button and then the Start button will no longer be greyed out. Click Start to start the remote registry service. Again, this needs to be done on both machines.
Connect to Remote Registry Hive
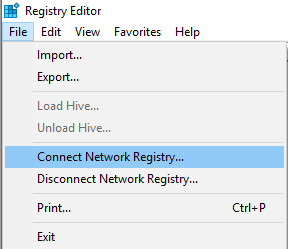
Once you have completed all the steps above, you can try to connect to the remote registry. Click on Start, type regedit to open the registry editor. Next, click on File and then click on Connect Network Registry.
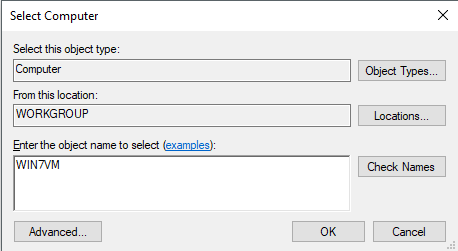
Here you will have to type in the NETBIOS name of the computer that you want to connect to.
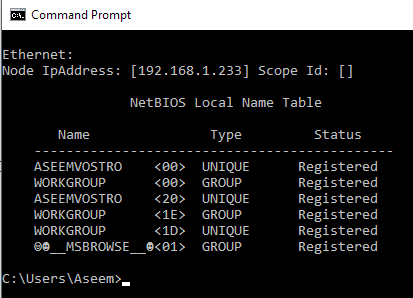
Note that you can quickly perform a search for all computers on the network by clicking on Advanced and then clicking on Find Now. If the computer you are connecting to has a long name, you’ll need to determine the NETBIOS name for the computer. You can do this by opening a command prompt on that computer and typing in nbtstat -n.
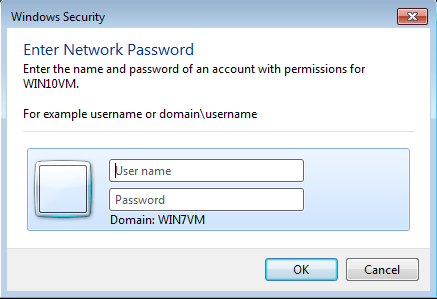
Once you type the name in and click OK, you will be prompted to enter the username and password for an administrator account on the remote computer.
Note that if you are connecting to a Windows 10 machine remotely and it’s logged in using your Microsoft account, you need to type the email address for the username and the password as usual. You should hopefully get connected to the registry on the remote computer. If you get any kind of Access Denied message, it means you must have typed in the credentials wrong.
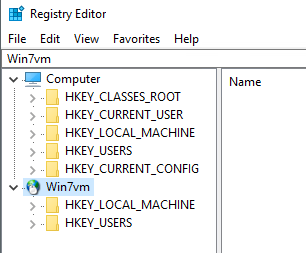
As you can see from above, I connected to a Windows 7 machine using remote registry from my Windows 10 PC. You’ll only see HKEY_LOCAL_MACHINE and HKEY_USERS when connected to a remote registry. If you have any questions or run into any problems, post a comment and I’ll try to help. Enjoy!

