If you have emails that you no longer need, but don’t necessarily want to delete, you can archive them. In Microsoft Outlook, you have a few ways to manually or automatically archive emails to get them out of the way.
We’ll show you how to archive emails in Outlook on your desktop, the web, and your mobile device. No matter where you use Outlook the most, you can make room for new messages.
About Archiving Emails in Outlook
For Microsoft 365, exchange accounts, and Outlook on the web, you have a default Archive folder. With exchange server accounts, retention policies may apply. For POP and IMAP accounts, you can create an Archive folder.
By using an Archive folder, you can retrieve any emails you move there later if needed.
When you move items to the Archive folder using the button as described below, this doesn’t decrease your inbox size. If you’re concerned about space, you can create a separate Outlook Data File (.pst) when using Windows which we’ll explain below.
Archive Outlook Emails on Windows
You can manually archive emails in Outlook on Windows or use one of the AutoArchive features available. These automatic archive features may differ depending on your version of Outlook.
Manually Archive Emails on Windows
You can manually archive one or more emails a few different ways on Windows.
Start by selecting the email(s) one of these ways:
- For a single email, simply select it.
- For a group of adjacent emails, choose the first one, hold Shift, and choose the last one in the range.
- For a group of non-adjacent emails, choose one, hold Ctrl, and choose each additional one.
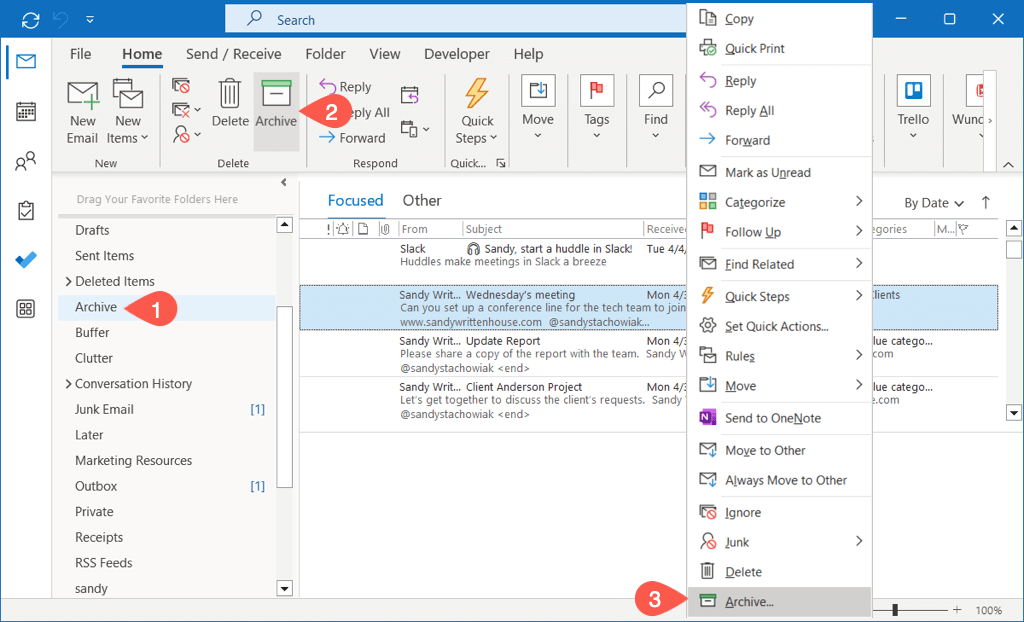
Once you have the email(s) selected that you want to archive, do one of the following:
- Drag the email(s) to the Archive folder.
- Choose Archive in the ribbon on the Home or Message tab.
- Right-click and pick Archive.
- Use your Backspace key.
Automatically Archive Emails on Windows
On Windows, you can automatically archive older emails by performing a mailbox cleanup or setting up the AutoArchive to run every so often.
Perform an Inbox Cleanup
You can move emails to an Outlook Data File to save space and clean up your mailbox in one fell swoop.
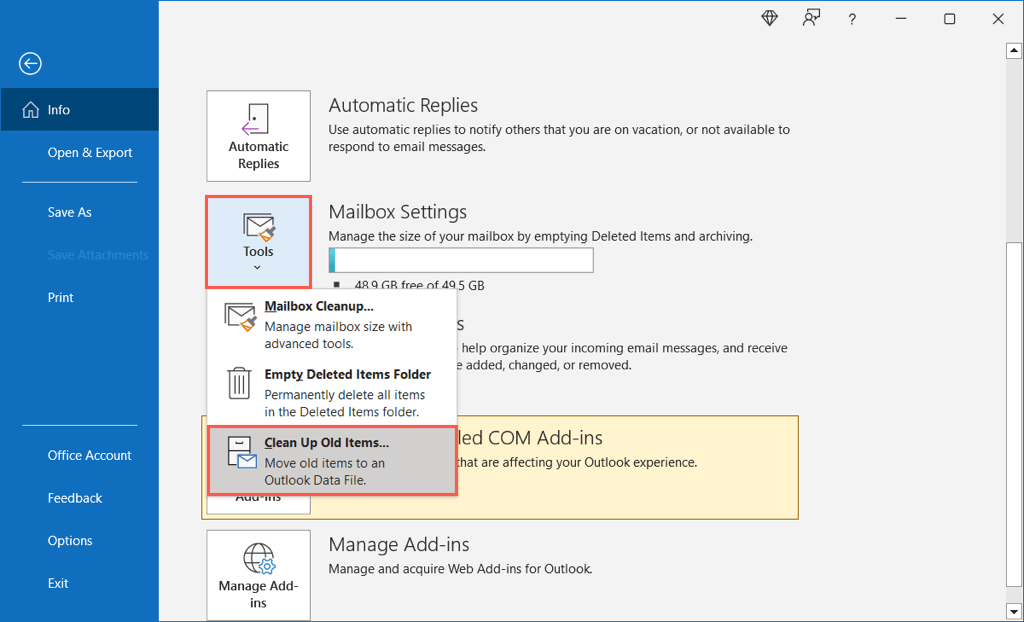
- Select File > Info. Then, open the Tools menu and choose Clean Up Old Items.
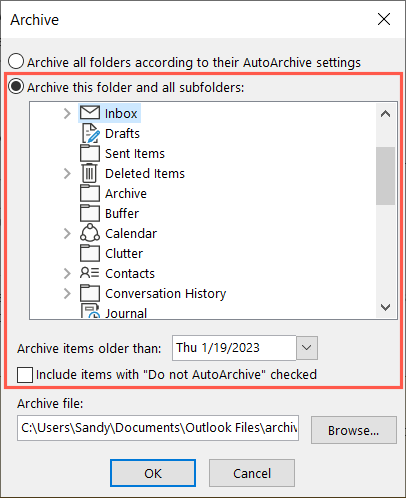
- Choose the email account inbox, folder, and subfolders you want to perform the maintenance on and pick a date in the drop-down box beneath. Optionally, check the box to include “Do not AutoArchive” emails.
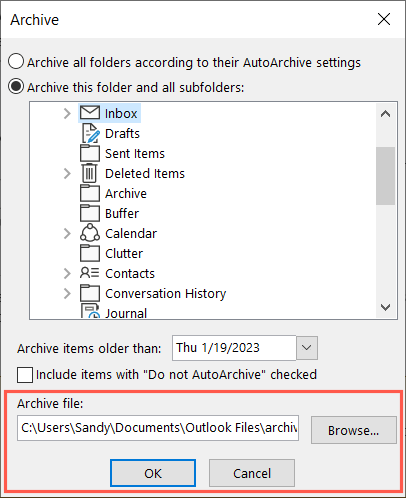
- You can see the file path for the location of the archive file so that you can easily access it later if needed. Take a look at these ways to access the PST file if you run into trouble.
- Choose OK to perform the cleanup.
Set Up AutoArchive
To automatically archive items on a schedule, you can set up the AutoArchive option.
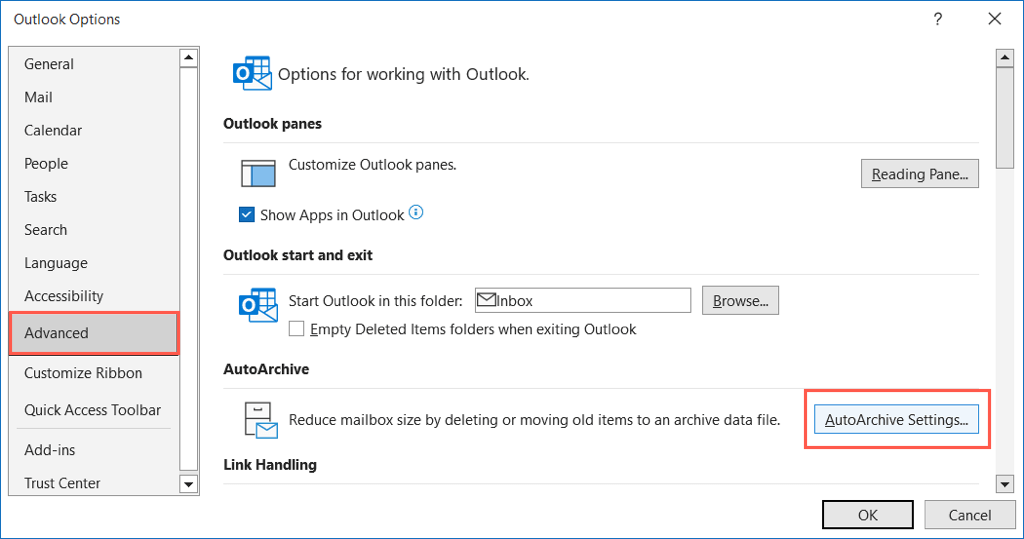
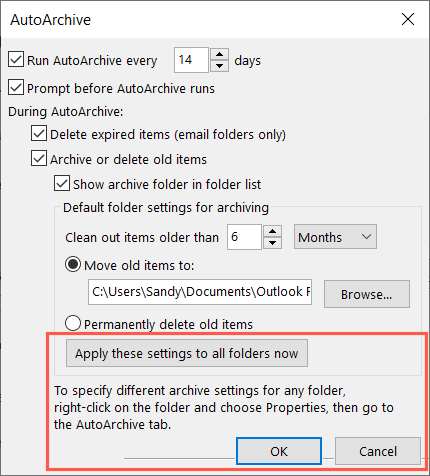
- Select File > Options. Choose Advanced on the left and AutoArchive Settings on the right.
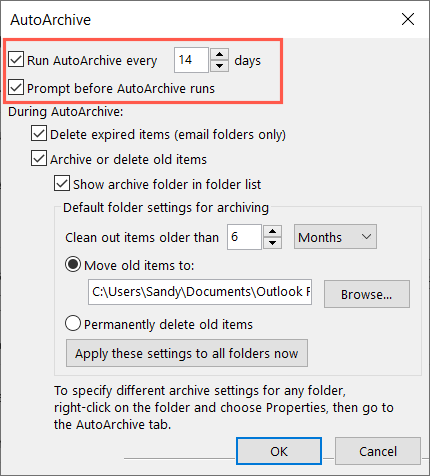
- Check the box at the top for how often you want to run AutoArchive and enter the timing in the box. Optionally, you can mark the checkbox to be prompted before it runs.
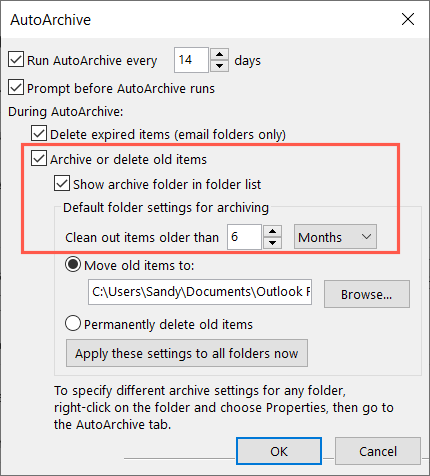
- In the During AutoArchive section, check the box for Archive or delete old items and then pick the age of the emails.
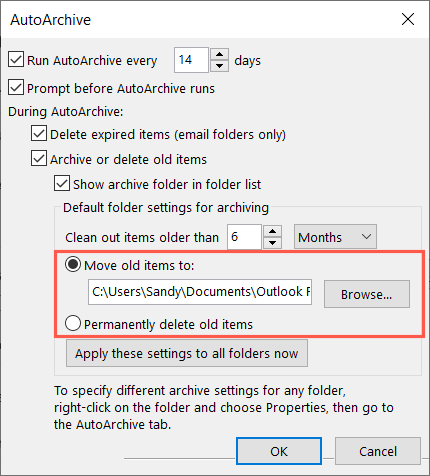
- You can then choose to move the items to the Outlook Data File or permanently delete the items.
- Optionally, select the button to apply the settings to all of your folders and then OK to complete the setup. Choose OK in the Outlook Options window to save your change.
Archive Outlook Emails on Mac
You can manually and automatically archive emails in Outlook on Mac, although a bit differently than on Windows.
Manually Archive Emails on Mac
You can manually archive one or more emails a few different ways on your Mac.
Start by selecting the email(s) one of these ways:
- For a single email, simply select it.
- For a group of adjacent emails, choose the first one, hold Shift, and choose the last one in the range.
- For a group of non-adjacent emails, choose one, hold Command, and choose each additional one.
Once you have the email(s) selected that you want to archive, do one of the following:
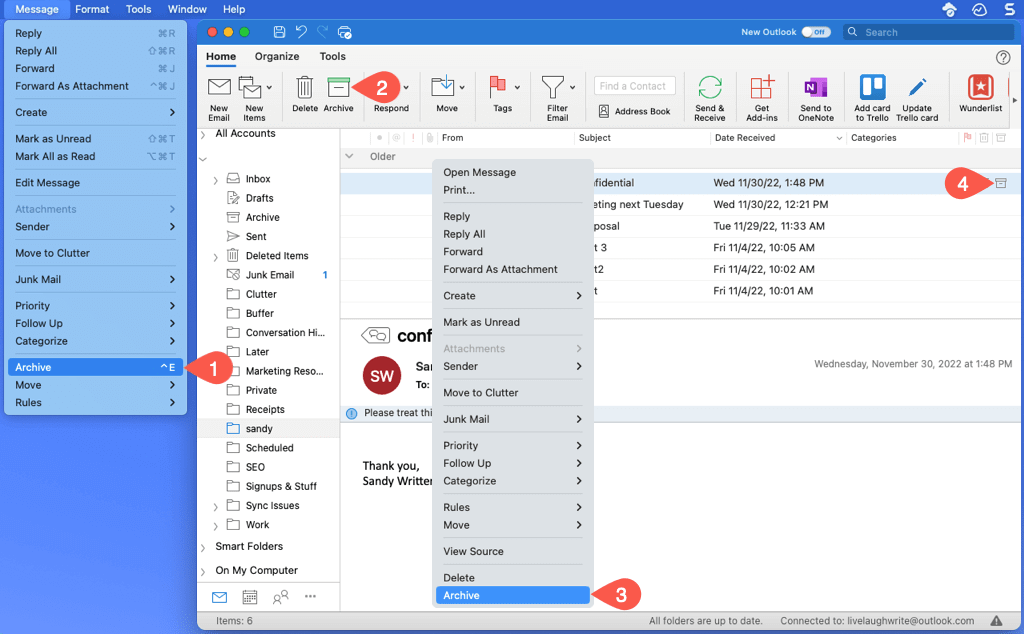
- Select Message > Archive in the menu bar.
- Choose Archive in the ribbon on the Home tab.
- Right-click and pick Archive.
- Select the Archive button (box) to the right in the inbox.
- Use the keyboard shortcut Control + E.
Automatically Archive Emails on Mac
While there isn’t an automatic archive option in Outlook on Mac, there is a workaround that may suit you. You can set up a rule to archive specific emails based on date.
- Open Outlook and select Outlook > Settings from the menu bar.
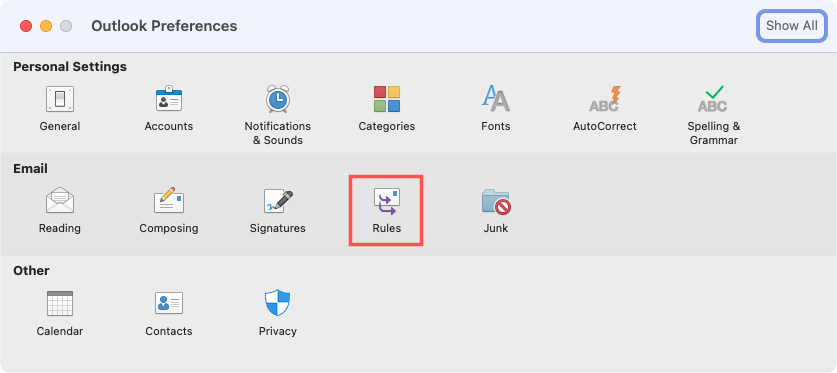
- Choose Rules in the window that appears.
- On the left of the next screen, pick an account if you have more than one.
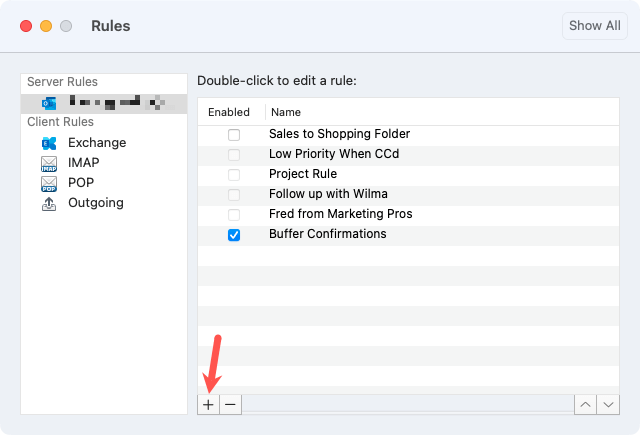
- On the right, select the plus sign button at the bottom to add a new rule.
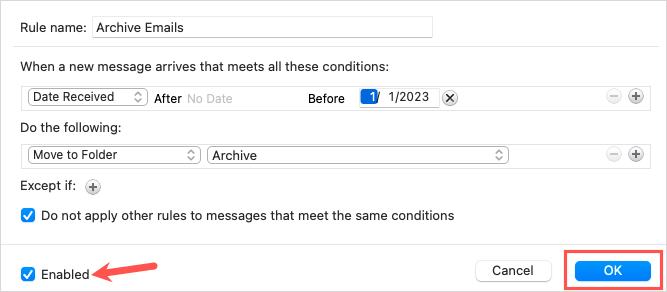
- Enter a Rule name at the top.
- For the condition, use the drop-down box on the left to pick the type of condition. You can select Date Received to base your rule on date. To the right, enter a date range or simply use the Before date field to enter a date in the past.
Note: Keep in mind that as time passes, you may want to update this rule to include a new date.
- For the action, choose Move to Folder in the first drop-down box and pick Archive in the list to the right.
- Optionally, use the plus sign next to Except if for emails the rule should avoid or check the box below to ignore other rules that meet the same conditions.
- Confirm that the Enabled box is checked and select OK to save your rule.
Archive Outlook Emails on the Web
Archiving emails in Outlook on the web is similar to the desktop versions.
Manually Archive Emails on the Web
- For a single email, select it or check the box on the left.
- For a group of adjacent emails, choose the first one, hold Shift, and choose the last one in the range.
- For a group of non-adjacent emails, choose one, hold Ctrl (Windows) or Command (Mac), and choose each additional one.
Once you have the email(s) selected that you want to archive, do one of the following:
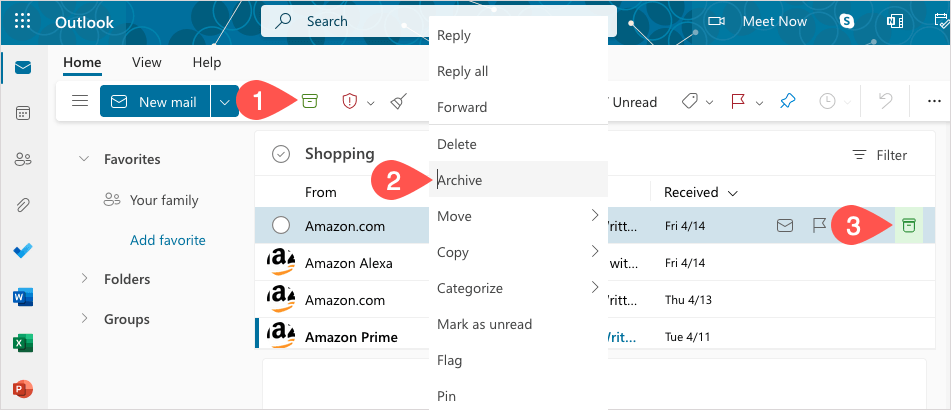
- Choose Archive in the toolbar on the Home tab.
- Right-click and pick Archive.
- Select the Archive button (box) to the right in the inbox.
Automatically Archive Emails on the Web
Like on Mac, there isn’t currently an AutoArchive feature in Outlook on the web. Instead, you can set up a date-based rule.
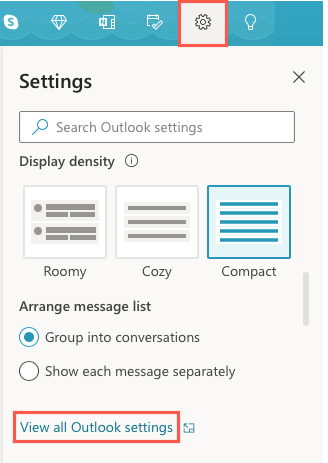
- Select the gear icon on the top right and choose View all Outlook settings in the sidebar that appears.
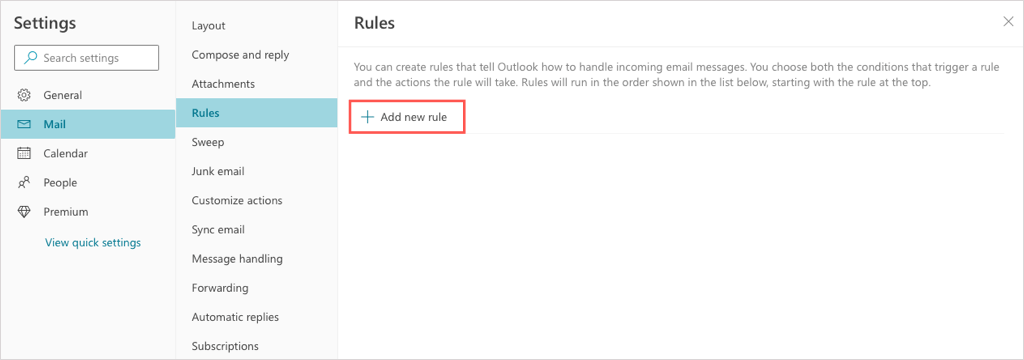
- On the far left, choose Mail and to the right, choose Rules. Then, pick Add new rule.
- Give your rule a name at the top.
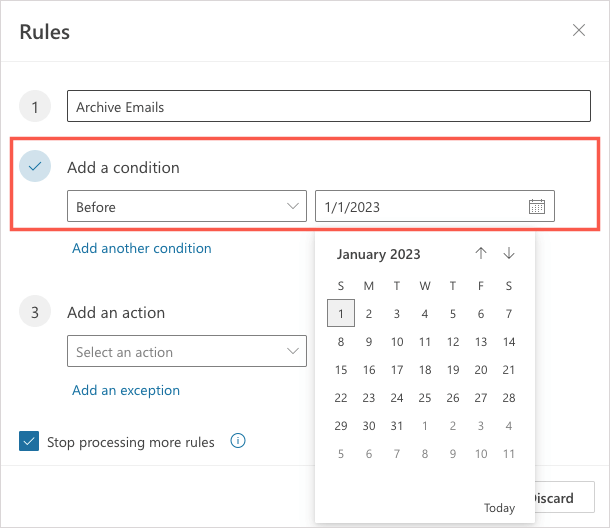
- Below Add a condition, use the drop-down list to pick Before. Then, add the date to the right.
Note: Like on Mac, you may want to update this rule later to include a new date.
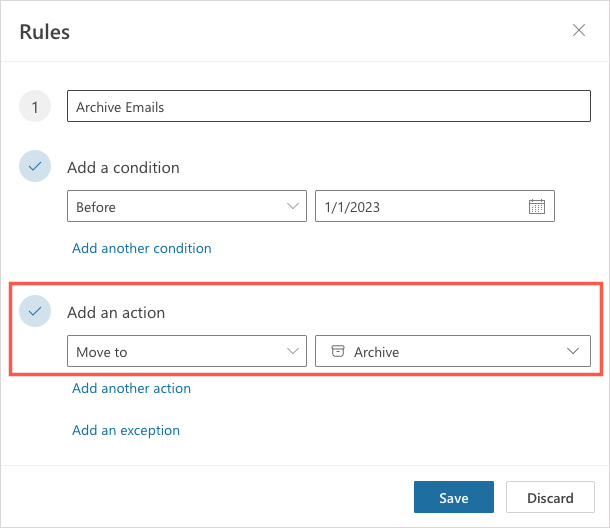
- Below Add an action, use the drop-down list to pick Move to. Then, select Archive to the right.
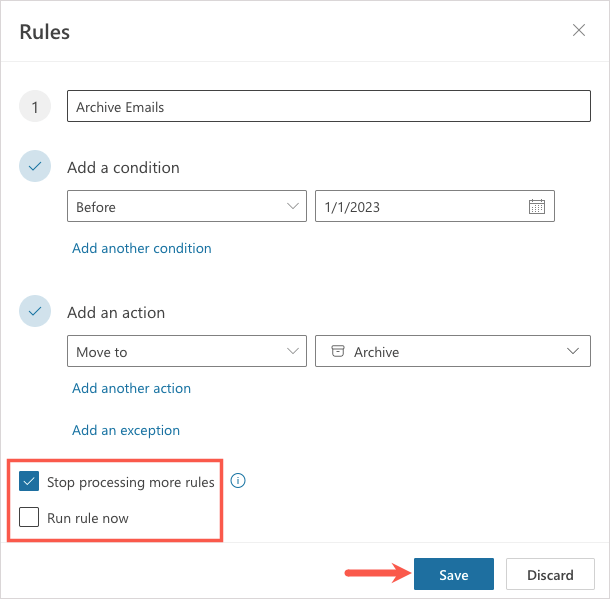
- Optionally, select Add an exception for emails the rule should avoid and check the box to stop processing more rules.
- To run the rule immediately in your inbox, mark the checkbox for Run rule now. Then, select Save.
Archive Outlook Emails on Android and iPhone
If you use Outlook on your Android device or iPhone, you can archive emails there as well. At this time, there isn’t an AutoArchive feature, but you have a few ways to archive emails manually.
To archive a single email, you can use the swipe action. Slide the email from left to right or vice versa per your setup and select the Archive icon. Alternatively, open the email and tap the Archive icon at the top.
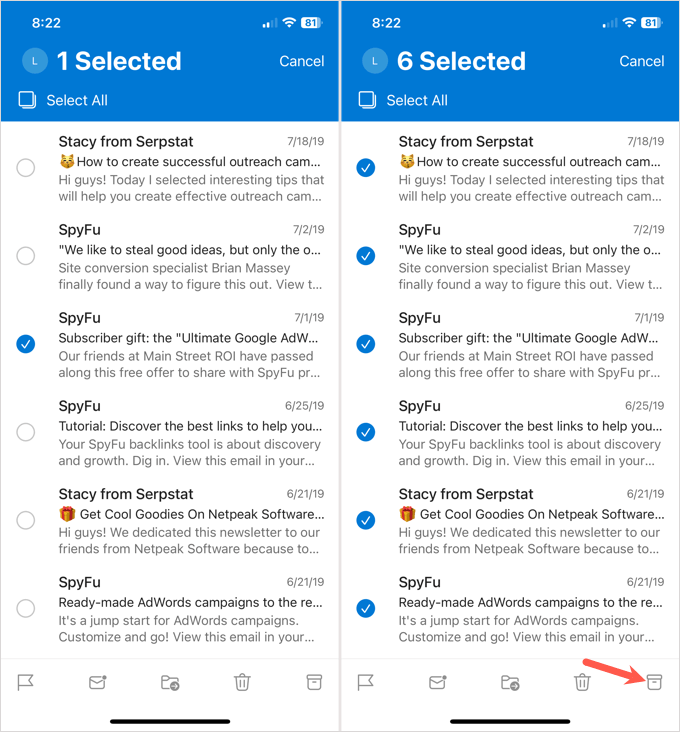
To archive several emails in your inbox, tap and hold one email and you’ll see the selection screen. Choose the remaining emails and then tap the Archive icon at the top (Android) or bottom (iPhone).
Taking care of those unneeded old emails is easy in Outlook on Windows, Mac, the web, and your mobile device. Now that you know how to archive emails in Outlook, check out ways to fix Outlook not opening.
