Crafting the ideal document is essential, whether you’re a student, professional, or simply someone looking to organize your thoughts. Microsoft Word offers numerous formatting options to ensure your content looks clean and polished. One such option is double-spacing, which can make your text easier to read.
Microsoft Word makes adjusting line spacing simple and provides several ways to get the job done. Even better, you can set double-spacing as the default format for all future documents.
Which Writing Styles Require Double-Spaced Text?
Double-spacing is often required in various academic and professional writing styles to enhance readability and facilitate editing or annotating. Here are some of the more prominent writing styles that typically require double spacing.
- American Psychological Association (APA) Style: Commonly used for writing research papers and essays in the social sciences, education, and psychology.
- Modern Language Association (MLA) Style: Widely used for writing papers and citing sources within the liberal arts and humanities.
- Chicago Manual of Style (CMS): Used in various disciplines, including history, literature, and the arts, and often used in book publishing and manuscript preparation.
Regardless, you still need to ask about the specific guidelines for the writing style you are using. Individual institutions, professors, or editors might have their own preferences or requirements regarding line spacing.
Double-Space the Entire Document
You can adjust a setting that double-spaces the entire document, including future edits. Here’s how.
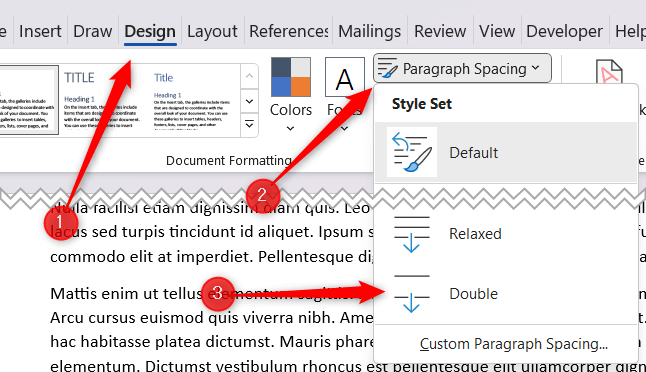
- Open the Word document you want to set to double space, then click the Design tab.
- Click Paragraph Spacing.
- Select Double from the bottom of the drop-down menu.

The document is now set to double space.
Double Space Part of a Document
Sometimes you may only need to double-space part of a document. For example, CMS uses double-spacing for the main text, but footnotes and endnotes are generally single-spaced. In this case, you’ll only want to double-space the body of the document.
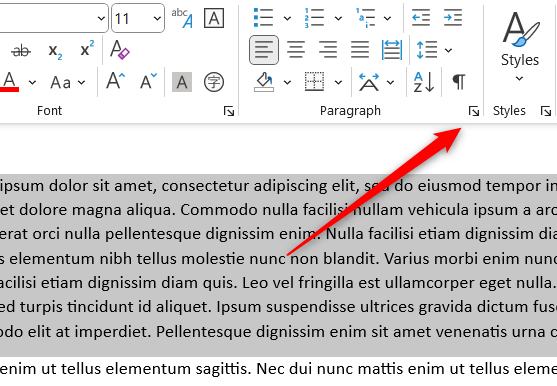
- Open the document and select the text you want to double-space by clicking and dragging your cursor over it.
- Click the Paragraph Settings icon in the Paragraph group of the Home tab. This is the icon in the bottom-right corner of the group.

- The Paragraph window will appear. Click the down arrow under the Line Spacing option in the Spacing group. Select Double from the drop-down menu, and then click OK.
The selected text is now set to double space.
Double Space All or Part of a Document With a Keyboard Shortcut
There’s also a keyboard shortcut that lets you set the spacing to double. First, select the text you want to double space. Then, you can select part of the document by clicking and dragging your mouse over the text, or you can select all the text in the document by pressing Ctrl + A.
Once the text is selected, all you have to do is press Ctrl + 2. The text is now set to double space.
Set Double Space as the Default Line Spacing
If most of the documents you create in Word are going to be set to double space, then you can set double space as the default line spacing instead of setting it with each document individually.
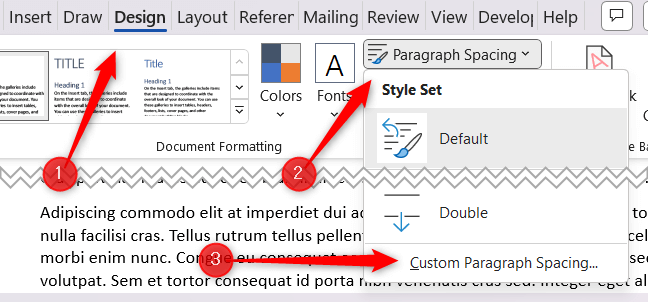
- Open Word and click the Design tab.
- Select Paragraph Spacing > Custom Paragraph Spacing.

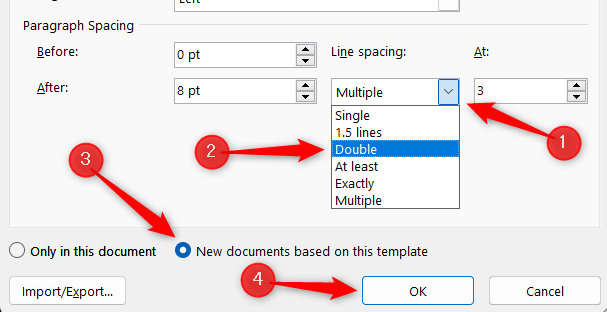
- The Manage Style window will appear. Choose Double under Line Spacing.
- Select the bubble next to New documents based on this template, and then select OK.

All future documents will be set to double space.
Related Posts
Marshall is a technical writer based in Tokyo, Japan. His bylines are found on VGKAMI, How-To Geek, PCWorld, Zapier, and many other online magazines. Read Marshall’s Full Bio

