Google Docs is one of the best ways to create and share documents for all purposes, and one of the main reasons for such is that it allows a wide range of formatting capabilities. If there’s something worth inserting in your document to organize it or convey your message better, Google Docs probably supports it.

However, some of Google Docs’ formatting options can be a little tricky for new users. Not all of the options jump out at you, and you may find it difficult to get your document looking exactly as you want it.
Although you can split a document into columns with Google Docs, you may find it easier to simply create a table for this same purpose. However, table borders can sometimes look harsh and unsightly. Luckily, there’s a way to remove table borders in Google Docs.
How To Remove Table Borders In Google Docs
Laying out text in Google Docs using a table with hidden borders is a great substitution to other complex formatting options. Let’s go over how to achieve this, step by step.
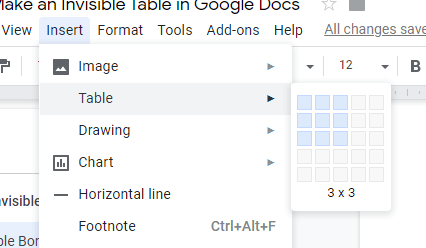
- To create your table, click on the Insert menu and hover your cursor over Table. Here, a menu will slide out that allows you to set the dimensions of your table.

- Once you’ve selected your desired column and row dimensions, click to confirm, and you should then see a table with solid black borders inserted within your document.
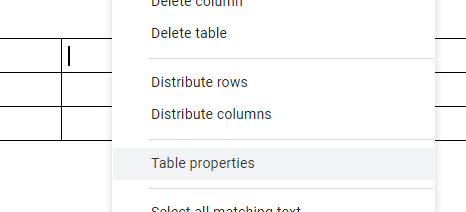
- From here, the Table options under the Format menu mostly have to do with adjusting or deleting your rows, columns, or the entire table. However, there is a Table properties option that’s easy to overlook.

- You can also find this option if you right-click on a table you’ve inserted in the document. All options, including Table properties, will be in that context menu.

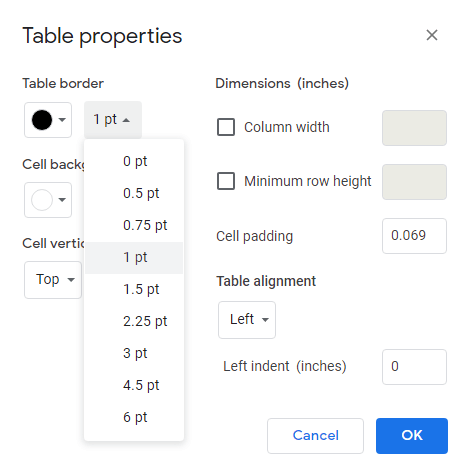
Clicking on the option, a screen with your table’s properties will come up. These properties include the table’s border, which you can change by both color and thickness.
While many people will achieve creating an invisible table by setting the border color to white, this is not the best practice. If something were to happen where the document’s background color was changed, you’d look a bit amateurish.
Instead, change the border thickness to 0 pt. This will completely remove your table’s borders, allowing you to use its cells to better organize your text in a way similar to setting up a multi-column page.
If you ever want to undo this change and see the cell boundaries of your table again, just change the border thickness to any other value. The default is 1 pt.
Removing table borders is a great way to format your text in a presentable manner that would otherwise require more complicated document settings. It only takes a matter of seconds, so do consider it if you ever require text confined to multiple rows or columns.
Related Posts
Craig is a long-time writer, coder, and marketer with years of experience in the technology and gaming spaces. Since 2008, he’s worked remotely with some of the most notable publications in these industries, specializing in Windows, PC hardware and software, automation, and the like. Read Craig’s Full Bio
