An expense tracker is vital if you’re budgeting or you need to know where your money is going. Google Forms is a free form builder that works great as an expense tracker.
Google Forms is heavily customizable, so while it can also be used as a survey, RSVP tool, contact form, product signup sheet, or any other question/answer form, you can make it into a custom expense tracker by choosing expense-related questions.
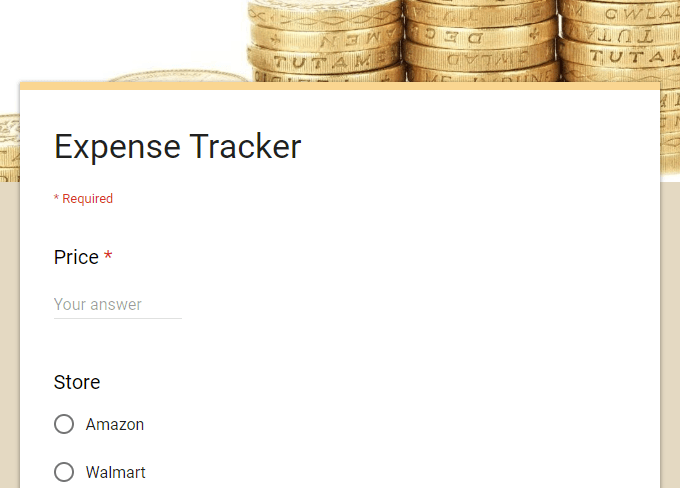
A Google Forms expense tracker can keep tabs on anything you want regarding a transaction, and since it works great from a phone, you’ll have it with you wherever you go.
You can stop saving receipts or trying to decipher a charge on your credit card; just pull up your expense tracker right after you spend money to record all the important details and submit it to a spreadsheet you can review later.
Tip: See our list of the best budgeting and expense tracking apps for some other ways to track expenses. They’re not as customizable as Google Forms but they do have their own benefits.
Decide What To Track
The idea of an expense tracker is to keep tabs on what you’re spending your money on, so there are a few basic details that the form needs to include. But depending on what you’re wanting to track, you might need some extra fields in the form.
Here are some examples of what you might want to track:
- Price: How much is this transaction?
- Store: Where are you spending the money?
- Description: What are you spending money on?
- Category: What type of purchase is it (entertainment, food, bill, etc.)?
- Payment method used: How are you paying for it (which card/bank/app)?
- Who ran the expense: If there are multiple people using the form
- Notes: Any extra notes you need to make?
When deciding what to include in a Google Forms expense tracker, keep in mind that you want the fields to be as broad as possible so that they can apply to anything you’re purchasing. You don’t necessarily need a field that asks what kind of food you’re buying, for example, unless this is solely a food expense tracker; you might want to also use this for recording rent payment and phone bills.
On that note, you can make any of the fields in your expense tracker form required or not required. So, if you do want a really specific field for something, just make it not required so that you don’t have to use it for every transaction.
Build The Google Forms Expense Tracker
This is a sample expense tracker, so yours, by no means, needs to look exactly like this one. We’re using broad questions with even broader answer options to show how this works. You’ll learn that editing the form is extremely easy, so you shouldn’t have any problem customizing it for yourself.
- Open Google Forms.
- Select Blank to start a new form.
- Rename your form to something recognizable.
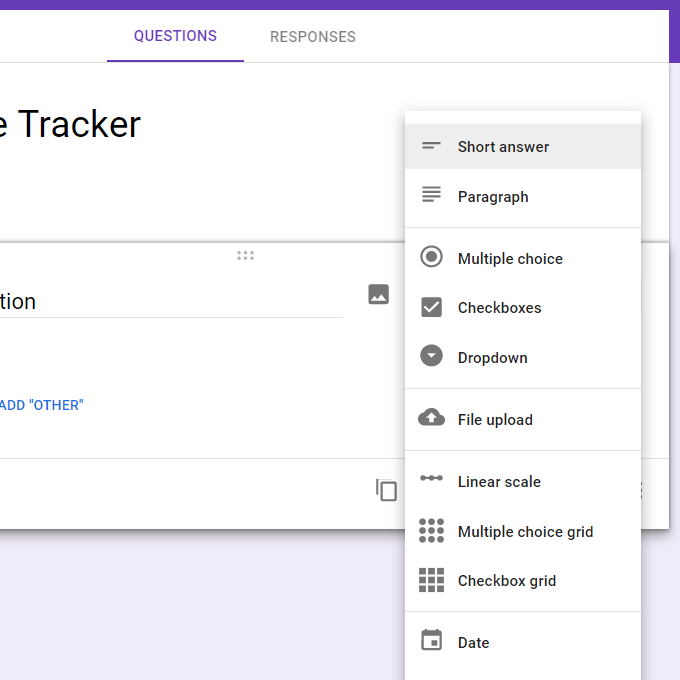
- Select the first box and change it to Short answer.
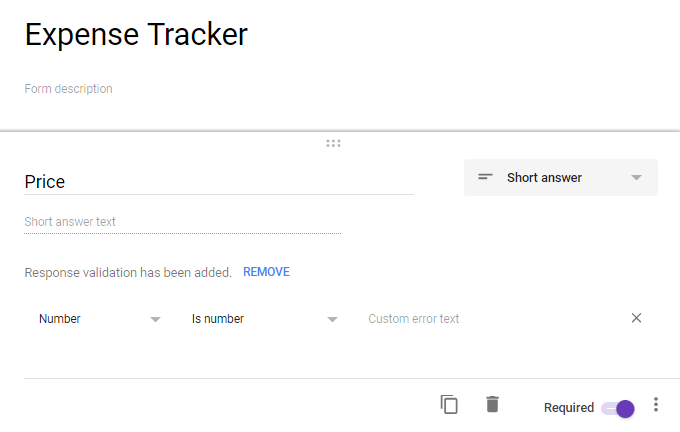
- Name this one Price, confirm that Is number is shown, and then mark the Required button.
- Use the plus sign from the menu off to the right to add a new question, but this time choose Multiple choice.
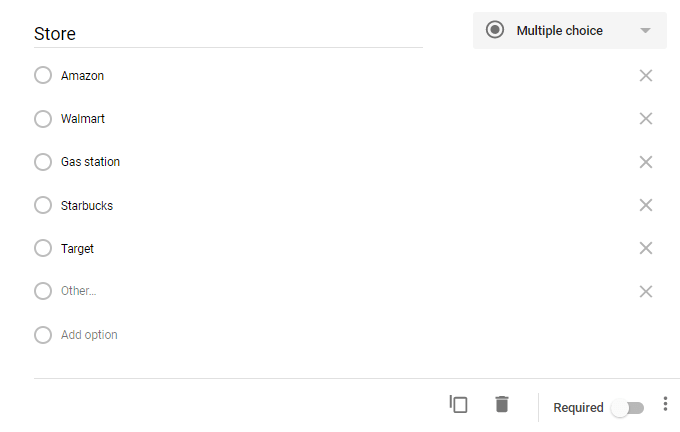
- Name this one Store, and then fill out the answer options with the usual stores you shop at. Other is added by default, so if you end up making a purchase from a different store, you can type it in there.
- Continue through the form making all the different questions you want to ask yourself each time you buy something. Use the suggestions above, like the payment method and description question, to provide yourself with as much detail as possible. This will come in handy later when we interpret all the results from the form.
- Use the preview button (the eye icon) at the top of Google Forms to get the URL to your form. You can share this with anyone you want to use the form with, or send it to yourself so that it’s easily accessible from your phone.
This isn’t necessary, but your form can also include images, headings, and a unique color scheme. A colorful form might make tracking expenses fun, if that’s at all possible! The paint icon at the top of the page is where you go for those changes.
Set Up Calculations
Every entry from your form is gathered in a nicely formatted spreadsheet at Google Sheets. Select RESPONSES from the top of your form and then click the spreadsheet icon to rename the spreadsheet (if you want).
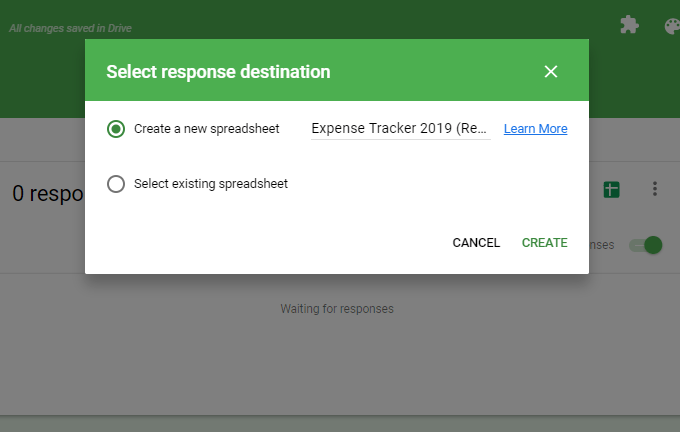
After the spreadsheet opens, create a new tab at the bottom and name it something like Calculations.
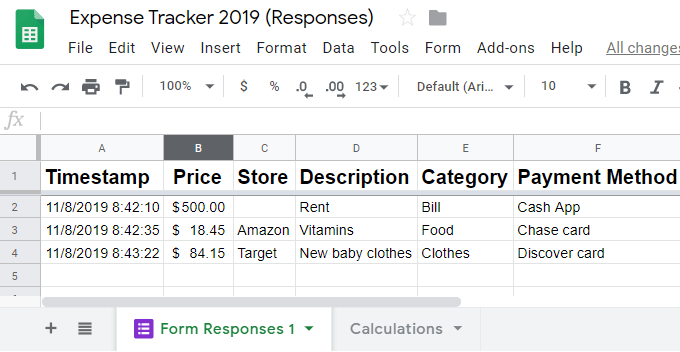
From there, you can do anything that Google Sheets supports: add up all your expenses for a given time period, create graphs for a visual understanding of your expenses, see who’s spending the most money, identify which stores are costing you the most, etc.
Using those types of formulas in Google Sheets is out of the scope of this article, but let’s look at something really simple like adding up all the expenses for each person so that we can really see who’s spending the most. You can always adapt the formula to total how much you’re spending at each store.
The easiest way to total all the expenses regardless of the person who did the transaction, is to run the sum formula, like this:
=sum(‘Form Responses 1’!B:B)
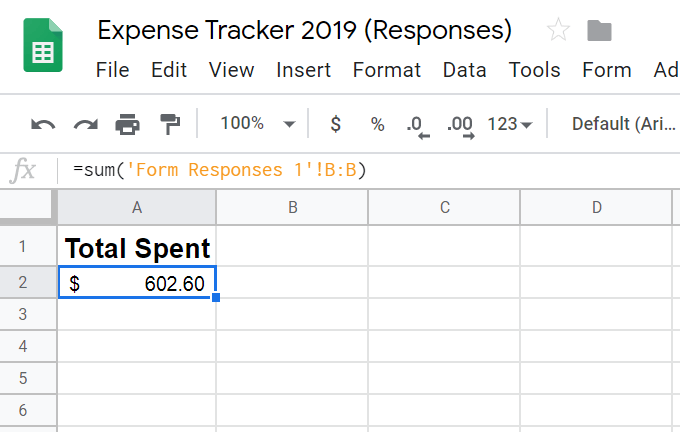
This calculation works for our example because the price column from the form responses is in column B.
Here’s a Google Sheets formula that shows a much more detailed look at how much each person is spending:
=sumif(‘Form Responses 1′!G:G,”Jeff”,’Form Responses 1’!B:B)
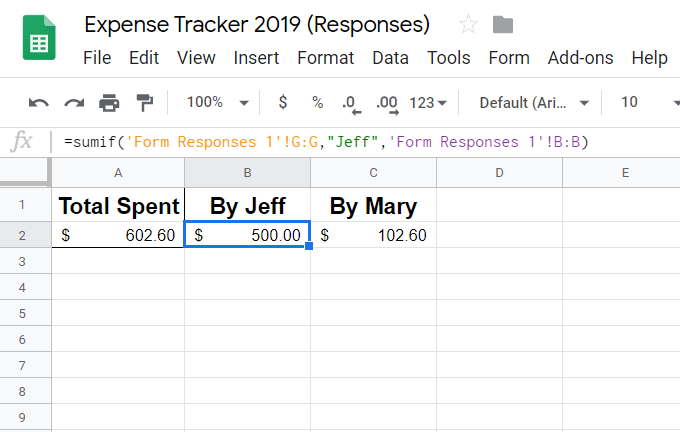
The way this works is by entering sumif and then choosing the column that contains the names (G in our example). The next part is identifying the name, Jeff. Finally, select the column heading with the prices so that when the other column matches the name we’re after, it will add just those prices.
Look through Google’s list of Google Sheets functions for some other ways to can interpret the data from your form. Another way to see your expenses is with a chart or graph; Google has a tutorial on doing that.
Related Posts
- How to Repair a Corrupted User Profile in Windows 11
- Preparing for Windows 10 End of Support: Upgrading to Windows 11
- How to Access and Change Your WiFi Router Settings (2025 Edition)
- How to Install the Latest Large Language Models (LLMs) Locally on Your Mac
- How to Find Circular References in Microsoft Excel