There are plenty of apps out there for managing projects and teams, from Kanban boards to collaboration applications. If you already use Microsoft Office, you can take advantage of many built-in features to keep yourself and your team organized in Outlook.
You can color-code emails and turn messages into tasks when project planning. If you work with a team, you can create and assign tasks and set up a group. For using these features along with others, here are several suggestions, tips, and steps for using Microsoft Outlook as a project management tool.
Categorize Incoming Emails
One of the simplest but most helpful features you can use when managing a project is color-coding your emails. Once you set up categories Outlook, you can assign them to emails which makes them stand out in your inbox. Additionally, you can create rules to automatically assign categories if you like.
You can create categories for what makes the most sense. Some suggestions include a category for each project, client, or department.
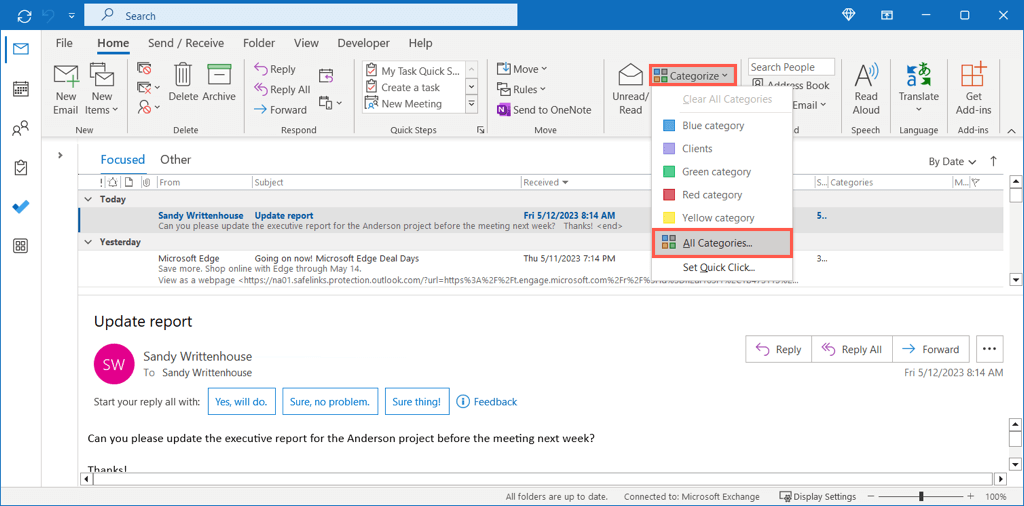
- Head to Outlook’s Home tab and open the Categorize menu in the Tags group. Then, choose All Categories.
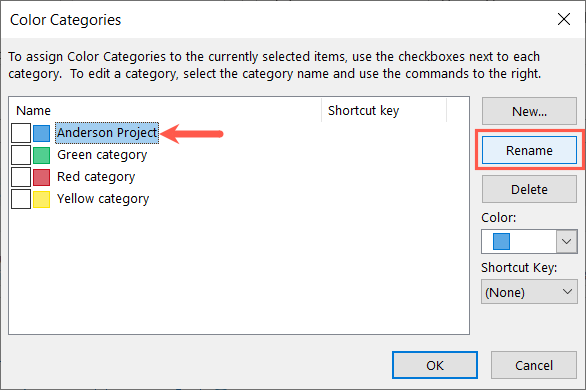
- You’ll notice several pre-made categories which are simply the colors as the category names. You can edit one of these to use a more meaningful name. Select a category, choose Rename on the right, enter the new name, and use Enter to save it.
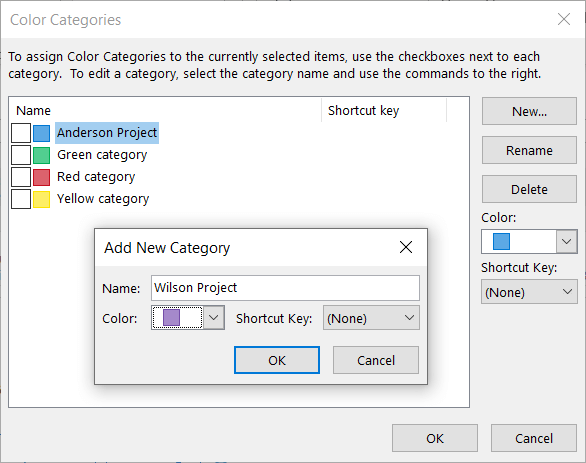
- To create a new category, choose New on the right. Enter a name, pick a color, optionally add a shortcut key, and use OK to save it.
To assign a category to an email, do one of the following:
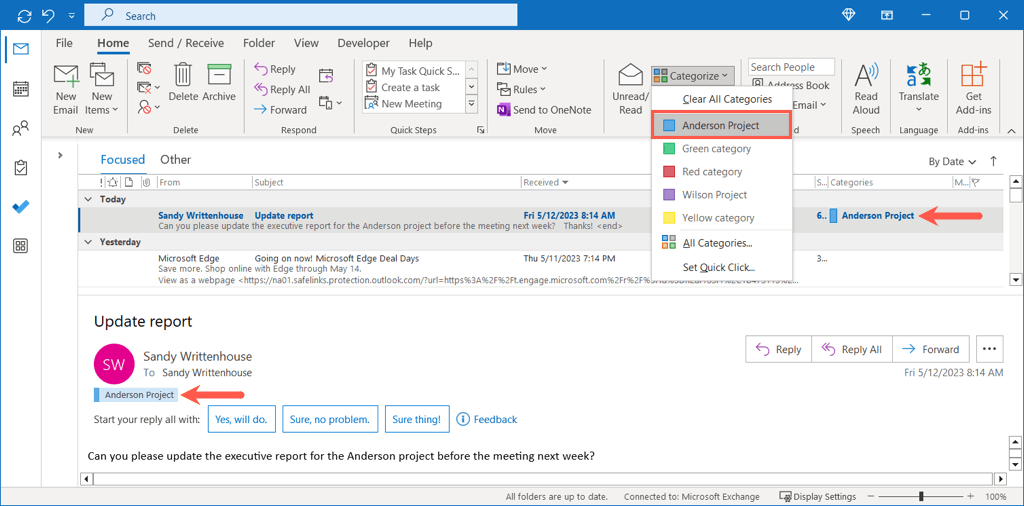
- Choose Categorize on the Home tab and pick the one you want to use.
- Right-click, move to Categorize, and pick one in the pop-out menu.
You’ll then see the category next to the email in your inbox as well as on top of the message in its own window.
Turn Emails Into Tasks
An especially helpful way to manage a project in Outlook is by turning emails into tasks. You may receive a request to update the project status for your stakeholders or send documents to a team member. By placing that message on your task list, you’ll have it at your fingertips to complete.
To quickly turn an email into a task, just do one of the following:
- Right-click the message in your inbox, go down to Move, and pick the task folder in the pop-out menu.
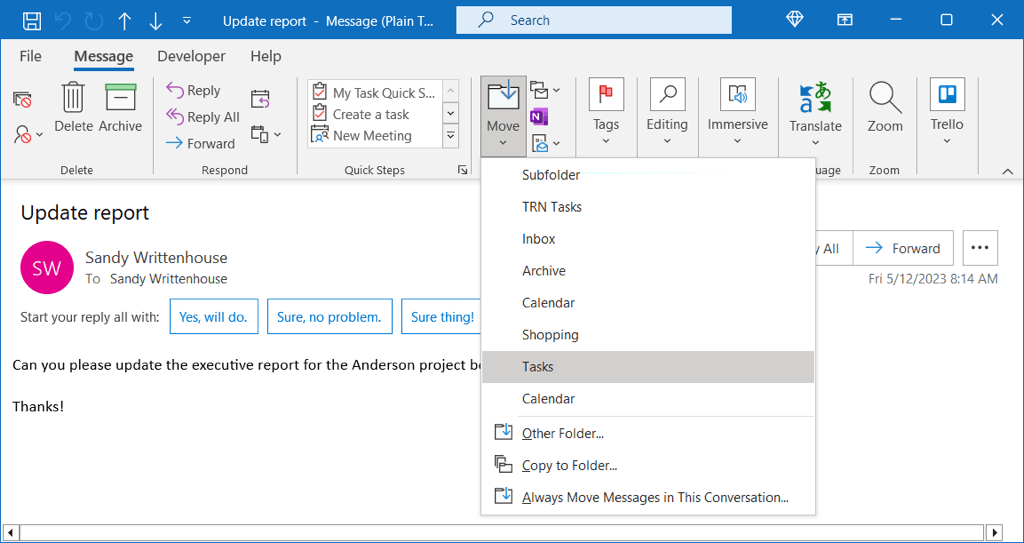
- In the message window, select Move in the ribbon and use the Move drop-down menu to pick the task folder.
- Drag the message from your inbox to the Tasks icon in the left-hand navigation.
For additional options when turning an email into a task, you can use this next method instead.
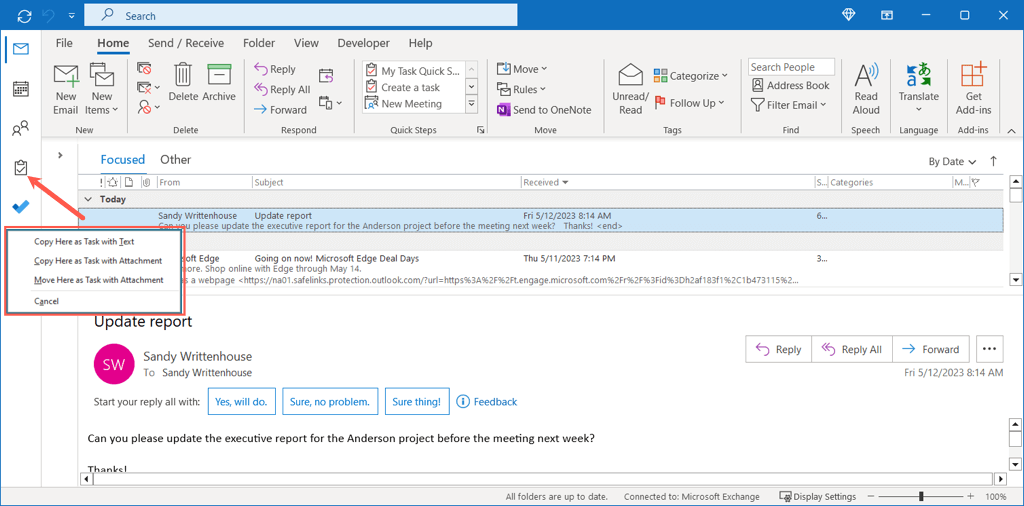
- Hold your right-mouse button as you select the email and then drag it to the Tasks icon on the left and release.
- You’ll see options appear for copying the email as a task with text, copying it as a task with the email as an attachment, or moving the email as a task with an attachment.
- Pick one of those options and you’re set. You can also pick Cancel if you change your mind.
Then, select the Outlook Tasks icon anytime to view your to-do list.
Create and Assign Tasks
Along with turning emails into to-dos for yourself, you can create tasks and assign them in Outlook. This is convenient if you decide to delegate a task rather than tackle it yourself or if you want to receive status reports for the task which can be sent with a click.
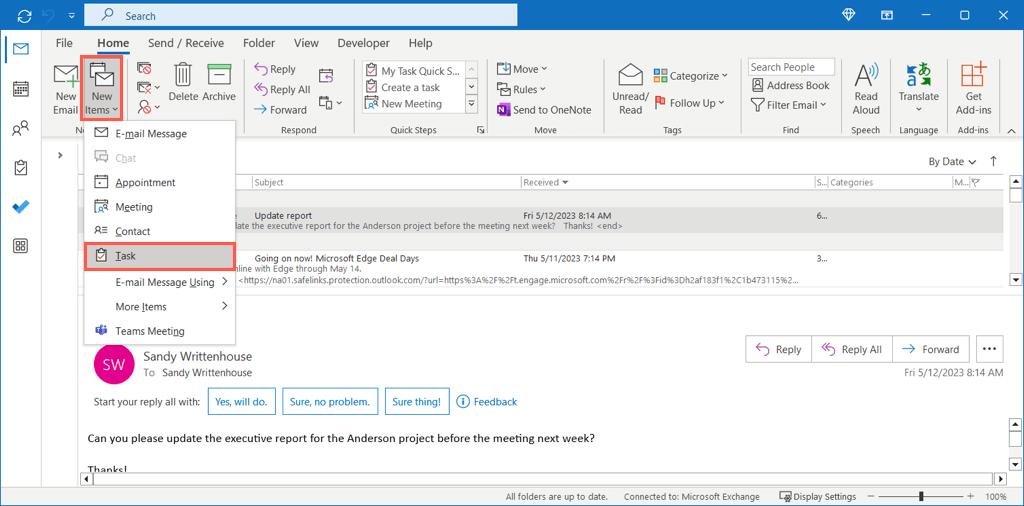
- Select the Tasks icon on the left or New Items > Task on the Home tab and create a new task as you normally would. Alternatively, you can use the steps above to turn an email into a task.
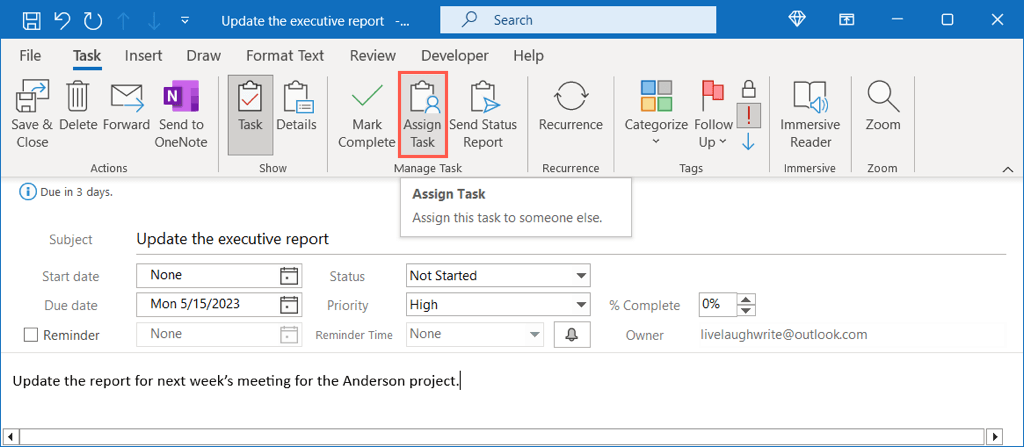
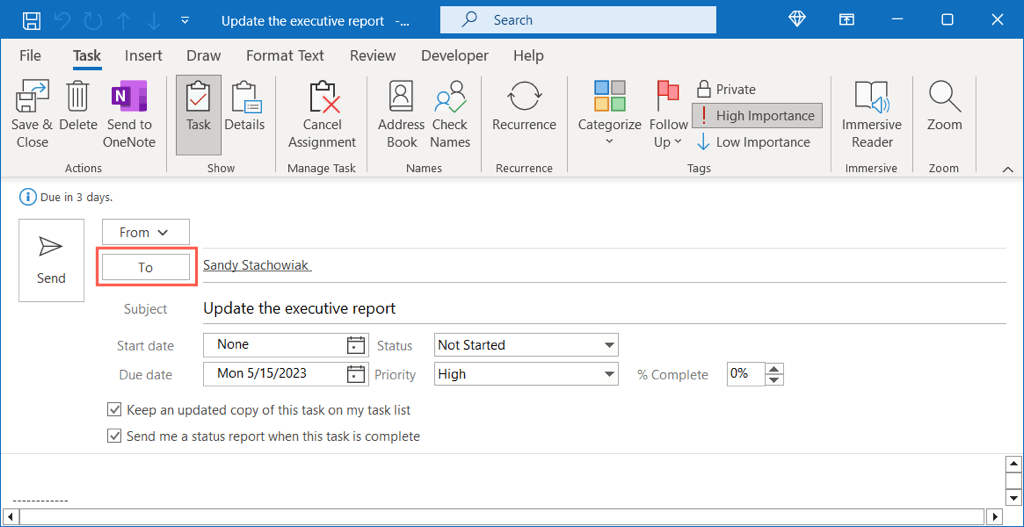
- Complete all of the task details including Subject, Start and Due date, Priority, and the details. When you’re ready, go to the Task tab and choose Assign Task in the Manage Task section of the ribbon.
- This refreshes the task window to include a To line for adding the assignee. Enter their name or email address or use the To button to choose them from your address book.
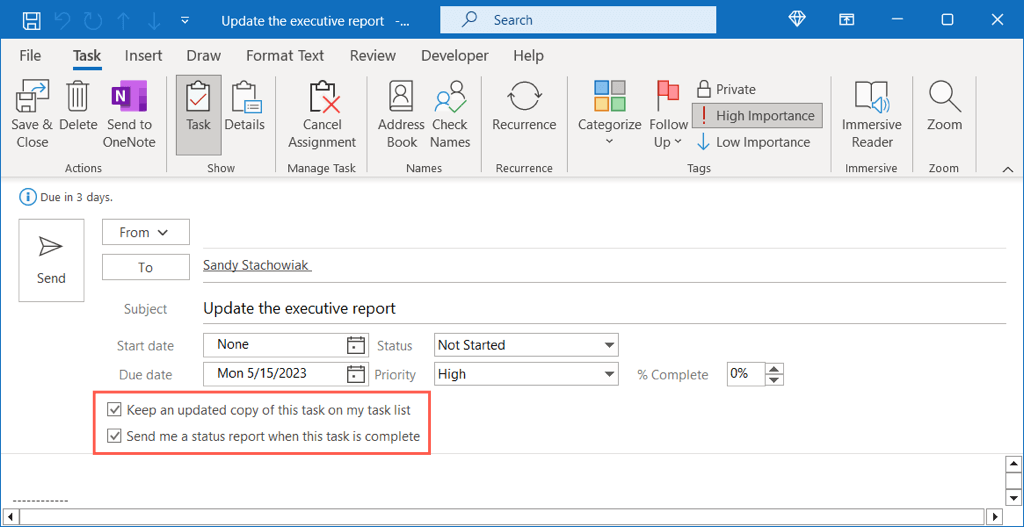
- Optionally, you can check the boxes to keep an updated copy of the task in your list and receive a status report when the task is complete.
- After everything is complete, select Send to send the task to the assignee.
When they receive the task via email, they simply add it to their own task list.
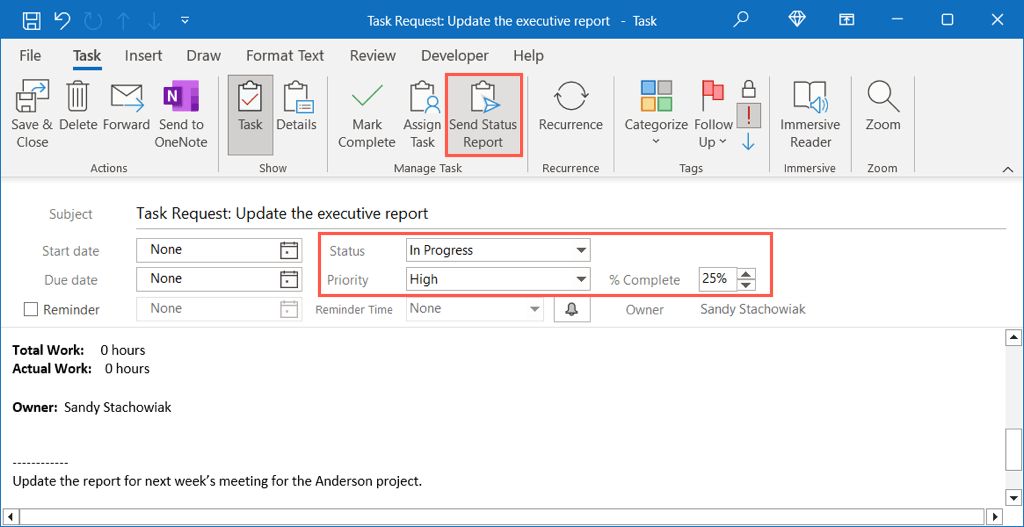
They can use the Status and Percent Complete fields on the task as they progress through it and can select Send Status Report on the Task tab to provide you with an updated status via email.
Set Up a Contact Group
When you’re working with a team, creating a distribution list, or contact group, saves you time. Rather than add every team member to an email, calendar event, or task, you simply add the group.
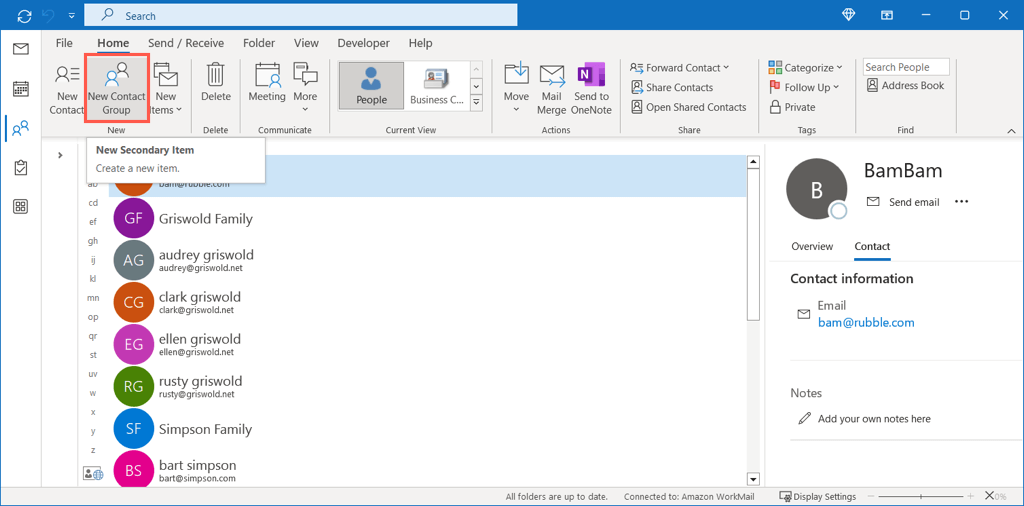
- Select the People icon in the left-hand navigation.
- Go to the Home tab and pick New Contact Group in the New section of the ribbon.
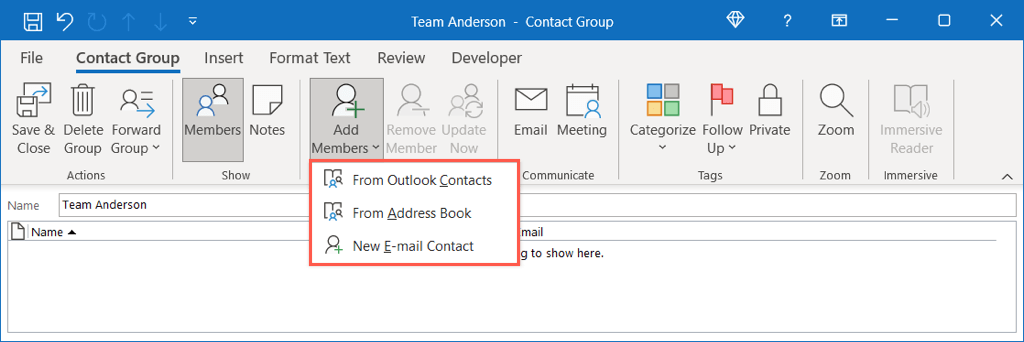
- Enter a group name at the top. Then, choose Add Members in the members section and pick From Outlook Contacts, From Address Book, or New Email Contact.
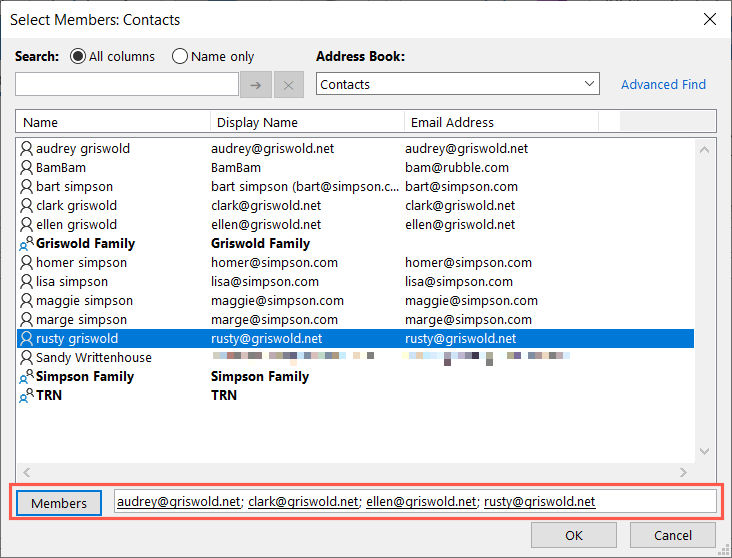
- With the first two options, a new window pops open where you select the contact and use the Members button to add them. Continue this process until you have all members and select OK to save.
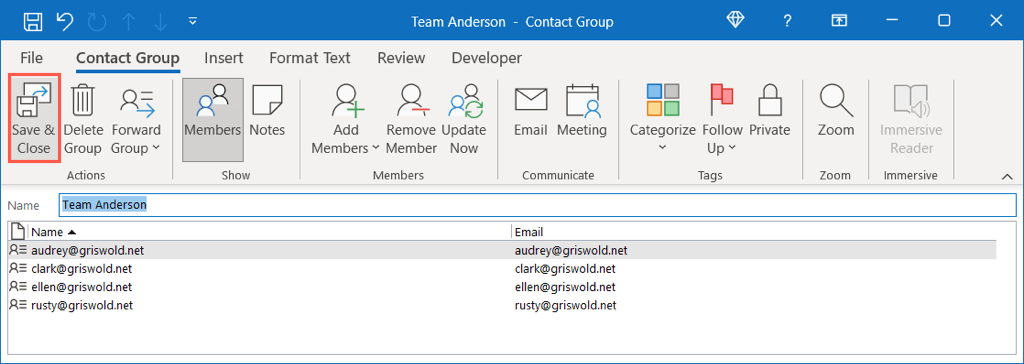
- You’ll then see your group members listed and can add more if necessary. Select Save & Close to complete the process and save the group.
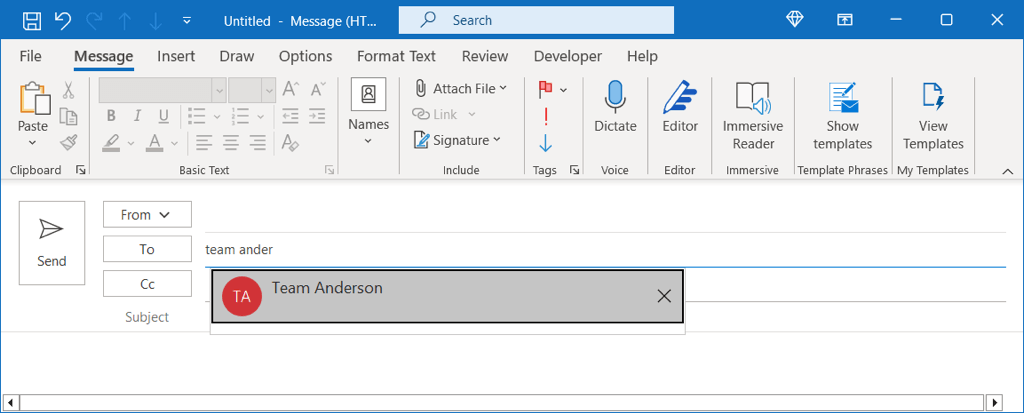
To use the group you created in the address line of an email or as invitees for an event, start typing the name of the group and pick it from the suggestions or use the To button to locate and select the group.
Share a Calendar
While you can set up a specific group calendar in Outlook, you may want to simply share your own calendar. This is helpful for a team member who acts as your backup or co-manager for your projects.
- Select the Calendar icon on the left and then choose the calendar using the Folder Pane.
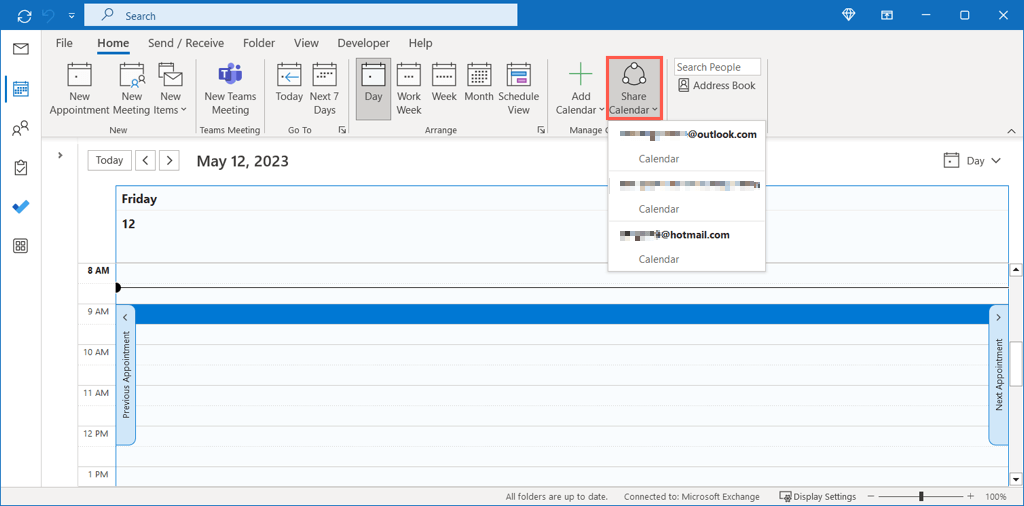
- Go to the Home tab and select Share Calendar in the Manage Calendars group. Pick the calendar.
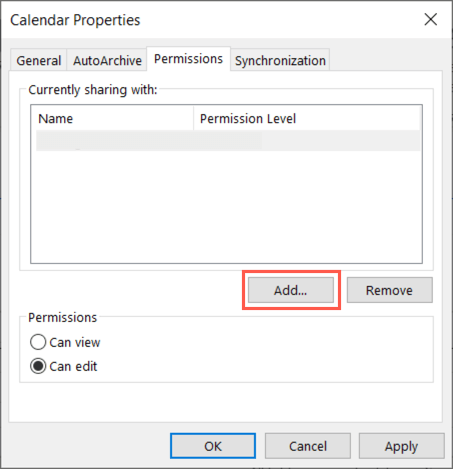
- On the Permissions tab, use the Add button to choose the contact to share with.
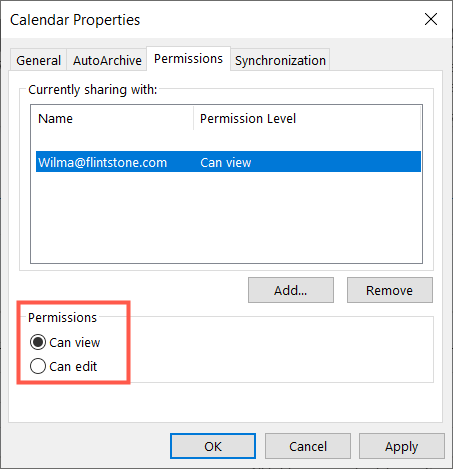
- Locate the contact, select Add, and pick OK. Then, choose either Can View or Can Edit depending on the permissions you want to allow.
- Select Apply and then OK to share your calendar.
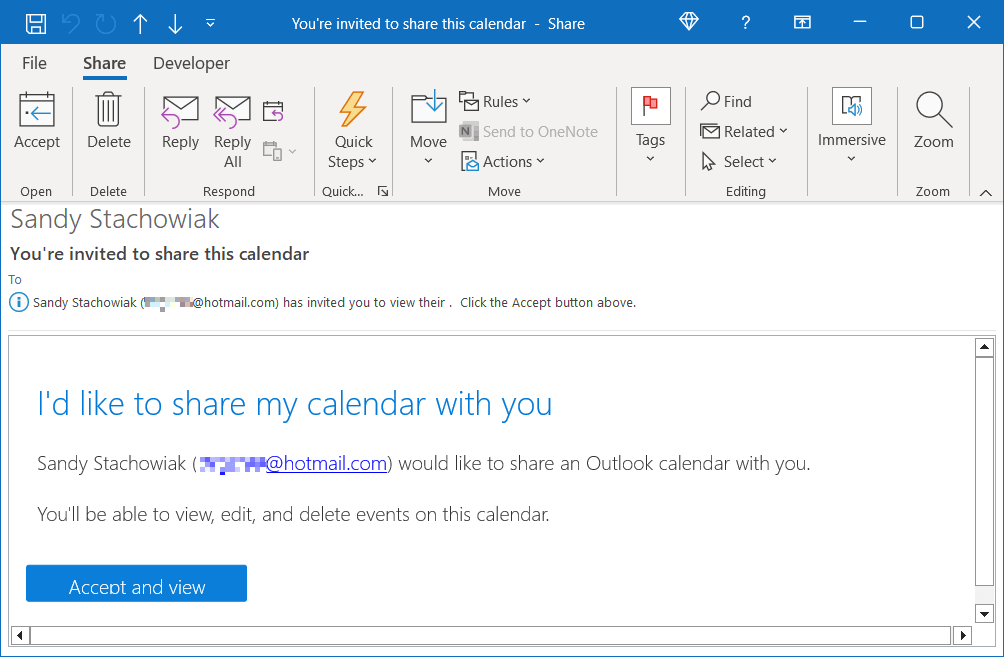
Your recipient should receive an email that you’re sharing a calendar with them. They can accept to see your calendar in their Outlook calendar list.
Manage Your Folders
Folders in Outlook are just like those you use on your computer; they give you simple ways to organize your items. You have a few great ways to manage Outlook folders for your project or team.
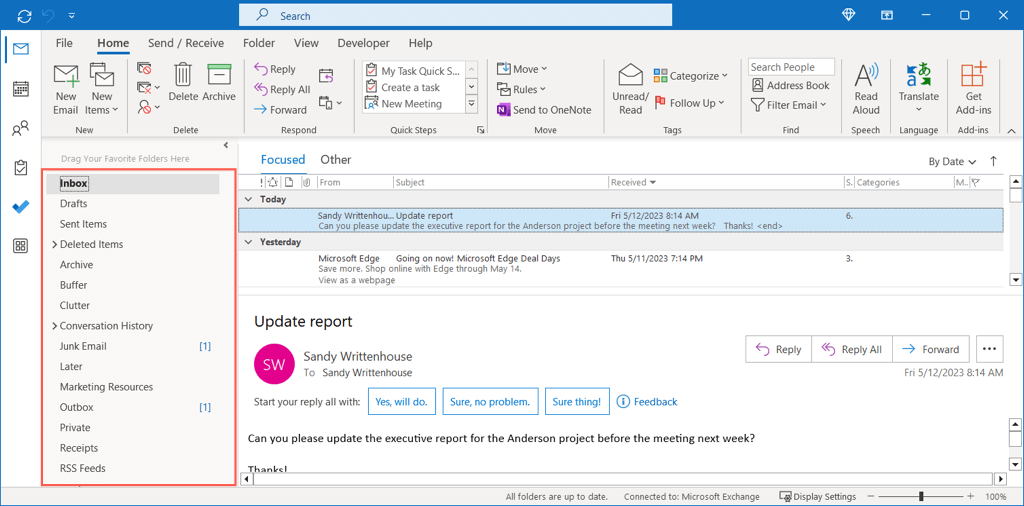
Open the Folder Pane on the left side of your inbox. You can then expand an account, if you have more than one, to view all folders within it.
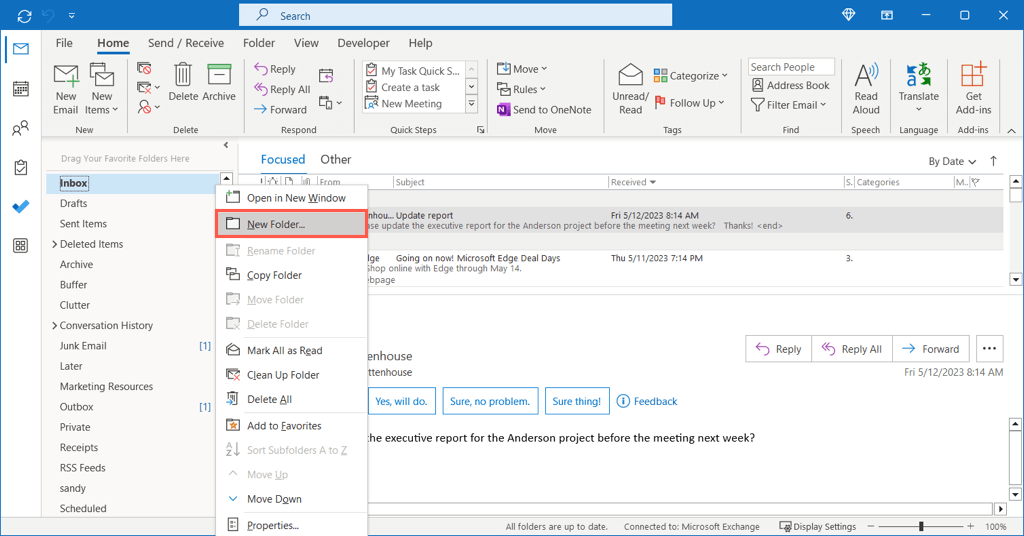
Create a New Parent Folder or Subfolder
Consider creating a folder for each project or one for every client or team member to keep everything organized.
Right-click an account or current folder, choose New Folder, and give it a name.
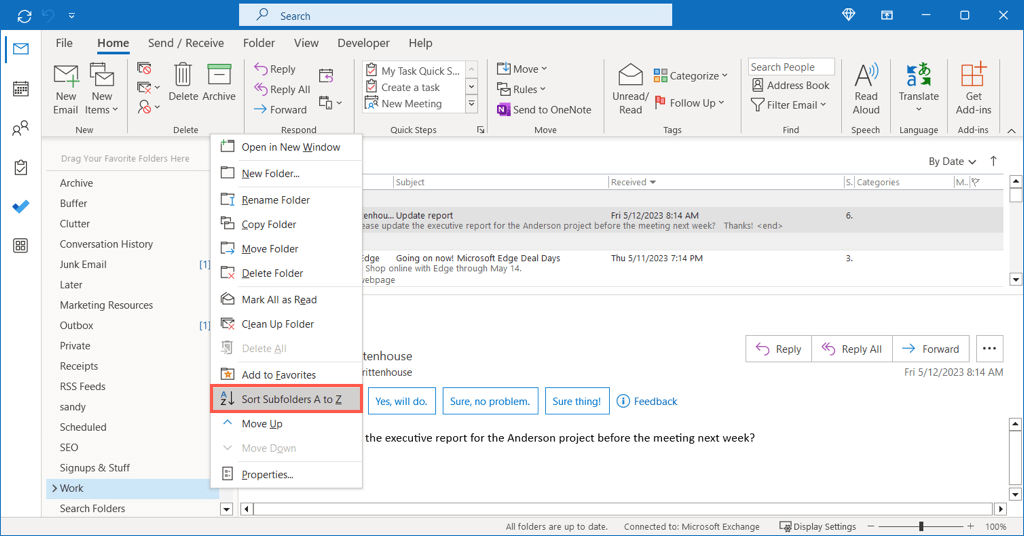
Sort Your Subfolders
If you have a parent folder with many subfolders, you can find the one you need quickly by sorting them. Right-click the parent folder and select Sort Subfolders A to Z.
Add a Folder to Favorites
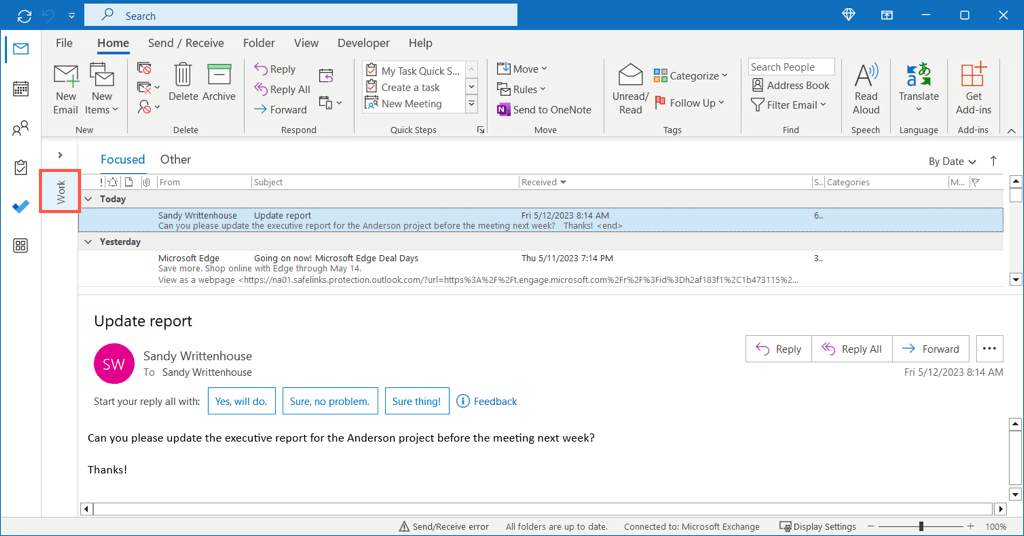
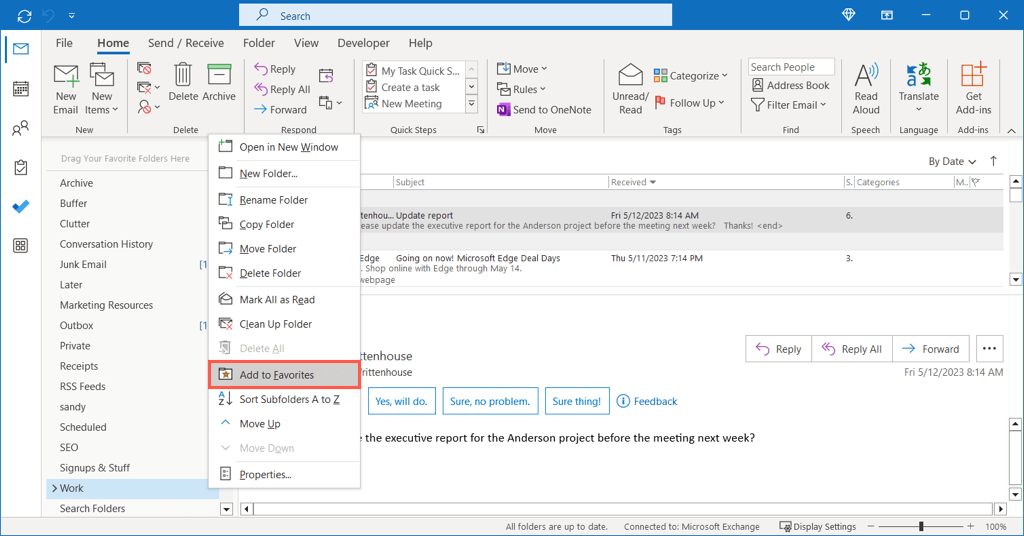
The Favorites section sits at the top of your Folder Pane. When you collapse that pane, you can see your Favorites in the bar along the left. Both of these give you fast access to frequently-used folders.
Either right-click the folder and pick Add to Favorites or drag the folder to the Favorites section at the top of the Folder Pane.
Show the Number of Unread Items
You can display the total number of unread items for a folder right on that folder in the pane. This is handy if you send emails to folders automatically because you can spot new messages quickly.
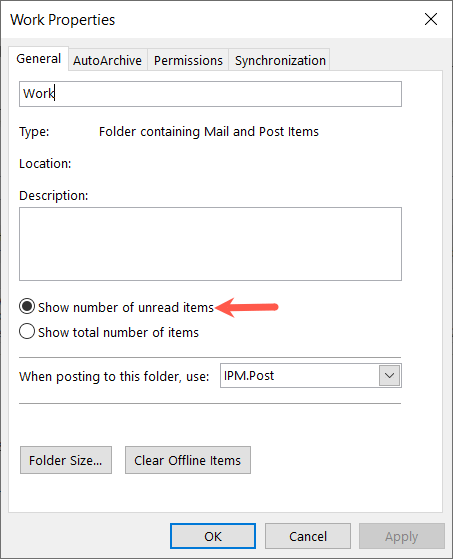
- Right-click the folder and select Properties.
- Open the General tab and choose Show number of unread items.
- Select Apply and OK to save the change.
If you prefer to see all items, choose Show total number of items instead.
Automate Common Actions
As mentioned above, you can perform automatic actions in Outlook. This includes moving emails to folders, forwarding messages, and marking items with importance. Each of these can not only help you stay on top of your inbox but your project or team as well.
Create Outlook Rules
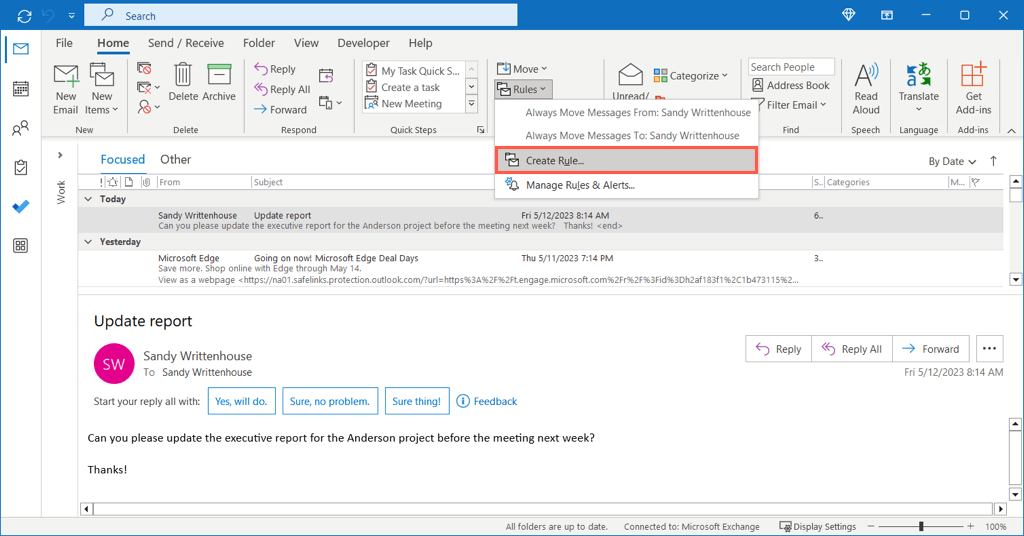
We have a complete guide to creating rules in Outlook on Windows, Mac, and the web you can check out, so here, we’ll look at one example that’s helpful for project management. You can automatically move emails to a folder as mentioned above. Plus, instead of creating the rule from scratch, you can base it on an email you’ve received.
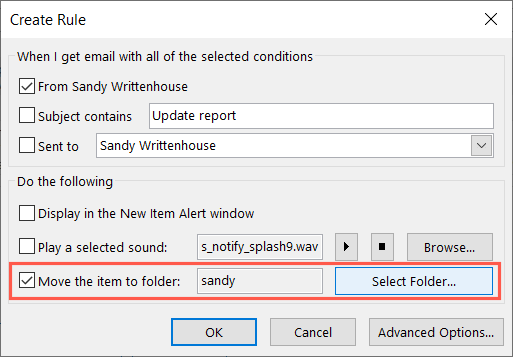
- Select the email and either right-click, move to Rules, and pick Create Rule or choose Rules on the Home tab and pick Create Rule.
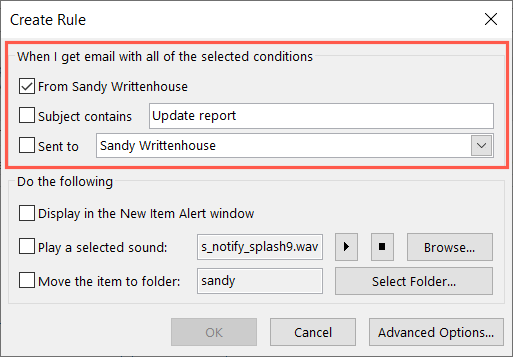
- You’ll see basic conditions for the email at the top. You can base the rule on the sender, subject, or how it’s addressed. Choose one or more of the conditions you want to use.
- In the Do the following area, check the box for Move the item to a folder. Then, use the Select Folder button to choose the folder.
- Select OK when you finish and your new rule is ready to go. Whenever an email arrives based on the condition(s) you picked, it’ll automatically move to your chosen folder.
Create Quick Steps
Another wonderful automation tool in Outlook is called Quick Steps. With Quick Steps, you can perform an action on an email with a single click. As you can imagine, this is a huge time-saver.
You can set up Quick Steps for things like moving, categorizing, or forwarding an email. As an example, we’ll set up a Quick Step to flag an email for follow up tomorrow.
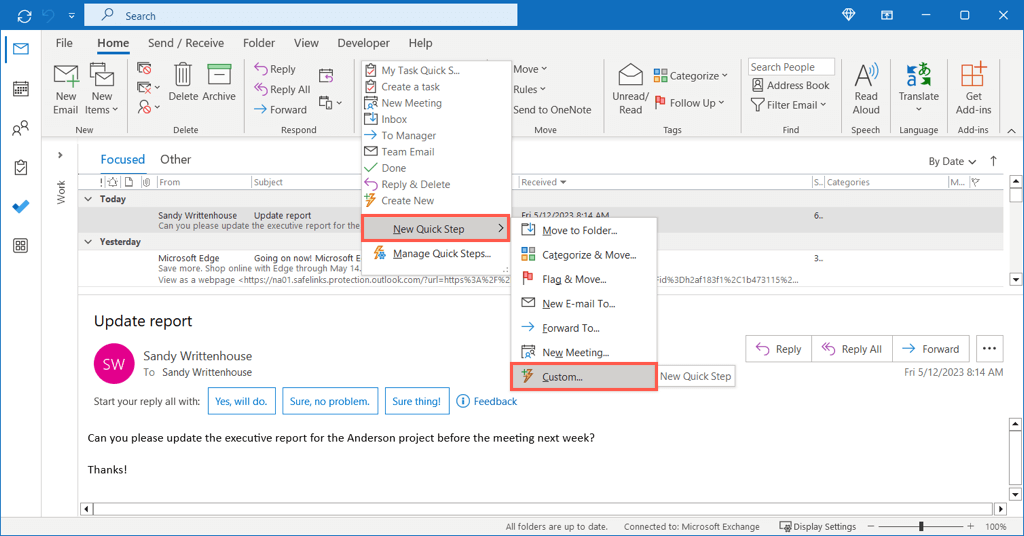
- Go to the Home tab and select the More arrow (bottom arrow) in the Quick Steps box. Choose New Quick Step > Custom.
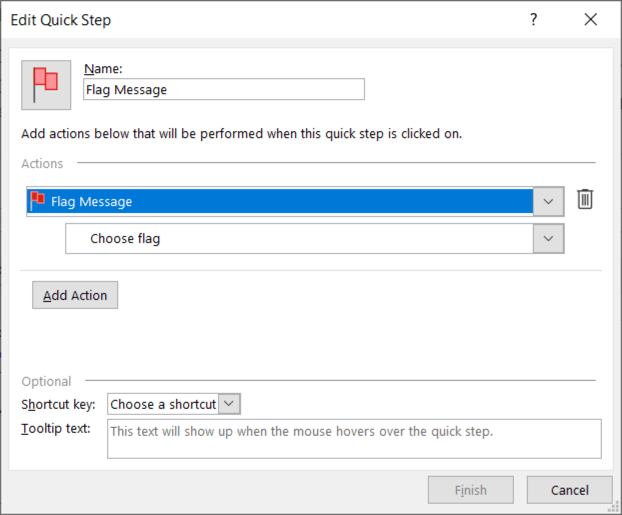
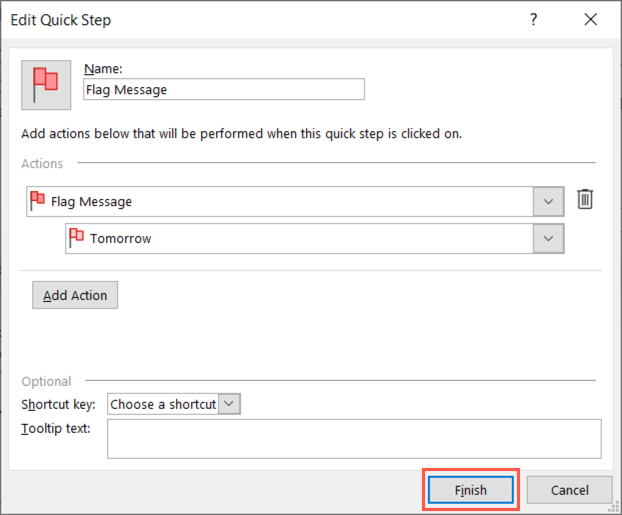
- In the Edit Quick Step box, give it a name at the top. Then, open the Choose an Action drop-down menu and pick Flag Message.
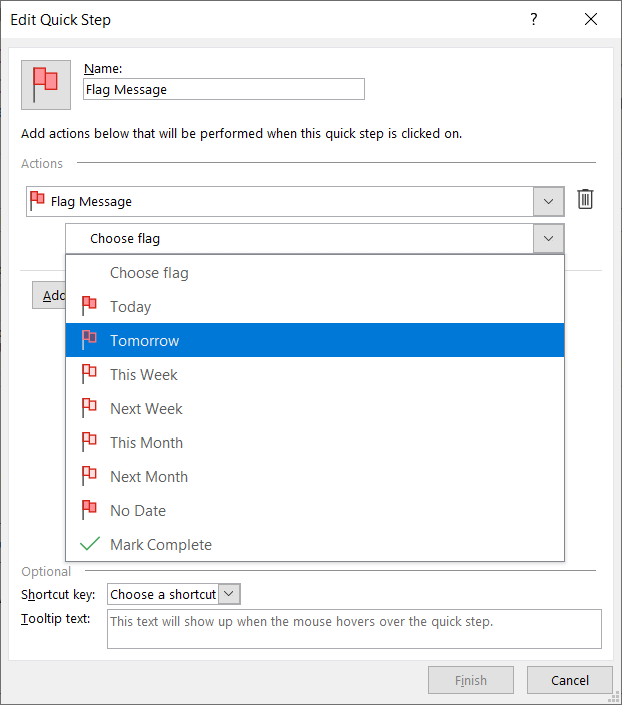
- In the subsequent drop-down menu, choose Tomorrow. You can pick a different option like Today or Next Week or if you prefer.
- Choose Finish to save the Quick Step.
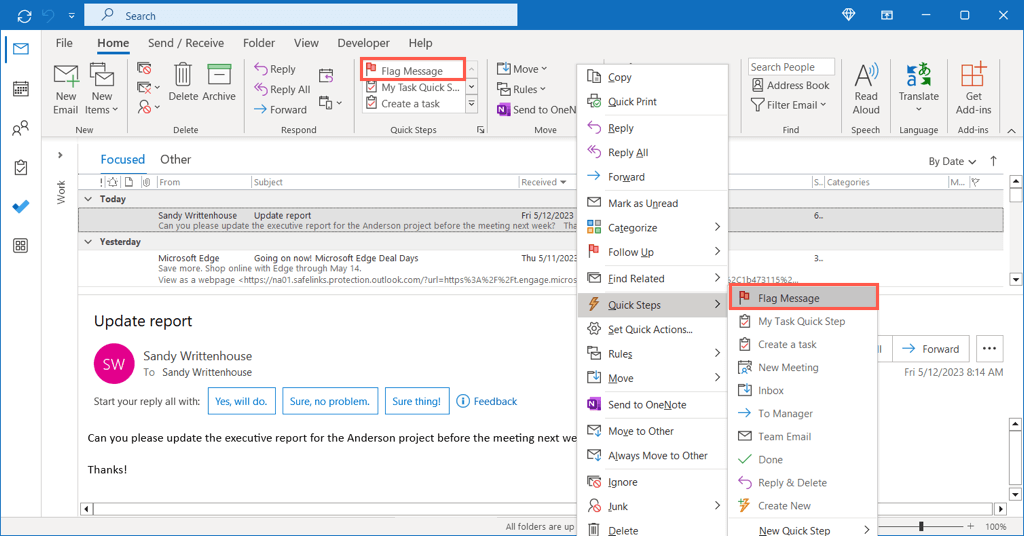
To use your Quick Step, select the email, go to the Home tab, and choose it in the Quick Steps box or right-click, move to Quick Steps, and pick it in the pop-out menu.
That’s all there is to it. You’ve just flagged an email for follow-up tomorrow with just one click.
Hopefully these suggestions have you on your way to managing your next new project or even your team in Outlook. For even more, look at how to add Microsoft Teams to Outlook for a simpler way to join or schedule meetings.
Related Posts
Sandy Writtenhouse is a freelance technology writer and former Project, Department, and Program Manager. She turned her education, job experience, and love of technology into a full-time writing career. With all sorts of gadgets in her home and her hands, she seeks to help others make life easier through technology. Read Sandy’s Full Bio

