Named ranges are a useful, but often underutilized, feature of Microsoft Excel. Named ranges can make formulas easier to understand (and debug), simplify the creation of complicated spreadsheets, and simplify your macros.
A named range is just a range (either a single cell, or a range of cells) to which you assign a name. You can then use that name in place of normal cell references in formulas, in macros, and for defining the source for graphs or data validation.
Using a range name, like TaxRate, in place of a standard cell reference, like Sheet2!$C$11, can make a spreadsheet easier to understand and debug/audit.
Using Named Ranges in Excel
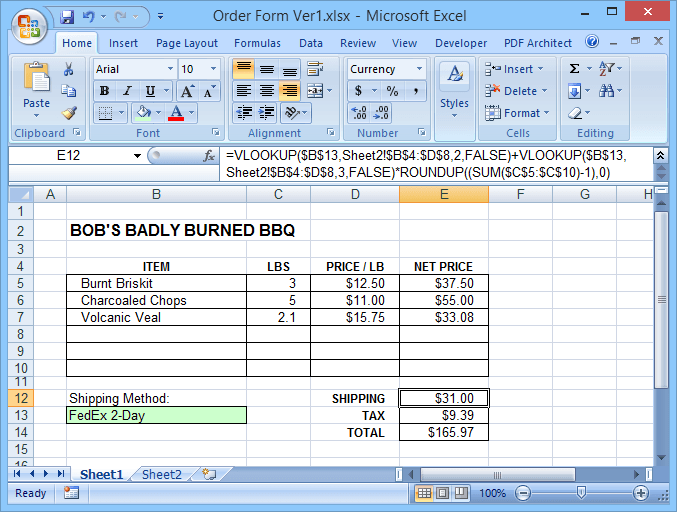
For example, let’s look at a simple order form. Our file includes a fillable order form with a dropdown to select the shipping method, plus a second sheet with a table of shipping costs, and the tax rate.

Version 1 (without named ranges) uses normal A1-style cell references in its formulas (shown in the formula bar below).

Version 2 uses named ranges, making its formulas much easier to understand. Named ranges also make it easier to enter formulas, since Excel will display a list of names, including function names, that you can pick from, whenever you start to type a name in a formula. Double-click the name in the pick list to add it to your formula.

Opening the Name Manager window from the Formulas tab displays a list of the range names and the cell ranges they reference.

But named ranges have other benefits also. In our example files, the shipping method is selected using a dropdown (data validation) in cell B13 on Sheet1. The selected method is then used to lookup the shipping costs on Sheet2.
Without named ranges, the dropdown choices must be manually entered since data validation will not allow you to select a source list on a different sheet. So all of the choices must be entered twice: once in the dropdown list, and again on Sheet2. In addition, the two lists must match.
If an error is made in one of the entries in either list, then the shipping cost formula will generate an #N/A error when the erroneous choice is selected. Naming the list on Sheet2 as ShippingMethods eliminates both problems.
You can reference a named range when defining the data validation for a dropdown list by simply entering =ShippingMethods in the source field, for example. This allows you to use a list of choices that are on another sheet.
And if the dropdown is referencing the actual cells used in the lookup (for the shipping cost formula), then the dropdown choices will always match the lookup list, avoiding #N/A errors.
Create a Named Range in Excel
To create a named range, simply select the cell or range of cells you want to name, then click in the Name Box (where the selected cell address is normally displayed, just left of the Formula Bar), type the name you want to use, and press Enter.

You can also create a named range by clicking the New button in the Name Manager window. This opens a New Name window where you can enter the new name.
By default, the range to be named is set to whatever range is selected when you click the New button, but you can edit that range before or after saving the new name.

Note that range names cannot include spaces, although they can include underscores and periods. Generally, names should begin with a letter and then contain only letters, numbers, periods, or underscores.
Names are not case-sensitive, but using a string of capitalized words, such as TaxRate or December2018Sales, makes the names easier to read and recognize. You cannot use a range name that mimics a valid cell reference, such as Dog26.
You can edit your range names or change the ranges they refer to using the Name Manager window.
Note also that each named range has a defined scope. Normally, the scope will default to Workbook, which means the range name can be referenced from anywhere within the workbook. However, it is also possible to have two or more ranges with the same name on separate sheets, but within the same workbook.
For example, you might have a sales data file with separate sheets for January, February, March, etc. Each sheet could have a cell (named range) called MonthlySales, but normally the scope of each of those names would only be the sheet containing it.
Thus, the formula =ROUND(MonthlySales,0) would give February sales, rounded to the nearest whole dollar, if the formula is on the February sheet, but March sales if on the March sheet, etc.
To avoid confusion in workbooks having multiple ranges on separate sheets with the same name or simply complicated workbooks with dozens or hundreds of named ranges, it can be helpful to include the sheet name as part of each range name.
This also makes each range name unique, so that all the names can have a Workbook scope. For example, January_MonthlySales, February_MonthlySales, Budget_Date, Order_Date, etc.
Two cautions regarding the scope of named ranges: (1) You cannot edit the scope of a named range after it is created, and (2) you can only specify the scope of a new named range if you create it using the New button in the Name Manager window.
If you create a new range name by typing it in the Name Box, the scope will default to either Workbook (if no other range with the same name exists), or to the sheet where the name is being created. Therefore, to create a new named range whose scope is limited to a particular sheet, use the Name Manager “New” button.
Finally, for those who write macros, range names can be easily referenced in VBA code by simply placing the range name within brackets. For example, instead of ThisWorkbook.Sheets(1).Cells(2,3) you can simply use [SalesTotal] if that name refers to that cell.
Start using named ranges in your Excel worksheets and you will quickly being to appreciate the benefits! Enjoy!