VMware Workstation Pro is paid virtualization software that lets you run another operating system inside your current one. Want to use Linux for some situations but you’ve only got a Windows 10 computer? No problem — use VMware Workstation on Windows to install Ubuntu.
This program even lets you run multiple operating systems at the same time. If all you have is Windows 10 but you like to play old Windows XP games and also use a few programs that only work on a Mac, just load up the XP or Mac virtual machine, make it full screen, and use it just like you would if it were the only OS you had.

The process to install a new operating system in VMware Workstation is fairly straightforward because the setup wizard makes things super easy. Below are step-by-step screenshots showing everything you need to know, from the initial setup screen all the way to booting into the new operating system.
Tip: Also be sure to read the section at the very bottom of this page for some first-install tips.
Install New OS in VMware Workstation
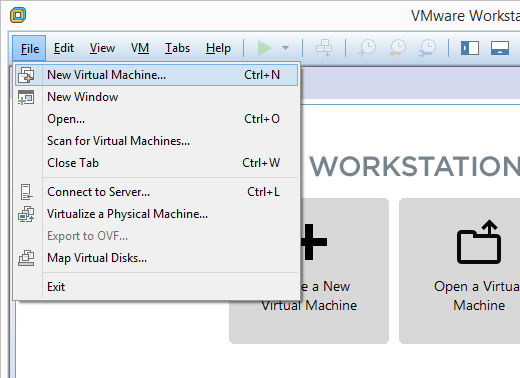
Step 1: Go to File > New Virtual Machine.
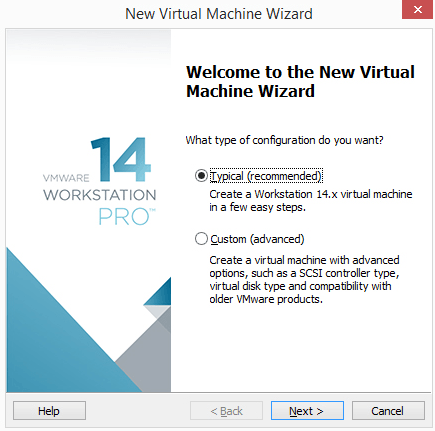
Step 2: Select Typical (recommended), and then press Next.
Step 3: Pick how to install the operating system.
Select Installer disc if the operating system is in the disc drive. Otherwise, choose Installer disc image file (iso) if you have a file that contains the OS, like a Windows 10 ISO or an ISO for macOS.
Step 4: Choose precisely where the OS files are located.
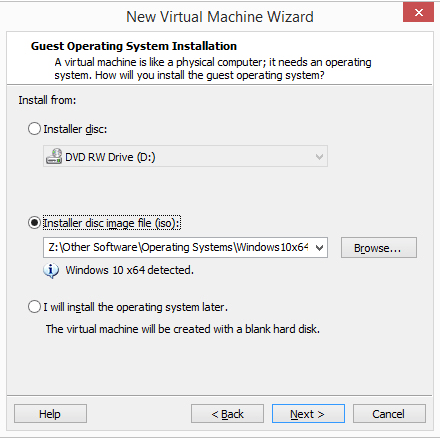
If you selected to install the operating system from a disc, choose the correct disc drive from the drop-down menu. For an ISO install, select Browse and locate the ISO image.
Step 5: Press Next to proceed to the screen where you name the new virtual machine and pick where its files should be stored. Fill out that information and then select Next again.
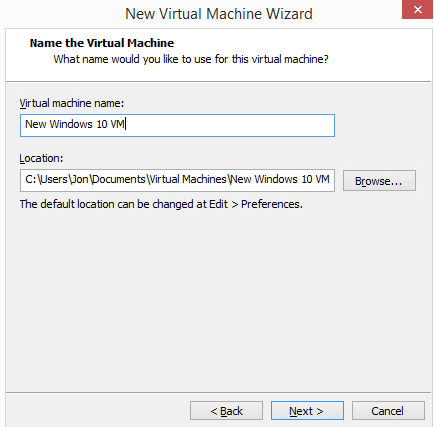
Important: Be sure to pick a location that can handle the possibly ultra-large files created by the operating system as you use it. You might end up needing hundreds of gigabytes if you use this VM heavily. Storing it on an external hard drive is a good idea if your local hard drive doesn’t have the space.
Note: For some operating system setups, you’ll be asked to enter the product key used to activate it. You should be able to skip through that step if you want to enter the key later.
Step 6: Define how storage should take place with this virtual machine, and then press Next.
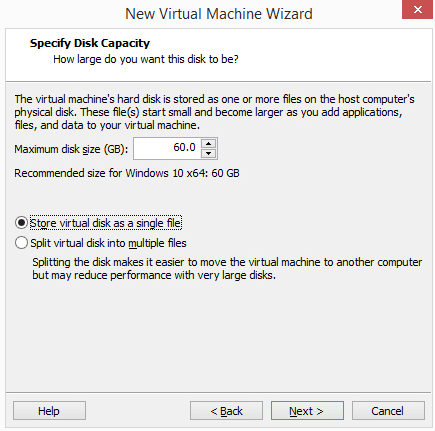
You can change the maximum size of the virtual hard drive from the small box. From the bottom of this window are two options: Store virtual disk as a single file and Store virtual disk into multiple files.
Pick the second option if you think you might one day move the VMware hard drive to a different computer, but take note of the text on that screen that mentions a possible performance reduction of using multiple files with a large hard drive.
In other words, if you plan to store lots of data in this VM, select the “single file” option, otherwise go with “multiple files.”
Step 7: Select Customize Hardware and make any necessary changes. You can change details about the memory, processors, disc drive, network adapter, USB controller, sound card, printer, and display.
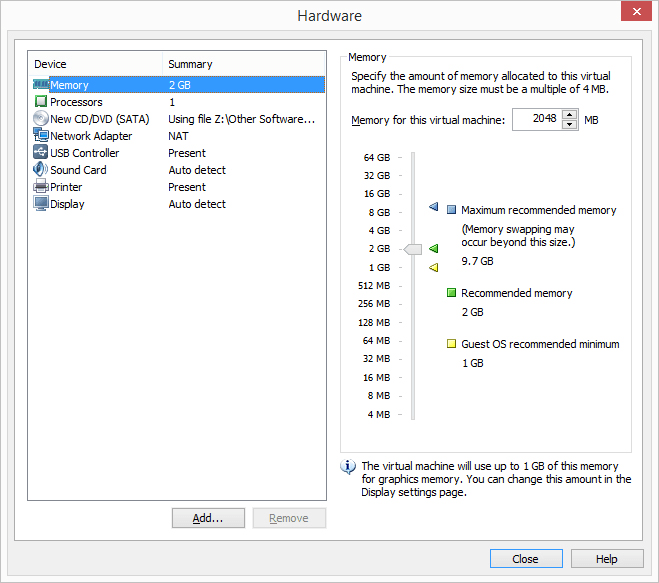
For example, the Memory section is how you specify how much physical RAM the virtual machine is allotted. If you later decide that you’ve given too little memory to the VM, it might perform slowly. Similarly, if you give too much, your host computer will perform sluggishly and will have a difficult time even using the VM.
VMware Workstation recommends a specific amount based on how much you have installed, but you can adjust the memory to anything you like (though it’s best to stick to the recommended level). Different operating systems require different amounts of memory (e.g., Windows 10 needs more than Windows 2000).
Network Adapter is an important component here that you might end up having to adjust later if your virtual machine doesn’t have internet access. There are multiple options, and some may or may not work properly depending on how your host computer is set up and how the guest OS (the VM) works. You can skip this for now to have the default option chosen for you.
Step 8: Choose Close to exit the Hardware screen, and then press Finish.
VMware Workstation will create the virtual
disk you specified in Step 6 and then turn on the virtual machine
automatically. This process might take a while, but you can watch the progress
bar for an estimation of when it will finish.

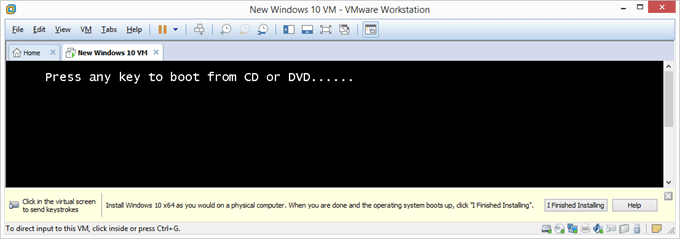
Step 9: Follow any on-screen prompts to begin the OS installation. For example, if you see Press any key to boot from CD or DVD, do that to start the OS setup.
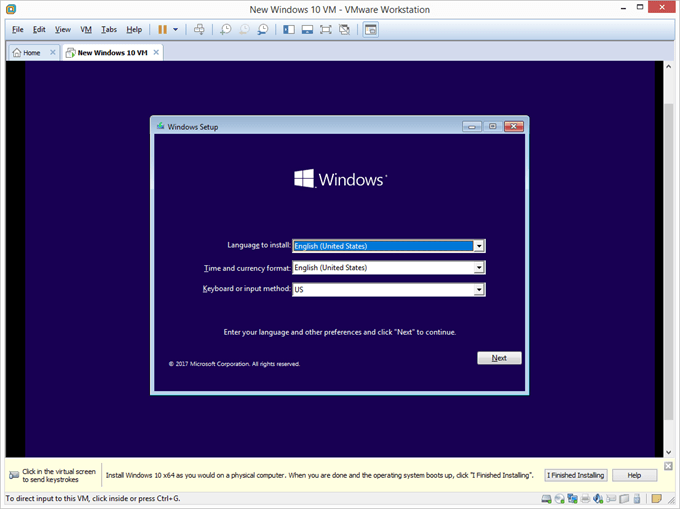
Step 10: Follow the directions for your specific operating system install to add the OS to VMware Workstation.
Things to Remember
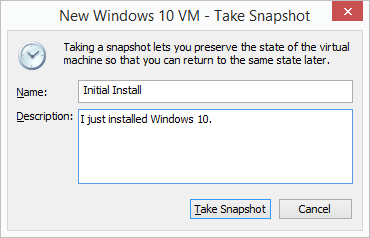
The VM > Snapshot option is how you “freeze” the current state of the VM so that you can return to that same state again later. You might need to do this if the operating system fails later on, you get lots of viruses that can’t be cleaned, or you simply want to start over from a fresh install.
We recommend making a new snapshot the moment the operating system is fully installed and you get logged in, but before you make any changes to the VM.
However, even after that, consider installing all the operating system updates and any of your necessary programs, like your favorite web browser and antivirus software, Adobe Flash, etc., and then make another snapshot. Restoring the VM back to a state that includes those items will save you time not having to reinstall all of them.
Once the operating system has been installed and is running, go to VM > Settings to adjust any hardware settings you changed or didn’t change from Step 7. Some options are only editable when the virtual machine is off.
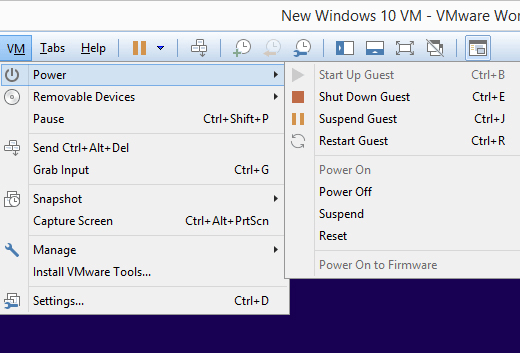
At any time when the VMware virtual machine is on, you can shut it down or restart it from the VM > Power menu. This is also how you suspend the VM, which means to pause it so that you can resume at that exact same point the next time you access it. This is different from powering it on from an off state where you have to log back in again, open programs and files, etc.
Related Posts
Founder of Help Desk Geek and managing editor. He began blogging in 2007 and quit his job in 2010 to blog full-time. He has over 15 years of industry experience in IT and holds several technical certifications. Read Aseem’s Full Bio
