We have included two free methods for recording your screen on Windows 10 in this article. One method is via a feature built straight in to Windows 10 and the other requires you to download free software.
For both methods, we will be showing you step by step instructions to record videos and access your files. Before we get started, we’ll explain the differences between each method so that you know which option to go for.
Which Screen Recording Method Should I Use On Windows 10?
In this article, we’ll be focusing on recording via the Windows 10 Game Bar and recording via OBS Broadcaster. If you’d like to get a video recorded as quickly as possible, we’d suggest choosing the Windows 10 Game Bar.
If you want more control over what is recorded, for example, if you’d like to record a specific window or change recording quality, we would suggest OBS Broadcaster.
It’s also worth noting that the Game Bar will only record the events in the current active app, not the entire screen. If you start it while Chrome is the active window, it will only record what happens inside Chrome.
Quick Recording With Windows 10 Game Bar
Using the Windows 10 Game Bar can be a very quick and convenient option for recording your screen on Windows 10. To get started, simply press the Windows Key + G Key.
Doing this will open the Windows 10 Game Bar. Below, we have provided a screenshot for reference.

In the latest version of Windows, Windows 10 1809, the game bar has been redesigned a looks like this:

If nothing happens, that means you need to go to the Windows Store and download the Game Bar app. If it still doesn’t load, click on Start – Settings – Gaming – Game Bar and make sure it’s turned On.

To start recording, click the Start Recording button (the circle with the black dot). Alternatively, you can press Windows Key + Alt + R. You will now see a small recording icon in the top right hand of your screen.

At any point you can click the Stop button to stop recording, or you can press Windows Key + Alt + R again to stop it.
To access your new recording, go to This PC, Videos, then Captures. You’ll find all of your new saved recordings there. By default, your recordings will be named after whichever program you have open and in view at the time.

If you’d like to turn on your microphone and record your voice whilst you are recording a video, you can use the shortcut Windows Key + Alt + M. You can turn the microphone back off again by pressing the same keys again.
Finally, if you’d like to record the audio from the application you are currently using, but don’t want to record audio from any apps in the background, press Windows Key + G to open the Game Bar, then click the Settings cog on the left hand side.

Next, scroll through the settings menu that pops up, and select Game Only under the Audio to record section. Alternatively, you can choose to record no sound whatsoever, or record all audio on your computer.

Windows Game Bar was specifically created to record your video game moments, but you’ll find that it works perfectly well for recording your screen in any other standard program as well.
For some programs like a web browser or something like Adobe Photoshop, etc., you’ll get a message stating gaming features are not available for this app and you have to check a box to enable it.

The one big downside to Game Bar is that you can’t use it to record your desktop or Windows Explorer. If you need to do that or need to record the entire screen regardless of which app is active, then you should check out our second suggestion below.
Free Screen Recording Software – OBS Broadcaster
Windows Game Bar can be a great way to quickly record your screen, but if you want more control, we’d suggest using OBS Broadcaster. You can download it for free here. OBS is mostly used as a video game streaming tool, but you can also use it to record your own screen and save the videos to your local drive.
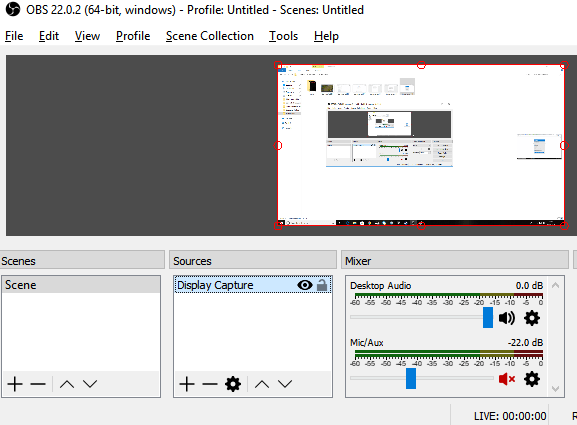
Once you have downloaded and installed OBS Broadcaster, you will see a screen that looks somewhat like what is shown below.

It may seem quite complex to begin with, but we’ll take you through the basics to get you up and running as quickly as possible. There are three steps we need to take before we can start recording.
- Step 1: Choose audio/microphones
- Step 2: Choose a program or window to record
- Step 3: Adjusting audio and recording
Step 1: Choose audio/microphones
This is a one time process that must be completed so that OBS uses the right devices for recording audio and your voice.
To get started,click the Settings option on the far right.

Once the settings menu is open, click on the Audio tab (1). From within here, you can then click and select your audio device from the Desktop audio device dropdown option (2).
Finally, select your microphone from the Mic/Auxiliary Device dropdown option (3).

Once you are done, click the Apply button and then OK.
Step 2: Choose a program or window to record
For this next step, you’ll need to add a source so that OBS Broadcaster knows what to record. This can be done with the ‘sources’ box on the OBS Broadcaster main dashboard.

The easiest option is to add your entire display. Click the ‘+’ arrow and then select Display Capture. After,click OK.
You’ll now have your display appear in the OBS Broadcaster dashboard. This option is perfect if you’d like to be able to record your whole display and any programs you have open.
If you don’t want to record everything on your display, you can instead record the contents of a single open program. To do this, Click the ‘+’ arrow and then select Window Capture.
You can then select a specific program from a drop down list. Once selected, OBS Broadcaster will only record the contents of that specific window.

Step 3: Adjusting audio and recording
You are now ready to start recording. However, before you get started, you may want to adjust the volume levels of your desktop audio and microphone audio. You will have a number of tools in the mixer tab. This includes a volume slider, a mute button, and a settings button.

After adjusting your audio, you can click the Start Recording button on the right side of the OBS Broadcaster dashboard. At any time, you can return back to OBS Broadcaster and click the same button to stop recording.
By default, the saved video files will be sent to C:Usersyour_usernameVideos.

To see the exact output location, click the settings button on the OBS Broadcaster dashboard and click Output, then click Recording.
Mastering OBS Broadcaster is another topic on its own, but the program gives you the freedom to set up complex scenes, change recording resolution, bitrate, and frames, and make adjustments to the audio or recording format.
Summary
Did this Windows 10 screen recording tutorial help you? Do you have any questions about the methods I used in this article? If so, leave a comment below and I’ll be happy to help as soon as I can. Enjoy!