If you’re running several apps that require a lot of memory, your system’s RAM can quickly become overwhelmed. To keep things running smoothly, Windows has a hidden feature known as virtual memory.
Windows automatically manages the virtual memory size for all drives on your PC, but if you find your applications are still lagging, you may want to manually increase the virtual memory size. Here’s how.
What Is Virtual Memory?
Virtual memory is a system that supplements physical memory (RAM) by using a portion of the hard drive known as the “page file.” When your computer runs out of RAM, which is faster but limited in size, it turns to virtual memory to keep things running smoothly.
This page file acts as a backup reservoir. When RAM gets filled up, Windows temporarily stores some of its data in the page file. This means that if you’re running several programs at once or are dealing with several tasks that exceed your computer’s RAM capacity, your system can still function without any major slowdowns.
This all sounds nice, but keep in mind that virtual memory isn’t a perfect substitute for RAM. Accessing data from virtual memory is much slower than accessing it from RAM.
How Much Virtual Memory Should You Set?
Determining how much virtual memory you should set depends on your computer’s specifications and how you’re using it. If you’re using memory-intensive apps like video editing software, you’d benefit from more virtual memory.
The general rule of thumb is that you can set your virtual memory at 1.5 to 3 times the size of your RAM. So, if your PC has 4GB or RAM, you can set the virtual memory between 6GB and 12GB.
Just remember that virtual memory uses disk space. Make sure you have enough room on your hard drive to handle this.
How to Increase (or Decrease) Virtual Memory
- Open the Settings app by pressing Windows + I.
- Click System > About.
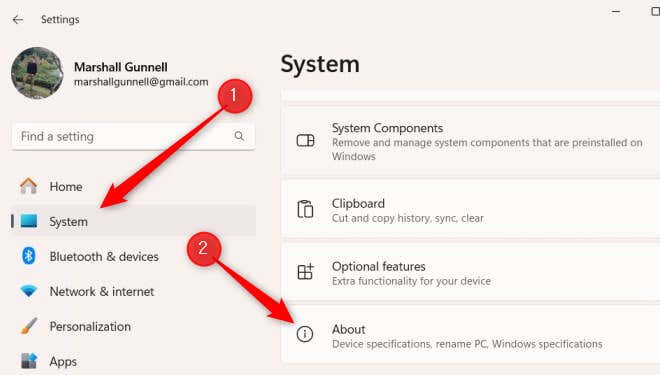
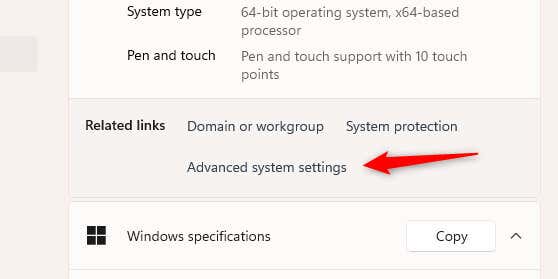
- Scroll down to the Related Links section and click Advanced system settings.
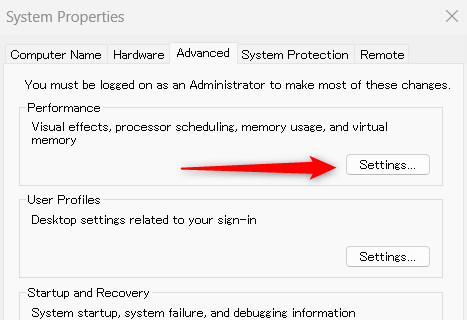
- You’re now in the Advanced tab in the System Properties window. Click Settings in the Performance group.
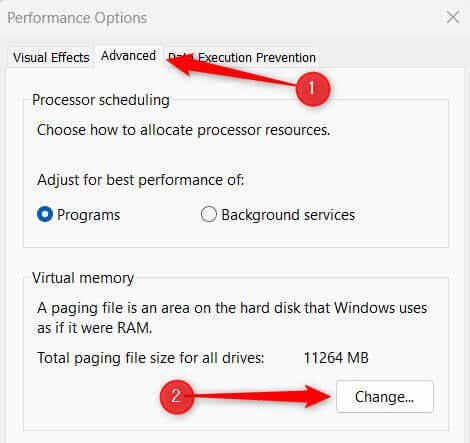
- The Performance Options window will appear. Click Advanced > Change.
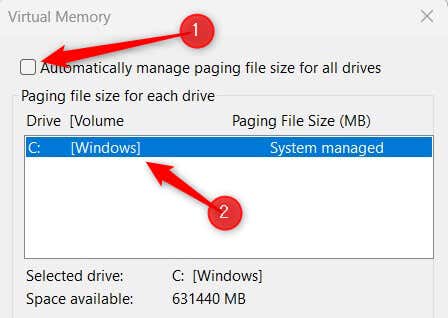
- You’ll now be in the Virtual Memory window. First, Uncheck the box next to Automatically manage paging file size for all drives, and then select the drive you want to manage.
- Click Custom size. You can now set the initial size (the amount of space reserved) and maximum size of (the limit it can grow to) the virtual memory. The size is in MB. Click Set > OK to confirm.
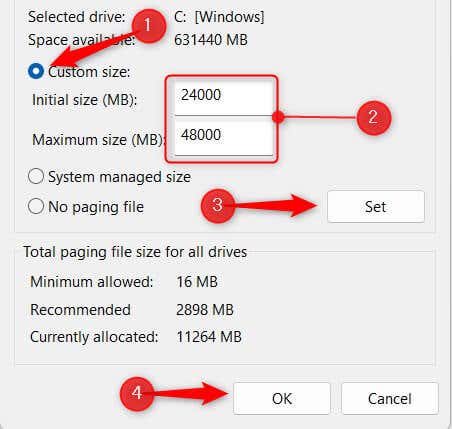
You’ve now increased the virtual memory of your Windows 11 PC! In the example above, our system has 16GB of RAM, so we set the initial size to 24000MB and the maximum size to 48000 MB.
Virtual Memory Mastery
The overall process of adjusting the size of your virtual memory is relatively straightforward, but finding the right balance is what’s important.
Too much virtual memory can unnecessarily occupy disk space. Too little? You’re looking at potential performance lags.
Keep an eye on your system’s performance after you make adjustments to its virtual memory to maintain optimal system operations.