As SSDs (solid state drives) become more affordable, it’s not uncommon for desktop and laptop devices to come with lots of super-fast storage. However, using a high-capacity SSD in a single partition setup isn’t always practical, as it combines all data types. It’s often better to divide the drive into two or more volumes.
For instance, you can allocate a specific partition for the operating system, another for your documents, music, and movies (making recovery easier if the system partition gets corrupt), or even create a volume for an additional operating system.
This tutorial will show you how to partition or allocate space on an SSD in Windows 11 using the native Disk Management and Settings apps.
Partition an SSD Using Disk Management in Windows 11
Disk Management is a built-in Windows tool that allows you to manage your disks and partitions without installing additional software. The user interface may appear dated (it’s been around since Windows 2000!), but it lets you visually "look" at your computer’s SSD and easily create, modify, and manage partitions.
Just right-click the Start button and select Disk Management to access the Disk Management tool in Windows 11. Alternatively, you can open the Start menu, search for Disk Management, or use the diskmgmt.msc Run command (press Windows + R).
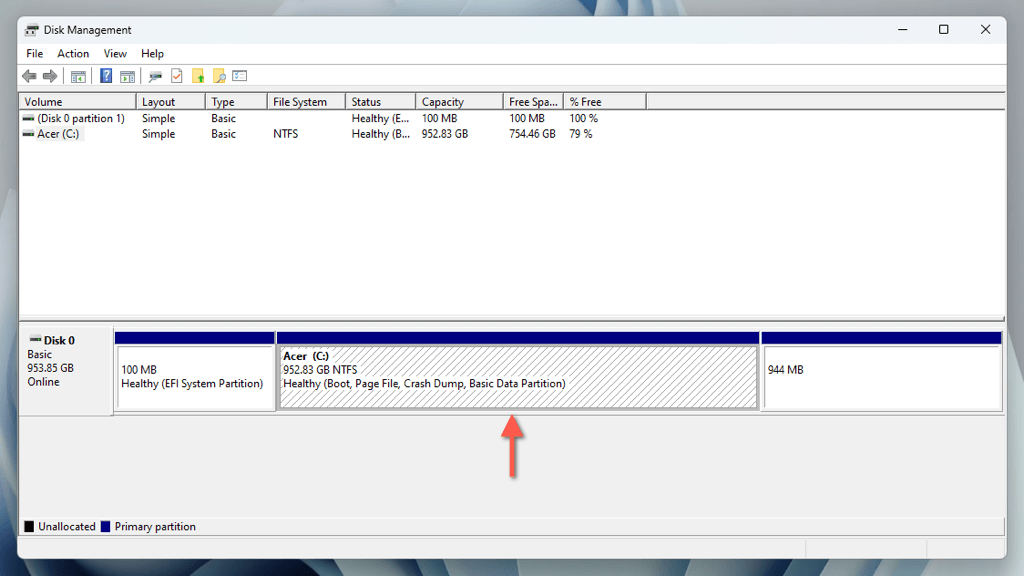
The Disk Management window provides a graphical representation of the drive. Besides the system partition (typically denoted by the letter C), you may see hidden partitions related to the EFI (Extensible Firmware Interface) and Windows Recovery. To prevent issues with startup and recovery, focus only on the larger system volume while creating a new partition.
Shrink the Main Partition in Disk Management
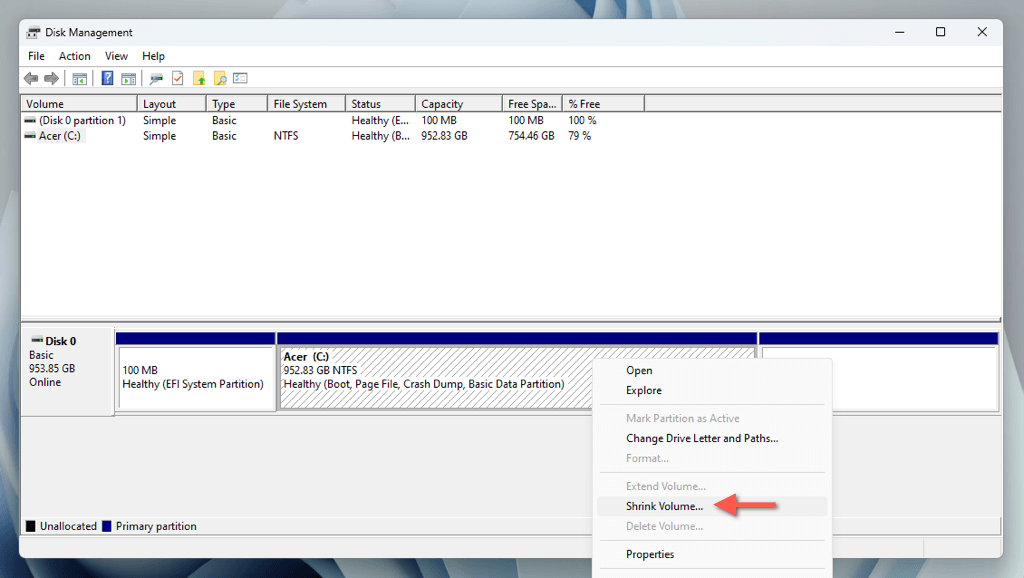
Since the system partition encompasses the entire SSD, you must begin by acquiring disk space for the partition you’re about to create using a process called "shrinking." Open Disk Management, and then:
- Right-click the system partition and select Shrink Volume.
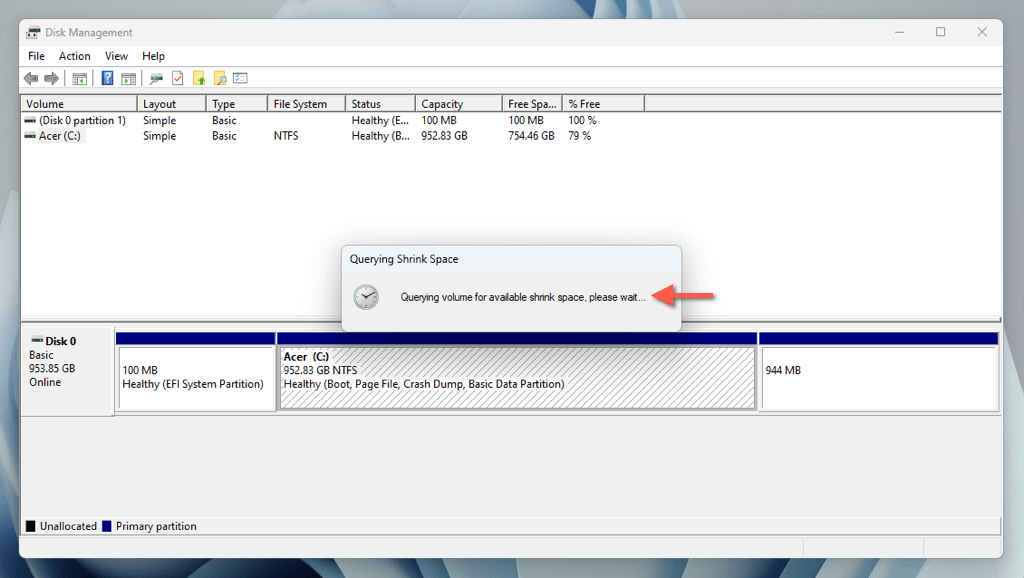
- Wait until Disk Management queries the amount of shrinkable disk space—this may take a while.
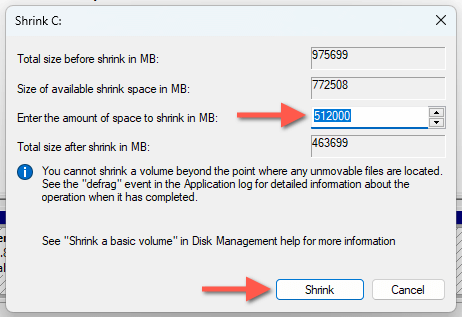
- Enter the amount of disk space you want to shrink into the Enter the amount of space to shrink field in megabytes (1024MB equals 1GB). You’re limited by the amount of free storage available—check Size of available shrink space in MB. Select Shrink to continue.
Important: Since you’re shrinking the system partition, it’s best to keep at least 25GB of space for general Windows-related activities like updates, caching, and virtual memory management.
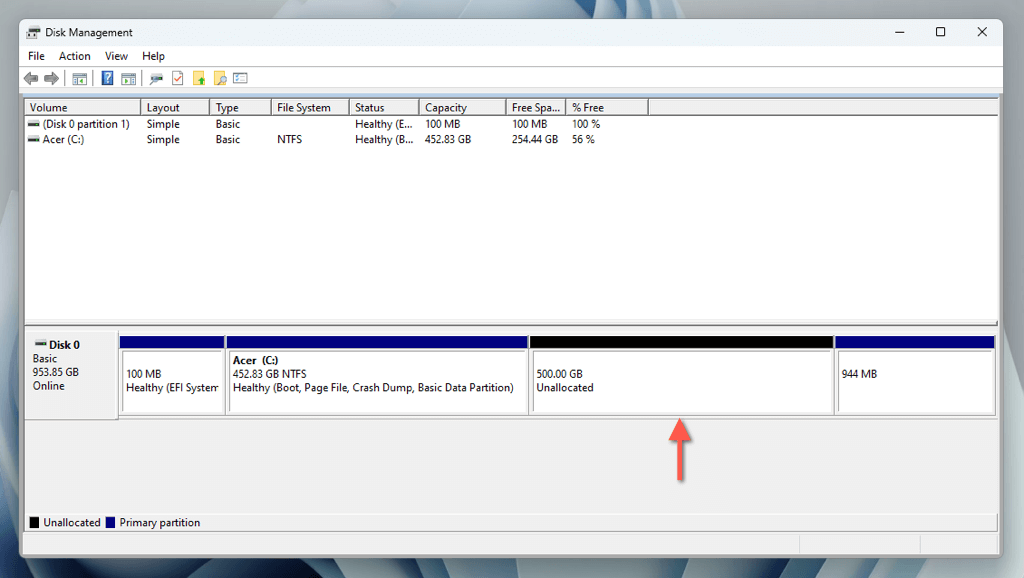
- Wait until Disk Management shrinks the volume and allocates the free space. Once done, you’ll see it on the right side of the system partition.
Partition the Unallocated Space
You can now create a partition out of the unallocated space. To do that:
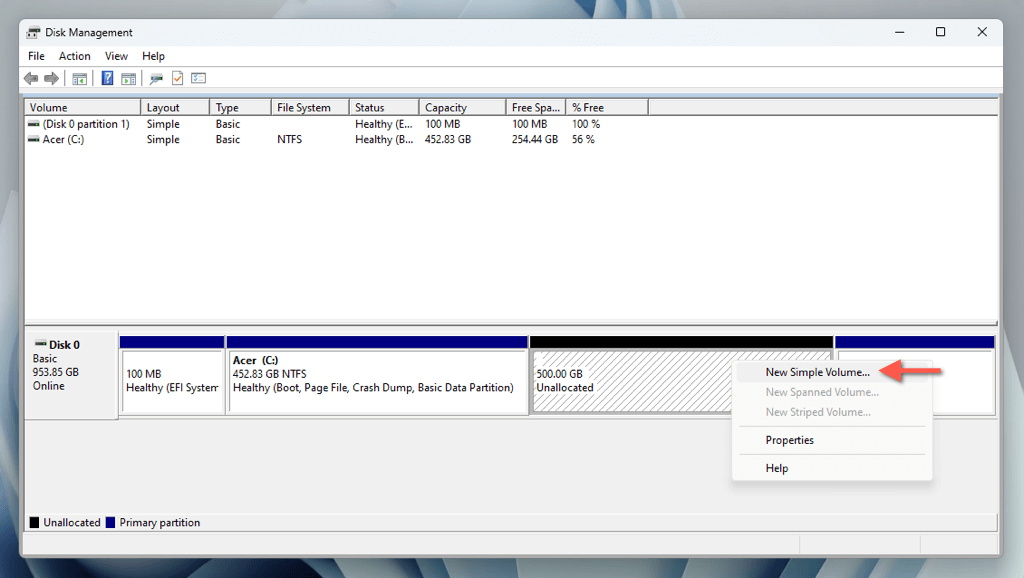
- Right-click the unallocated space in Disk Management and select New Simple Volume.
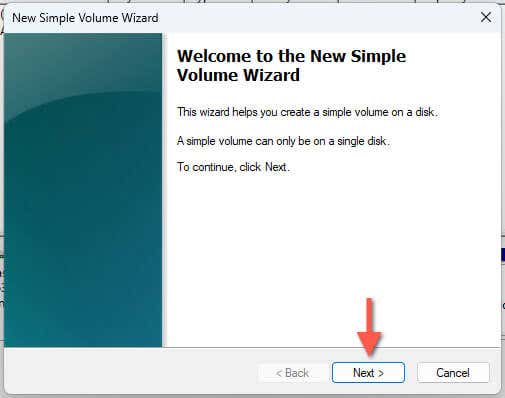
- Select Next on the "Welcome to the New Simple Volume Wizard" dialog.
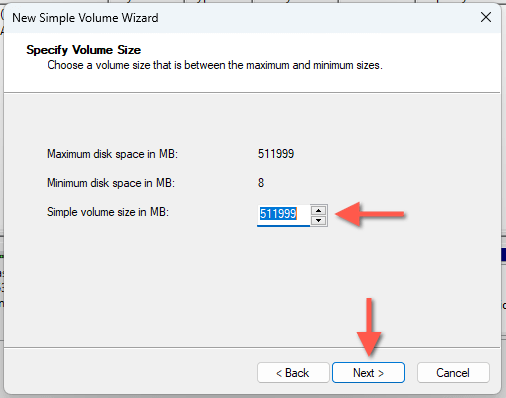
- Enter the partition size into the Simple volume size in MB field in megabytes. If you only need one new partition, enter the maximum size possible. Select Next to continue.
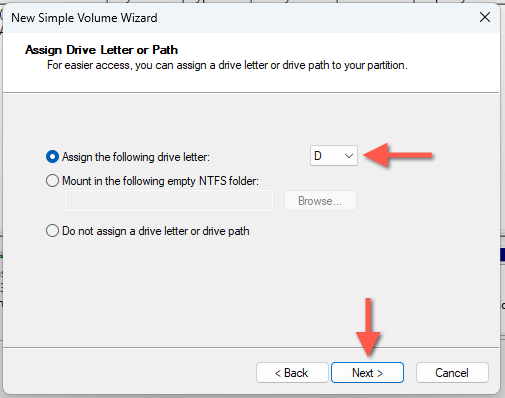
- Assign a drive letter—e.g., D—and select Next.
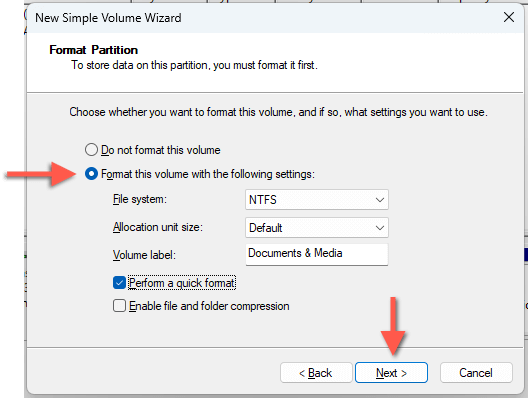
- Configure the format settings and select Next:
- File system: Pick between the NTFS and FAT32 file systems. NTFS has the best performance and security, while FAT32 provides broader compatibility.
- Allocation unit size: Define the minimum unit size of each data block on the partition.
- Volume label: Add a title for the volume—e.g., Documents & Media.
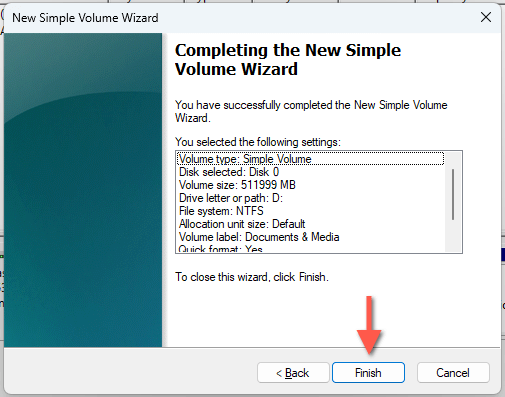
- Select Finish after Disk Management finishes creating the volume.
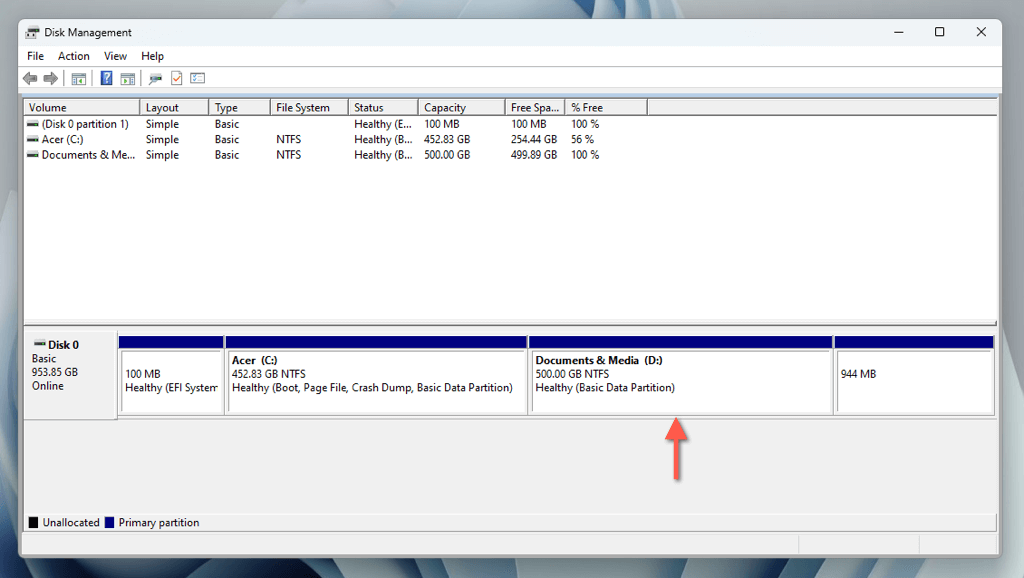
You should find the new partition next to the system partition in Disk Management. You’ll also see the partition among the list of local disks in File Explorer, meaning it’s ready for use!
If you want to change the drive letter, right-click the partition in Disk Management and select Change Drive Letter and Paths. To modify the label, choose Properties.
If you didn’t partition all of the unallocated space, you can continue creating additional partitions by repeating the steps above.
Delete and Merge the Partition
If you decide to delete a partition in the future, you can use the Disk Management app for that as well. After deletion, you can add the resulting unallocated space to the preceding volume. To do that:
Important: Deleting a partition erases all of the data on it. Make sure to back up important files and folders to another volume or an external drive before proceeding.
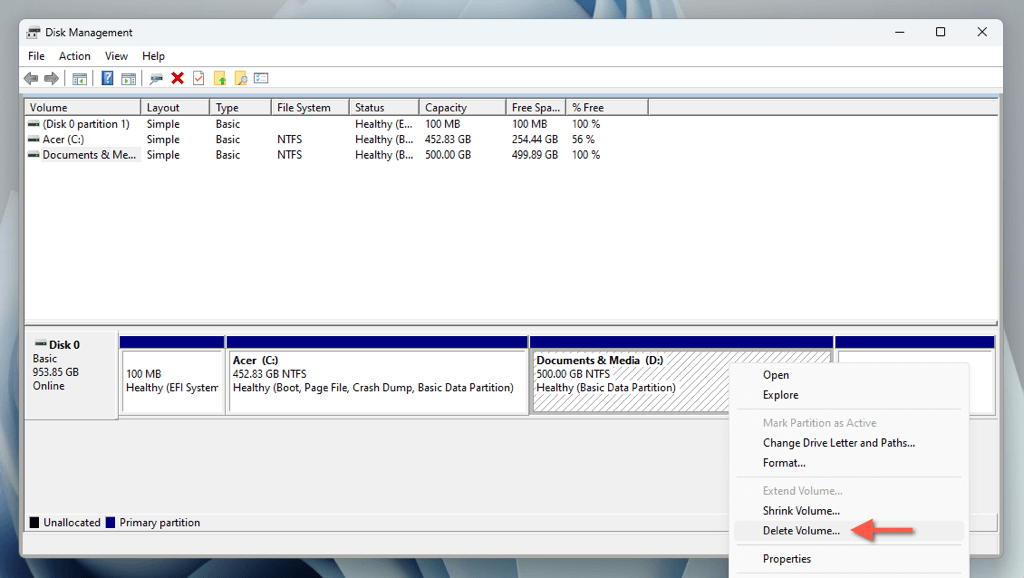
- Right-click the partition you want to remove and select Delete Volume.
- Select Yes on the "Delete simple volume" confirmation box. Disk Management will delete the partition and mark its space as "unallocated."
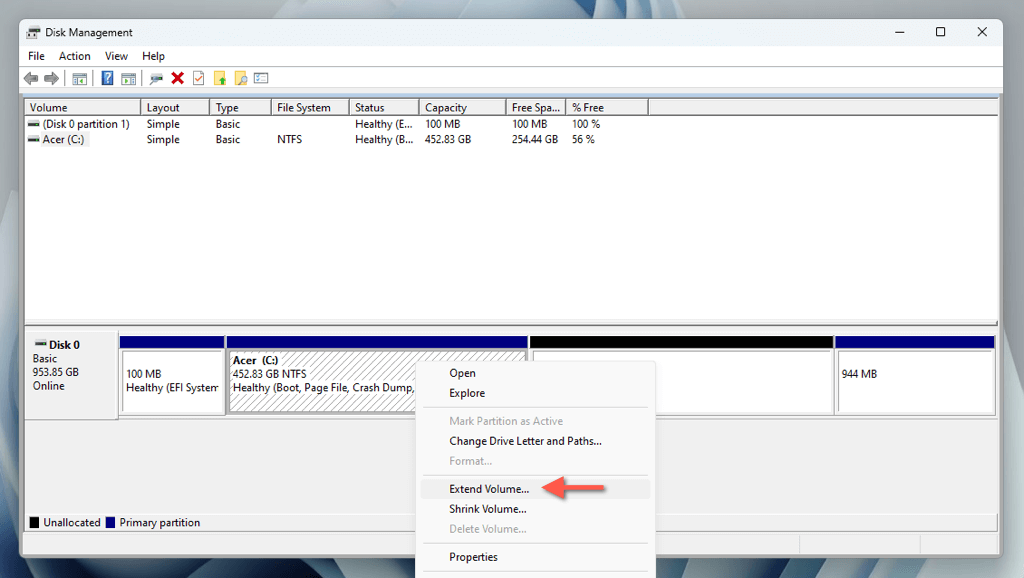
- Right-click the partition immediately to the left of the new unallocated space—e.g., the system partition—and select Extend Volume.
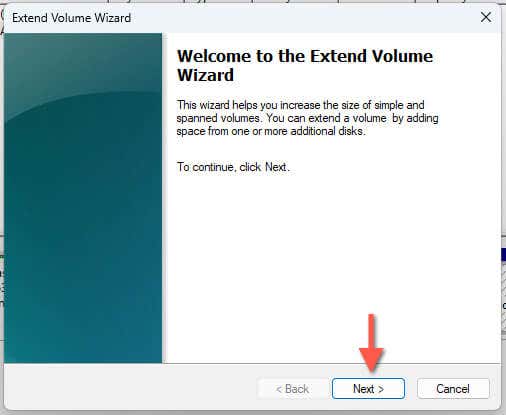
- Select Next on the "Welcome to the Extend Volume Wizard" screen.
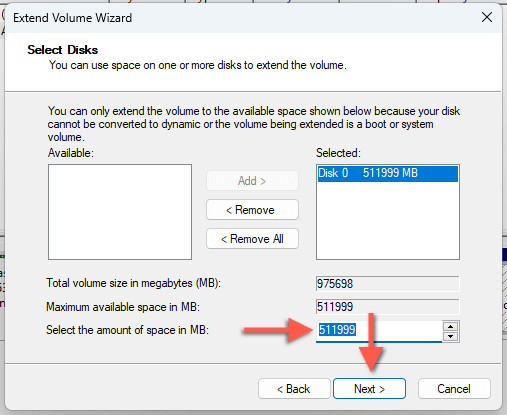
- Type in the amount of space into the Select the amount of space in MB field and select Next.
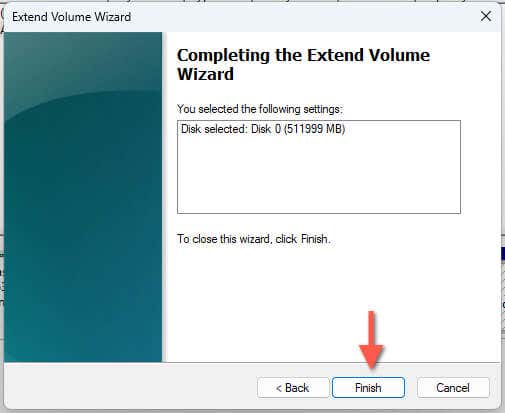
- Select Finish.
Partition an SSD in Windows 11 Using Settings App
The Storage management screen within the Settings app on Windows 11 provides a modernized interface for an alternative approach to shrinking, creating, and deleting disk partitions.
Shrink the Main Partition in Settings
You must begin by shrinking the system partition to free up space for the partition you want to create. To do that:
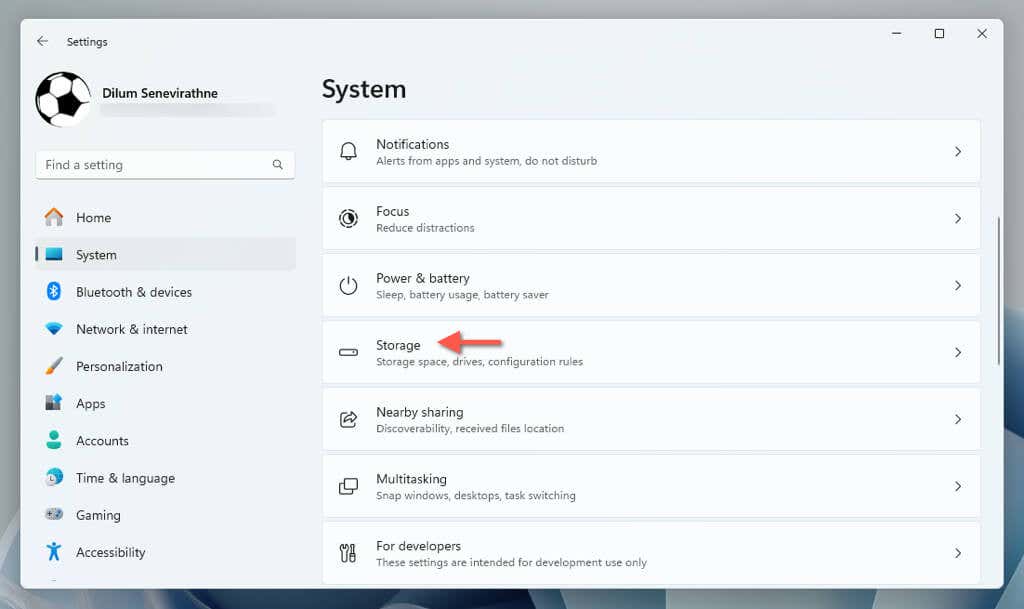
- Open the Settings app (right-click the Start button and select Settings) and go to System > Storage.
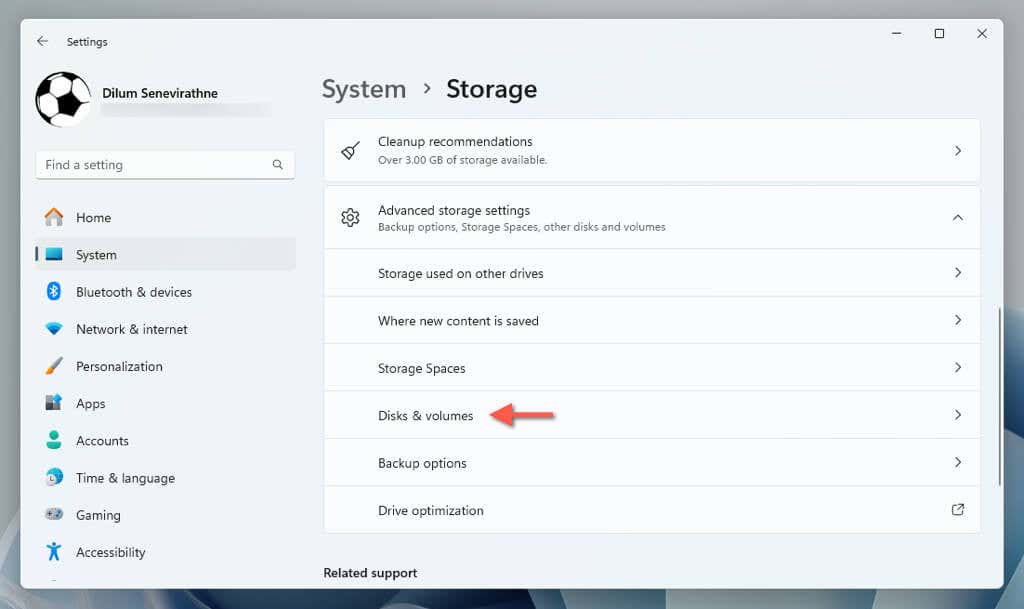
- Expand Advanced storage settings and select Disks & volumes.
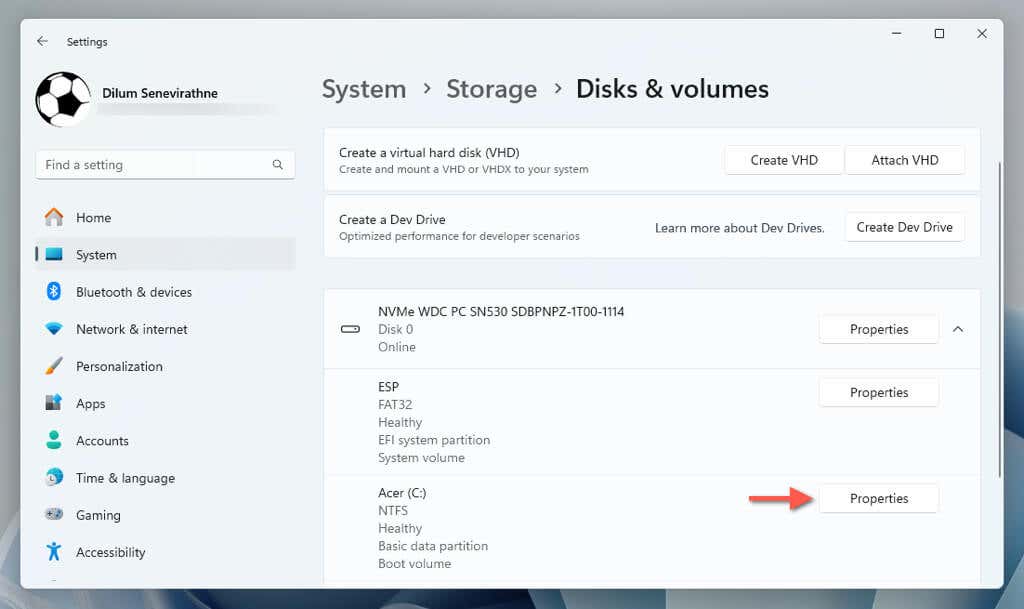
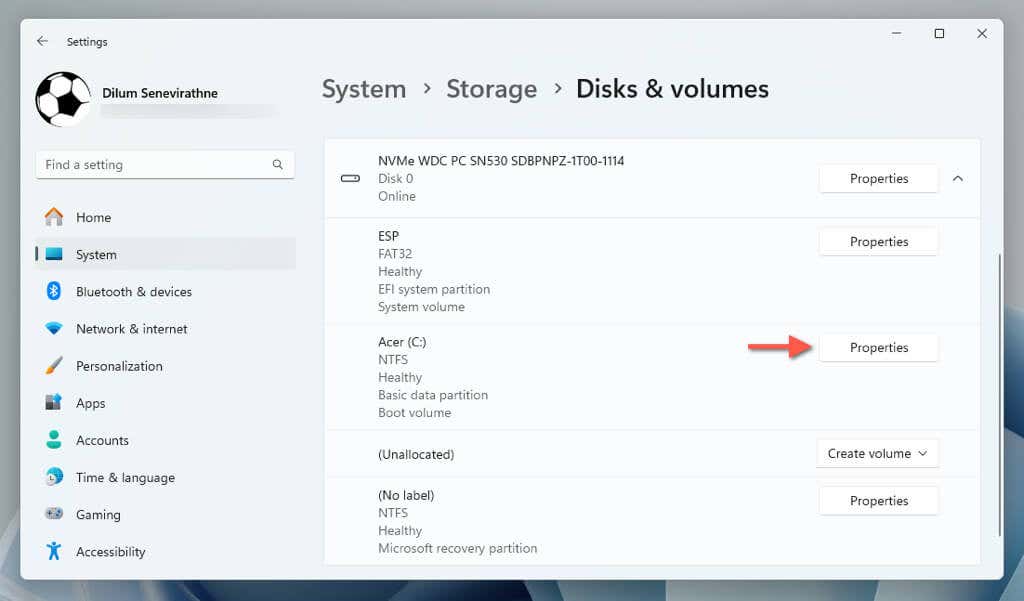
- Select Properties next to the system partition.
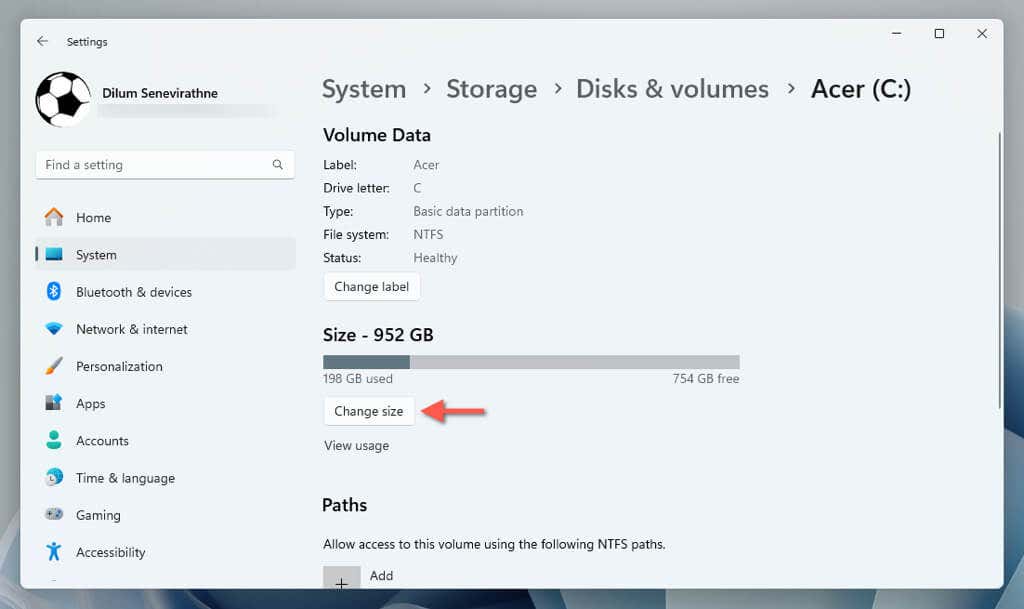
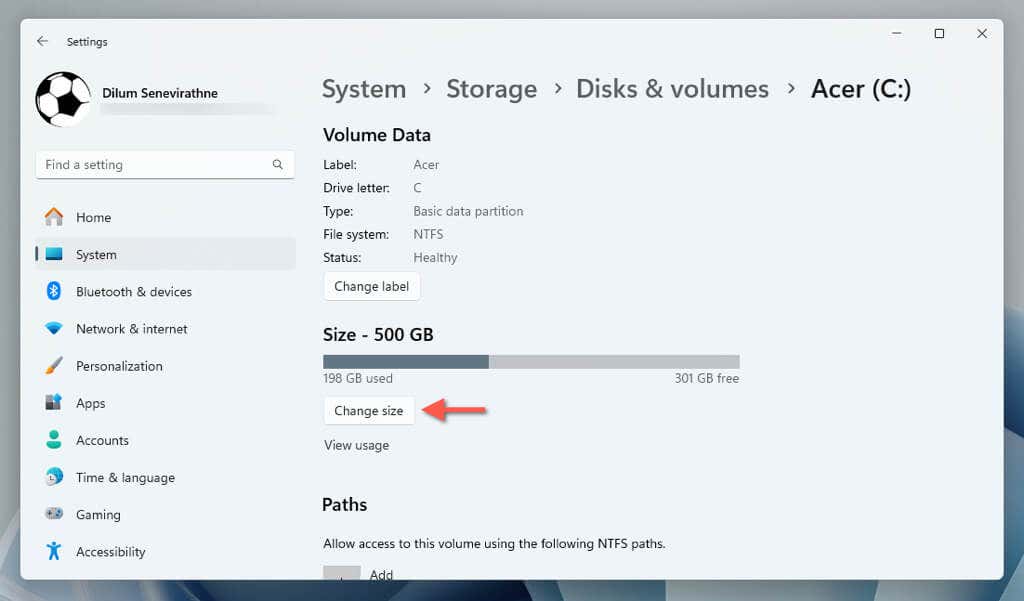
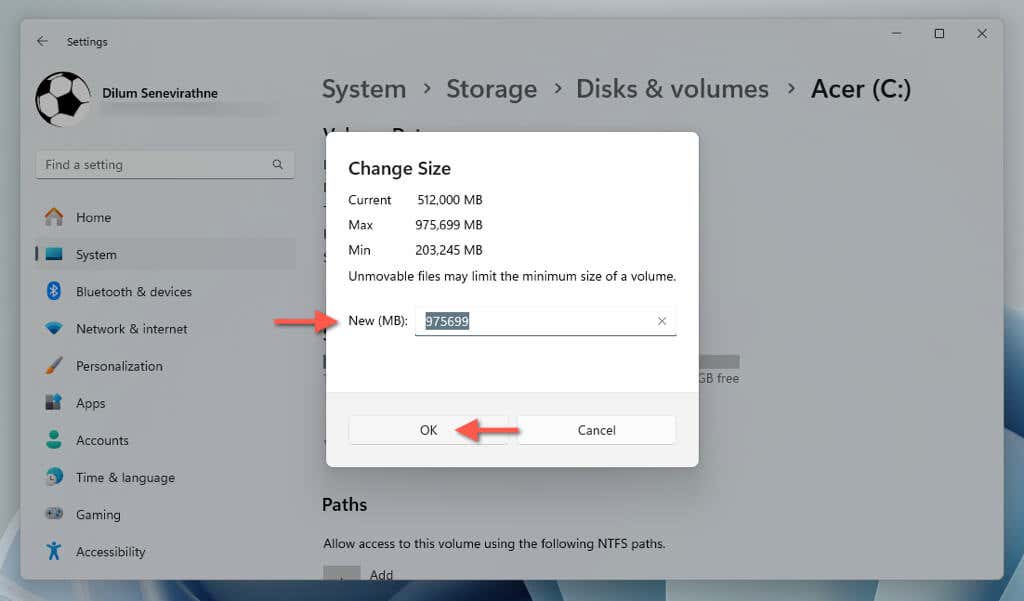
- Select the Change size button.
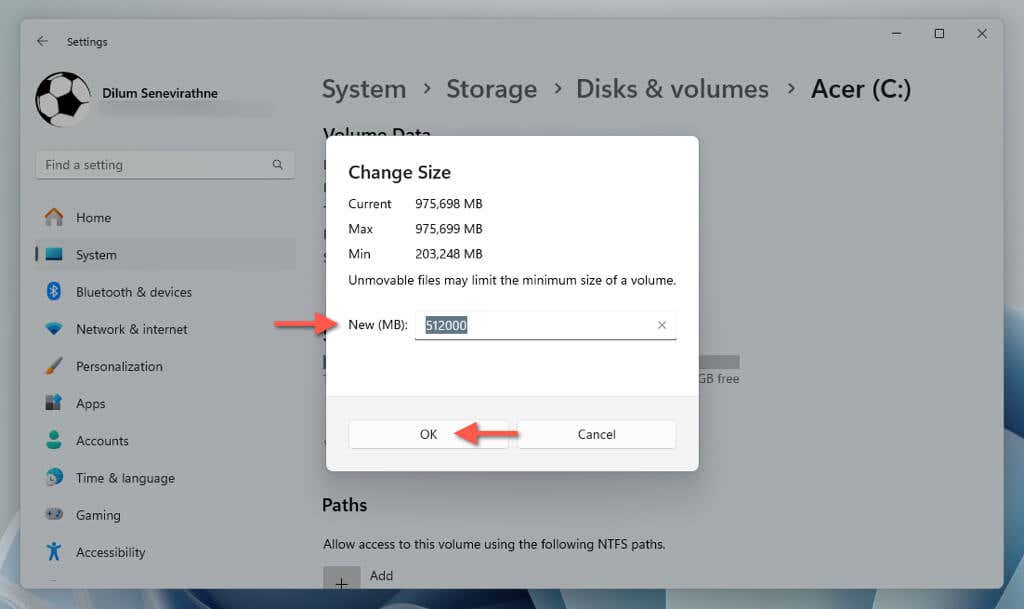
- Enter the new size of the partition in megabytes into the New (MB) field—use the Max and Min values for reference—and select OK.
- Wait until Windows resizes the system partition.
Partition the Unallocated Space
You can now create a new partition out of the unallocated space. Just:
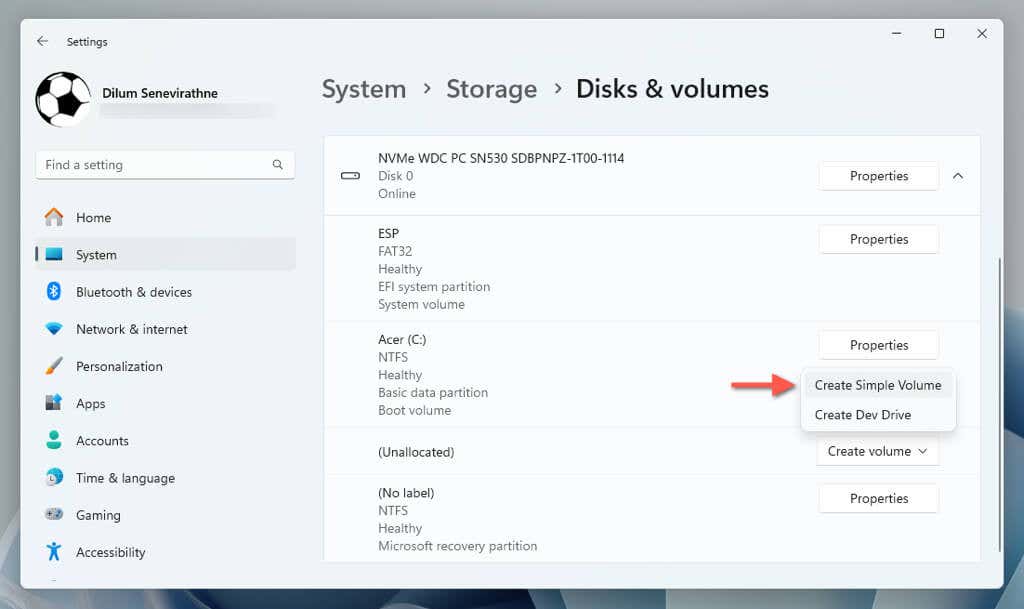
- Return to the "Disks & volumes" screen and select Create volume > Create Simple Volume next to Unallocated.
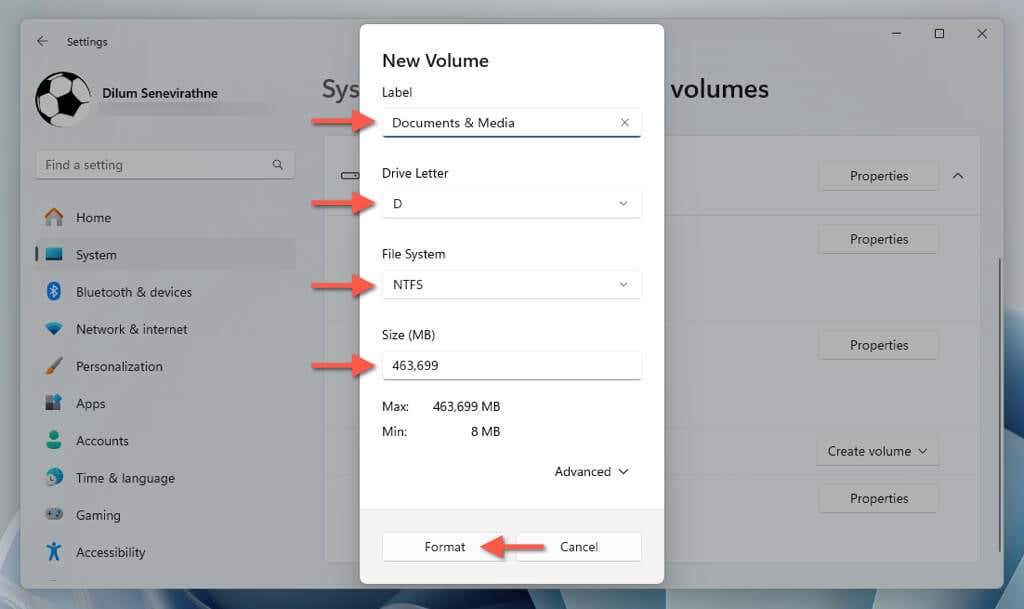
- Specify the label, drive letter, file system, and size, and choose Format.
The partition should now appear within the "Disks & volumes" screen. If you want to change the label and drive letter later, select Properties next to the partition and use the Change label and Change drive letter options.
Delete and Merge the Partition
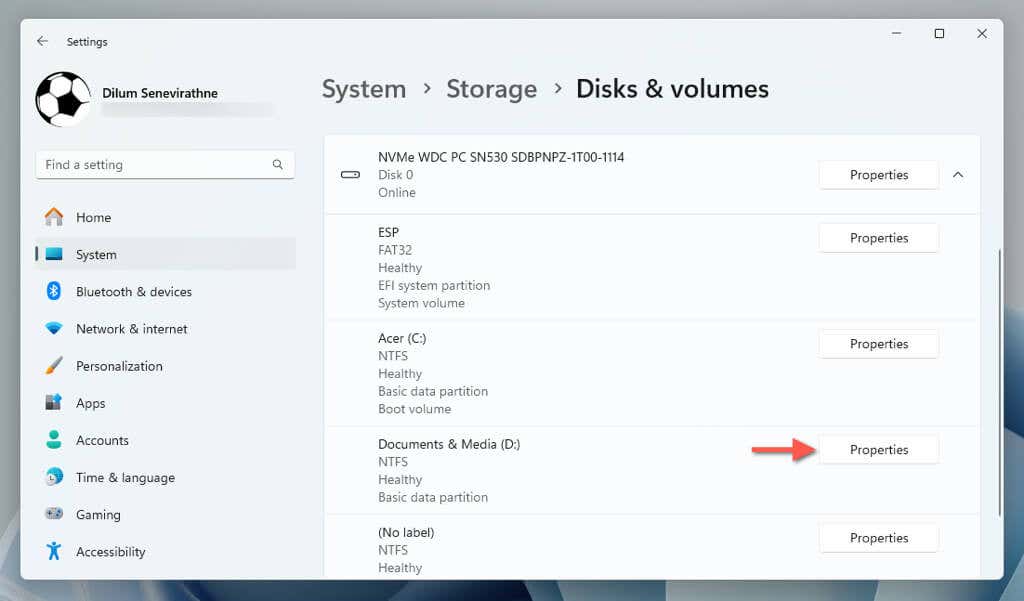
You always have the option to delete and merge the partition back to the volume that comes before it. Make sure to take a back up of your data first, and then:
- Select Properties next to the partition in the "Disks & volumes" screen.
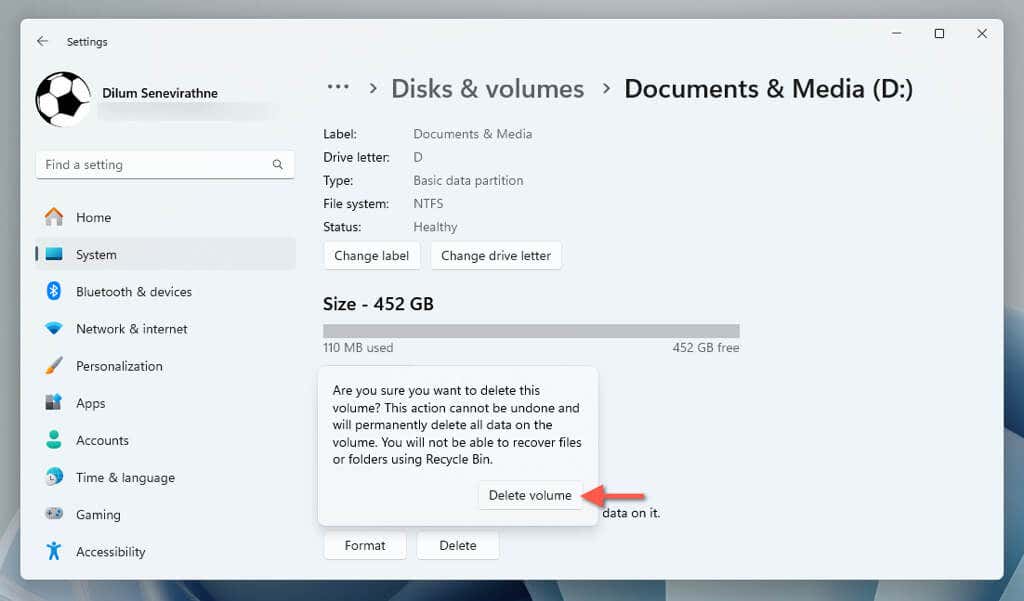
- Select Delete > Delete volume.
- Select Properties next to the previous volume in the "Disks & volumes" screen.
- Select Change size.
- Enter the max amount into the New (MB) field and select OK.
- Wait until Windows extends the partition.
Make Your Pick
Partitioning an SSD in Windows 11 is simple once you know what to do, and you have two built-in tools to choose from: the Disk Management tool and the Settings app. Each has its benefits. Disk Management provides comprehensive control and visual feedback during the partitioning process, while Settings presents a more contemporary interface for carrying out the task.

