

Your fingerprint reader just sat there. Windows stared at your face and did nothing. Or your PIN — the one you’ve typed a thousand times — suddenly doesn’t work. Windows Hello fails hard and tells you almost nothing about why.
The triage table below maps your exact symptom to the most likely fix. Start there, not at Fix #1.
What Is Windows Hello (and What Can Break It)?
Windows Hello is Windows 11’s built-in passwordless sign-in system. Instead of typing a password, you authenticate with one of three methods:
- PIN — A short numeric or alphanumeric code tied exclusively to your device. It’s stored inside the TPM (Trusted Platform Module) — a chip on your motherboard that keeps credentials isolated from the rest of the system. Your PIN can’t be used to sign in from another device, which makes it more secure than a reusable password.
- Fingerprint recognition — Requires a compatible fingerprint reader and the correct biometric driver installed in Windows.
- Facial recognition — Requires an IR (infrared) camera, not a standard webcam. A regular webcam cannot run Windows Hello face sign-in. IR cameras use depth-sensing to block photo spoofing, which is why they’re a hard requirement.
When Hello breaks, the cause almost always falls into one of three buckets:
- Software or settings problem — corrupted credentials, a bad Windows Update, or a misconfigured setting. Most common, and easiest to fix.
- Driver or hardware recognition problem — a fingerprint reader or IR camera that Windows can no longer communicate with.
- Policy or security configuration block — a Group Policy or registry setting is actively preventing Hello from working, often after an update or on a managed PC.
Knowing which bucket you’re in cuts the fix list from nine items down to two or three.
Before You Start: Self-Triage Flowchart
Answer the question that matches your situation, then jump straight to the recommended fix.
| Your Symptom | Most Likely Cause | Start Here |
|---|---|---|
| Hello broke right after a Windows Update | Update invalidated credentials or introduced a regression | Fix #1, then Fix #3 |
| Hello broke right after a driver install or update | Biometric driver regression | Fix #4 |
| Windows Hello is greyed out or missing from Settings entirely | Group Policy or registry block, or TPM disabled | Fix #5, then Fix #6 or Fix #7 |
| Hello has never worked on this device | TPM disabled in BIOS, or incompatible hardware | Fix #5 |
| PIN is broken but fingerprint/face still works | NGC folder corruption | Fix #8 |
| Fingerprint or face is broken but PIN still works | Biometric driver problem | Fix #4 |
| Hello broke after a Microsoft account password change | Cloud-side credential mismatch | Fix #9 |
| Not sure — it just stopped working | Start at the beginning and work down | Fix #1 |
If you’re not sure which row fits, start at Fix #1 and work down — each fix is fast to check.
Fix #1: Re-Enroll Your Windows Hello Credentials
Stored credentials can get corrupted or invalidated — especially after a Windows Update. Re-enrolling takes under two minutes and solves the problem more often than you’d expect.
- Open Settings > Accounts > Sign-in options.
- Find the Hello method that’s failing — Fingerprint recognition (Windows Hello), Facial recognition (Windows Hello), or PIN (Windows Hello).
- Click the method to expand it, then click Remove.
- Once removed, click Set up and follow the wizard to re-enroll.
- Lock your PC with Windows + L and test immediately.

If the options are greyed out: You have a policy or TPM block, not a credential problem. Skip to Fix #5, Fix #6, or Fix #7 depending on your Windows edition.
Fix #2: Run the Windows Hello Troubleshooter
Windows 11 has a built-in troubleshooter that can detect and auto-repair common Hello issues. Even when it can’t fix the problem, the error output tells you what’s wrong — which makes everything that follows less guesswork.
- Open Settings > System > Troubleshoot > Other troubleshooters.
- Find Windows Hello or a sign-in related troubleshooter entry.
- Click Run next to it.
- Read the results carefully. Note any error codes or specific messages — they point directly to the right fix.
Note: The troubleshooter’s availability varies by Windows 11 build. If you don’t see it, search “Fix sign-in options” in the Start menu as an alternative entry point.
Fix #3: Install Pending Updates or Roll Back a Recent One
Windows Hello breaks after bad updates — but Microsoft often pushes follow-up patches that fix those regressions. This fix goes in two directions depending on your situation.
If you have pending updates:
- Open Settings > Windows Update.
- Click Check for updates and install everything listed, including optional driver updates.
- Restart and retest Hello.
If Hello broke immediately after a specific update:
- Open Settings > Windows Update > Update history.
- Click Uninstall updates at the top.
- Find the most recently installed cumulative update.
- Click Uninstall next to it and follow the prompts.
- Restart and retest Hello.
Important: Rolling back an update is a temporary diagnostic step, not a permanent fix. The same update may reinstall automatically on the next patch cycle. If rolling back restores Hello and the next update breaks it again, report it via the Feedback Hub.
Fix #4: Update, Reinstall, or Roll Back Biometric Drivers
Fingerprint readers and IR cameras depend entirely on the correct drivers. A broken driver is one of the most common causes of biometric Hello failures — especially if your PIN still works but fingerprint or face sign-in doesn’t.
- Right-click Start and select Device Manager.
- Expand Biometric devices and look for your fingerprint reader or IR camera. A yellow warning icon means a driver problem.
- Right-click the device and select Update driver > Search automatically for drivers.
- If the automatic search finds nothing useful, go to your PC manufacturer’s support site and download the biometric driver manually. Search your laptop model plus “fingerprint driver” or “IR camera driver.”
- To do a clean reinstall: right-click the device > Uninstall device, check “Delete the driver software for this device”, then restart. Windows will reinstall the driver on reboot.
- To roll back a driver that recently broke Hello: right-click the device > Properties > Driver tab > Roll Back Driver. This option only appears if a previous driver version is stored on the system.
IR camera location tip: IR cameras don’t always appear under Biometric devices. Check under Cameras or Imaging Devices if you don’t see it there. For laptops, always use the driver from your manufacturer’s site — OEM drivers are tuned for your specific hardware.
Fix #5: Verify TPM Is Enabled in BIOS/UEFI
Windows Hello stores all credentials inside the TPM chip. If TPM is disabled, Hello can’t function at all — sign-in options in Settings will be greyed out or fail during setup. TPM 2.0 is required for Windows 11, so it should be on your hardware, but it can get accidentally disabled in BIOS.
- Press Windows + R, type
tpm.msc, and press Enter. - If the center panel says “Compatible TPM cannot be found,” TPM is disabled in your BIOS.
- Restart your PC and enter BIOS/UEFI setup. The key varies by manufacturer — common options are Del, F2, F10, or F12. Watch for a prompt during startup.
- Inside BIOS, look in the Security section. The TPM setting may be labeled TPM, PTT (Intel Platform Trust Technology), or fTPM (AMD firmware TPM).
- Enable it, then save and exit (usually F10).
- After Windows boots, run
tpm.mscagain to confirm TPM is recognized. - Re-enroll your Windows Hello credentials using Fix #1.
Can’t find the TPM setting? Search your laptop or motherboard model plus “enable TPM BIOS” — your manufacturer’s support page will show the exact location.
Fix #6: Fix Group Policy Settings (Windows 11 Pro, Enterprise, and Education Only)
This fix does not apply to Windows 11 Home. Home users should skip to Fix #7.
Group Policy controls system-wide Windows settings. IT administrators use it to enforce configurations across an organization. On Pro, Enterprise, or Education editions, a Group Policy setting that disables Windows Hello is one of the most common reasons Hello is greyed out.
Domain-joined PC warning: If your PC is on a workplace or school network, an IT admin may have intentionally configured these policies. Don’t change Group Policy on a work-managed device without checking first — the restriction may be deliberate.
- Press Windows + R, type
gpedit.msc, and press Enter. - Navigate to: Computer Configuration > Administrative Templates > Windows Components > Windows Hello for Business.
- In the right pane, look for policies set to Disabled or Enabled that conflict with Hello:
- “Use Windows Hello for Business” — if set to Disabled, change it to Not Configured.
- “Turn off the fingerprint reader” — if set to Enabled, change it to Not Configured.
- Double-click any conflicting policy, select Not Configured, and click OK.
- Restart the PC, or run
gpupdate /forcein an elevated Command Prompt to apply changes immediately.
Fix #7: Edit the Registry to Re-Enable Windows Hello (Windows 11 Home)
On Windows 11 Home, Group Policy Editor isn’t available. But the same settings live in the Windows Registry — a database where Windows stores low-level configuration values. A wrong registry value can block Hello just as effectively as a Group Policy setting.
You’re making one targeted change to a single value. That’s it.
Step 1: Back up your registry first
- Press Windows + R, type
regedit, and press Enter. Click Yes at the UAC prompt. - Click File > Export.
- Choose a save location, name the file something like
registry-backup-before-hello-fix, and set Export range to All. - Click Save.
Step 2: Edit the PassportForWork key
- In the Registry Editor address bar, navigate to:
HKEY_LOCAL_MACHINE\SOFTWARE\Policies\Microsoft\PassportForWork
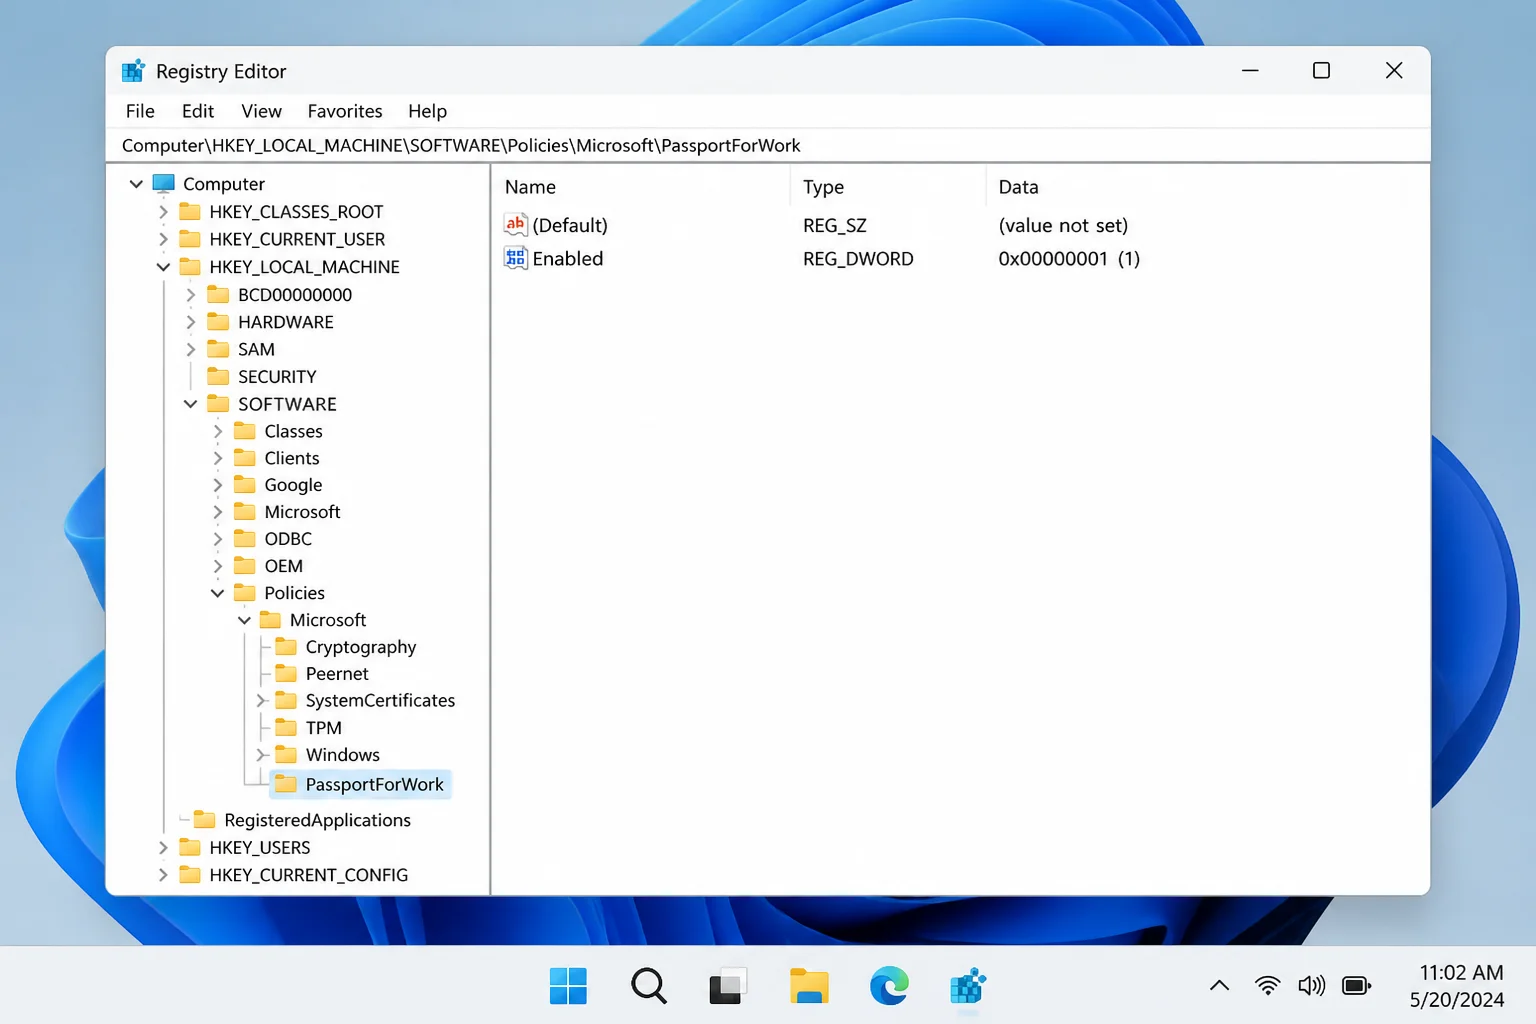
- Look in the right pane for a DWORD value named Enabled.
- If Enabled exists and is set to
0: double-click it, change the value to1, and click OK. - If Enabled doesn’t exist: right-click the right pane, select New > DWORD (32-bit) Value, name it
Enabled, and set the value to1. - If the PassportForWork key doesn’t exist at all: the registry isn’t the cause. Revisit Fix #5 or Fix #6.
- If Enabled exists and is set to
- Close Registry Editor and restart your PC.
You’re changing one value in one key. As long as you follow these steps exactly, this is fully reversible — that’s what the backup is for.
Fix #8: Restart the Biometric Service and Clear the NGC Folder
The NGC folder lives at C:\Windows\ServiceProfiles\LocalService\AppData\Local\Microsoft\NGC. It stores your Hello PIN credential data. If it gets corrupted — after a Windows Update, account change, or password reset — your PIN stops working even though everything else looks fine.
Clearing the folder forces Windows to rebuild it clean on next boot.
Step 1: Show hidden files
- Open File Explorer.
- Click View > Show > Hidden items.
Step 2: Restart the Windows Biometric Service
- Press Windows + S, search for Services, and open the app.
- Scroll down to Windows Biometric Service.
- Right-click it and select Restart.
Step 3: Take ownership of the NGC folder
The NGC folder has strict permissions. You need ownership before you can delete its contents.
- Navigate to
C:\Windows\ServiceProfiles\LocalService\AppData\Local\Microsoft\. - Right-click the NGC folder and select Properties.
- Go to the Security tab > Advanced.
- Click Change next to the Owner field.
- Type your Windows username, click Check Names, then click OK.
- Check “Replace owner on subcontainers and objects”, then click Apply > OK.
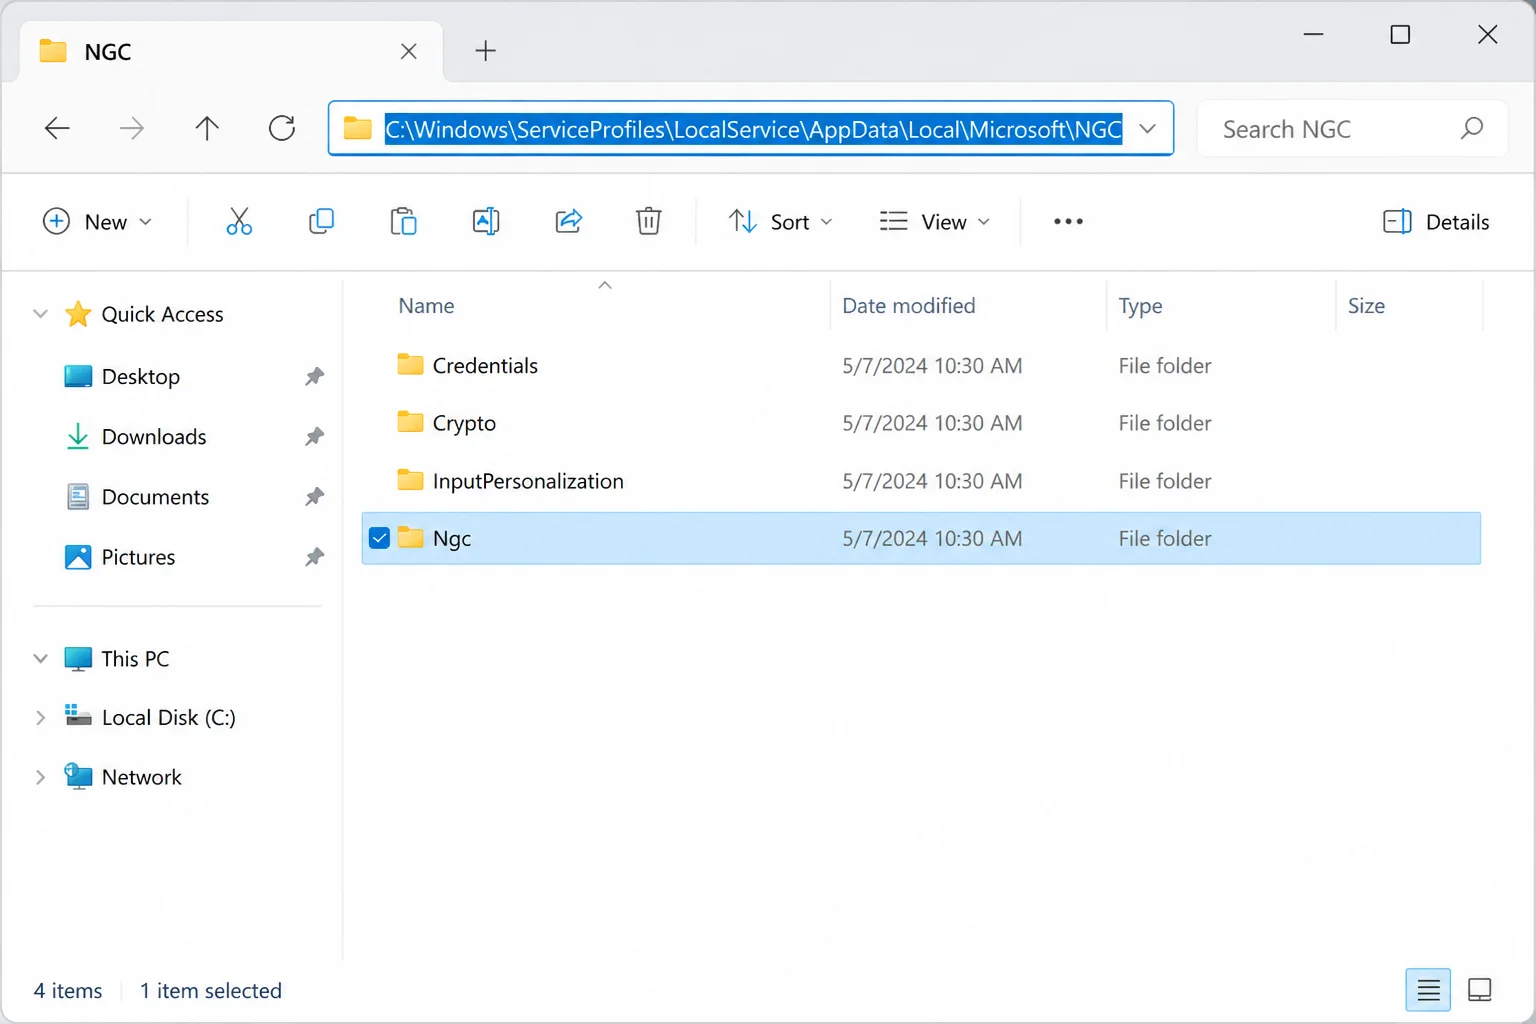
Step 4: Delete the NGC folder contents
- Open the NGC folder.
- Select everything inside (Ctrl + A) and delete it. Delete the contents, not the NGC folder itself.
- Restart your PC. Windows rebuilds the NGC folder automatically.
- Re-enroll your PIN via Settings > Accounts > Sign-in options.
If you get “Access Denied” even after taking ownership: Open Command Prompt as Administrator and run:
icacls C:\Windows\ServiceProfiles\LocalService\AppData\Local\Microsoft\NGC /T /Q /C /RESETThen try deleting the folder contents again.
Fix #9: Reset Windows Hello via the Microsoft Account Online Portal
This fix only applies if you sign into Windows with a Microsoft account. Local account users can skip this.
Sometimes your Microsoft account’s cloud-side Hello data gets out of sync with your local device. This happens after password resets, account recovery, or switching from a local account to a Microsoft account. No local fix will resolve it — the mismatch has to be cleared from the portal.
- On a different device or browser, go to account.microsoft.com and sign in.
- Navigate to Security > Advanced security options.
- Scroll to the Windows Hello and security keys section.
- Find any Hello keys tied to your affected PC and click Remove.
- Back on your PC, open Settings > Accounts > Sign-in options and re-enroll Windows Hello from scratch.
- Restart and test sign-in.
Removing Hello keys from the portal doesn’t affect your password or other sign-in methods. It only clears the stale registration for that device.
Error Messages Quick Reference
| Error Message | What It Means | Fix to Try |
|---|---|---|
| “Something went wrong” during Hello setup | Generic credential enrollment failure | Fix #1, Fix #8 |
| “This option is currently unavailable” | Policy or TPM block | Fix #5, Fix #6, Fix #7 |
| “Compatible TPM cannot be found” (in tpm.msc) | TPM disabled in BIOS | Fix #5 |
| “Your PIN is no longer available” | NGC folder corruption | Fix #8 |
| “We weren’t able to set up Windows Hello” | TPM issue or driver problem | Fix #5, Fix #4 |
| Hello options greyed out in Settings | Group Policy or registry block | Fix #6 (Pro) or Fix #7 (Home) |
| Facial recognition option missing entirely | No IR camera detected or driver missing | Fix #4, hardware check |
When None of These Fixes Work
If you’ve worked through all nine fixes and Hello still won’t cooperate, the problem may be hardware. Fingerprint sensors and IR cameras do fail — it’s not common, but it happens.
Test your hardware before giving up on software fixes:
- Open Device Manager and check whether your fingerprint reader or IR camera appears at all. A device that doesn’t show up — not even with a warning icon — is likely dead or physically disconnected.
- Open the Camera app and see if your IR camera produces any image. If the Camera app can’t detect it, the hardware has failed.
On a domain-joined or work-managed PC: If IT locked down Group Policy, escalate to your IT administrator. The restriction is almost certainly intentional.
As a true last resort: A Windows repair install — via Settings > System > Recovery > Reset this PC > Keep my files, or by running an in-place upgrade from a Windows 11 ISO — can fix deep system file corruption without wiping your data. Only go here after everything else has failed.
Microsoft Support (support.microsoft.com) and the Microsoft Community forums are both legitimate escalation paths if you need a second opinion.
Prevention Tips
- Stay current on Windows Updates. Microsoft regularly patches Hello regressions. Letting updates pile up increases the chance of hitting a known bug that’s already been fixed.
- Keep biometric drivers from your manufacturer, not just Windows Update. OEM drivers are tuned for your specific hardware. Check your manufacturer’s support page every few months.
- Re-enroll Hello after changing your Microsoft account password from another device. Password changes frequently invalidate stored credentials on the local PC.
- Note what changed before Hello broke. Knowing what happened right before it stopped — an update, a driver change, a password reset — cuts diagnostic time significantly.
Wrapping Up
Fix #1 (re-enrolling credentials) and Fix #8 (clearing the NGC folder) solve most Windows Hello failures. They cover the two most common causes: post-update credential corruption and PIN data corruption. If neither works, the triage table at the top points you to the right fix.
Most Hello failures are software problems — no reinstall required. If you’ve run the full list and Hello still won’t cooperate, a physically failed fingerprint sensor or IR camera is the most likely remaining explanation. A USB fingerprint reader (around $30) is faster and cheaper than a repair install.
Last updated: May 2026 | Applies to Windows Hello on Windows 11 (all editions)