
Recently, I had a situation where I wanted to send someone a picture, but I wanted it to be a combination of two pictures. Sending the pictures separately would not have been fun, due to the fact that they had to be shown side by side to get the best effect. I also wanted to do this without Photoshop or downloading some third party program!
I got it to work using Paint, though it’s not the most ideal tool to use for obvious reasons. As long as you are ok with a little bit of cropping and image resizing, it’s not really that bad at all and the results are good. In this article, I’ll walk you through the steps to merge two pictures into one in Windows.
If you’re using Mac or just prefer a different tools than MS Paint, check out our YouTube video where we go through a couple of good photo editing tools that can do complete the same task easily.
Combine Two Images in MS Paint
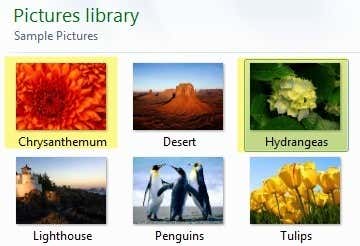
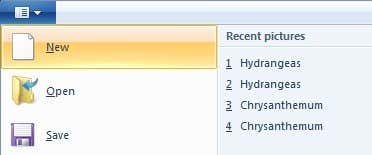
First, let’s start with the images we want to combine. In my example, I will be using two of the sample photos that Microsoft includes with Windows 7: Chrysanthemum and Hydrangeas.
The next thing we want to do is to figure out the image sizes. Depending on the photos you are trying to combine, you may have to crop one in order for it to fit properly next to the other image. Since we are using Paint, right-click on one of the images and choose Open with – Paint.
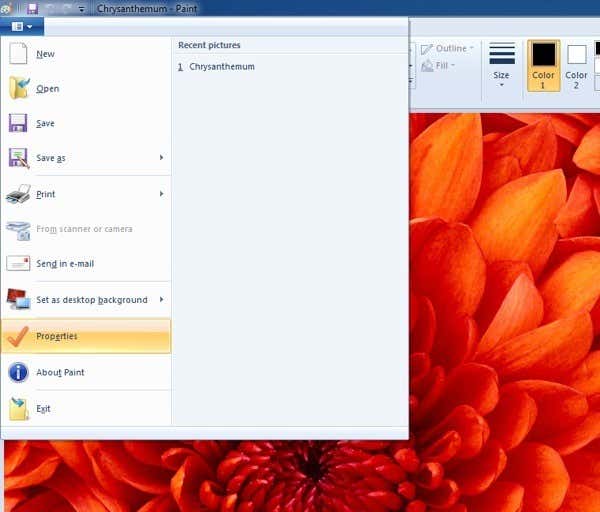
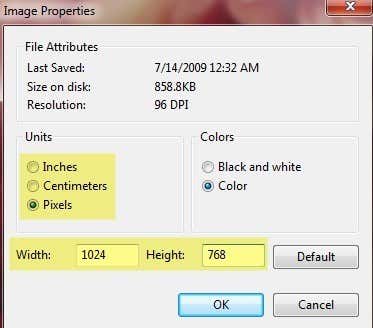
Click on the little arrow to the left of the Home tab and click on Properties. Here is where we will see how big the image is in pixels or inches.
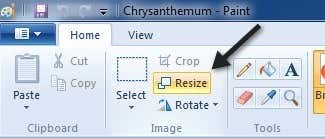
If you are opening pictures from a digital camera, they may be very large and therefore it’s a good idea to first resize them to something more reasonable. This way, you can also email the combined picture without it being something crazy like 8 MB in size! To resize in Paint, click on the Resize button on the Home tab.
You can either do it by percentage or by pixels if you prefer. You also want to make sure you keep the Maintain aspect ratio box checked.

Once you have resized it, then you can also crop it if you want. Again, you can always go to Properties to see the final size of the image in pixels or inches. That way you can adjust the second image to be the same size if you want that. To crop, just click on the Select button and then select the area you want to crop. Finally, just click the Crop button and you’re good to go.

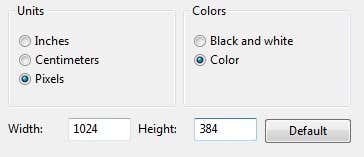
After you are done adjusting the size and cropping, go ahead and save the photo. Now open the second image and do the same adjustments to match the first image. Now to the fun part of combining the images. Make a note of the sizes of both images and then create a new file in Paint.
By default, it’s going to create a new file with a default size. We need to specify the size of our new image so that the width is exactly the width of image 1 to image 2 and the height is just the height of one image. In my case, both images were originally 1024×768, but I then resized them to half. So I need to change my new image size to 1024×384 in order to accommodate both images. Make sense? Again, go to Properties and adjust the size manually:
Note that this will put the two images side by side. If you wanted them on top of each other, then you would make the width in our case 512 and the height 768. So just have to do a little math to get the right size for what you want to do. Once you have resized the new image, go ahead and open another instance of Paint. If you try to do File Open, it will ask you to close the current image, so you have to open a new instance of Paint.
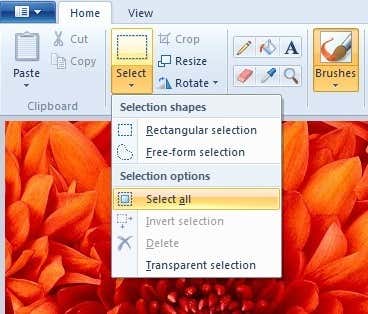
Open one of the images and click Select All to select the whole image. Then click on Copy.
Now go to the new image and click on the Paste button at the top left. It should look like this now:

Now in the second instance of Paint, go ahead and open the second image and Select All and then Copy. Then Paste it into the new image. By default, it’s going to go right over the first image. If you hover your mouse over the image, you’ll see you can drag it to a new location. Just click and drag to the right side.
If you mess up and drop it in the wrong place, for some reason it’s impossible to select the image again. At least I could not figure it out. In that case, you just have to click the Undo arrow at the very top or press CTRL + Z. Then just paste it in again and move it. Also, when you paste it the first time, you can use the arrow keys on your keyboard to move the image also.
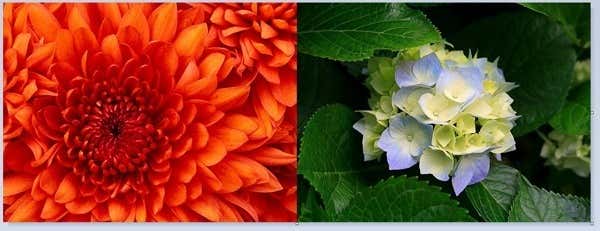
So that’s it! Now just do a File – Save As and go ahead and save the combined image! It can take a little time and patience, especially if you have two images that are completely different in size, but once you get the hang of it, it’s pretty easy. It’s also good to know just in case you are using someone’s computer that doesn’t have third-party photo editing software installed. Enjoy!