It’s taken a while for Microsoft to become competitive again in the browser market, but the company has finally launched a browser worth using in the new, Google Chrome-based Microsoft Edge. Microsoft’s new browser has been lauded for its speed and ease of use on multiple platforms, including on smartphones.
Microsoft Edge isn’t for everyone, however. If you’re happy using Chrome or Firefox, you probably aren’t in a rush yet to switch to another Microsoft browser. You can bypass Edge pretty easily if you don’t use it, but if you want to know how to remove Microsoft Edge from Windows 10 completely, you’ll need to follow these steps.

Is It Possible To Remove Microsoft Edge From Windows 10?
The answer is: it depends. At the moment, there are two versions of Microsoft Edge that you may have installed on your computer, and the ability to remove them varies.
If you have the older Microsoft Edge browser installed, which used Microsoft’s own browsing engine and had a different interface, then you won’t be able to remove it directly. However, from Windows 10 version 2004, this version of Edge is being automatically replaced with the new, Chrome-based Edge release.
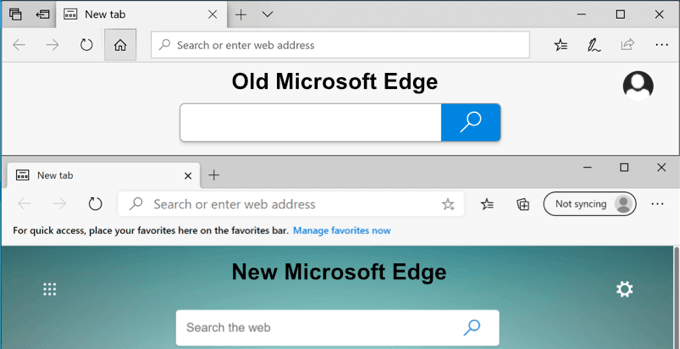
Unfortunately, you won’t be able to remove this version of Microsoft Edge directly, either. The only way you can remove Microsoft Edge from your PC is if you’ve downloaded the new Chrome-based Edge and installed it manually from the Microsoft website. This won’t remove Edge completely, however.
One way or another, Microsoft Edge is a core component of Windows 10. If you’ve upgraded early and installed the Chrome-based Edge, removing it will cause the original Edge browser to return (at least until this is replaced with the newer version automatically).
There are options to stop, hide, and otherwise disable Edge if you don’t want to use it, but this isn’t necessarily the best thing to do. Some core Windows features will rely on Edge, but you can (for the most part) bypass it entirely by setting another browser as your default web browser and ignoring Edge completely.
This will ensure that, in almost every situation, your third-party browser is used for the web. If you insist on disabling Edge, then you’ll need to remember this warning, as it could result in complications at a later date.
Using The Windows 10 Uninstall Menu (For Manual Edge Installations)
If you’ve installed the new, Chrome-based Microsoft Edge yourself from the Microsoft website, then you can remove this like any other Windows app from the Windows Settings menu.
- Right-click the Start menu icon and click Settings to begin. From here, click Apps > Apps & Features and find Microsoft Edge in the list (or by using the search bar).
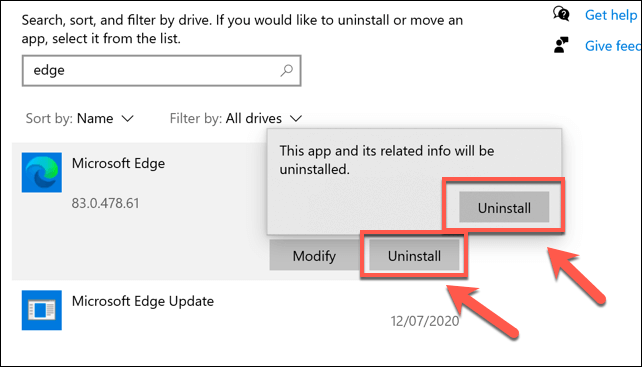
- Once you’ve found Edge, click the entry and press Uninstall to begin the removal. Press Uninstall in the pop-up menu again to confirm. Make sure that any open Edge browsers are closed, otherwise the removal won’t be able to proceed.
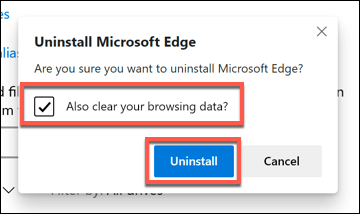
- Edge will ask you for confirmation to uninstall. Click Uninstall again to agree to do this, making sure that the Also clear your browsing data checkbox is removed if you want to wipe your browsing history in the process.
This will only work if you’ve manually installed the new Edge release. Once Windows 10 has updated (version 2004 and newer), this version of Edge will replace the older version entirely through Windows update, and you won’t be able to remove it.
Changing Your Default Web Browser In Windows 10
If you prefer to use another web browser, you can mostly ignore the existence of Microsoft Edge by selecting another browser as your default web browser in Windows 10.
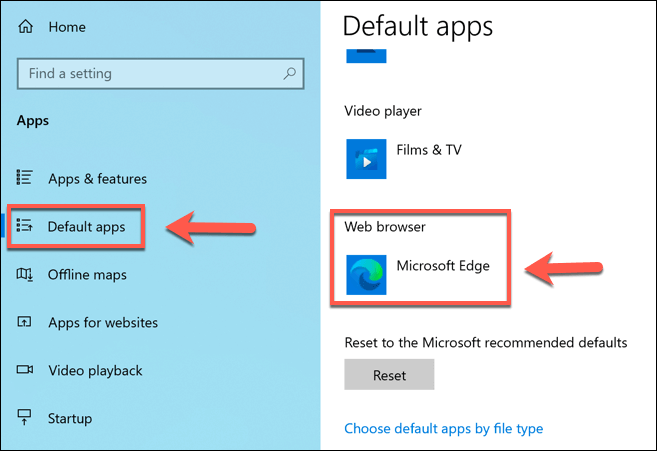
- To do this, right-click the Windows Start menu and click Settings. From here, press Apps > Default Apps. Click the existing Web Browser entry to begin changing your default browser.
- In the Choose an app pop-up window, select another installed web browser from the list. If you don’t have one installed, click Look for an app in the Microsoft Store to find an alternative.
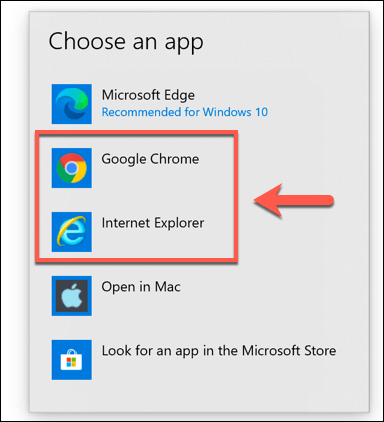
Once selected, your chosen browser will be used for almost all web-based services on Windows 10. You can change this at any time by repeating the steps above.
Using PowerShell To Remove Microsoft Edge
If you’re determined to try to remove Microsoft Edge entirely, you may be able to do so using a PowerShell command. This isn’t guaranteed to work, however, and may cause you complications if you try to use an app or system feature that needs Edge to work.
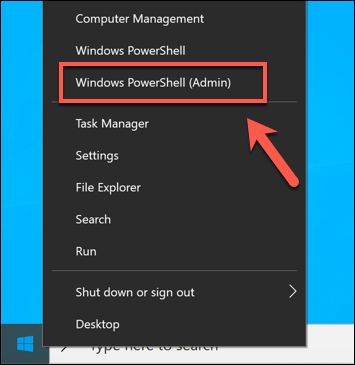
- To do this, open a PowerShell window by right-clicking the Start menu and selecting Windows PowerShell (Admin).
- In the open PowerShell window, type get-appxpackage *edge* to find all appropriate system packages for Microsoft Edge on your PC.
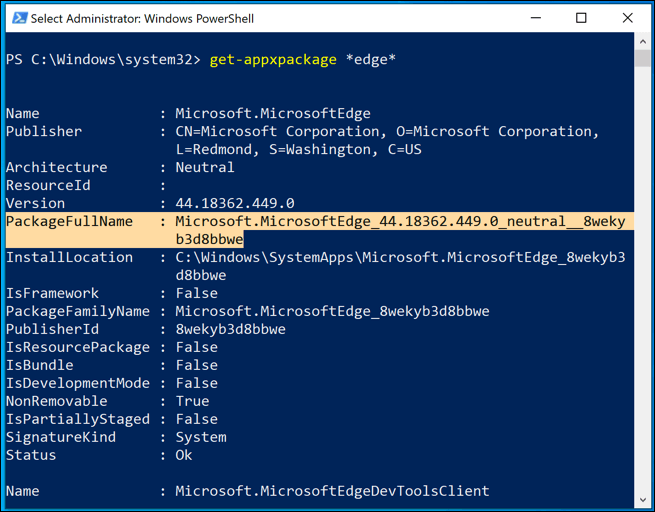
- Take note of the PackageFullName value for the Microsoft.MicrosoftEdge package. To remove this from your PC, type remove-appxpackage. At the next stage, type the PackageFullName value and hit enter.

This may only work for older versions of Microsoft Edge, however. If this method doesn’t work for you, you’ll need to try disabling it manually using the method below.
Disabling Microsoft Edge Using Windows File Explorer
For security reasons, Windows is pretty protective of core system features and files. If you’re trying to disable Microsoft Edge and you’re not having luck with the methods above, you should be able to rename the folder it sits in using Windows File Explorer.
By renaming the folder, you’ll hide all Edge system files, preventing it from running and disabling it in the process.
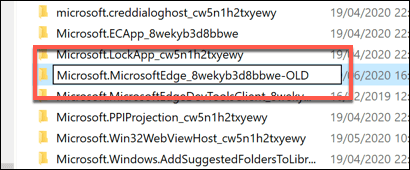
- To disable the system version of Edge, open C:WindowsSystemApps in File Explorer. Locate the Microsoft.MicrosoftEdge_xxxxxx folder, right-click, then select Rename.
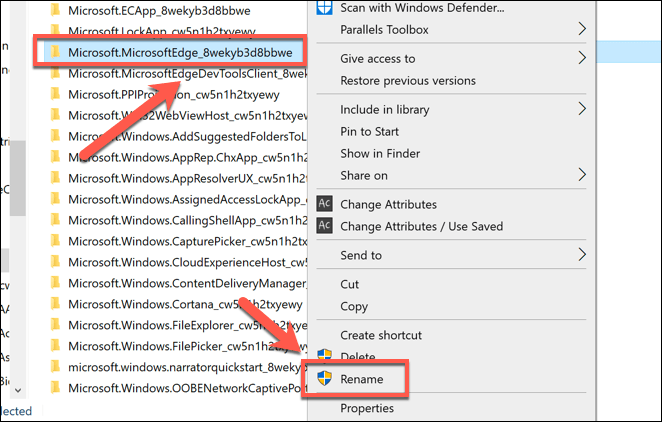
- You can rename this to anything you like, but it’s best to simply add -OLD to the folder name. This will allow you to easily rename and restore the folder if you encounter problems later.
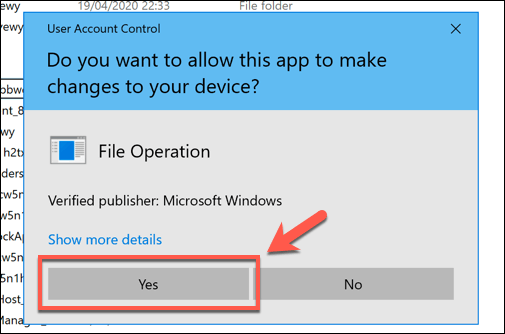
- A UAC window will appear, asking you to confirm. Click Yes to allow the change.
Once renamed, the Edge system files will remain in place, but Windows won’t be able to access them (because it won’t know where to find them). This will ensure that Edge remains disabled, but you can restore access to it by renaming the folder back to the original folder name at a later date.
Better Web Browsing In Windows 10
Whether you’re an Edge fan or you’re just too used to Firefox or Chrome, there are plenty of options out there to choose from to get online and browse your favorite websites. If you’re worried about your safety online, you could consider using VPN Chrome extensions to hide your IP address.
You may decide to go even further and use a browser sandbox in Windows 10, isolating your web browsing completely from other system resources. If you want to make money while you browse, you could even consider turning to the Brave Browser instead, which offers cryptocurrency rewards for using it.
Related Posts
- Preparing for Windows 10 End of Support: Upgrading to Windows 11
- How to Fix a “This file does not have an app associated with it” Error on Windows
- How to Fix an Update Error 0x800705b4 on Windows
- How to Resolve “A JavaScript error occured in the main process” Error on Windows
- How to Fix the Network Discovery Is Turned Off Error on Windows
Ben Stockton is a freelance technology writer based in the United Kingdom. In a past life, Ben was a college lecturer in the UK, training teens and adults. Since leaving the classroom, Ben has taken his teaching experience and applied it to writing tech how-to guides and tutorials, specialising in Linux, Windows, and Android. He has a degree in History and a postgraduate qualification in Computing. Read Ben’s Full Bio
