If you want to set up a server at home, you may want to be able to access it remotely. Of course, you can only connect remotely if you leave your PC or server left turned on. You may not want to do this, however, especially if you’re looking to lower your energy bill.
A good way to get around this problem is to switch your PC or server off, and then wake it up remotely only when you’re ready to use it. If you want to remotely wake up your Windows 10 PC, you can do so using existing methods, such as Wake-on-LAN (WOL), or using remote access software like Teamviewer.

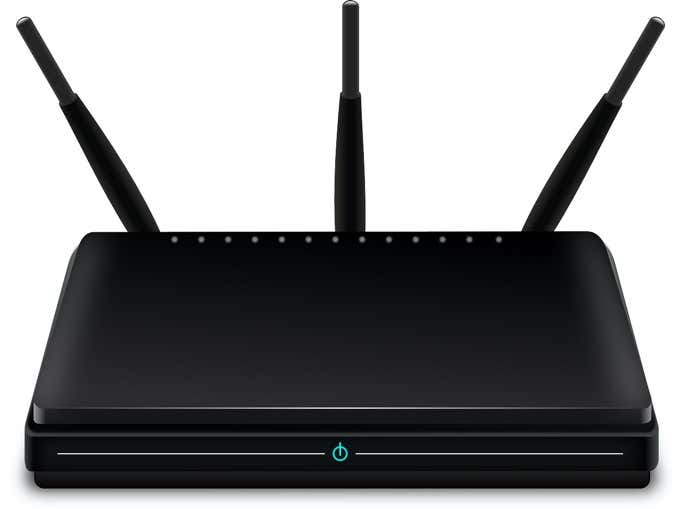
Preparing Your Network Router Or Firewall
Before you start using a remote wakeup tool to remotely wake up your Windows 10 PC, you’ll need to make sure that your network router is properly configured to allow you to access your PC, including setting up appropriate firewall rules.
For instance, most residential network routers have built-in support for Wake-on-LAN. You may need to consult your user manual for additional information on how to set this up, including how to forward the magic packet (the special data packet sent to switch your PC on) to your PC’s MAC address.
You can access the residential settings menu for most home routers by typing http://192.168.0.1 or http://192.168.1.1 in your web browser. You’ll need the administration username and password to sign in, which (if you haven’t changed it) should be printed on your router itself, or within the supplied user manual.
Enabling Wake-on-LAN On A Windows 10 PC
If your router is correctly configured, the next step in enabling Wake-on-LAN on a PC running Windows 10 is to enable the feature in your BIOS/UEFI settings.
This setting may be placed in different sections, depending on your motherboard firmware, but you should be able to find it in the Advanced or Power Management menus. Make sure the setting for Wake-on-LAN is set to On or Enabled. If it isn’t, the WOL magic packet (used to switch your PC back on) won’t turn on your PC.
If Wake-on-LAN is enabled in your BIOS, your next step is to enable it as a feature in Windows 10. You’ll have to set your network adapter to respond to the magic packet.
Note: This can only work with ethernet-connected PCs, meaning you can’t typically use Wake-on-LAN over WiFi.
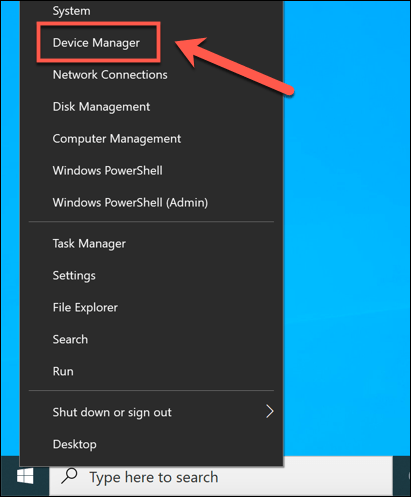
- To enable WOL in Window 10, you’ll need to enable it in the Device Manager settings menu. Right-click the Start menu and click Device Manager to begin.
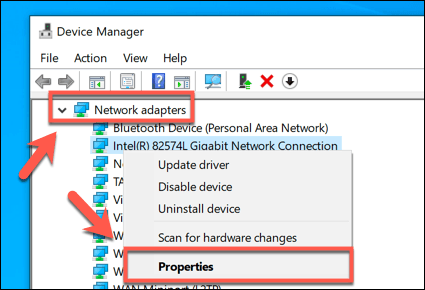
- In the Device Manager window, open the Network Adapters category. Right-click the network adapter you use to connect to your network, then click the Properties option.
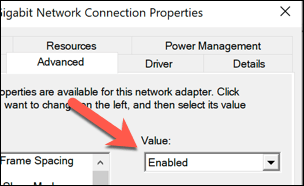
- In the Advanced tab of the Properties window, you can access various specialist settings for your network adapter. Click the Wake on Magic Packet option, then select Enabled from the Value drop-down menu.
- Once the magic packet setting is enabled, switch to the Power Management tab. Windows will need to allow your PC to respond to a WOL magic packet, so make sure the Allow this device to wake up the computer and Only allow a magic packet to wake the computer checkboxes are enabled. Click OK to save your new settings.
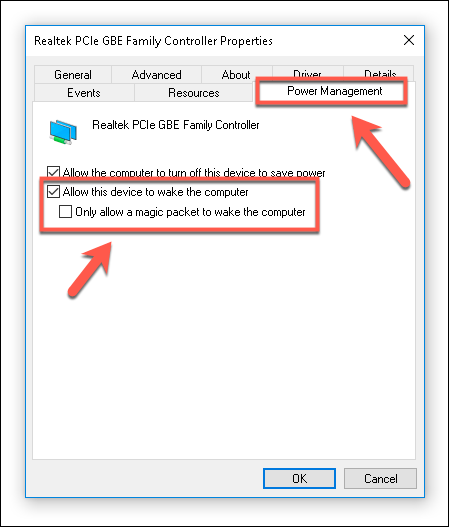
Once the settings are saved, your PC should be ready to be woken up with a Wake-on-LAN magic packet from another computer.
Sending a Wake-On-LAN Magic Packet
To remotely wake up your Windows 10 PC, you’ll need software on another PC capable of issuing a WOL magic packet, such as NirSoft WakeMeOnLAN. Despite a somewhat outdated interface, WakeMeOnLan still works as a free and easy solution for using WOL on Windows PCs.
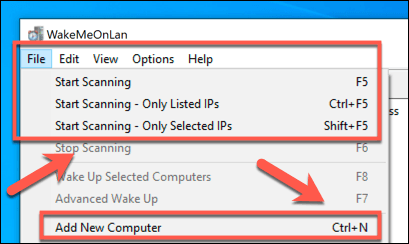
- To use WakeMeOnLan, you’ll need to download the software from the NirSoft website. Once you’ve extracted the ZIP file, launch the WakeMeOnLan.exe file to launch the software. You can begin scanning for WOL-capable PCs on your local network by clicking File > Start Scanning, or add a PC manually by clicking Add New Computer instead.
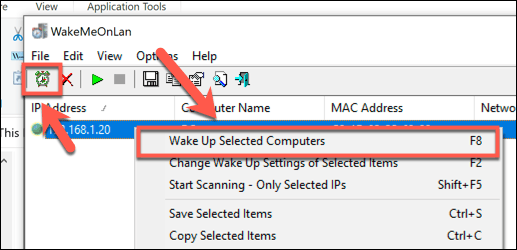
- Once you have a PC (or PCs) in your saved list, you can power them up using a WOL magic packet by selecting it and pressing the Wake Up Selected Computers icon. Alternatively, right-click and press the Wake Up Selected Computers option, or press F8 on your keyboard instead.
- You’ll need to confirm that you actually wish to remotely wake these PCs. Press OK to confirm.
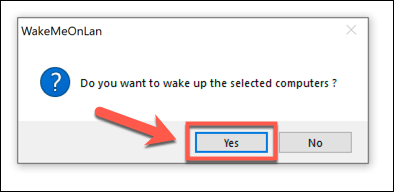
The WOL magic packet will be sent automatically once you confirm this. If everything is set up correctly, your PC should begin to wake up, allowing you to access it remotely.
Using Remote Access Software
You can also use remote access software like TeamViewer to remotely wake up a Windows 10 PC. TeamViewer uses the same WOL technology to remotely wake up a PC, which would allow you to wake up a PC that isn’t connected to your local network.
You might want to do this if you want to access your work PC from home or if you’re away from home and want to connect to your home PC, for instance.
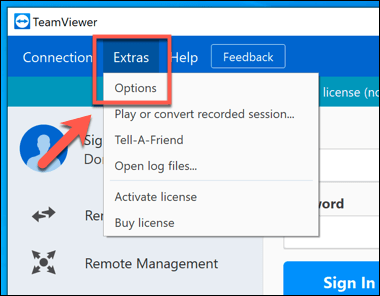
- You’ll need to enable Wake-on-LAN in your Teamviewer settings first. To do this, open the Teamviewer client and press Extra > Options.
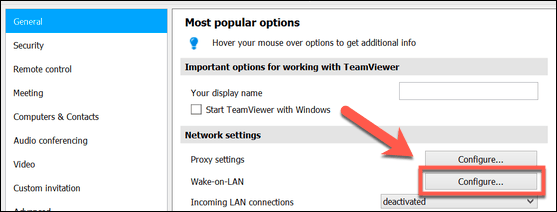
- In the General tab of the TeamViewer Options window, you should see a Network settings section. You can configure your Wake-on-LAN settings by clicking the Configure button next to the Wake-on-LAN setting, where you can set up the TeamViewer IDs that are allowed to connect to your PC. If you don’t see this setting, your network device probably isn’t capable of supporting Wake-on-LAN.
Once WOL is enabled in Teamviewer, you can launch it by clicking the Wake Up button for your PC, listed under the Computers & Contacts menu. Your remote PC will need to have TeamViewer installed and signed in with the same TeamViewer account for this to work.
Managing Your PC Remotely
You may have a remote PC or server you want to access, but you’ll also need a safe way to manage it. Turning your PC on from afar is one way to do this, but you may need to make more significant changes to your PC configuration. You might need to change the registry remotely to help troubleshoot an issue, for instance.
If you’re having trouble with your IP address changing regularly, you may want to set up a free dynamic DNS address to make sure you can always connect. If you’re worried about your data, you could even think about setting up your own personal cloud storage for easy access to your important files from home.
Related Posts
- Preparing for Windows 10 End of Support: Upgrading to Windows 11
- How to Fix a “This file does not have an app associated with it” Error on Windows
- How to Fix an Update Error 0x800705b4 on Windows
- How to Resolve “A JavaScript error occured in the main process” Error on Windows
- How to Fix the Network Discovery Is Turned Off Error on Windows
Ben Stockton is a freelance technology writer based in the United Kingdom. In a past life, Ben was a college lecturer in the UK, training teens and adults. Since leaving the classroom, Ben has taken his teaching experience and applied it to writing tech how-to guides and tutorials, specialising in Linux, Windows, and Android. He has a degree in History and a postgraduate qualification in Computing. Read Ben’s Full Bio
