If you’re looking to connect remotely to a computer, one of the best and most secure methods is to use a Secure Shell (SSH) connection. This creates an encrypted connection between you and the remote host, ensuring that the data being sent can’t be intercepted or monitored in any way.
You can use SSH as a tunnel for other traffic, too, such as a secure VNC connection over SSH. One way you can make your SSH connections even safer is to use SSH keys, which replaces potentially easy-to-crack passwords with a 617-digit encryption key. Here’s how to generate new SSH keys on Windows, Mac, and Linux computers.
What Are SSH Keys?
SSH keys allow you to create secure connections to remote servers or PCs without using a password using the Secure Shell protocol. SSH keys are created in pairs, with a private key and a public key that remain connected—one can’t be used without the other.
In most cases, the public key remains on the remote PC or server to encrypt the connection. The private key is then used to authenticate with that remote device, allowing you to connect and use it without supplying a password.
Public and private SSH keys are two parts of the same whole—without the private key, you can’t authenticate with the public key and establish a connection, and without the public key, the private key is useless. You can generate new SSH keys on Windows, Mac, and Linux, then transfer the public key to the remote device.
The private key is then stored safely on your PC or Mac. It’s important to save a copy of this key securely (for instance, using a password manager). If you lose it, you may not be able to re-establish your remote connections.
It’s also important not to share either your public or private key with others, but especially your private key (or the passphrase that may decrypt it). With the private key at their disposal, a rogue user will be able to establish a connection to your remote device without requiring any additional authentication.
How to Use Windows to Generate SSH Keys
You can use Windows to generate SSH keys using the built-in OpenSSH client or the popular, third-party PuTTY client. If you’d prefer to use a graphical user interface (GUI) to create new SSH keys, PuTTY is the best option. If you’d rather use built-in software, then use OpenSSH (via the Windows PowerShell) instead.
Using OpenSSH via Windows PowerShell
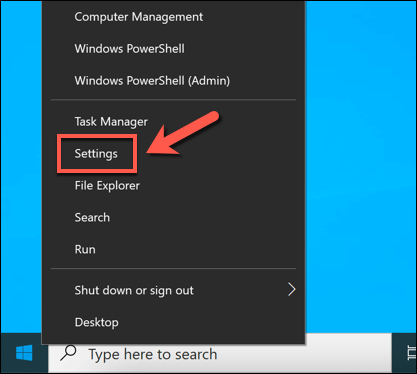
- If you want to use OpenSSH, you’ll need to first check that it’s enabled first. To do this, right-click the Start menu and select Settings.
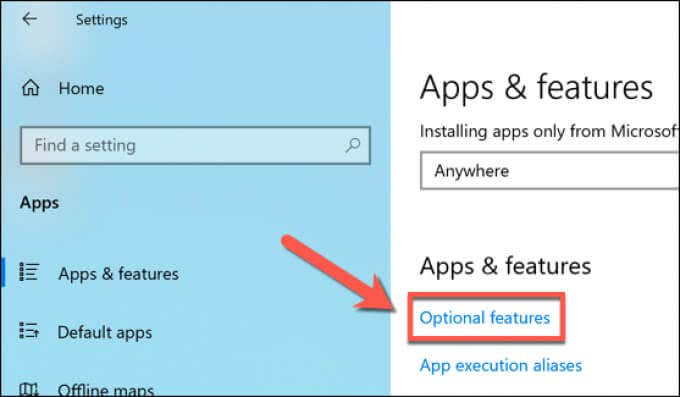
- In the Settings menu, select Apps > Apps & features > Optional features.
- Look through the Optional features menu for the OpenSSH Client entry. If it isn’t there, select Add a feature.
- Select the OpenSSH Client option, then select Install to install it. Allow a few moments for Windows to install the required software. If you want to use SSH to connect to your Windows PC, make sure to select the OpenSSH Server option, too.
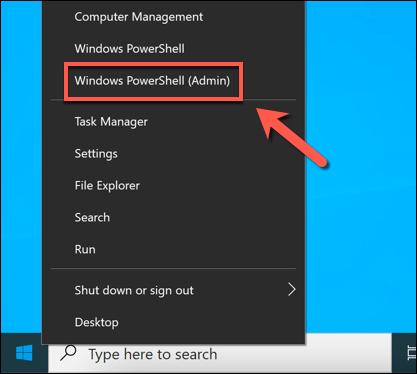
- With OpenSSH installed, right-click the Start menu and select Windows PowerShell (Admin).
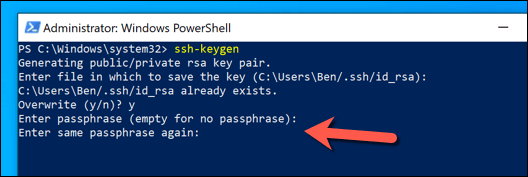
- In the new Windows PowerShell window, type ssh-keygen and select the enter key. You can type a new save location and filename for your key at this point, or simply press enter a second time to save your files in the C:Usersuser.ssh folder (replacing user with your own user directory).
The ssh-keygen tool will use RSA encryption by default, but you can switch to another form of encryption by typing ssh-keygen -t method instead, replacing method with one of the available encryption options (dsa, ecdsa, ed25519, rsa).
- Next, you’ll be required to enter a passphrase. This encrypts your private key on your PC and is typically recommended, although it isn’t required. You can use a memorable word or phrase, but you can also use a secure password here instead. Type in your passphrase and select enter to confirm, or simply leave it blank and select enter to leave it blank.
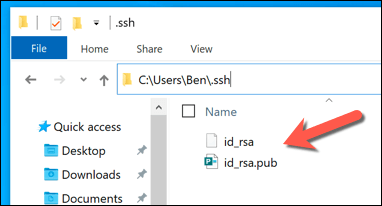
- Once you’ve added your passphrase, Windows will generate the required keys in the C:Usersuser.ssh folder (replacing user with your own user folder name). If you select to use the default filename, the id_rsa.pub file is your public key, while id_rsa (with no extension) is your private key. Once you’ve generated your keys, you’ll need to move your public key (id_rsa.pub) to the .ssh directory on your remote PC, Mac, or server.
Using PuTTY
The well-known PuTTY SSH client is the default client for most Windows users. It includes several other tools for establishing SSH connections, including PuTTYgen, a tool for generating new SSH keys.
- To use PuTTY to generate your SSH keys, download PuTTY for your PC and install it. Once installed, launch PuTTYgen (the included SSH generator tool) from the Start menu, select RSA from the Type of key to generate options, then select Generate. You can also select one of the alternative encryption options, but the steps below may vary.
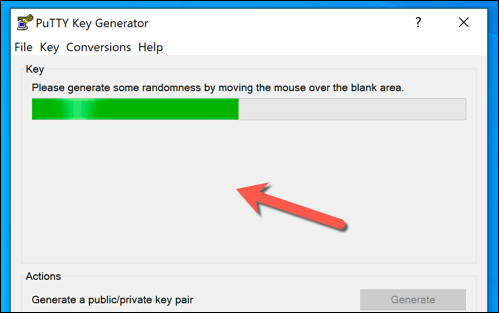
- Part of the process of generating your keys is to move your mouse randomly. Use your mouse or trackpad to do this in the area immediately below the progress bar until the key pair is generated.
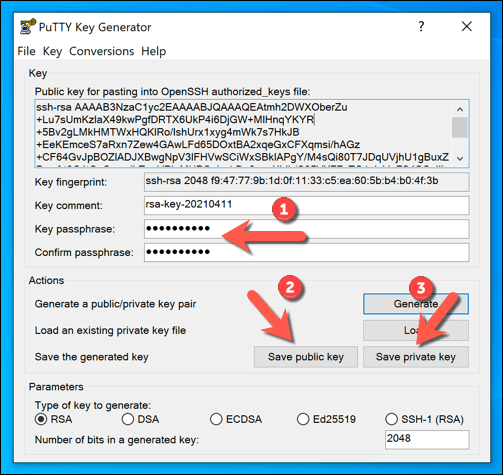
- If you want to add a passphrase to your keys, type this in the Key passphrase and Confirm passphrase boxes, then select Save public key and Save private key to save your keys. You can also select the text in the Public key for pasting into OpenSSH authorized_keys box, then right-click and select Copy to copy and paste it into a file manually.
- With your keys saved, you can then move the public key to your remote PC, Mac, or server. For your private key, you may need to move this into your C:Usersuser.ssh folder (replacing user with your correct user directory) to use it with your preferred SSH client.
How to Generate SSH Keys on Linux or Mac
OpenSSH is the gold standard set of tools for SSH management and, just like the Windows version, the ssh-keygen tool remains the best way to generate new SSH keys on Mac or Linux computers.
As a consequence, GUI tools for generating SSH keys are rare and not typically recommended. As the OpenSSH tools are included with all Mac computers and with almost all Linux distributions, the steps below should work for both platforms.
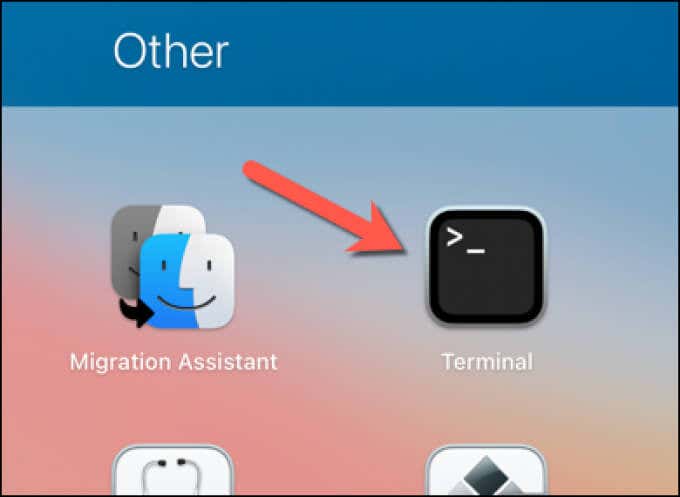
- To begin, open a new terminal window on your Linux PC or Mac. If you want to use your Mac to generate SSH keys, you can launch the Terminal app using the Launchpad. The steps for opening a new terminal on a Linux PC will vary, depending on your distribution.
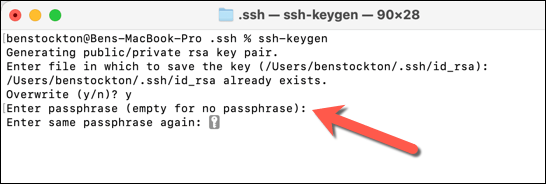
- In the new terminal window on your Linux PC or Mac, type ssh-keygen and select the enter key. As with ssh-keygen on Windows, the Linux and Mac version defaults to using RSA encryption. If you’d prefer to use another form of encryption, type ssh-keygen -t method, replacing method with the form of encryption you wish to use (eg. dsa, ecdsa, ed25519, rsa).
- You’ll next need to determine where you’d like to save the new SSH keys—the default file name and location will be shown in round brackets in the terminal window. If you want to save your keys somewhere else and with a different filename, type a new location and file name here, then select the enter key.
- Next, you’ll need to type a passphrase to encrypt your private key (if you’d like to use one). Type your passphrase twice, or select enter twice to leave the passphrase blank (although this isn’t recommended).
- At this point, your SSH keys will be generated in the save location you specified and using the default id_rsa filename for RSA encryption (id_rsa.pub for the public key and id_rsa for the private key). You’ll need to move your public key (id_rsa.pub) to your remote PC, Mac, or server to be able to establish your connection using SSH.
Making Secure Connections Using SSH
Once you’ve generated your SSH keys, you’ll need to make sure to copy the public key to your remote PC, Mac, or server. This links with your private key, which allows your preferred SSH client to establish secure SSH connections without a typical password. For instance, you could use SSH to connect to another Mac remotely.
Secure SSH connections can also help you get around a school or workplace firewall using an SSH tunnel. You can also use SSH to connect to (and update) a Raspberry Pi or other Linux-based PCs and servers. You’ll need to make sure you enable the OpenSSH server if you want to do this on Windows 10, however.
Related Posts
Ben Stockton is a freelance technology writer based in the United Kingdom. In a past life, Ben was a college lecturer in the UK, training teens and adults. Since leaving the classroom, Ben has taken his teaching experience and applied it to writing tech how-to guides and tutorials, specialising in Linux, Windows, and Android. He has a degree in History and a postgraduate qualification in Computing. Read Ben’s Full Bio


