Getting a new computer is an exciting experience, like purchasing a new car—you can’t wait to test its capabilities. At the same time, it can feel overwhelming, especially if you’re changing platforms, for example, from Windows to macOS.
Following our step-by-step guide, you can effectively set up your new computer and optimize its performance.
What to Do Immediately After Getting a New Computer
Here’s a helpful guide for those who have just acquired a new computer. Let’s start on the essential steps after getting a new machine. These tips work for the devices running Windows 11 and the earlier versions.
1. Power On & First Charge (for Laptop Users)
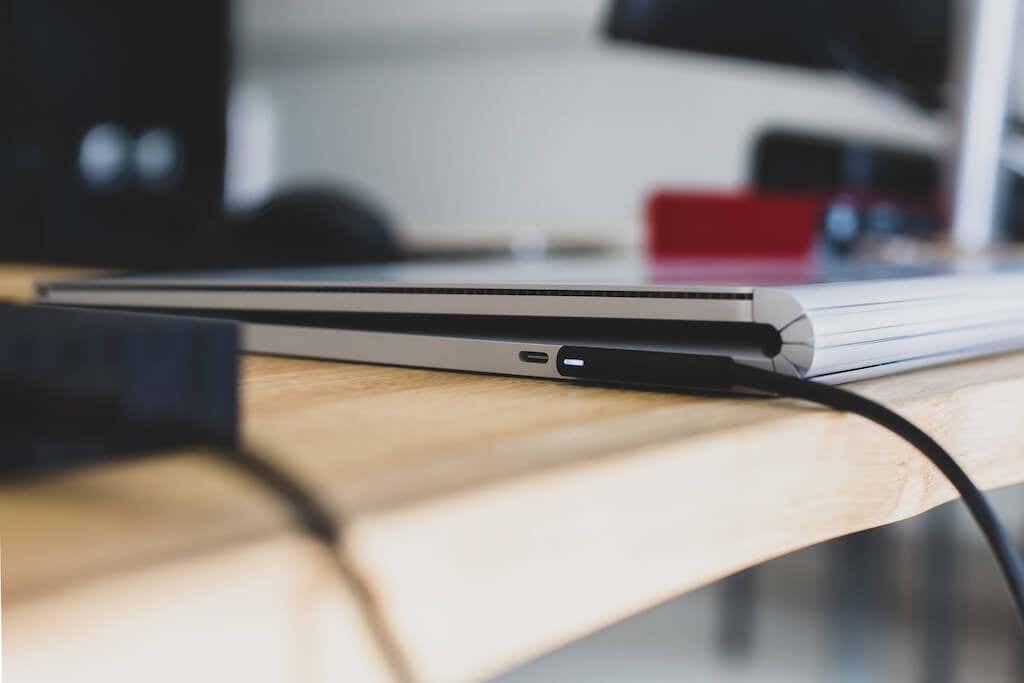
After buying a new laptop, the first step is to connect it to a power source and allow the battery to charge completely before switching it on.
Although it might be challenging to wait patiently, this step is crucial. Charging your computer for approximately 10 to 12 hours for the first time is recommended, roughly equivalent to leaving it overnight. This method ensures that your computer recognizes the total capacity of its battery, ensuring optimal performance and maximizing its overall lifespan. Rushing this process may negatively impact the longevity of your battery, something we want to avoid.
If you live in an area prone to power interruptions, don’t forget to add a surge protector to protect your computer against sudden power fluctuations.
2. First Start
After you connect all the essential components like the monitor, keyboard, and mouse and charge your computer, it’s time to check that everything is in the right place and you got what you paid for.
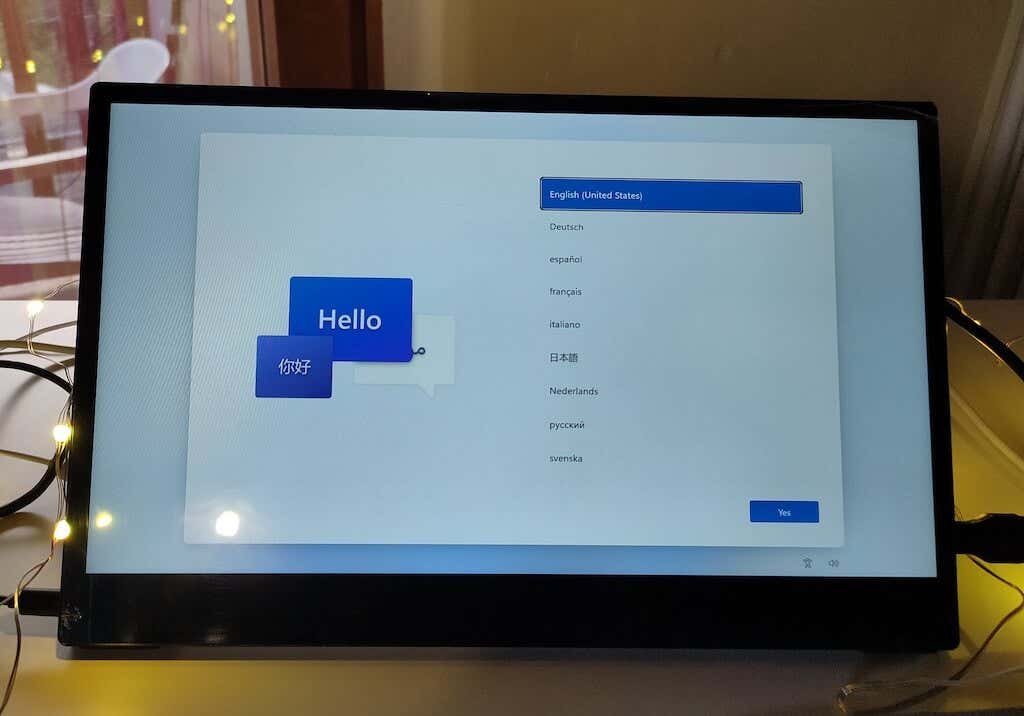
If it’s a Windows computer, the OS will prompt you to set up crucial details such as language, time zone, and clock settings. Microsoft encourages creating or using a Microsoft account for login, offering the convenience of syncing wallpapers and settings across all your Windows PCs through cloud connectivity. However, if you prefer to maintain a local account, setting up is a bit trickier. Still, you can achieve this by disconnecting from the internet during the Windows setup process.
Additionally, you might want to consider setting up multiple accounts for family members or kids, though this isn’t mandatory during the initial setup and can be done later.
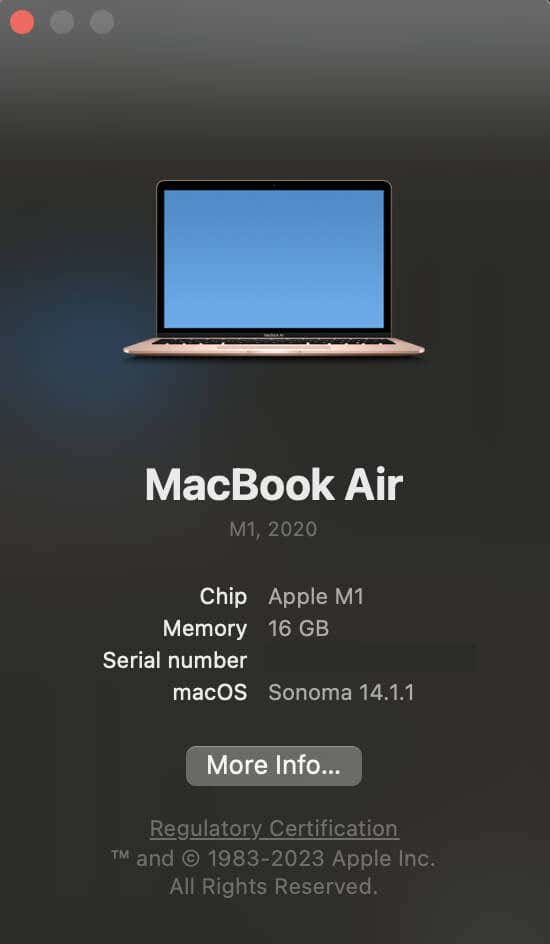
To check the hardware specifics of your new computer, Windows users can download the free CPUID software. Mac users can access this information by following the path Apple Icon > About This Mac > More Info on OS X. Linux users also have various options.
Verify that the installed processor model and speed, hard disk drive (HDD), and dedicated graphics card (if applicable) match your ordered specifications.
Finally, it’s essential to check your screen for dead pixels. Doing so will help ensure the display is free from defects. If any dead pixels are found, remember that you typically can return the computer for a replacement. You can easily find online resources by searching for “check for dead pixels” to assist you.
3. Get Rid of Bloatware
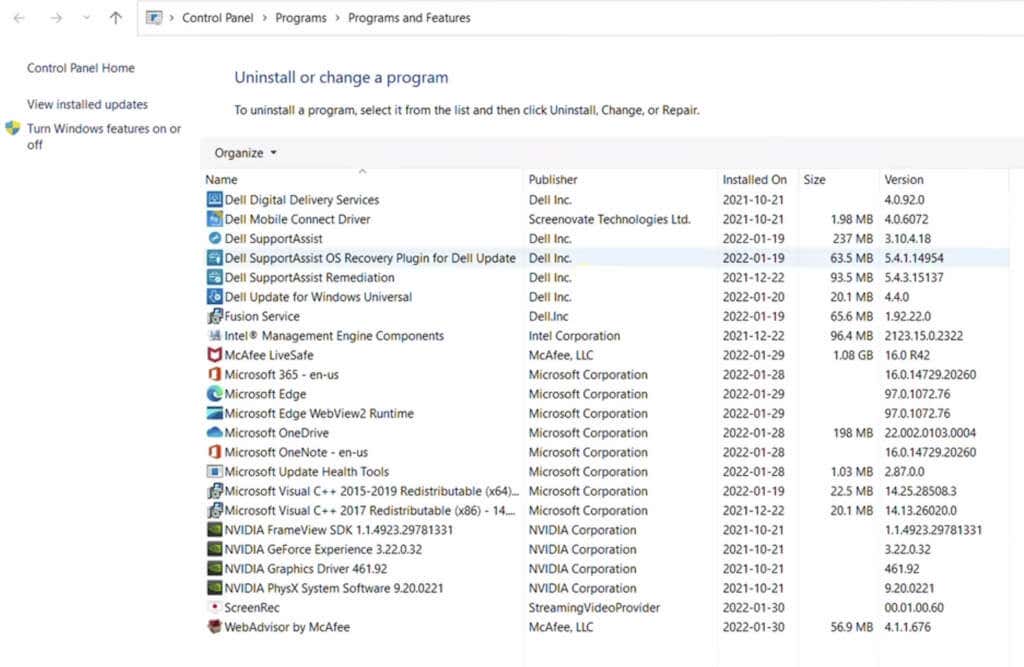
To streamline your PC experience and declutter your system, it’s essential to tackle bloatware (bundleware, shovelware, and crapware). These preinstalled applications consume storage space and often clutter your Start menu.
You can go through the list of the apps installed and uninstall any unwanted programs. Don’t delete apps from your hardware makers — leave software from the likes of Intel, AMD, Dell, Nvidia, Microsoft, HP, or Lenovo. But feel free to wipe out any bundleware you see. You can find more specific information on what bloatware is, as well as how to identify and remove bloatware from your computer, in our previous tutorials.
On top of that, follow these steps to remove extra bloatware and ads from your Windows operating system and efficiently eliminate unwanted apps using third-party uninstaller utilities:
- Start Menu Advertising. Open Settings, go to Personalization, and select Start. Turn off the option Show suggestions occasionally in Start to avoid unnecessary advertisements.
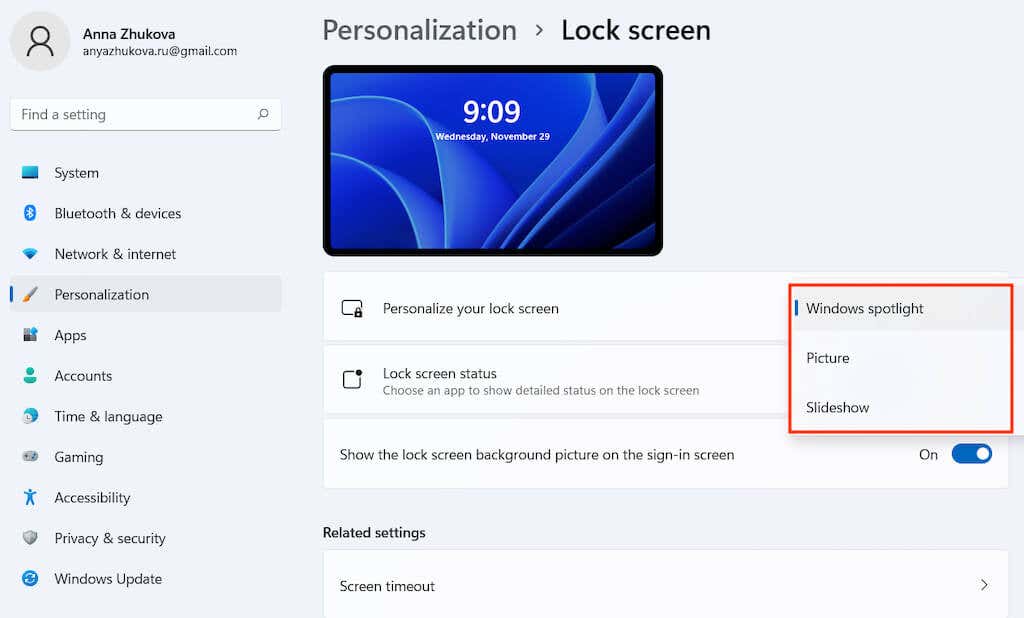
- Lock Screen Ads. Navigate to Settings > Personalization > Lock screen and change the background to a Picture or Slideshow to avoid advertisements for Microsoft products via Windows Spotlight.
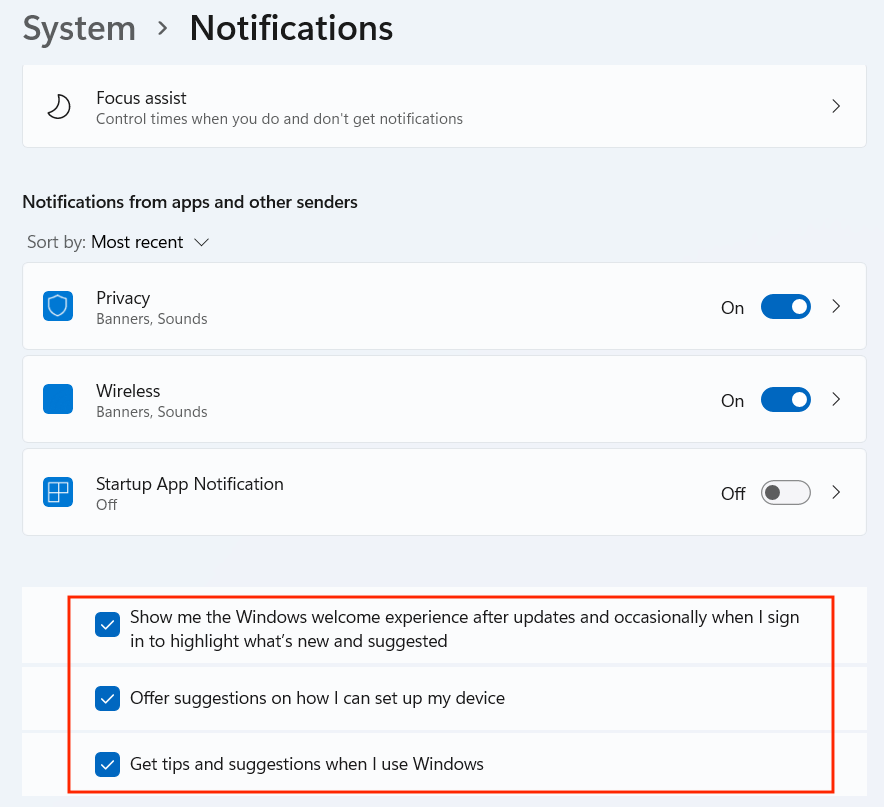
- Taskbar Pop-Ups. You might encounter persistent notifications suggesting Windows 10 tips. To turn these off, go to Settings > System > Notifications & actions and turn off Get tips, tricks, and suggestions as you use Windows. Also, turn off the Show me the Windows welcome experience after updates and when I sign in option.
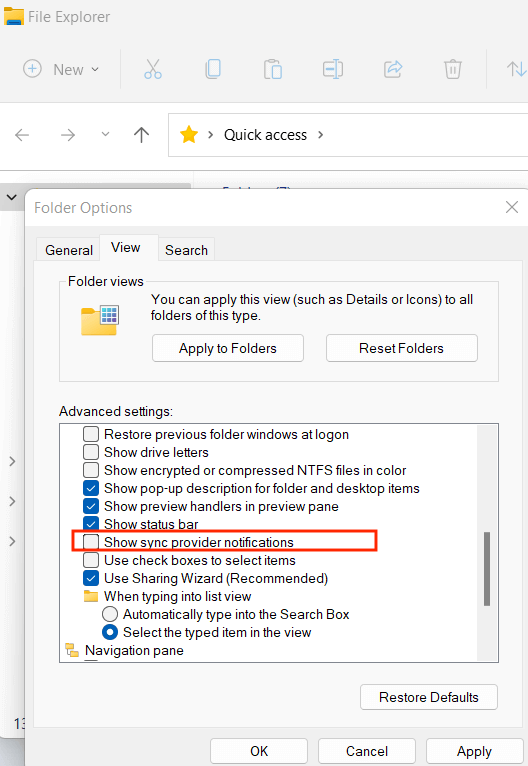
- File Explorer Advertising. If you notice ads in File Explorer, especially when using the free plan of OneDrive, go to View > Options > Change folder and search options. In the Folder Options window, head to the View tab and disable Show sync provider notifications.
Following these steps will help rid your system of unnecessary ads, suggestions, and bloatware, providing a cleaner and more focused user experience on your Windows PC.
4. Download Updates
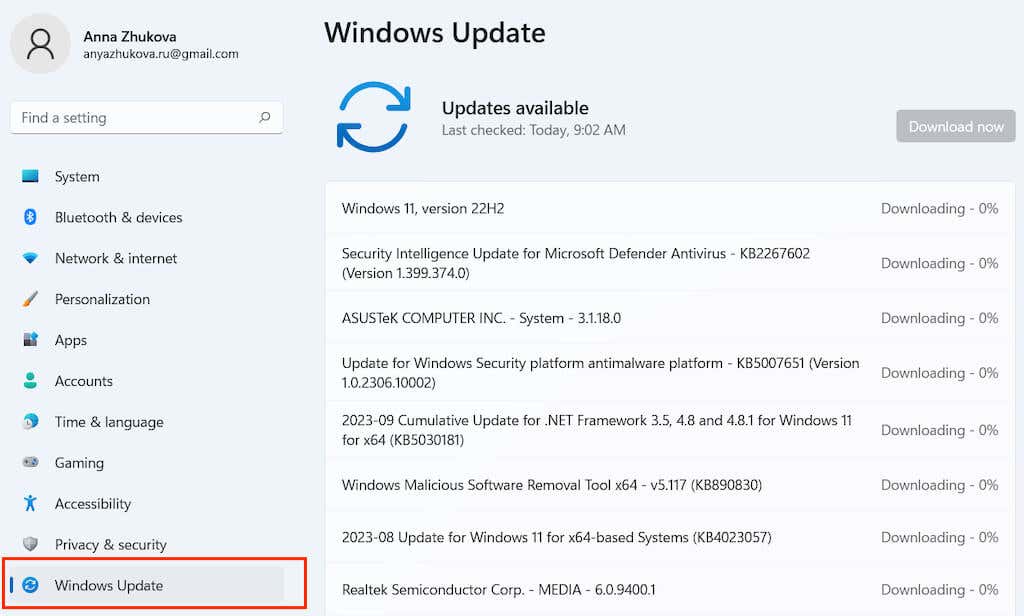
Ensuring your PC is up to date with the latest Windows updates is crucial for maintaining system security and performance. Here’s how to manage updates effectively. You’ll find the Windows Update Manager on the Windows Control Panel. Make sure you have a stable internet connection before you begin.
- Check for Updates. Go to Settings > Update & Security > Windows Update to see if there are any pending updates. Since your Windows installation might not be current, several substantial updates could be waiting to download.
- Allow Time for Updates. Updates, especially larger ones, may take considerable time to download and install. Let the update process run its course. Take a break, grab a snack, or catch up on a movie while waiting for the updates to complete.
- Run Windows Update Again. After the initial update, rerun Windows Update. There might be subsequent updates that were prompted by the previous ones. It’s common for updates to lead to more updates in subsequent rounds.
- Optimize Update Settings. If updates seem overwhelming, delay them for up to seven days. Alternatively, set active hours when your PC won’t install updates, allowing them to occur overnight or during weekends to minimize disruption during your active hours.
By regularly updating your Windows system, you ensure that your PC operates smoothly, receives essential security fixes, and remains optimized for performance.
5. Set Up Windows Security
Setting up security measures on your new Windows computer is crucial but often overlooked. With Windows 10 and later versions, all security settings can be accessed through the Windows Security screen in the Update & Security section.
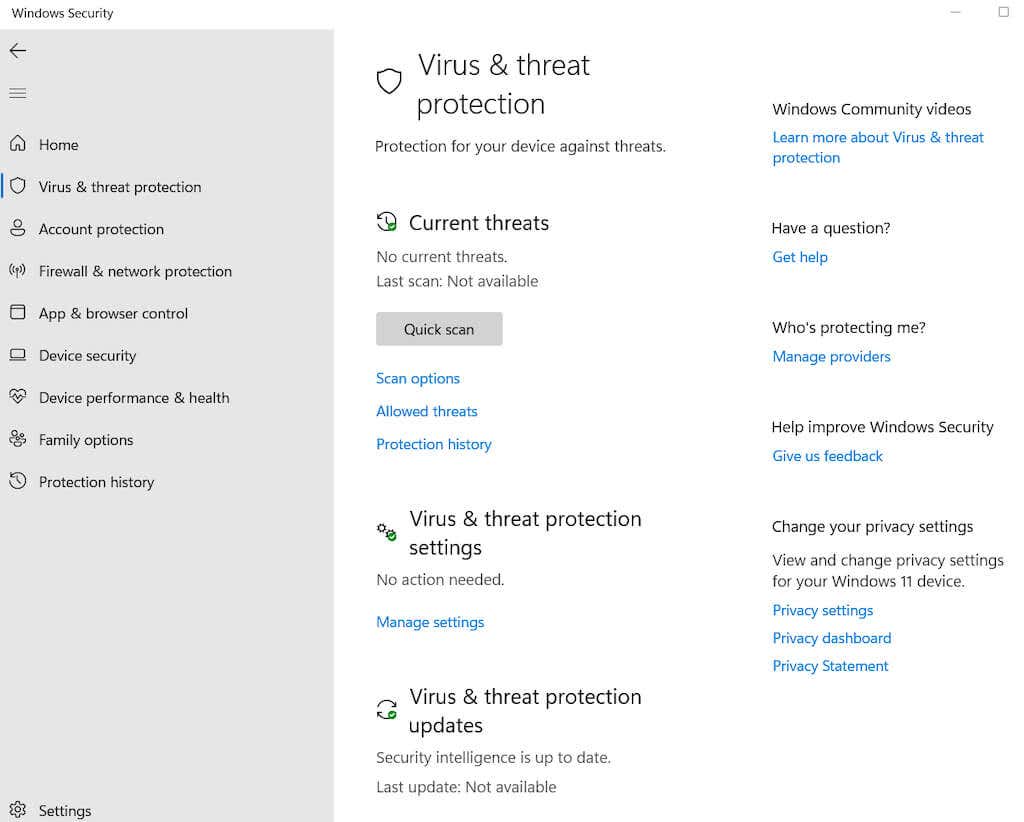
Virus & Threat Protection
Access the Virus and Threat Protection settings and choose Manage settings. Here, you can adjust essential Windows Security configurations, such as enabling Cloud-delivered protection or setting up automatic submission of samples to block viruses and malware in real-time.
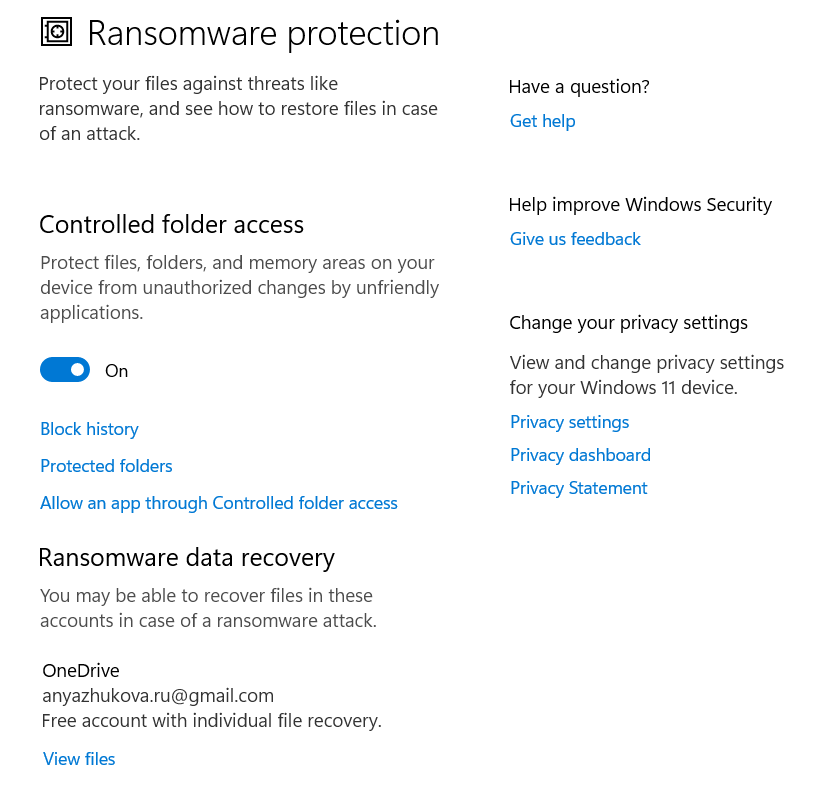
Ransomware Protection
To safeguard your files, click Manage ransomware protection. Activate Controlled Folder Access and select Protected folders to restrict unauthorized apps from altering your files, preventing suspicious apps from making changes.
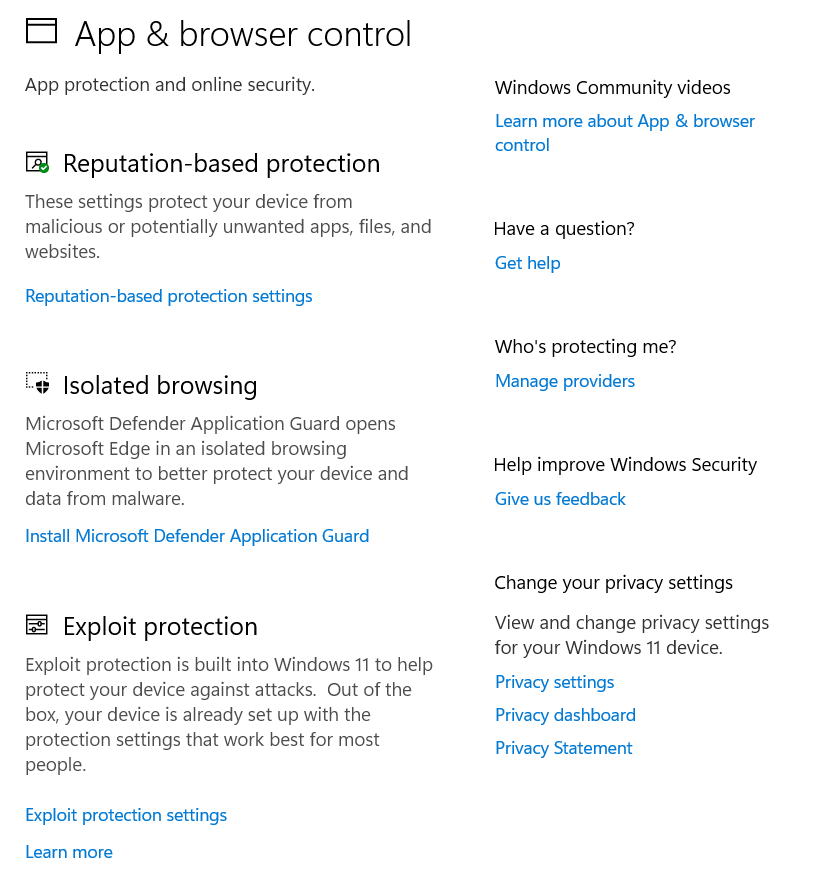
App & Browser Control
Customize how Windows handles potentially unsafe apps and malicious websites. Configure your Edge browser’s behavior in unsecured environments (like public Wi-Fi) to secure your data. The settings include SmartScreen for Edge, installed apps, files, and exploit protection functions like DEP, ASLR, and SEHOP settings.
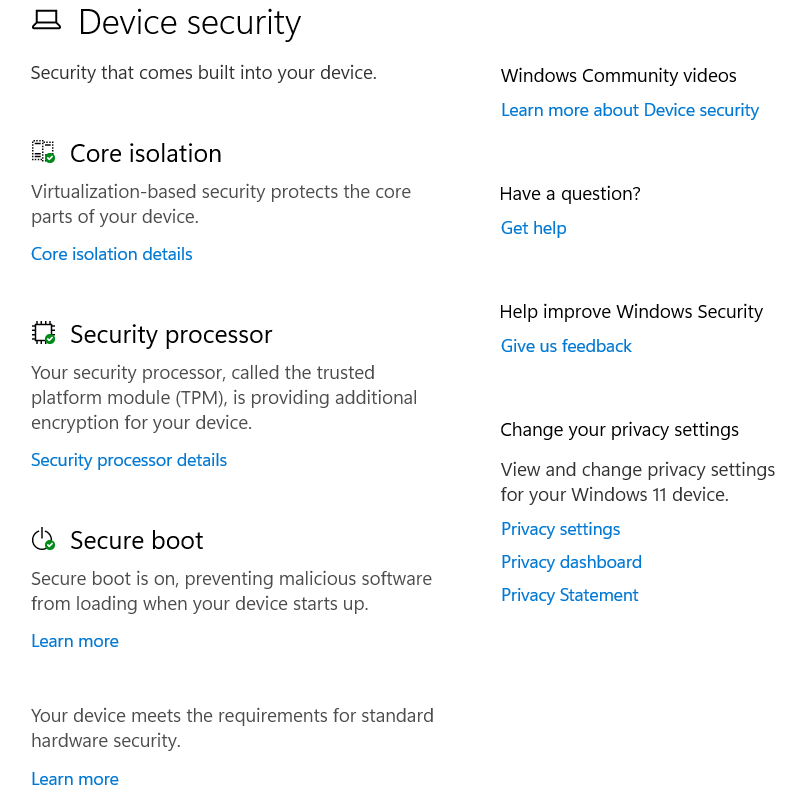
Device Security
Utilize Windows 10’s built-in virtualization-based security features, designed to defend against malicious code attacks.
6. Install Antivirus Software
Securing your new computer from malware is essential to keep it running smoothly. Although most PCs come with preinstalled basic antivirus protection, it’s typically not frequently updated.
Windows Defender is the built-in antivirus for Windows. While it has improved recently, it’s wise to invest in a third-party antivirus program for enhanced protection. Besides, many antivirus security packages offer more than just anti-malware tools, including firewalls, antispam tools, and parental controls.
Even if you opt not to pay, there are reliable free antivirus programs available, such as Avast One Essential, which provide a decent level of protection. Installing a third-party antivirus automatically disables Windows Defender, ensuring only one antivirus runs at a time, as running multiple antivirus programs can be detrimental to your system’s performance.
While personal firewall software used to be crucial for a new PC, the integrated firewall in Windows, coupled with the firewall on your home network router, is usually sufficient for protection against unauthorized access over the internet.
7. Install Your Favorite Browser
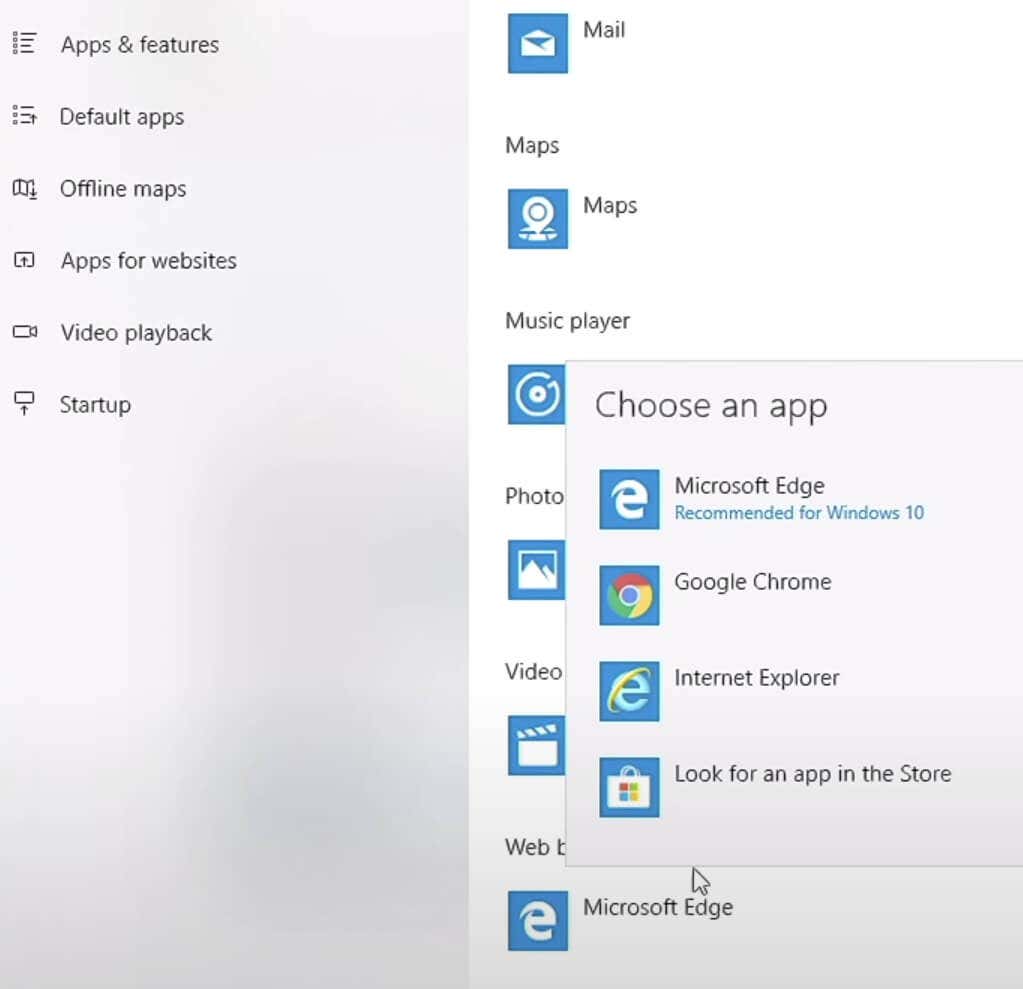
Choosing your web browser is a personal preference and an important decision for your online experience. Luckily, there are various options, and you need not stick to outdated ones like Internet Explorer.
Windows comes with Edge as its default browser, unremovable due to Microsoft’s dependency reasons. Edge shares its system foundation with Google Chrome, ensuring proper webpage rendering and compatibility with Chrome extensions. However, Chrome remains a popular choice for most users.
If you prefer using open-source software and prioritize standards support, Firefox stands out as the browser that sets the benchmark.
8. Transfer Files
Moving files from your old computer to a new one might seem challenging without the Windows Easy Transfer utility available in Windows 10 or 11.
The traditional method involves copying files to a USB flash drive (or external hard drive) from your old PC and then to your new device. However, if there are numerous files, the USB drive option can be time-consuming. An efficient alternative is using your home network to transfer files between devices.
The simplest way is to have your old PC files backed up on cloud storage services like Dropbox, IDrive, or Microsoft OneDrive (integrated with Windows). Once installed on your new PC, all files across devices become accessible. Besides transferring files, this method also creates a backup system.
To transfer files between computers, you can restore your old Mac from a Time Machine backup or use the File History feature for PCs. Another option involves storing old computer files on a hard drive, then connecting it to the new computer for file transfer.
When moving software licenses to a new computer, generally, you’ll reinstall the software and log in with your credentials. In some cases, you may need to deactivate the license from the old device before activating it on the new one, especially for software limited to a specific number of devices.
9. Choose Your Backup Solution
Consider installing a file recovery program before you actually need it. Although you may not have used your computer yet, having this program preemptively is vital. If a file gets accidentally deleted, installing a recovery program afterward may overwrite the space where the deleted file was, making it irretrievable.
Our list of File Recovery Software Programs offers excellent tools for you to try. Simply install one and keep it ready. When needed, it’ll be available for use without any hassles.
Another solution that’s worth considering is enrolling in an online backup service, like Google Drive or Dropbox. These services combine software tools with subscriptions, automatically safeguarding your desired data on secure servers external to your location.
Online backup services provide a cost-effective, long-term solution for securing your data. The well-rated services in our list are budget-friendly, allow unlimited backups, and offer user-friendly installation processes. If you prefer not to make further significant purchases after buying a new computer, consider using a free backup service or, at minimum, a local backup tool.
10. Measure Performance
Whether it’s a new desktop computer or a new laptop that you got, it’s important to verify its performance to make sure they actually sold you what you wanted. While trustworthy sellers usually provide the right components, it’s wise to double-check in a market flooded with similar processors, graphics chips, and memory options.
You can begin by installing a hardware-checking utility that displays details like the make, model, and speed of all components. Cross-verify this information with your PC’s invoice or specifications list. If any discrepancies arise, promptly inform the seller.
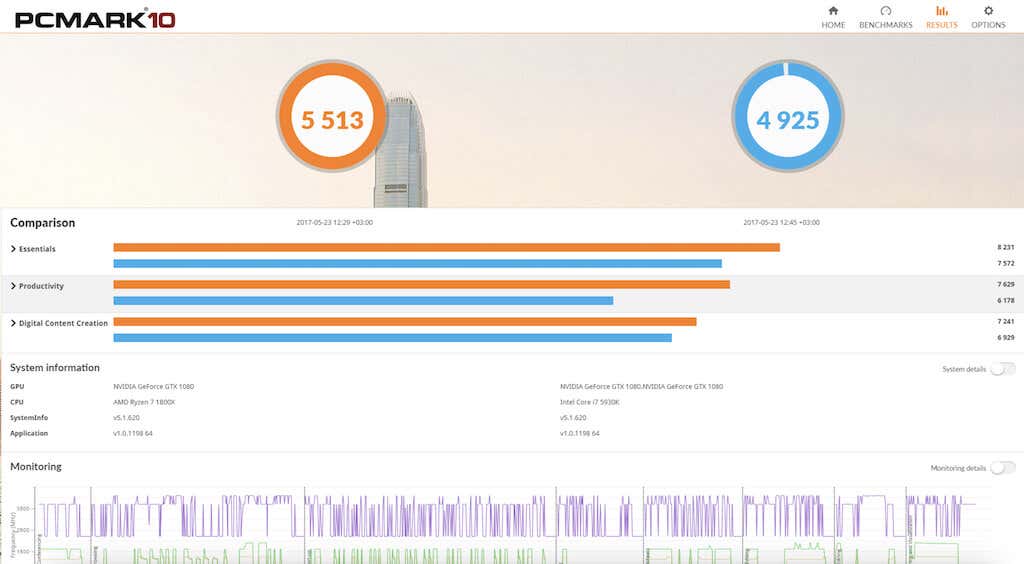
For performance evaluation, there are several benchmarking tools available. For instance, 3DMark Basic Edition gauges graphic card power, PCMark Basic Edition assesses overall performance, and UserBenchmark conducts component-specific reads and tests.
These applications compare your computer’s performance with others having the same hardware. By analyzing this data, you can identify whether your system operates slower or faster than the expected norm.
Time to Ditch Your Old Computer!
Ready to bid farewell to your old laptop? Consider selling it on platforms like eBay, Craigslist, or the Facebook marketplace. Before selling your old device, make sure to do a thorough hardware clean to maintain its value.
You can also reinstall the operating system to perform a complete reboot of your computer. A dirty PC not only diminishes its resale value but also poses a risk of exposing your personal data.
Related Posts
Anya is a freelance technology writer. Originally from Russia, she is currently a full-time Remote Worker and Digital Nomad. With a background in Journalism, Language Studies, and Technical Translation, Anya couldn’t imagine her life and work without using modern technology on a daily basis. Always looking out for new ways to make her life and location-independent lifestyle easier, she hopes to share her experiences as a tech- and internet-addict through her writing. Read Anya’s Full Bio

