Surround sound can transform your movie or video game experience. While most people use their gaming console or lounge TV to enjoy surround sound, Windows 10 also has robust support for it. However, it does require some preparation to make it work correctly.
Let’s walk through the process of setting up surround sound on Windows 10.
If You Need to Set Up Surround Hardware
Before you can do the software setup side of surround sound on Windows 10, you need to get your hardware in order. To get help with that, you may want to read How to Set Up a Surround Sound System before reading this guide.
Remember to Update Your Drivers and Software
Surround sound on your Windows computer is dependent on the drivers for the audio device and additional software utilities that come with that hardware. Download the latest version of its driver software from your sound device’s manufacturer page.
Picking the Right Audio Device
Your computer may have multiple audio devices, and not all may support surround sound. The surround sound output will appear as a separate audio device to your regular headphone or stereo speaker output with some sound cards.
For example, your sound card’s digital output to a surround receiver will be a different audio device.
Setting Up and Testing Surround Sound
With the preparation done, it’s time to make sure that you have set your surround sound device as the currently selected audio device. Following that, we’ll choose the proper speaker configuration and then test it.
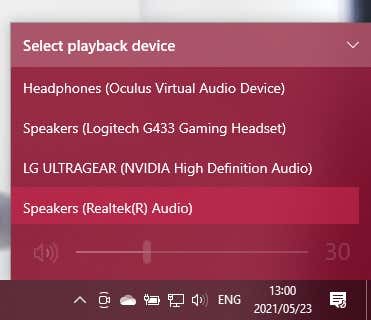
- Left-click on the speaker icon in the notification area in the Windows taskbar.
- Select the name of the currently active audio device above the volume slider.
- From the pop-up list, choose your surround sound audio device.
The surround sound audio device is now the active audio output for your computer. Any application should now play its audio through that device.
Choosing Your Speaker Configuration
Next, you need to tell your computer what speaker setup you have.
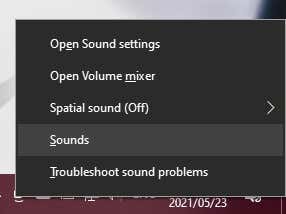
- Right-click the speaker icon in your notification area.
- Select Sounds.
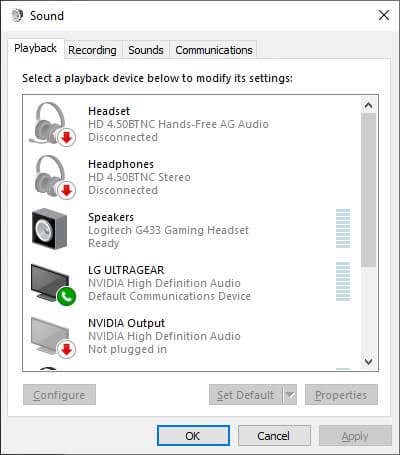
- Switch to the Playback tab.
- Scroll to the surround sound audio device and select it.
- Select the Configure button.
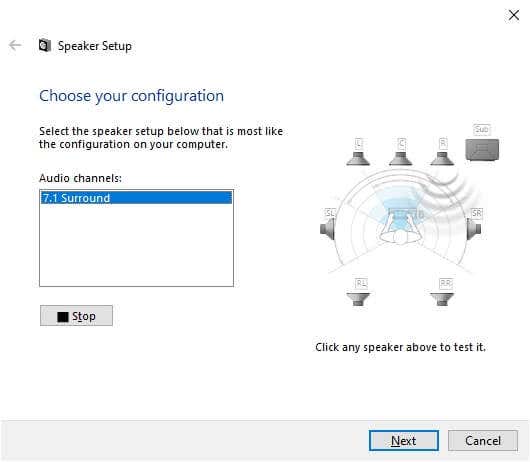
- Use the Speaker setup wizard to tell Windows:
- The speaker setup you have.
- Make sure all speakers are working.
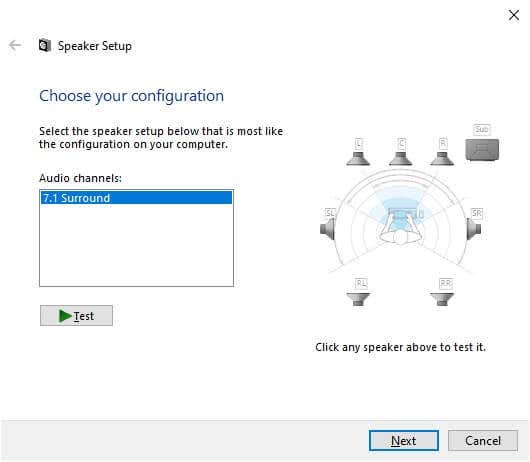
- Under Audio channels, choose the option that corresponds to your actual speaker setup. If you do see the exact configuration, choose it here. If you don’t, it’s still alright. For example, if you have a 5.1 setup but only see the 7.1 option, you can fix that in Step 11 below.
- To the right of the Audio channel selection box (in the picture above), note the representation of your speaker setup.
- Click on any speaker to see if the correct real speaker plays a sound.
- If it doesn’t, double-check that you’ve correctly wired your speakers.
- You can use the Test button to run through all the speakers in sequence quickly.
- Select Next.
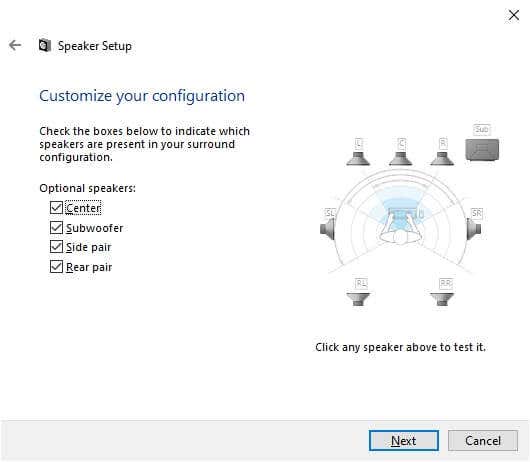
- You can now customize your speaker setup. If your physical speaker setup doesn’t have any speakers listed, uncheck them in the list below. If you don’t have a subwoofer, you should remove it from this list.
- Select Next.
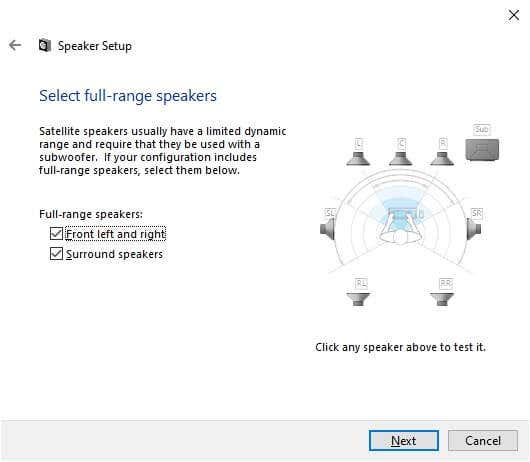
- Specify which of your speakers are full range or satellite.
- Full range speakers reproduce bass, mid and treble audio.
- Satellite speakers produce mid and treble sounds, relying on the subwoofer to fill in the rest.
- If Windows confuses a full range speaker for a satellite, you won’t get the most out of those speakers.
- If only your front left and right stereo speakers are full range, check the first box.
- If all your speakers (besides the subwoofer, obviously) are full range, check both boxes.
- Select Next.
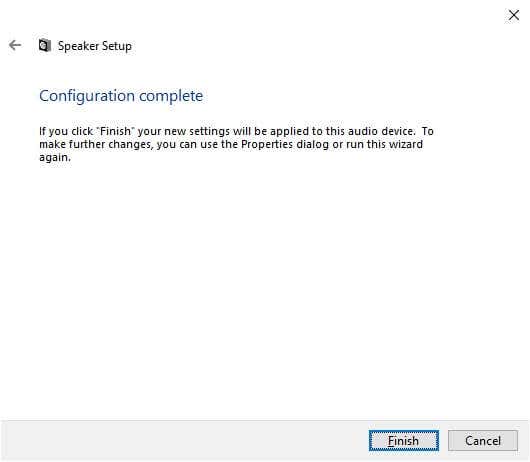
- Select Finish, and you’re done!
Activating Virtual Surround Sound With Windows Sonic
Whether you can select surround sound audio channels depends on whether your device supports them or not. For example, in this guide we used a pair of USB surround-sound gaming headphones. Although it doesn’t physically have seven speakers inside it, the built-in sound card reports to Windows that it has 7.1 audio channels and then translates it to virtualized surround in the headphones.
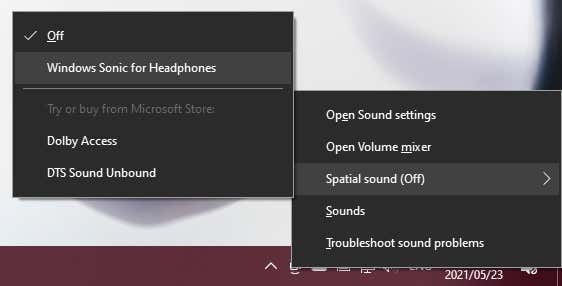
What if you just have a basic set of stereo headphones? Windows has a built-in surround virtualization feature called Windows Sonic.
To activate it, make sure that your stereo headphones are selected as the active audio device:
- Right-click on the speaker icon.
- Select Windows Sonic for Headphones. Your headphones should now provide simulated surround sound.
- To enable the other options, such as Dolby or DTS, you will need to pay a license fee in the Windows Store.
For more detailed information on Windows Sonic, check out How to Set up Windows Sonic for Headphones on Windows 10.
Hopefully, you can now enjoy immersive surround sound on your Windows 10 computer. If you’re looking for surround sound advice for a home theater setup, head over to The Ultimate Smart Home Theater System: How To Set It Up.
Related Posts
Sydney Butler is a social scientist and technology fanatic who tries to understand how people and technology coexist. He has two decades of experience as a freelance computer technician and more than a decade as a technologies researcher and instructor. Sydney has been a professional technology writer for more than five years and covers topics such as VR, Gaming, Cyber security and Transhumanism. Read Sydney’s Full Bio


