

Your Windows 10 or Windows 11 laptop boots to a black screen. The system is running, but the display stays completely dark with no cursor or login screen. A bad or incompatible Intel HD Graphics driver is almost always responsible, which is promising, as most cases are fixable without replacing any hardware. You can try to boot Windows into Safe Mode to troubleshoot the issue.

Fix #1: Reset the graphics driver with Windows + Ctrl + Shift + B
This keyboard shortcut signals Windows to reinitialize the display subsystem. It works when the Intel driver has crashed mid-session but the system itself is still running.
- Press
Windows + Ctrl + Shift + B.
- Your screen will briefly flicker or go dark for about a second, then recover.
- If the display comes back, you’re done. If the screen stays black, move on to Fix #2.
Not sure if the system is actually on? Press Caps Lock and check whether the keyboard indicator light toggles. If it does, Windows is running, the display driver is just failing to output anything to the screen.
Fix #2: Connect an external monitor
An external display often bypasses whatever is breaking the Intel driver’s output to the internal panel, giving you immediate access to a working Windows desktop.
- Connect an external monitor to your laptop via HDMI, VGA, or DisplayPort.
- Power on your laptop. If Windows loads normally on the external display, your OS is fine; the issue is isolated to the internal display output.
- From the working external display, skip ahead to Fix #4 to reinstall your Intel driver.
If neither display shows anything, continue to Fix #3.
Fix #3: Boot into Safe Mode via Automatic Repair
Safe Mode loads the Microsoft Basic Display Adapter instead of the Intel driver, bypassing the black screen entirely and giving you a usable low-resolution desktop to fix things from.
If you can reach the login screen or partially see the display:
- Hold
Shiftand click Power > Restart from the login screen.
- On the recovery screen, go to Troubleshoot > Advanced options > Startup Settings > Restart.
- Press
4to enable Safe Mode.
If the screen is completely black from the moment the laptop turns on:
- Hold the power button for 5 seconds to force your laptop off.
- Press the power button to start it up, then hold it again to force-shut it down as soon as Windows begins loading.
- Repeat this process a total of 3 times. After the third interrupted boot, Windows will display “Your PC did not start correctly” (Automatic Repair).
- Click Advanced options > Troubleshoot > Advanced options > Startup Settings > Restart.
- Press
4to enter Safe Mode.
In Safe Mode, your screen should appear at low resolution using the basic display adapter. From here, proceed to Fix #4.
Fix #4: Clean and reinstall your Intel graphics driver
A standard driver uninstall often leaves behind components that cause the black screen to return after the next reboot. Display Driver Uninstaller (DDU) wipes everything out completely, giving you a clean slate before reinstalling a known-good copy. You can download Display Driver Uninstaller (DDU) on another device and transfer it via USB, or download it directly while in Safe Mode.
- Run DDU, set the device type to GPU, and select Intel as the manufacturer.
- Click “Clean and restart” to remove all Intel graphics driver components from your system.
- After the reboot, go to your laptop manufacturer’s support site (Dell, HP, Lenovo, etc.) and find your exact model.
- Download the Intel HD/UHD Graphics driver listed for your specific model and Windows version (10 or 11). OEM drivers are tuned for your exact hardware and are the most reliable starting point. You can also use the Intel Driver & Support Assistant to auto-detect your GPU and download the correct driver directly from Intel.
- Install the driver and reboot.
If your display is back and working as expected after the reboot, you can stop here. This fix handles the majority of Intel HD black-screen cases. If the OEM driver isn’t available for your model or still causes a black screen, use the Intel support page to find more information about your specific Intel HD Graphics model.
Fix #5: Roll back to an older Intel driver version
Older Intel HD chips, particularly the HD 3000, HD 4000, and HD 630, sometimes only work reliably with specific legacy driver versions. Newer Intel driver packages can actually break display output on these GPUs, and rolling back is often the only fix that sticks.
- Boot into Safe Mode (Fix #3) or use an external monitor (Fix #2).
- Press
Windows + Xand select Device Manager.
- Expand Display adapters, right-click Intel HD Graphics, and choose Properties.
- Click the Driver tab, then click Roll Back Driver.
- If Roll Back Driver is grayed out, no previous version is stored. Download an older driver from the Microsoft Update Catalog or your OEM’s driver archive and install it manually.
- Reboot and confirm the display is working.
Once you have a working driver, go to Settings > Windows Update and click Pause updates (7 days or longer) to prevent Windows from automatically reinstalling the incompatible driver version over the one that works.
Fix #6: Disable Intel HD Graphics in Device Manager
If no driver version works, disabling the Intel GPU entirely forces Windows to fall back to the Microsoft Basic Display Adapter. You’ll lose hardware acceleration and high-resolution support, but the screen will be stable, and it confirms definitively that the Intel driver is the culprit.
- Boot into Safe Mode (Fix #3) or connect an external monitor (Fix #2).
- Press
Windows + Xand select Device Manager.
- Expand Display adapters.
- Right-click Intel HD Graphics and select Disable device.
- Reboot. Windows will load using the Basic Display Adapter and your screen should show a working desktop, typically at a lower resolution like 1024×768.
From this stable state, return to Fix #4 or Fix #5 to find a driver version that works on your specific hardware.
Fix #7: Disable Fast Startup
Fast Startup leaves Windows in a partial hibernation state between boots. On some laptops with Intel HD Graphics, this causes a bad handoff between the firmware and the graphics driver during power-on, resulting in a black screen every startup.
- Press
Windows + R, typecontrol, and press Enter to open Control Panel.
- Go to System and Security > Power Options.
- Click Choose what the power buttons do in the left sidebar.
- Click Change settings that are currently unavailable.
- Uncheck Turn on fast startup (recommended).
- Click Save changes and restart your laptop.
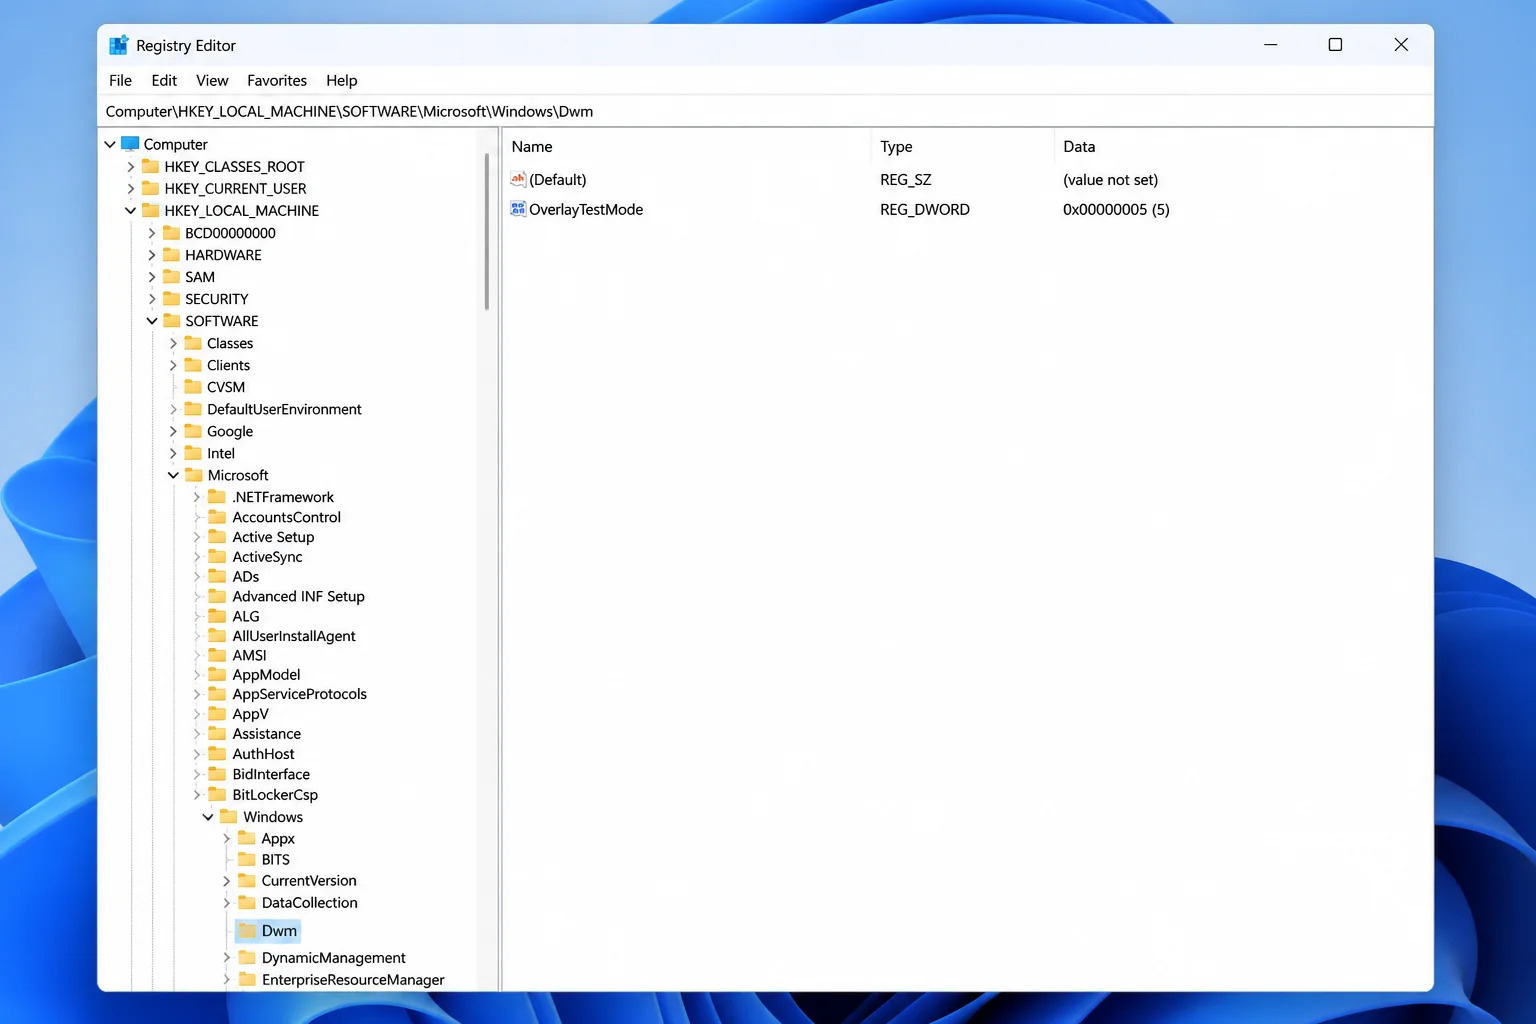
Fix #8: Disable Multi-Plane Overlay (MPO) via Registry
Try this only if all previous fixes haven’t worked. Multi-Plane Overlay (MPO) is a display optimization feature that conflicts with certain Intel HD Graphics drivers on Windows 10 and 11, causing black screens or intermittent flicker that survive even a clean driver reinstall.
- Press
Windows + R, typeregedit, and press Enter. Click Yes if prompted by User Account Control.
- In the left pane, navigate to:
HKEY_LOCAL_MACHINE\SOFTWARE\Microsoft\Windows\Dwm
- Right-click the Dwm key in the left pane and select New > DWORD (32-bit) Value.
- Name the new value
OverlayTestModeand press Enter.
- Double-click
OverlayTestMode, set the value data to5, and click OK.
- Close Registry Editor and restart your laptop.
When the fixes don’t work
If you’ve worked through all eight fixes without success, the problem may be hardware rather than software. A failing internal display panel, a loose display cable, or a physically degraded Intel GPU could all be responsible. Connecting a permanent external monitor is a practical long-term workaround in that situation. If the laptop is still under warranty, contact your manufacturer for a hardware inspection or replacement.
Conclusion
Fix #4 (DDU clean install + OEM driver) is the solid choice. It resolves the black screen for the vast majority of Intel HD Graphics laptops. If Windows Update keeps reinstalling the problematic driver and undoing your work, pair Fix #4 with the update pause in Fix #5 to lock in the version that actually works. On older hardware like the Intel HD 4000 or HD 630, the newest Intel driver packages often simply don’t function on those chips. A legacy OEM driver from the manufacturer’s archive is the only reliable path forward, and that’s worth knowing before spending hours reinstalling the latest version. You can also visit the Microsoft support page for more information on updating drivers through Device Manager.