

“Detected DNS Cache Poisoning Attack” from ESET reads like a crisis. Check the IP address shown in the alert before doing anything. If it’s a local address, your router almost certainly triggered a false positive.
Fix #1: Check whether the IP address is local or external
Open ESET’s notification history and note the remote IP address in the alert. That one detail decides your next step.
Private (local) IP ranges, almost certainly a false positive:
192.168.x.x10.x.x.x172.16.x.xthrough172.31.x.x
If the IP falls in one of those ranges, ESET flagged your router, NAS, printer, or another device on your local network, not a real attacker. ESET’s intrusion detection occasionally misreads normal internal DNS traffic as suspicious. Go to Fix #2.
If the IP is not in any of those ranges, treat the alert as a potential real attack and work through Fixes #3 through #5.

Fix #2: Add the local IP to ESET’s IDS exclusion list
Only do this for an internal IP you’ve confirmed belongs to a trusted device, such as your router’s admin address. Don’t exclude external or unknown IPs.
- Open the ESET main window.
- Press F5 to open Advanced setup.
- Click Network access protection.
- Click Edit next to IP sets.
- Select Addresses excluded from IDS and click Edit.
- In the Remote computer address (IPv4, IPv6, range, mask) field, type the local IP ESET flagged.
- Click OK three times to save and close Advanced setup.
The alert stops for that IP. If you don’t recognize the local address, check your router’s DHCP client list before adding any exclusion. An unrecognized device is worth investigating before you dismiss the alert entirely.
Fix #3: Flush DNS with ESET’s DNS Flush tool
Whether the IP is external or you just want to clear any doubt, ESET’s dedicated DNS Flush tool is the fastest option. It’s documented in ESET KB2933, which covers the full guidance on ARP, ICMP, and DNS cache poisoning alerts.
- Download the DNS Flush tool from the ESET KB2933 page and save it to your Desktop.
- Extract
Flush DNS.zipand double-clickFlush DNS.exe. - The tool flushes and re-registers your DNS cache automatically. No commands needed.
- Restart your PC.
- Open ESET and run a full Computer scan.
A clean scan means you’re done. If ESET finds a threat, quarantine it and continue to Fix #4.
Prefer the command line? Open Command Prompt as Administrator and run:
ipconfig /flushdnsThis clears the DNS cache on Windows 10 and Windows 11. It doesn’t re-register DNS entries the way ESET’s tool does, but it works for most situations.
Fix #4: Reset the Windows HOSTS file
A successful DNS spoofing attack often plants redirect entries in your HOSTS file, a plain-text file Windows checks before it contacts any DNS server at all. Resetting it removes any forced redirects.
- Press
Windows + R, typenotepad, then pressCtrl + Shift + Enterto open Notepad as Administrator. Click Yes if UAC prompts you. - Click File > Open and navigate to
C:\Windows\System32\drivers\etc. - Change the file type filter to All Files and open the file named hosts.
- Delete every line that doesn’t start with
#(those are comments; keep them). - Save the file and close Notepad.
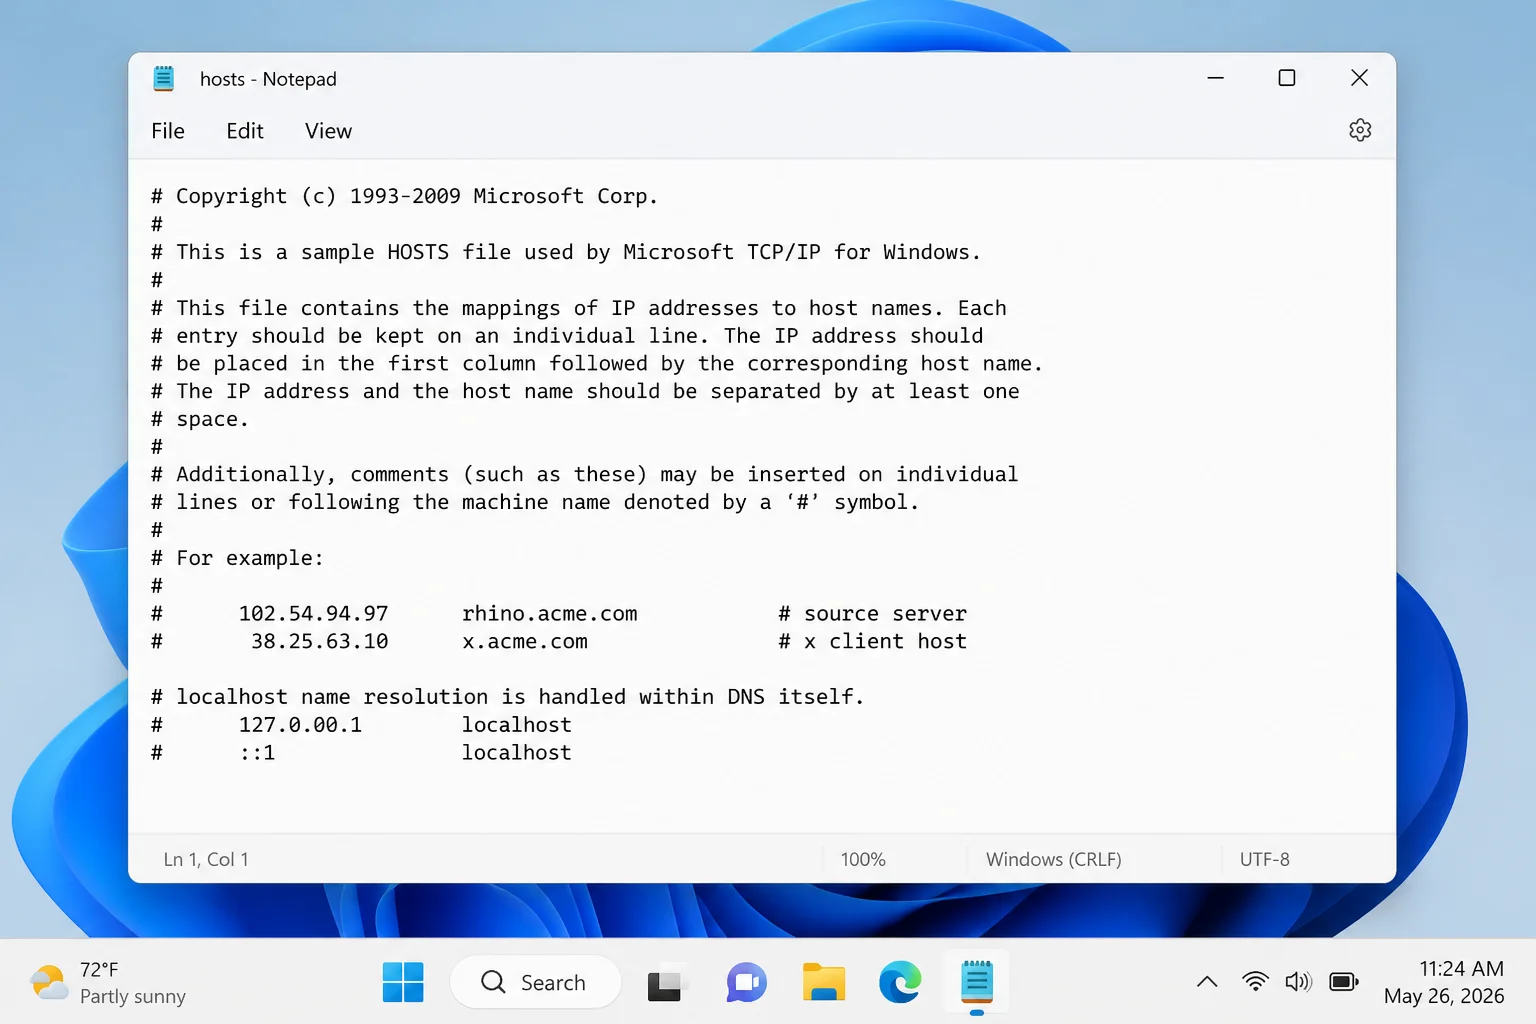
The default HOSTS file has no active entries. If you had custom lines for local development or private hostnames, re-add those now that you’ve confirmed there are no malicious entries.
Microsoft’s official HOSTS repair guidance is at https://support.microsoft.com/en-us/help/972034/how-to-reset-the-hosts-file-back-to-the-default if you’d rather use an automated option.
Fix #5: Verify your DNS settings and switch to a secure resolver
After a potential DNS attack, confirm your network adapter isn’t pointing at a malicious DNS server. Attackers sometimes swap that address as part of the attack.
- Press
Windows + Ito open Settings. - Go to Network & internet > Wi-Fi (or Ethernet) > Hardware properties.
- Click Edit next to DNS server assignment.
- If the DNS addresses look unfamiliar, switch to Manual and enter addresses from a trusted resolver.
Three solid options that include DNSSEC validation and malware filtering:
| Provider | Primary DNS | Secondary DNS |
|---|---|---|
| Cloudflare | 1.1.1.1 | 1.0.0.1 |
8.8.8.8 | 8.8.4.4 | |
| Quad9 | 9.9.9.9 | 149.112.112.112 |
Resolvers like Quad9 validate DNSSEC signatures, which means spoofed DNS responses get rejected at the server level before they can poison your cache.
When nothing works
If ESET keeps firing on an internal IP even after you’ve added an exclusion, the router itself may need attention. Outdated firmware can cause routers to send packets that trip ESET’s intrusion detection. A firmware update sometimes stops the alerts without any ESET changes needed. Log into your router’s admin panel, install any available updates, and confirm Wi-Fi security is set to WPA2 or WPA3. If the alerts persist, posting your router model and the alert details to the ESET forum usually surfaces a faster answer than more trial and error on your own.
Conclusion
Fix #2 (adding the local IP to ESET’s IDS exclusion list) resolves this permanently for most ESET users, as the alert almost always traces back to the router. Fix #3 is worth running regardless, since a stale cache entry can keep misdirecting traffic even after the source is gone. The one scenario that warrants real concern: an external IP in the alert combined with a positive ESET scan result. If that’s you, change your Wi-Fi password, reset the HOSTS file, verify your DNS settings, and don’t reconnect to anything sensitive until the scan comes back clean.