

Getting Windows Update error 0x80072efe and updates won’t install? Start with Fix #1 below — a VPN, proxy, or security software intercepting the connection is the most common cause, not a broken internet connection.
Fix #1: Disconnect your VPN or proxy and retry
A VPN or corporate proxy that inspects HTTPS traffic is the most common trigger for 0x80072efe in 2026. Windows Update uses TLS connections that some proxies silently block.
- Disconnect your VPN client completely. Don’t just pause it.
2. If you’re behind a corporate proxy, ask your IT team to whitelist .update.microsoft.com and .windowsupdate.com.
3. Open Settings > Network & Internet > Proxy and confirm Use a proxy server is set to Off unless your network requires it.
4. Press Windows + I, go to Windows Update, and click Check for updates.

If the update proceeds, your VPN or proxy was the culprit. Keep it disconnected until the update finishes, then reconnect.
Fix #2: Run the Windows Update troubleshooter
Windows has a built-in troubleshooter that detects and repairs common update failures automatically, so run it before doing anything manual.
On Windows 11:
- Press Windows + I to open Settings.
2. Go to System > Troubleshoot > Other troubleshooters.
3. Find Windows Update and click Run.
4. Wait for the troubleshooter to finish, then click Close and retry Windows Update.
On Windows 10:
- Press Windows + I to open Settings.
2. Go to Update & Security > Troubleshoot > Additional troubleshooters.
3. Select Windows Update and click Run the troubleshooter.
The troubleshooter often fixes corrupted update metadata or stalled service states without any further steps needed.
Fix #3: Reset Windows Update components
If the troubleshooter didn’t resolve it, the Windows Update cache or service state may be corrupted. Resetting the components clears that state completely.
- Press Windows + S, type
cmd, right-click Command Prompt, and select Run as administrator.
2. Stop the Windows Update services by running each command, pressing Enter after each one:
net stop wuauserv
net stop cryptSvc
net stop bits
net stop msiserver
3. Rename the update cache folders (this forces Windows to rebuild them):
ren C:\Windows\SoftwareDistribution SoftwareDistribution.old
ren C:\Windows\System32\catroot2 catroot2.old
4. Restart the services:
net start wuauserv
net start cryptSvc
net start bits
net start msiserver
5. Close the Command Prompt and go to Settings > Windows Update > Check for updates.
Windows will recreate the SoftwareDistribution and catroot2 folders fresh on the next update attempt. The renamed folders can be deleted after a successful update.
Fix #4: Verify your date and time settings
A clock that’s significantly off can cause TLS certificate validation to fail, which produces 0x80072efe. This is less common on modern Windows, which syncs automatically, but worth a quick check.
- Press Windows + I and go to Time & language > Date & time.
2. Make sure Set time automatically and Set time zone automatically are both toggled On.
3. Click Sync now under Additional settings to force an immediate time sync.
4. Confirm the displayed time is correct, then retry Windows Update.
Fix #5: Check cipher suite configuration (managed/enterprise PCs)
If you’re on a domain-joined or IT-managed PC and nothing above has worked, a Group Policy that restricts TLS cipher suites may be blocking the Windows Update handshake. Microsoft documents this as a direct cause of 0x80072efe.
- Press Windows + R, type
regedit, and press Enter. Click Yes at the UAC prompt.
2. Navigate to:
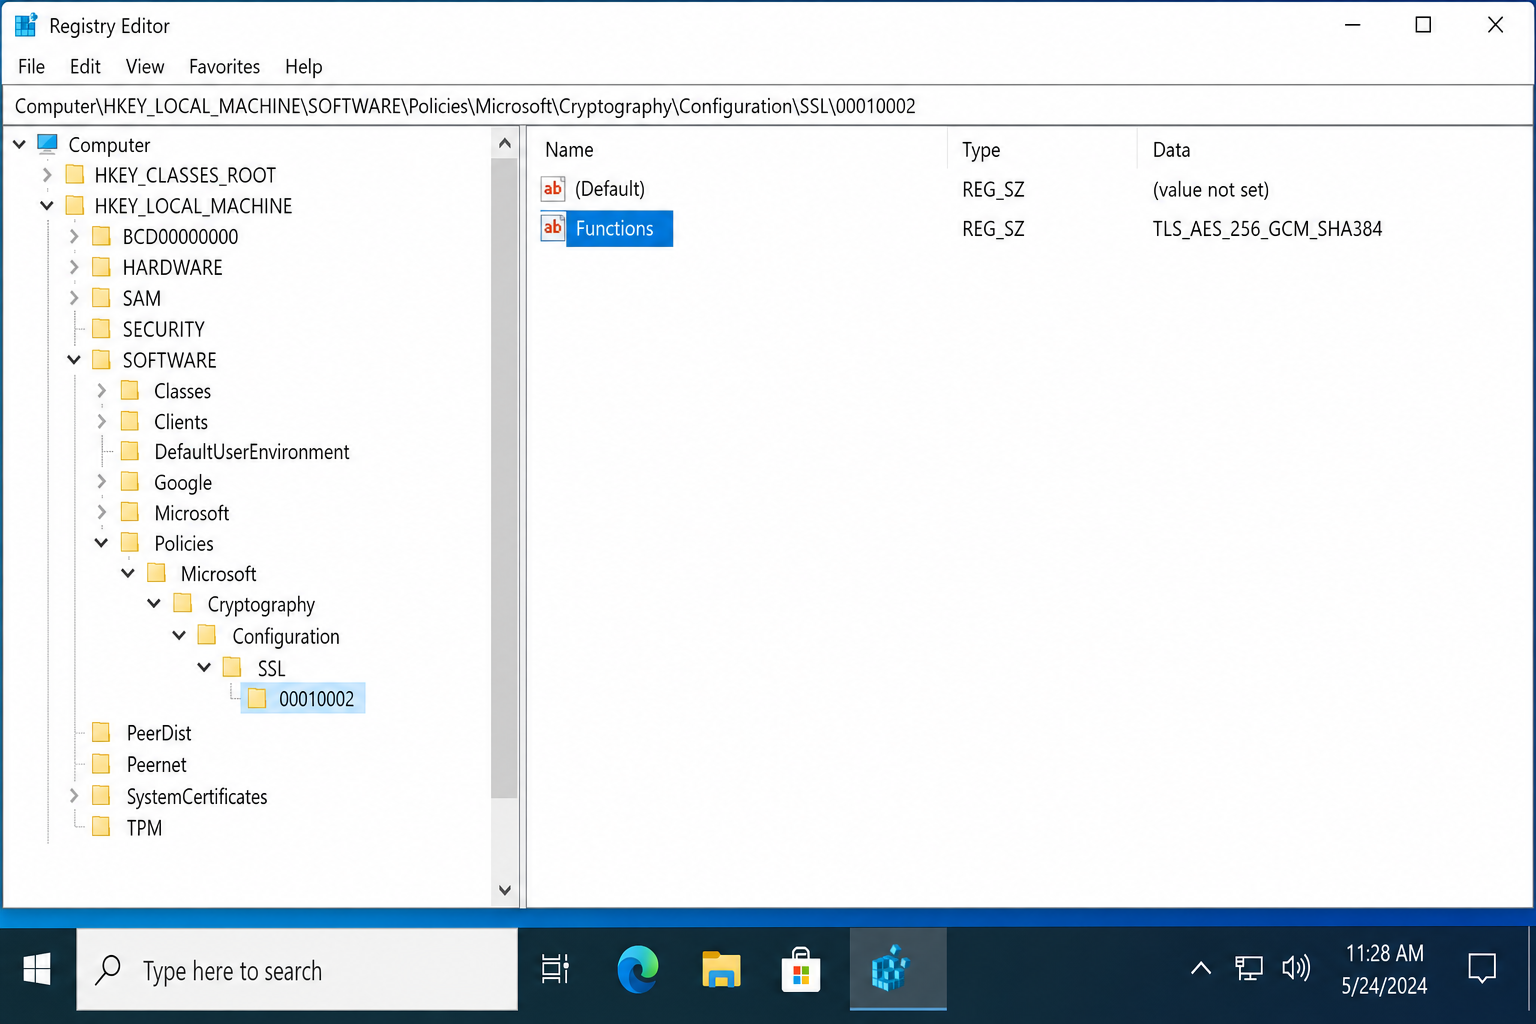
HKEY_LOCAL_MACHINE\SOFTWARE\Policies\Microsoft\Cryptography\Configuration\SSL\00010002
3. Look for a value named Functions. If it exists, double-click it to view the cipher suite list.
4. Confirm that at least one Microsoft-supported cipher suite is present in the list. If the list is empty or all entries are unsupported, contact your IT administrator, as the policy needs to be corrected at the domain level.
5. If you made a change, restart the PC and retry Windows Update.
This fix applies mainly to enterprise environments. If you’re on a home PC and this registry key doesn’t exist, skip it. It’s not the cause.
When none of these fixes work
If 0x80072efe persists after all five fixes, the most likely remaining causes are a third-party security suite with HTTPS inspection enabled (check your antivirus settings and look for a “web shield” or “SSL scanning” option to disable temporarily), or a network-level firewall blocking Microsoft’s update endpoints. Running sfc /scannow in an elevated Command Prompt can also rule out underlying system file corruption. If you’re on a corporate network, escalate to your IT department, as the block is almost certainly at the network perimeter, not on your PC.
Conclusion
Fix #1 (disconnecting a VPN or proxy) and Fix #3 (resetting Windows Update components) resolve 0x80072efe for the majority of people. If neither works and you’re on a managed PC, the cipher suite check in Fix #5 is worth the extra few minutes. Microsoft has confirmed it as the cause in cases where everything else looks fine. A persistent error after all five fixes almost always points to something at the network level rather than Windows itself.