VirtualBox displays the “E_FAIL (0x80004005)” error code when it can’t open a virtual machine session. The error could be due to problems with the VirtualBox app, configuration files, or hardware-related issues.
This tutorial highlights probable causes and troubleshooting solutions for the E_FAIL (0x80004005) VirtualBox error on Windows devices.
1. Update VirtualBox
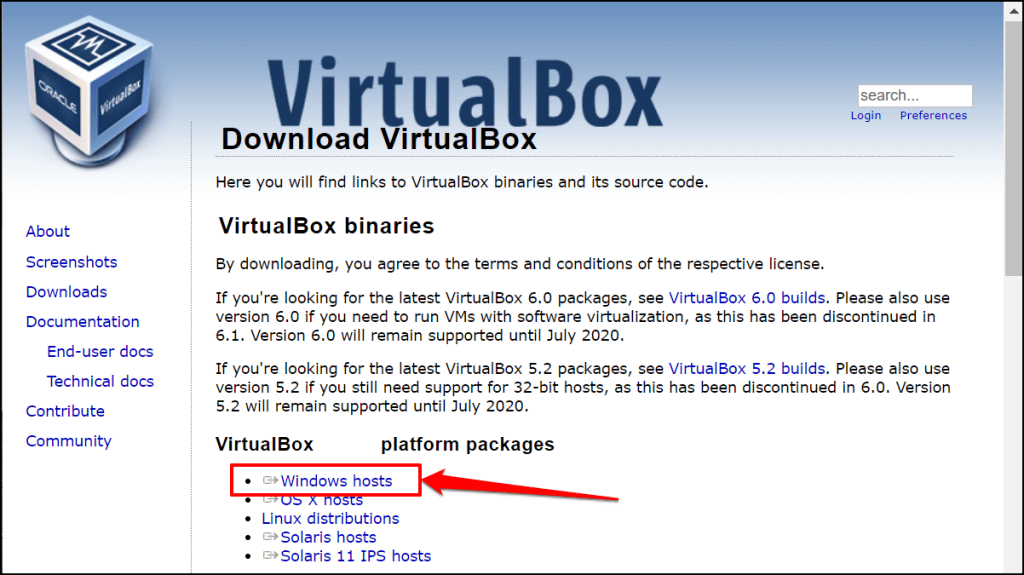
Some Windows users resolved this error by installing the latest build of VirtualBox 6. Head to the developer’s website and download the Windows hosts VirtualBox setup file.
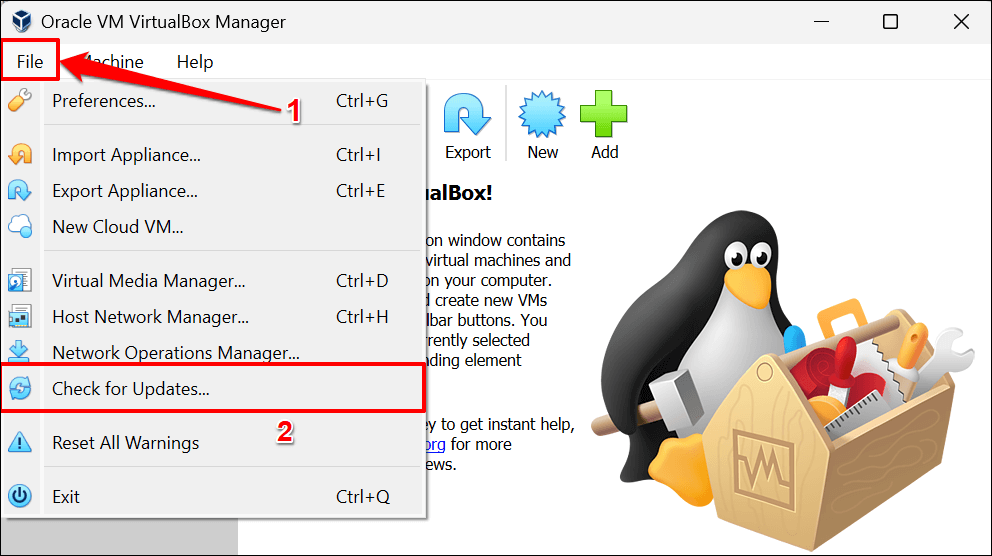
You can also update VirtualBox directly within the app. Open the VirtualBox Manager app, select File on the menu bar, and select Check for Updates.
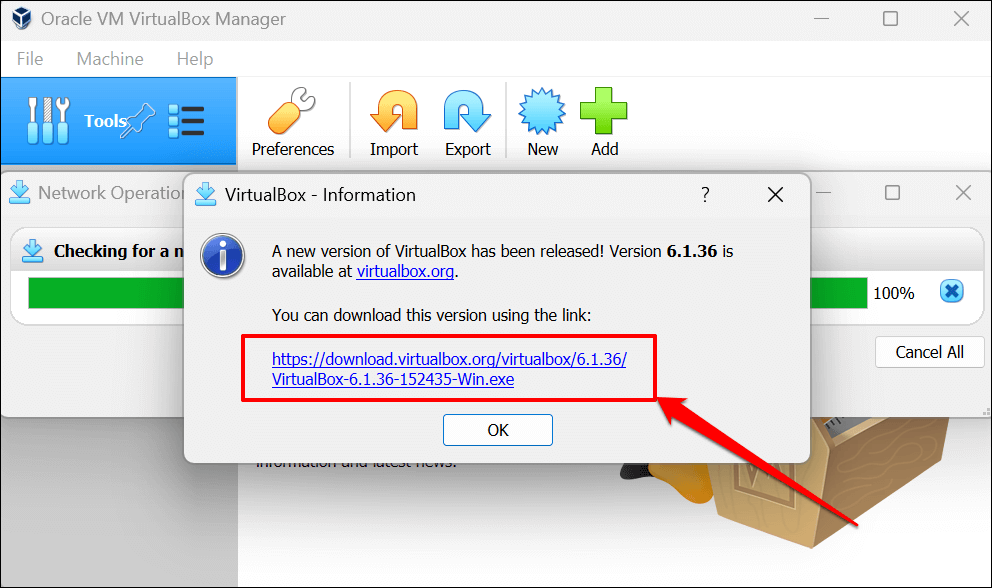
Select the provided link to download the executable (.exe) file of the latest version of VirtualBox.
2. Restart the Windows Hypervisor (Hyper-V)
Hyper-V is a Windows feature that lets your computer run multiple operating systems as virtual machines. You may be unable to access virtual machines in VirtualBox if Hyper-V is experiencing a glitch.
Restarting Hyper-V in Windows (see steps below) can fix issues preventing VirtualBox from running virtual machine sessions.
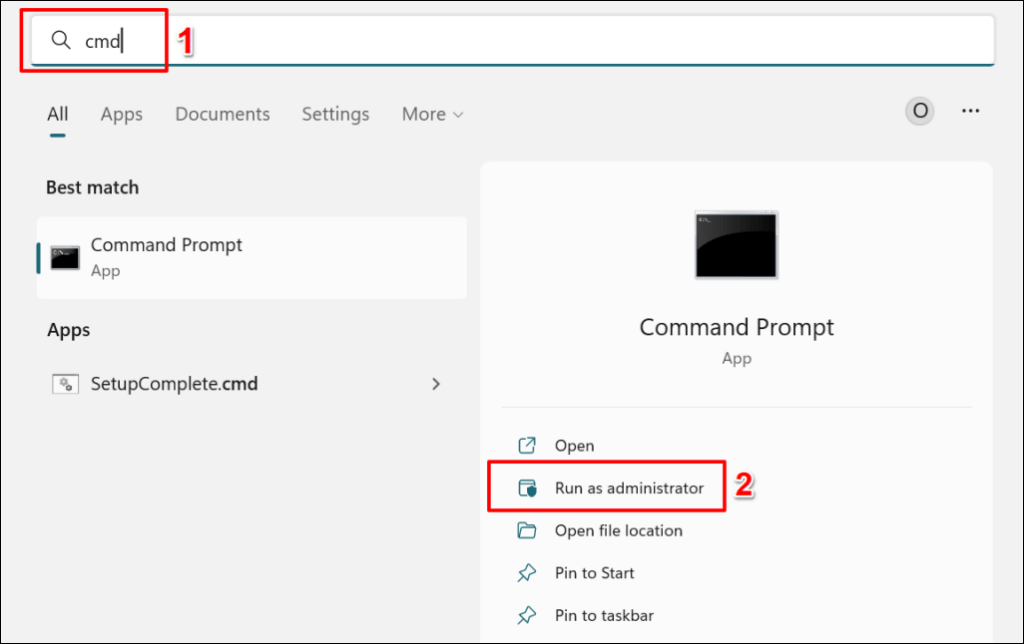
- Open the Start menu, type cmd in the search bar, and select Run as administrator below the Command Prompt app.
- Paste bcdedit /set hypervisorlaunchtype off in the Command Prompt console and press Enter.
Running this command turns off Hyper-V on your computer. If you have multiple operating systems installed on your computer, run the command below to disable Hyper-V for the active/current OS.
Paste bcdedit /set {current} hypervisorlaunchtype off in the Command Prompt console and press Enter.
Restart your computer when you get a “This operation completed successfully” message.
- Open Command Prompt with administrative privileges and run the command below to re-enable Hyper-V.
bcdedit /set hypervisorlaunchtype auto
Restart your computer again when Command Prompt displays a “The operation completed successfully” message. Launch VirtualBox and try opening the virtual machine.
3. Discard Saved State
VirtualBox may also display the E_FAIL (0x80004005) error if there’s a problem with the virtual session’s saved state. So, if you cannot restore a session, discard the saved state and reopen the virtual machine.
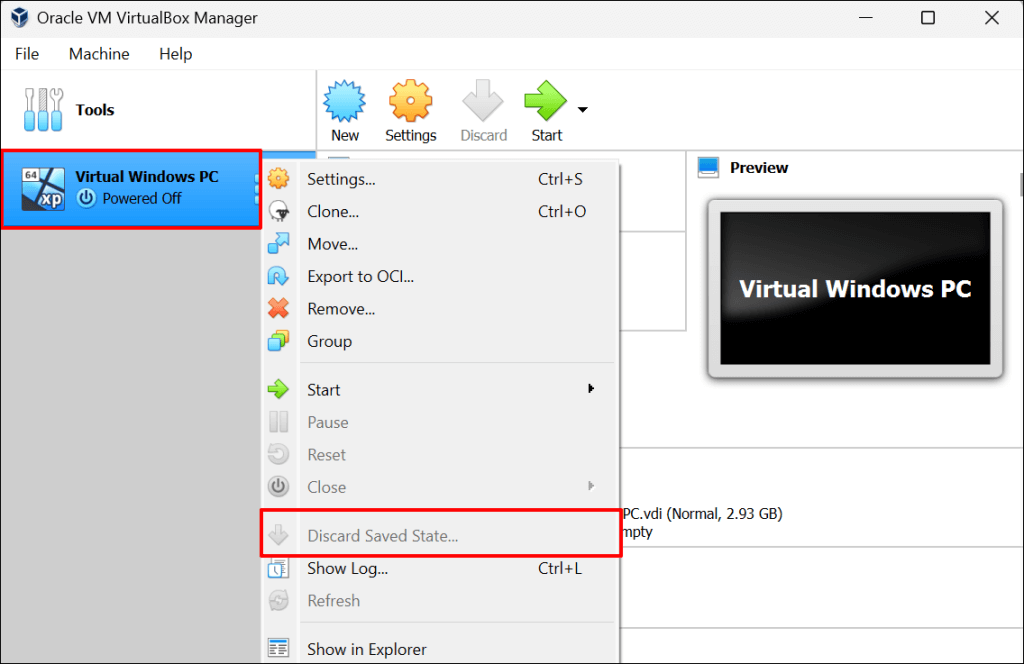
Discarding a machine’s saved state has the same effect as shutting it down. Open VirtualBox, right-click the virtual machine, select Discard Saved State (or press Ctrl + J), and restart the session.
Try the troubleshooting solutions below if “Discard Saved State” is greyed out—i.e., the virtual machine has no saved state.
4. Rename VirtualBox Configuration Files
Force-quitting VirtualBox without first closing a virtual machine can trigger the E_FAIL (0x80004005) error. We’ll explain how and why this happens.
Let’s assume you have a “Linux PC” virtual machine in VirtualBox. When you launch the virtual machine, VirtualBox renames the machine’s file from “Linux PC.vbox” to “Linux PC.vbox-prev.” VirtualBox then creates and uses a new/temporary copy of the virtual machine file—”Linux PC.vbox-tmp”—for the active session.
When you end the virtual machine session, VirtualBox renames the temporary file (i.e., Linux PC.vbox-tmp) to Linux PC.vbox. The “Linux PC.vbox-prev” file serves as a backup—VirtualBox overwrites the file every time you start a new session.
Terminating VirtualBox without closing your virtual machine can disrupt the file conversion process. That’ll prompt the “Result Code: E_FAIL (0x80004005)” error the next time you try to launch the virtual machine.
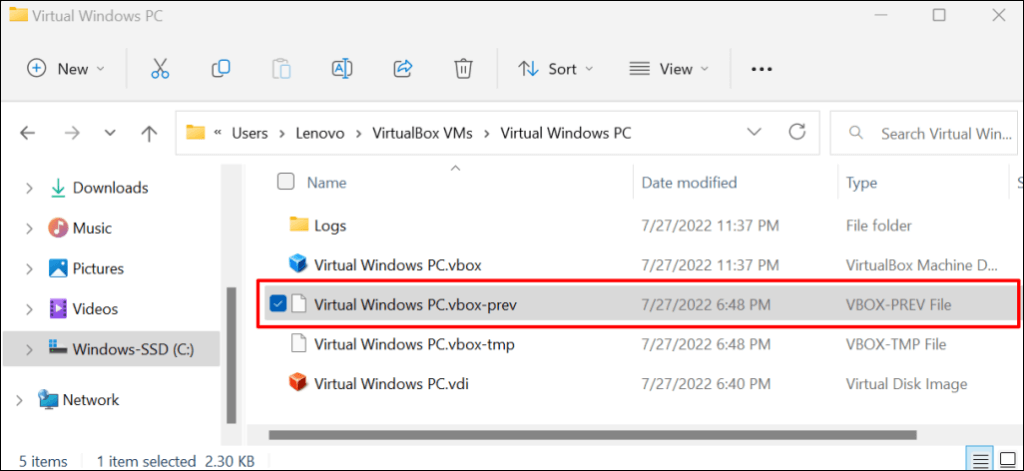
Open your PC’s VirtualBox folder and check if there’s a .vbox file for your virtual machine. If you only find temporary (.vbox-tmp) and backup (.vbox-prev) files in the folder, you probably force-closed VirtualBox while running a virtual machine.
Renaming the backup file can fix the problem and get your virtual machine running again. Close the VirtualBox Manager application and follow the steps below to get it done.
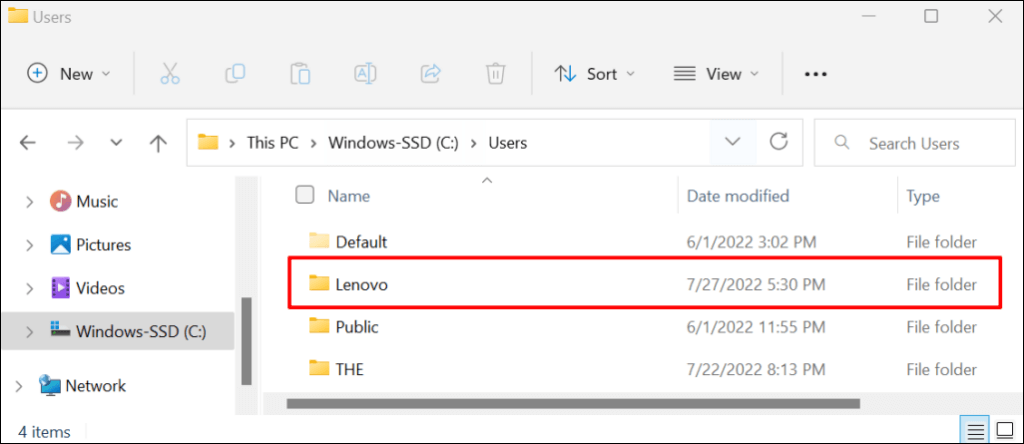
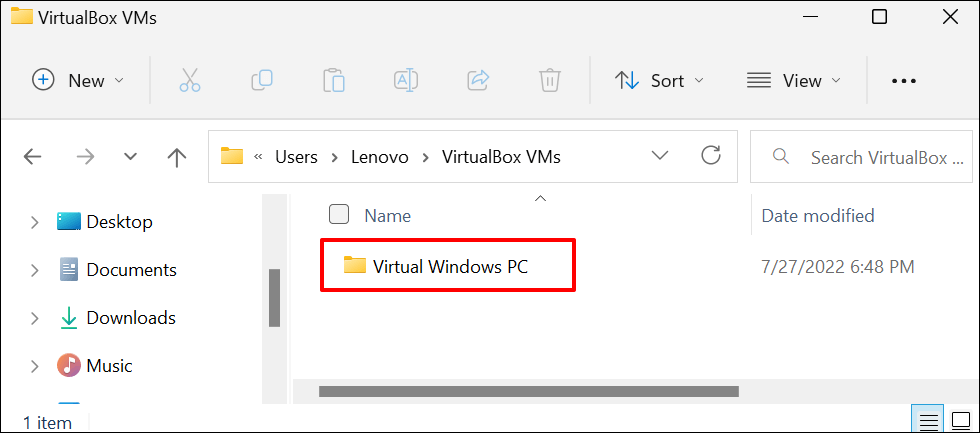
- Open the VirtualBox’s file manager in File Explorer. Open your local disk (C:) folder, double-click the Users folder, and select your computer or account name.
- Open the VirtualBox VMs folder, select Machines, and double-click the virtual machine’s folder.
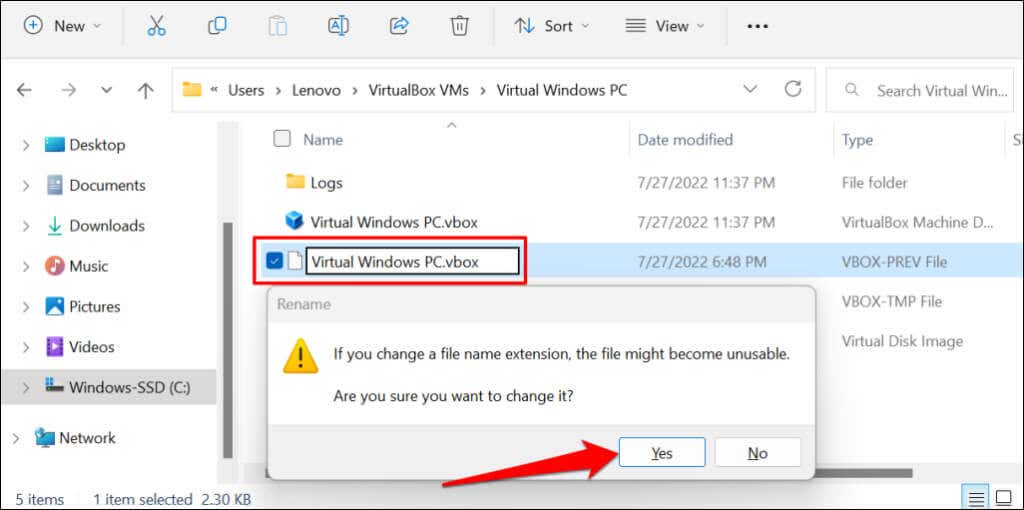
- Copy or backup both files (.vbox-tmp and .vbox-prev) somewhere on your computer. Change the file extension of the temporary file from .vbox-prev to .vbox.
- Select OK on the warning prompt and open the virtual machine in VirtualBox.
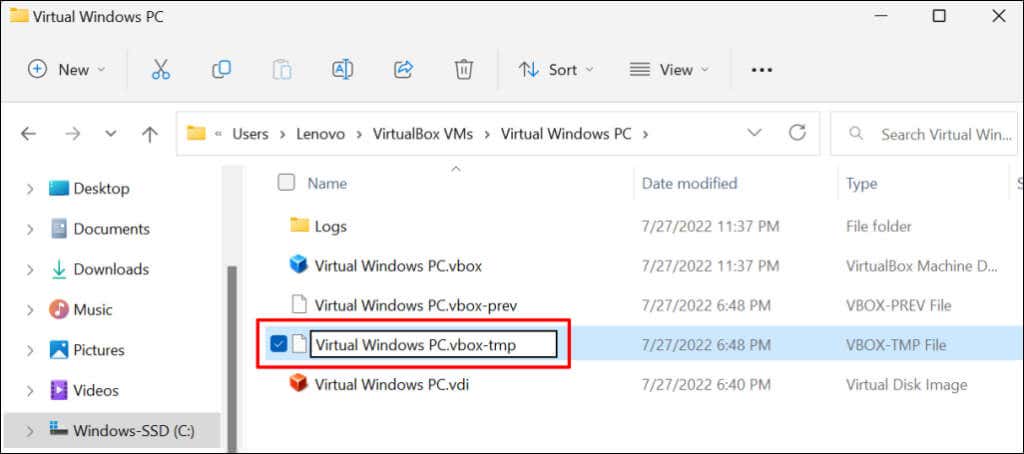
- Close VirtualBox and change the .vbox file back to .vbox-prev if the error persists. Afterward, rename the .vbox-temp file to .vbox and check if VirtualBox now runs the virtual machine.
Note: Older VirtualBox versions (v3.2 and older) store virtual machines configuration files in .xml format—not .vbox. If you find files with this extension in your virtual machine folder, rename them following the steps above. That means you’ll change files in .xml-prev or .xml-tmp format to .xml.
5. Enable Virtualization in BIOS Settings
You must have hardware or CPU virtualization enabled on your computer to run virtual machines. If VirtualBox includes the “AMD-v” or “VT-x” keywords in the error details, your PC’s hardware virtualization is likely disabled.
Follow the step below to verify your computer’s hardware virtualization status.
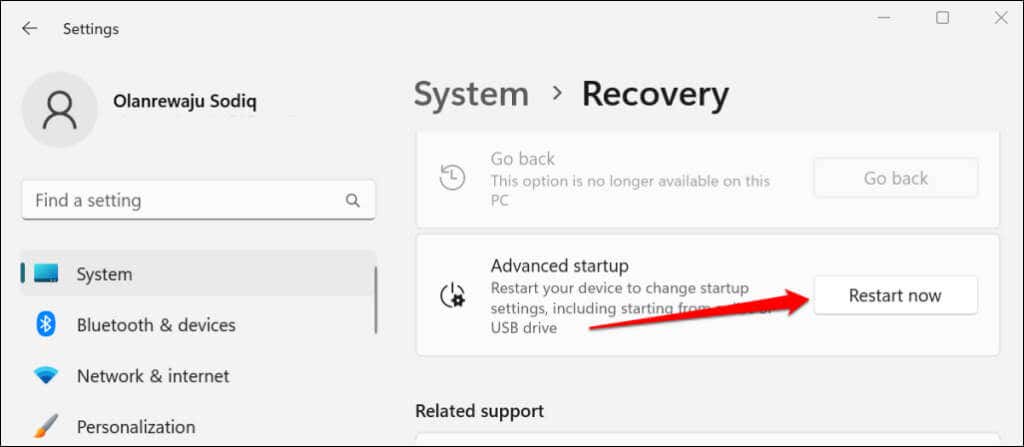
- Go to Settings > System > Recovery > Advanced startup and select Restart now.
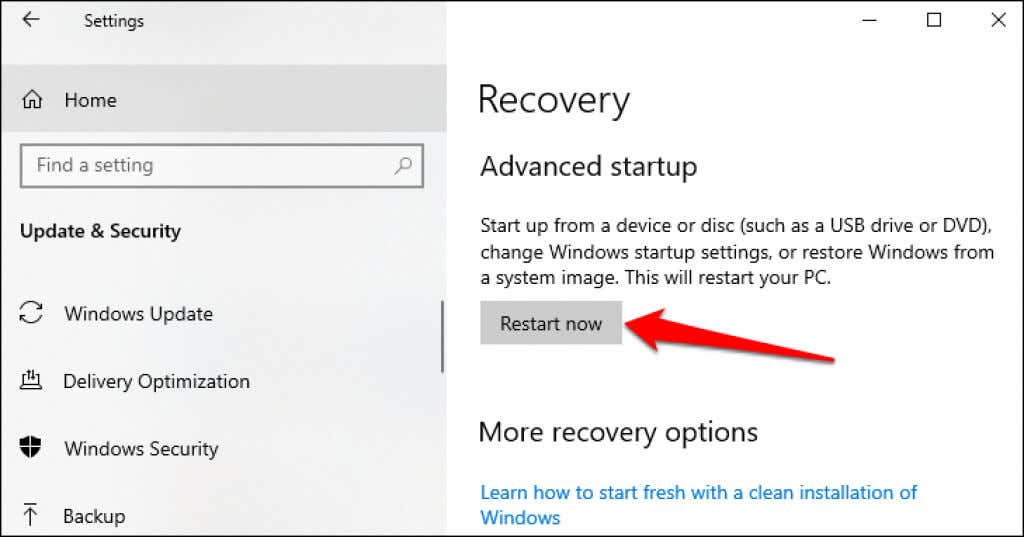
In Windows 10, head to Settings > Updates & Security > Recovery and select Restart now in the “Advanced startup” section.
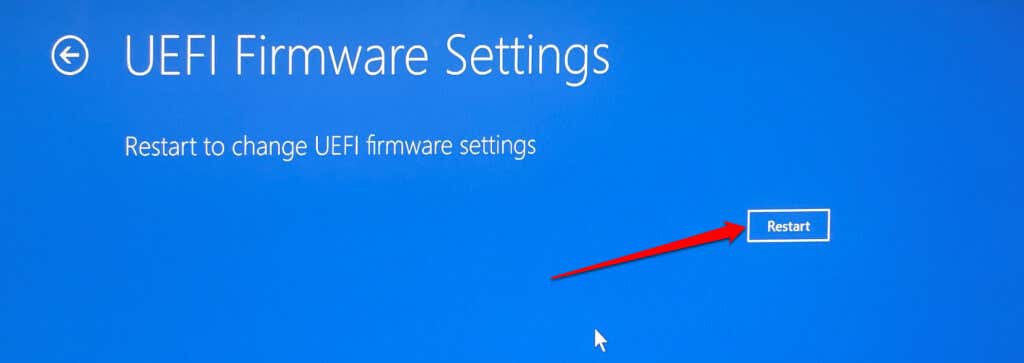
- Head to Troubleshoot.> Advanced options.> UEFI Firmware Settings and select Restart to boot into your PC’s UEFI or BIOS settings.
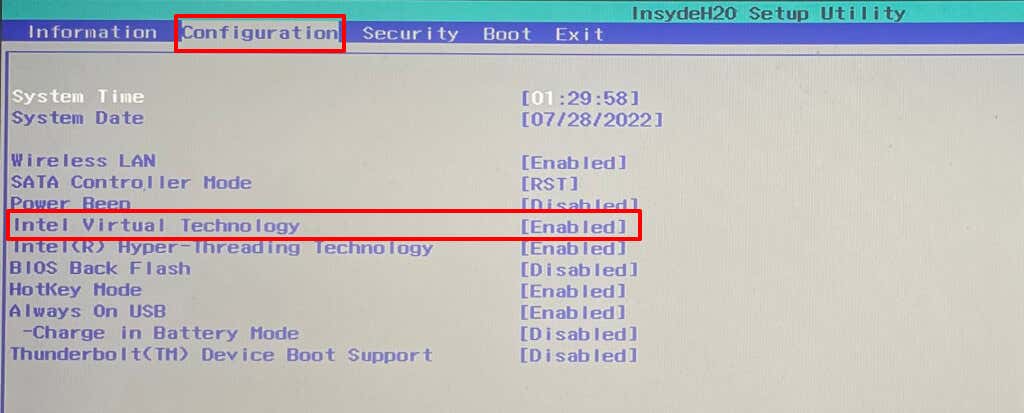
- How you enable virtualization in the BIOS settings will depend on your PC manufacturer or model. For Lenovo devices, head to the Configuration section and set Intel Virtual Technology to Enabled.
Head to the Configuration section on HP computers and keep Virtualization Technology enabled. This Microsoft Support document has instructions for enabling virtualization for all PC manufacturers and devices.
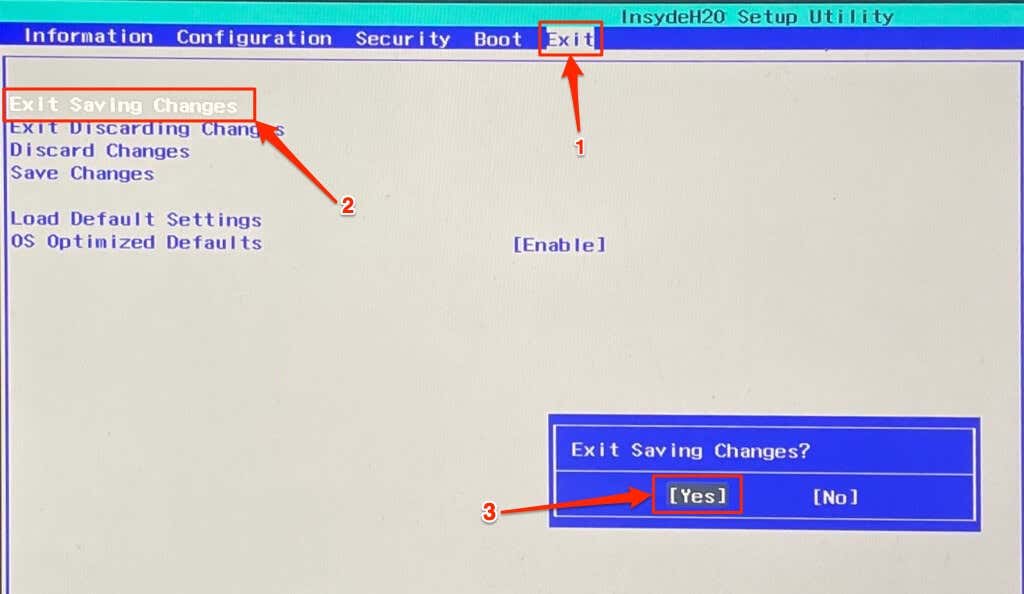
- Head to the “Exit” section, select Exit Saving Changes, and select Yes to boot into Windows.
VirtualBox should now run the virtual machine after enabling virtualization in your PC’s BIOS/UEFI settings.
6. Reinstall VirtualBox
Uninstall VirtualBox if none of the troubleshooting tricks resolve the problem. Afterward, reboot your computer and install the latest VirtualBox version. Reinstalling VirtualBox fixed the problem for some Windows users in this Microsoft Community thread.
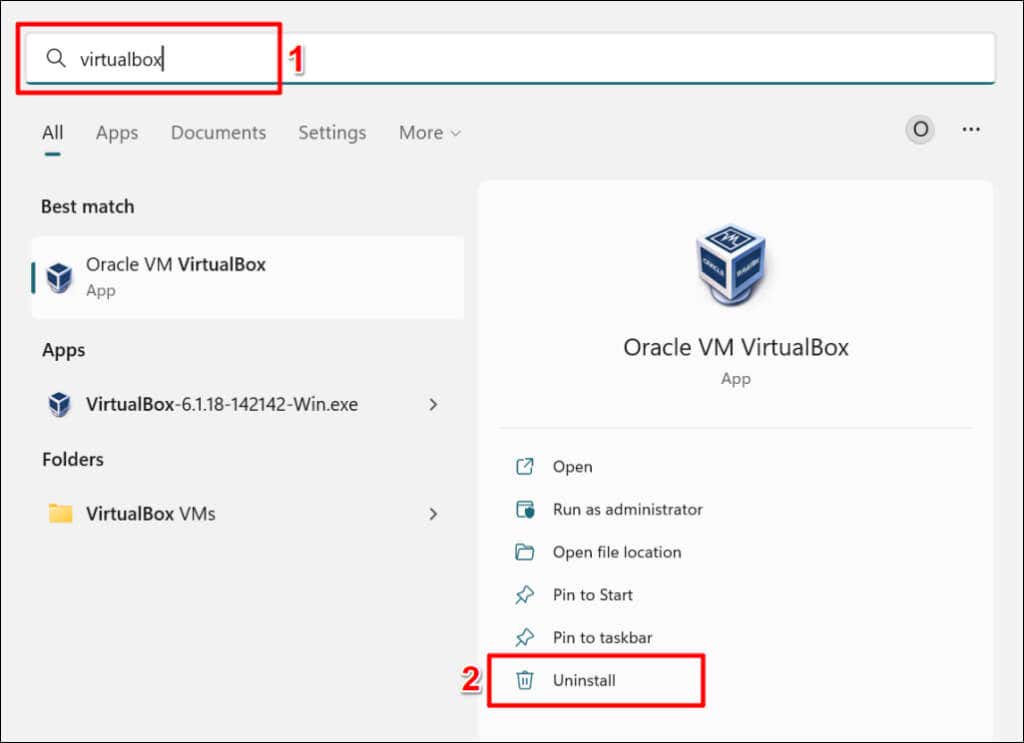
Type virtualbox in the Start menu search, select Uninstall below the Oracle VM VirtualBox app and follow the uninstallation prompt.
Contact Oracle Support or your PC manufacturer if the “Result Code: E_FAIL (0x80004005)” error persists despite reinstalling VirtualBox.
