Google publishes frequent updates to enhance the performance, stability, and security of its flagship Chrome browser. Major version upgrades also improve the browsing experience with new features and hidden experimental flags.
Chrome updates itself to the latest version within a few days after release to ensure you don’t miss anything. But you can also initiate an update manually to get up to speed faster.
However, if the Windows version of Chrome fails to update on its own, hangs during a manual update, or throws out an error code, here are several likely reasons:
- Network-related problems
- Compatibility issues
- Incorrectly configured Google Update Service
- Malicious extensions and browser hijackers
- Corrupt or missing files
In most instances, you can identify the problem behind a failed Chrome update by accessing the About Chrome screen (open the More menu and select Help > About Google Chrome). For example, an error message with codes 3, 11, 7, and 12 indicates complications with network connectivity.
The solutions that follow can sort out most update-related issues in Google Chrome on Windows. It’s best to quit and relaunch the browser as you work your way through each fix.
Exit Chrome and Restart Computer
Restarting your PC alone can resolve many minor bugs and glitches that randomly pop up and prevent Chrome from updating. So do that now and attempt another Chrome update before moving onto the rest of the fixes.
Run the Built-In Network Troubleshooters
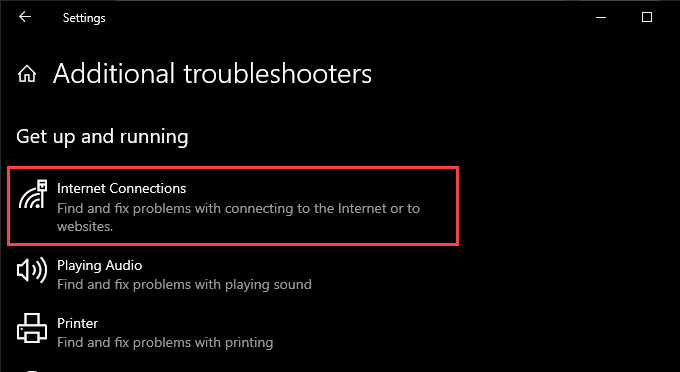
Suppose a failed Chrome update points at a faulty internet connection or access point. In that case, running the built-in network-related troubleshooters in Windows may help you diagnose and fix when Chrome is not updating.
1. Open the Start menu and select Settings.
2. Select Update & Security.
3. Switch to the Troubleshoot tab.
4, Select Additional Troubleshooters.
5. Run the Internet Connections troubleshooter.
6. Perform the recommended suggestions to fix issues detected by the troubleshooter.
7. Scroll down the Additional troubleshooters screen and run the Incoming Connections and Network Adapters troubleshooters.
Flush the DNS Cache
An obsolete Domain Name System (DNS) cache stops Chrome from connecting to Google’s update servers. Clearing it should help fix that.
1. Press Windows + X to open the Power User Menu. Then, select Windows PowerShell (Admin).
2. Type the following command and press Enter:
ipconfig /flushdns
3. Exit Windows PowerShell.
Renew Your Computer’s IP Lease
If you experience spotty internet connectivity throughout Chrome, try resetting the IP (Internet Protocol) lease for your PC.
1. Press Windows + X and select Windows PowerShell (Admin).
2. Execute the following commands one after the other:
ipconfig /release
ipconfig /renew
3. Exit Windows PowerShell.
Reset Router & Network Settings
If Chrome continues to run into issues connecting to or downloading from Google’s update servers, try resetting the router. If that fails, you must reset the network settings in Windows.
Disable or Reconfigure Compatibility Mode
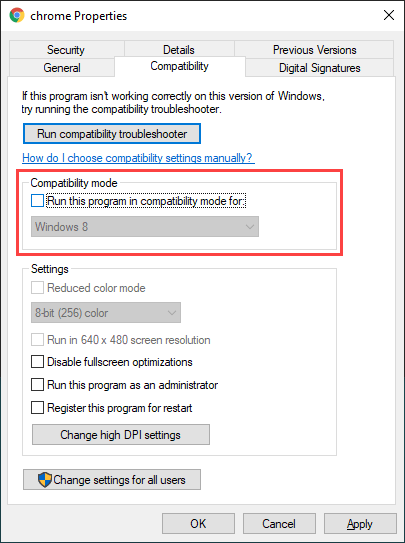
If you’ve configured Chrome to run in compatibility mode for Windows XP or Windows Vista, you can’t update the browser since Google no longer supports both operating systems. Deactivating compatibility mode (or selecting Windows 7 or later) can help fix that.
1. Right-click the Google Chrome desktop shortcut and select Properties.
Suppose you don’t use a desktop shortcut, open File Explorer and go to Local Disk (C:) > Program Files > Google > Chrome > Application. Then, right-click chrome.exe and select Properties.
2. Switch to the Compatibility tab and uncheck the Run this program in compatibility mode for option. Alternatively, select Windows 7 or a newer version of Windows.
3. Select Apply > OK to save the changes.
Deactivate Chrome Extensions
Extensions help boost the functionality in Chrome, but they can also create conflicts and prevent the browser from updating. Try disabling them before attempting another update.
To do that, open the Extensions menu (located at the screen’s top-right corner) and select Manage extensions. Then, turn off the switches next to each active extension.
Check for Harmful Software
Failed Chrome updates can also stem from malicious extensions, browser hijackers, and other forms of harmful software.
To help you deal with that, Chrome comes with a malware scanner built right into the browser itself. Open Chrome’s More menu and go to Settings > Reset and clean up > Clean up computer to run it.
If Chrome manages to detect and remove harmful software, run a system-wide malware scan using Windows Security or a reputed third-party malware removal utility.
Look Around the Firewall Settings
If you use a third-party anti-malware utility with an integrated firewall, open its configuration pane and ensure that Google Chrome and the Google Installer (GoogleUpdate.exe) have permissions to connect to the internet.
You must also ensure that you haven’t restricted access to the following websites:
- tools.google.com
- dl.google.com
Alternatively, disabling any third-party anti-malware utilities running on your computer for the duration of an update may also help.
If you use Windows Security only, look around the Windows Firewall’s rules and settings to confirm that nothing’s amiss.
Reconfigure the Google Update Service
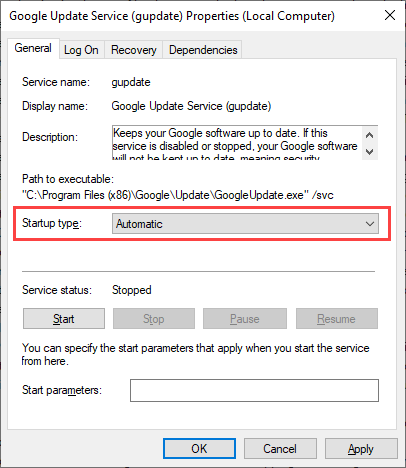
Chrome relies on a background service called the Google Update Service to apply updates automatically. If it consistently fails to do that (as in, you can only update the browser manually), you must configure the service to start alongside the operating system.
1. Press Windows + R to open the Run box. Then, type services.msc and select OK to bring up the Services applet.
2. Locate and double-click the entry labeled Google Update Service (gupdate).
3. Set Startup type to Automatic.
4. Select Apply > OK to save the changes.
5. Locate and double-click Google Update Service (gupdatem) and repeat steps 3–4.
6. Restart your computer.
Reset Google Chrome
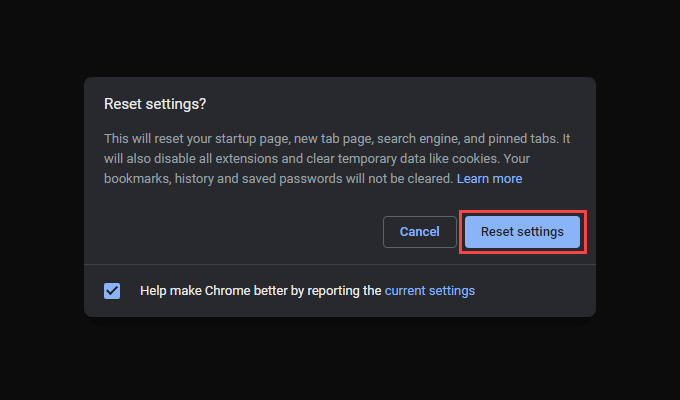
If the fixes above failed to resolve Chrome not updating, you must reset Chrome. That should resolve any corrupt or conflicting configurations preventing the browser from updating. You won’t lose personal data such as bookmarks, history, or passwords, but we recommend syncing your data to a Google Account (if you haven’t already) as a precautionary measure.
To reset Chrome, open Chrome’s Settings pane and go to Advanced > Reset and clean up > Reset all settings to defaults. Then, select Reset settings confirm.
Reinstall Google Chrome
If resetting Chrome didn’t help, you must reinstall it from scratch. Not only does that install the latest version of the browser, but the procedure should also take care of any corrupted or missing files preventing Chrome from updating going forward.
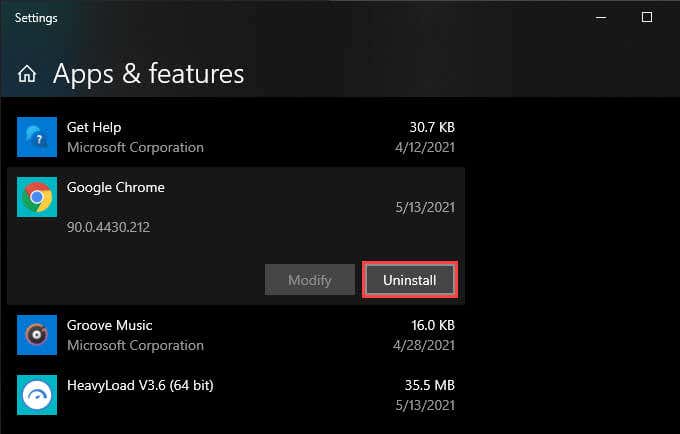
Since you’ll lose all data, you must sync your bookmarks, passwords, and settings to a Google Account. Then, go to Start > Settings > Apps and Features and select Google Chrome > Uninstall.
Follow by deleting all remaining folders from the Chrome installation in the following directory:
- Local Disk (C:) > Program Files > Google > Chrome
Once you’ve done that, download the Chrome installer stub or the standalone installer and launch it to re-install Google Chrome.
Update the Operating System
Updating Windows itself helps fix known system-related bugs preventing Chrome from working or updating normally. If you haven’t done that in a while, try applying the latest operating system updates now.
1. Open the Start menu and go to Settings > Update & Security > Windows Update.
2. Select Check for updates.
3. Select Download and install to update the operating system.
Chrome Fully Up-to-Date
Keeping Chrome up-to-date guarantees you the best version of the browser at all times, so taking the time to fix any update-related problems is well worth the effort. However, that doesn’t stop the browser from being a resource hog.
So if you’re willing to try out something new (or if Chrome continues to fail to update), check these lightweight Chromium browser alternatives instead.
Related Posts
Dilum Senevirathne is a freelance tech writer and blogger with three years of experience writing for online technology publications. He specializes in topics related to iOS, iPadOS, macOS, and Google web apps. When he isn’t hammering away at his Magic Keyboard, you can catch him binge-watching productivity hacks on YouTube. Read Dilum’s Full Bio
