Before throwing it at the wall
Your Chromebook might shut down without warning if it’s overheating, has a faulty battery, or runs an outdated operating system. This post will help you understand why your Chromebook keeps turning off abruptly and how to troubleshoot the issue.
1. Disconnect External Devices or Accessories
External accessories (monitor, webcam, docking station, etc.) or storage devices can interrupt your Chromebook’s boot process. Unplug any accessory or device (thumb drives, SD cards, etc.) from your Chromebook and try turning it back on.
2. Remove and Reinsert Your Chromebook’s Battery
If your Chromebook’s battery is detachable, removing and reinserting the battery might stop it from turning off during usage. Ensure the battery compartment is clean and free of dust, dirt, or any material that could interfere with the battery connection. Also, use a clean and dry cloth to wipe dirt off the metal contacts on the battery.
Replace the battery if it’s swollen or has any physical damage. Otherwise, check the battery’s health (see next section) if your Chromebook keeps shutting down on battery power.
3. Check Your Chromebook’s Battery Health
When disconnected from a power source, Chromebooks with degrading or faulty batteries might fail to boot or stay powered on.
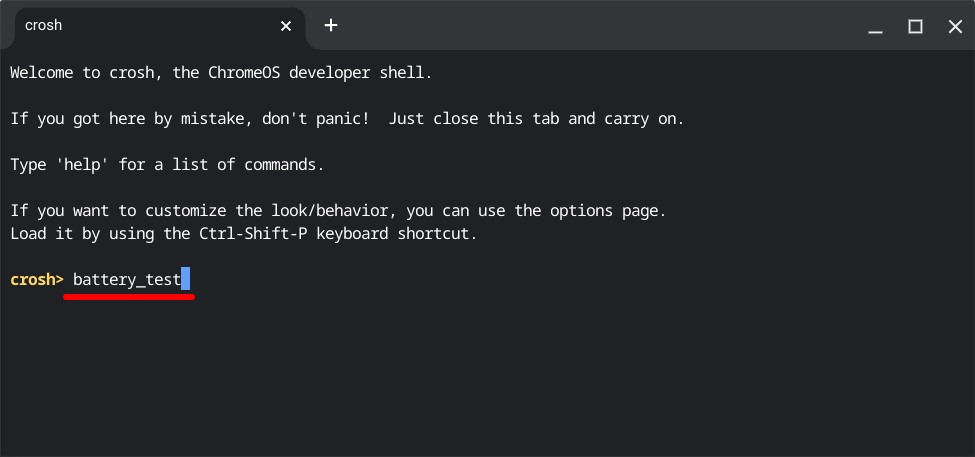
Follow the steps below to check your Chromebook’s battery health in Crosh—the ChromeOS Command Shell environment.
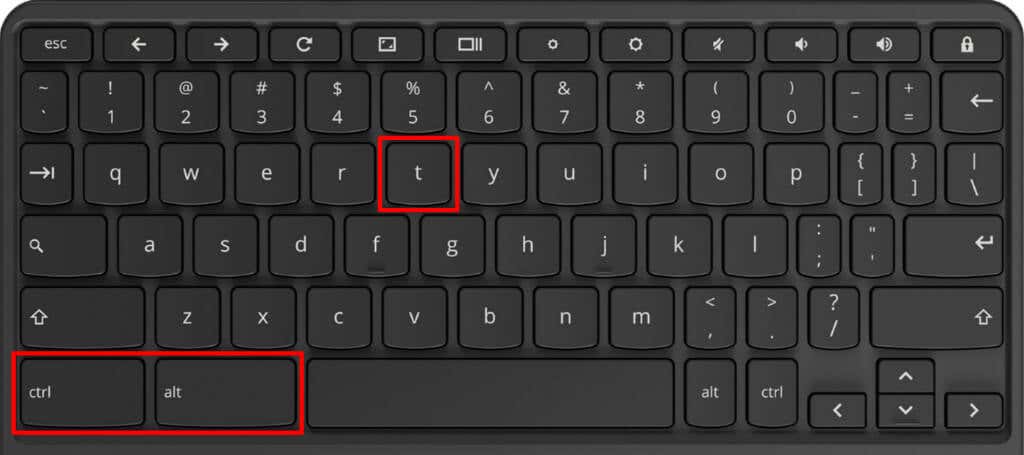
- Use the Ctrl + Alt + T keyboard shortcut to open your Chromebook’s Crosh Shell.
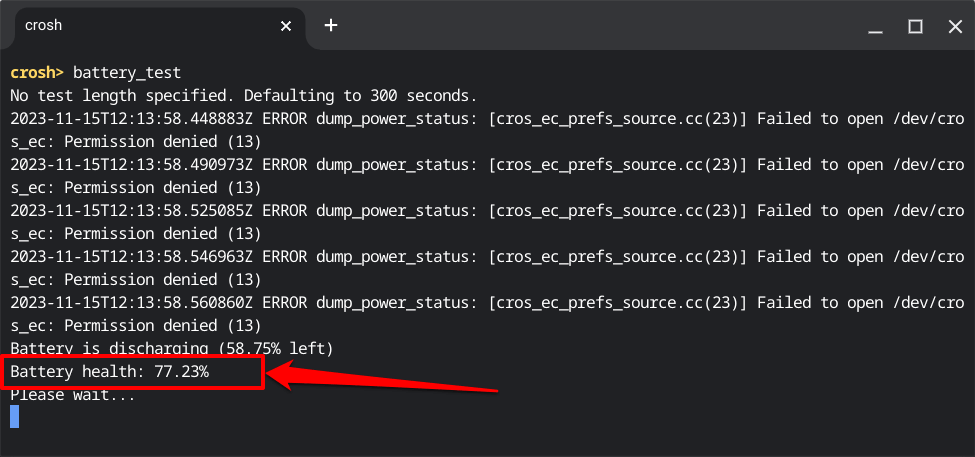
- Next, type battery_test in the terminal and press Enter on the keyboard.
Wait for Crosh to run the command (about 3-5 minutes) and proceed to the next step.
- Check the Battery health row for your Chromebook’s battery status.
An 80% battery_health (or lower) indicates a degrading battery. That means your Chromebook can no longer retain up to 80% of its original capacity.
Expect your Chromebook to discharge quicker (than usual) or start turning off without warning when its “battery_health” rating hits 80% or lower.
Contact your Chromebook manufacturer, administrator, or any computer technician to have the dying or worn-out battery replaced. Your Chromebook manufacturer won’t charge you for battery service or replacement if your device is under warranty.
4. Run a Battery Discharge Test
ChromeOS has a Diagnostics tool that detects battery failure and charging issues. Turn on your Chromebook and follow the steps below to run a battery discharge test before it shuts down.
The test measures the rate at which your Chromebook’s battery charges and discharges over a specific period.
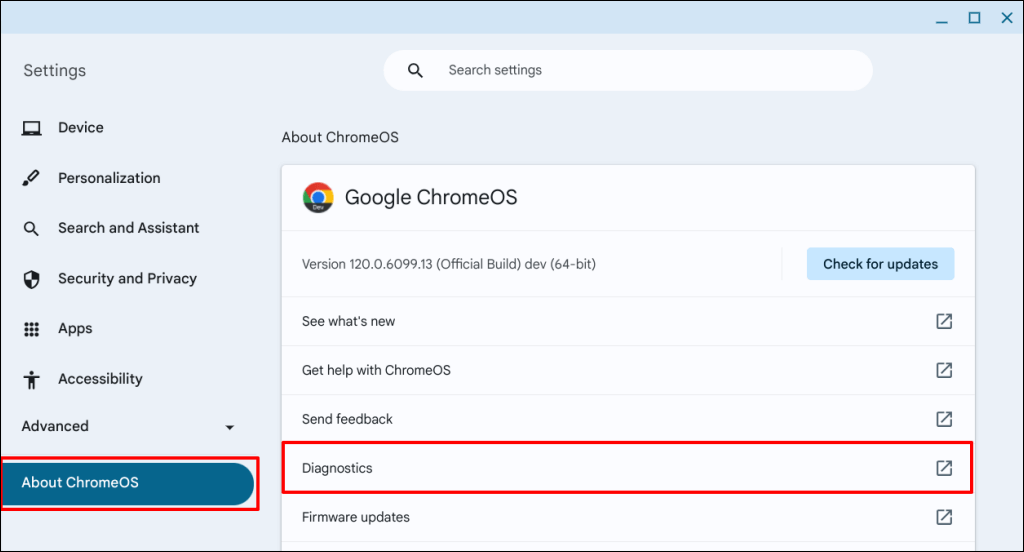
- Press the Ctrl + Search + Esc on your keyboard to launch the Diagnostics app. Alternatively, head to Settings > About ChromeOS and select Diagnostics.
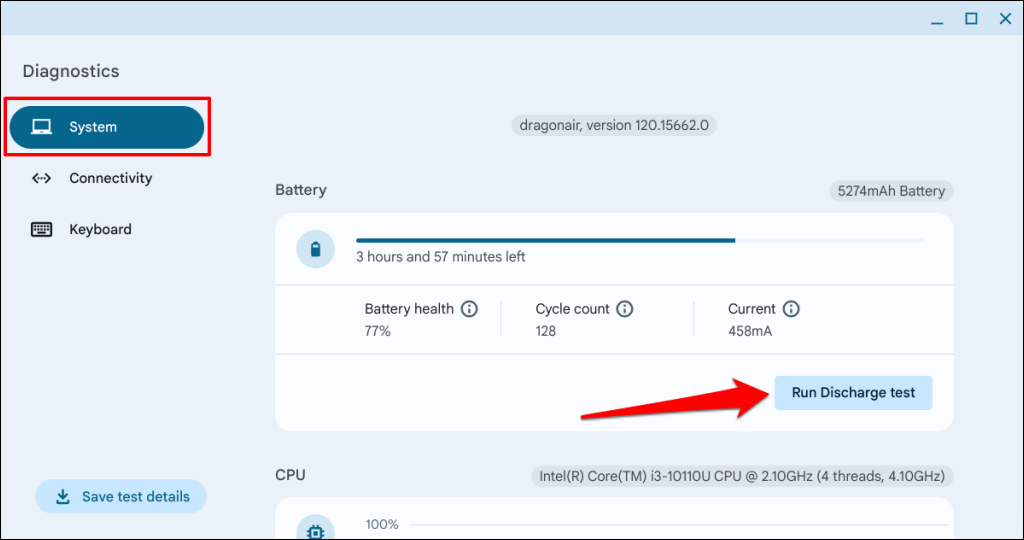
- Open the System tab on the sidebar, scroll to the “Battery” section, and select the Run Discharge test button.
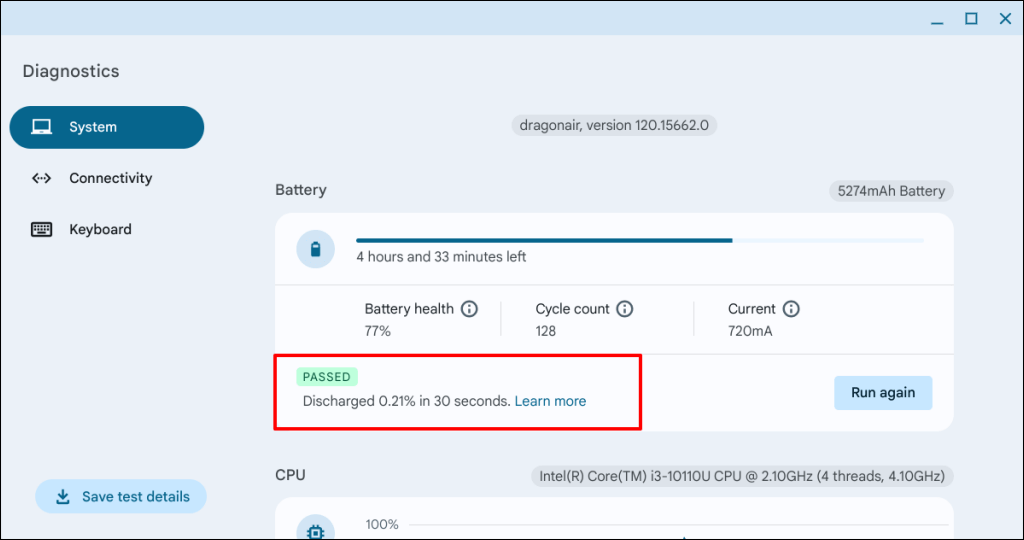
- Wait while Diagnostics checks your Chromebook’s discharging rate—the operation about 2-3 minutes.
Your Chromebook will fail the test if there’s an issue with its battery or charging port. Contact your Chromebook manufacturer to have its battery and charging port examined. You should read our tutorial on fixing Chromebook charging issues for more troubleshooting steps.
5. Leave Your Chromebook to Cool
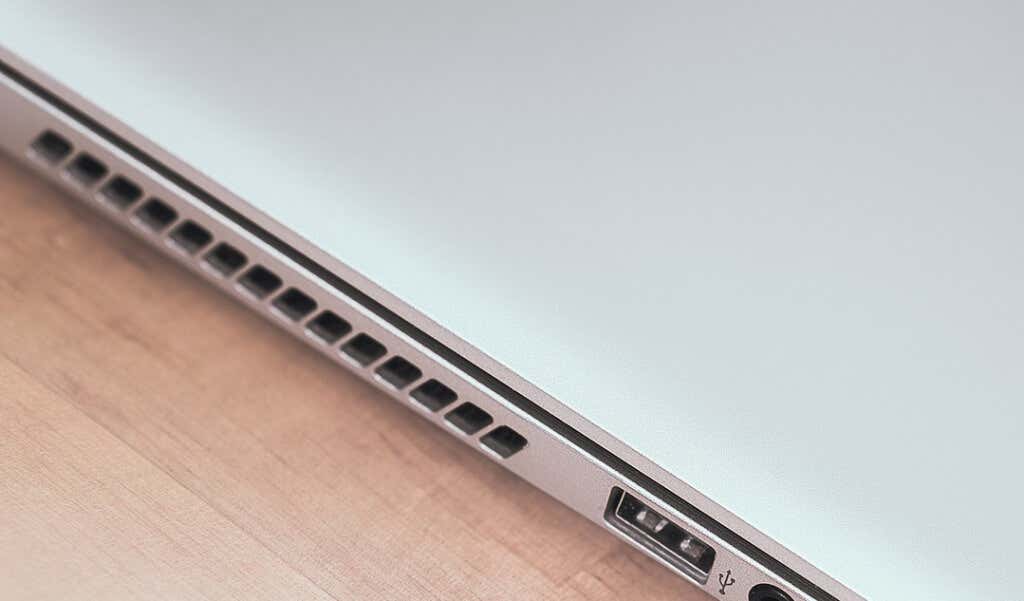
Laptops sometimes restart intermittently or temporarily stay powered off to prevent heat-induced damage. Your Chromebook might overheat due to poor ventilation or dirt build-up in the air vent. Also, expect your Chromebook to overheat if its cooling fan is malfunctioning or clogged.
If the base of your Chromebook feels warm or hot, leave it to cool before turning it back on. Better yet, place it on a laptop stand or cooling pad for faster cooling.
Also, check your Chromebook’s air vent for dust, dirt, or grime blocking air inlet and outflow. Swipe the air vent with a clean and dry cloth to remove dust or dirt. Dampen the cloth with cleaning fluid to remove grime stuck on the vent’s grills and crevices.
You can also use compressed air to blow out dirt and dust. Doing so will improve air circulation and stop your Chromebook from overheating. Closing unneeded browser tabs and applications can also reduce CPU workload and temperature. If you’re charging your Chromebook, unplug the power supply for a few minutes.
Contact your Chromebook manufacturer or a computer technician if the CPU fan doesn’t work, or the overheating persists. If you use a work or school Chromebook, report the persistent shutdown issue to your administrator.
6. Update Your Chromebook
Bugs in your Chromebook’s operating system can also cause it to keep shutting down without warning. If your Chromebook briefly stays on before shutting down, update its operating system as quickly as possible.
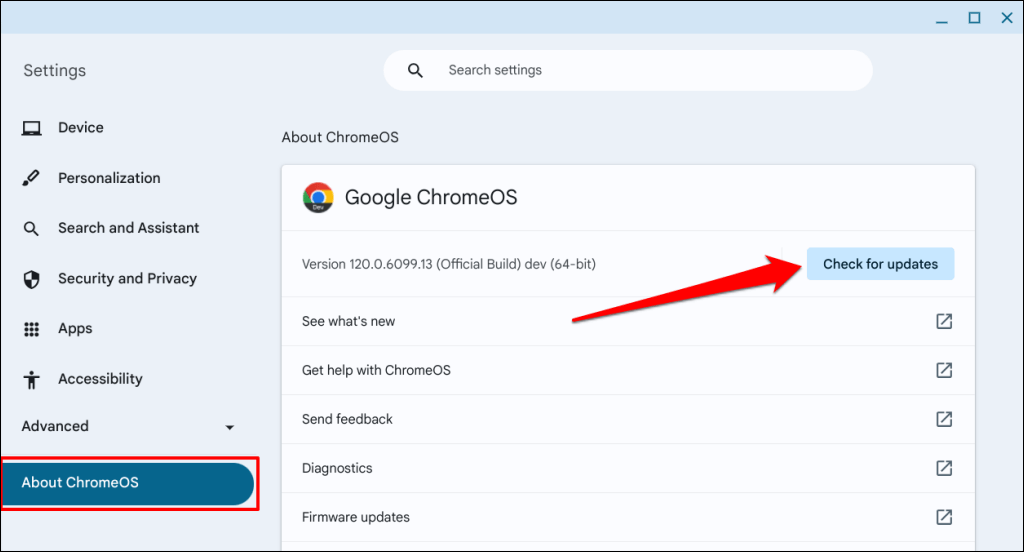
Join a Wi-Fi/Ethernet network, head to Settings > About ChromeOS, and select Check for updates to update your Chromebook manually.
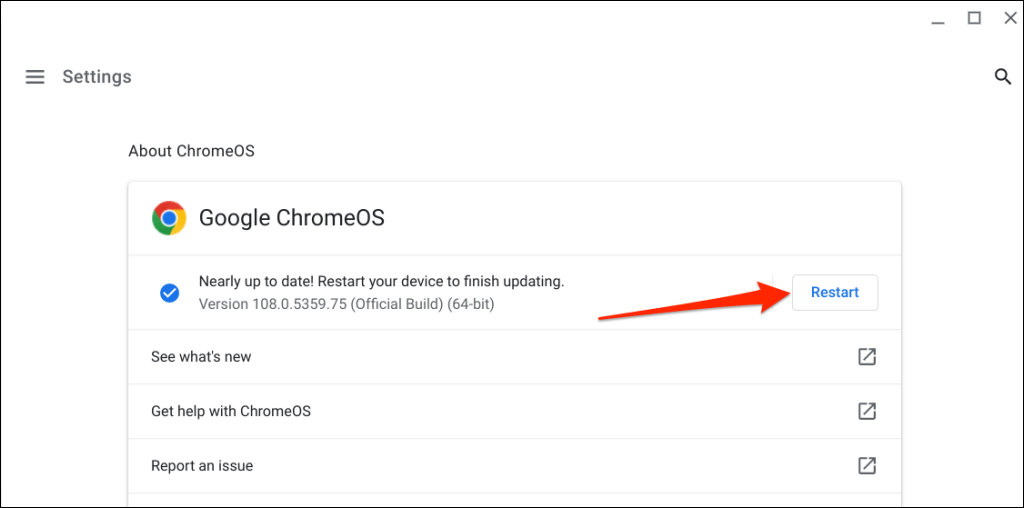
You’ll see an option to reboot your Chromebook if there’s a pending or pre-downloaded software update. Select the Restart button to install pending updates.
Hard reset your Chromebook (see next section) if it won’t stay on despite updating its software to the latest version.
7. Reset Your Chromebook’s Hardware
Hard resetting your Chromebook won’t delete personal files or applications. However, the operation might remove some files in the “Downloads” folder. Back up the folder or important files to Google Drive or an external storage device before performing a hardware reset.
Reset Chromebook Using Keyboard Shortcuts
- Turn off your Chromebook and wait 2-3 minutes for it to shut down completely.
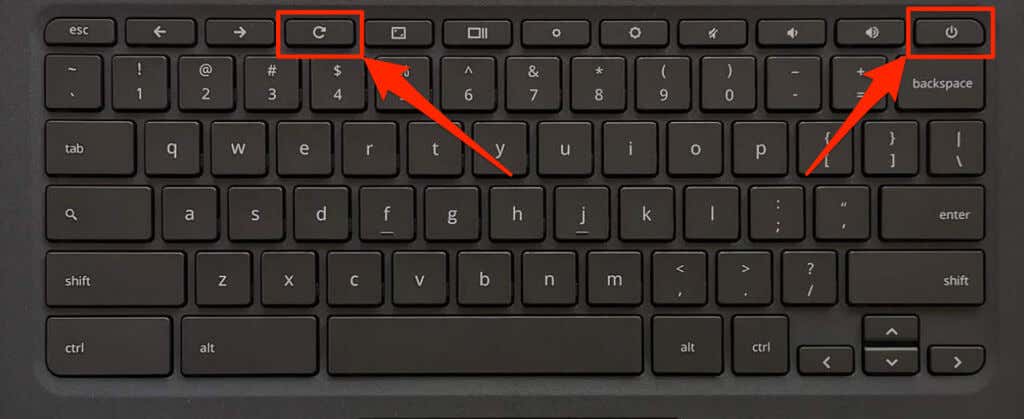
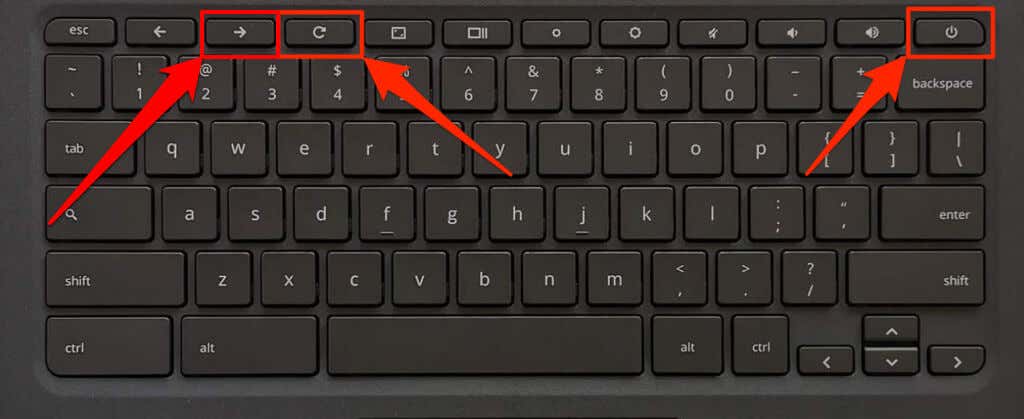
- Next, press and hold the Refresh button and tap the Power button.
- Release the Refresh button when your Chromebook boots or the ChromeOS logo appears on the screen.
You can also hard reset your Chromebook by pressing and holding the Back + Refresh + Power buttons for 10-15 seconds.
Reset Chromebook Using Special Reset Button
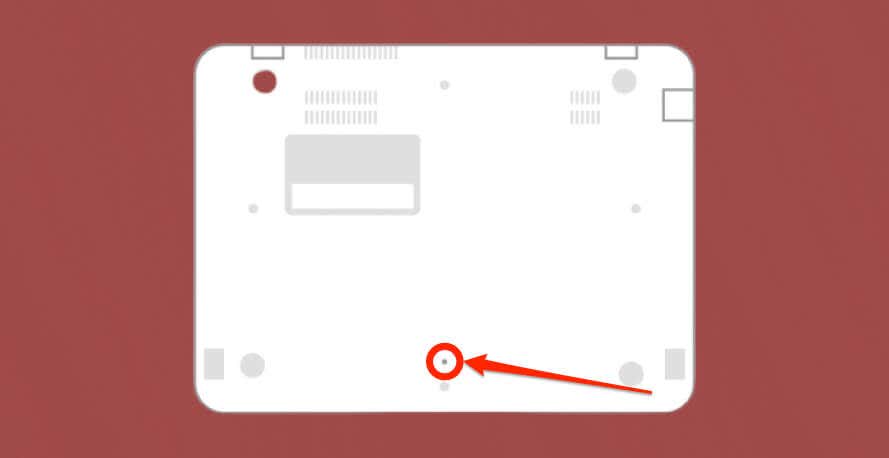
The following Chromebook models have a special reset button: Acer AC700, Lenovo Thinkpad X131e, Samsung Series 5, and Series 5 550. You’ll find the reset button in a hole at the bottom of your Chromebook’s case.
Turn off your Chromebook, unplug its charger, and follow the steps below to reset its hardware.
- Insert a SIM card ejector/pin or paperclip into the reset hole.
- Hold the paper clip or pin in place and connect your Chromebook’s power adapter.
- Press your Chromebook’s Power button and remove the SIM card ejector or pin.
8. Run a Malware Scan
ChromeOS runs applications and web pages in a restricted “sandbox” environment that safeguards Chromebooks from malware infection. The chances of malware infection in ChromeOS are slim, but it’s not entirely impossible.
Stubborn malware that manages to creep into your Chromebook’s operating system can cause startup and power issues. Run a complete system scan using third-party antivirus/security to detect and remove malware from your device.
9. Factory Reset Your Chromebook
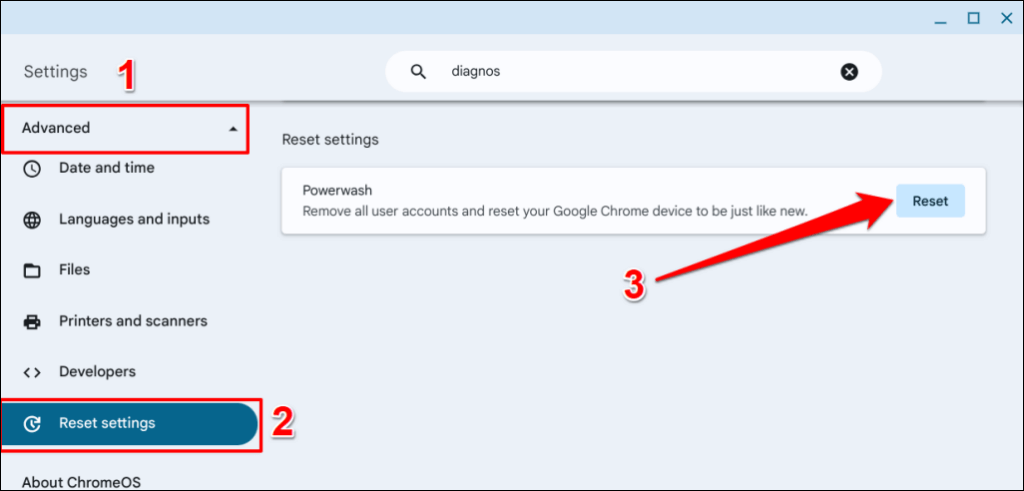
Powerwashing your Chromebook or resetting it to factory settings will permanently delete everything on the hard drive. Back up important files before running the powerwash—if your Chromebook stays on long enough for you to do so.
Head to Settings > Advanced > Reset settings and select the Reset button.
Refer to our tutorial on powerwashing Chromebooks if you have trouble factory resetting your device.
Stop Your Chromebook from Turning Off By Itself
We’re confident that one of these troubleshooting recommendations will get your Chromebook running again without interruption. Take your Chromebook to a repair shop or contact its manufacturer if it keeps blacking out.


