Installing Chrome OS updates, for instance, requires an internet connection. So does downloading apps from the Play Store or via the Linux Development Environment. Also, certain applications (video-conferencing apps, for example) won’t work without an internet connection.
Although Chromebooks support ethernet connectivity, Wi-Fi is a lot more popular and convenient. It also comes with more problems. In this guide, we’ll cover 8 things to try if your Chromebook won’t connect to Wi-Fi.
1. Move Closer to the Wi-Fi Router
Your Chromebook might encounter difficulties detecting or joining a Wi-Fi network if it’s too far away from the router. You may also encounter dropping connections if your device and the router are out-of-range.
If you’re using a mobile or portable router that’s battery-powered, bring it closer to your Chromebook and try joining the network again. You could also move your Chromebook closer to the router—whichever works best for you. For a plug-in router, relocate it to a power outlet closer to your Chromebook or workspace.
Re-enabling your Chromebook’s Wi-Fi could also fix the problem. Turn off your device’s Wi-Fi, turn it back on, and try joining the network.
2. Restart the Router
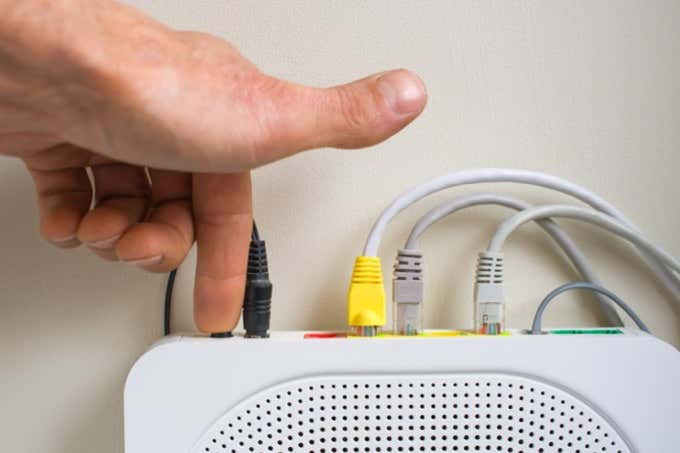
Sometimes, your router is the root cause of many connectivity issues. Luckily, you don’t have to do too much to fix these issues. Power-cycling the router can resolve temporary issues (e.g. IP address conflict) preventing your Chromebook from joining a Wi-Fi network.
It’s also worth noting that a router could malfunction due to overheating. When you shut down your router, we recommend allowing it to cool off for a few minutes before turning it back on. If your router overheats too often, consider relocating it to a properly ventilated location.
3. Rejoin the Wi-Fi Network
This entails deleting the Wi-Fi network from your Chromebook’s memory and reconnecting from scratch. You should consider this troubleshooting technique if your Chromebook suddenly won’t join a previously connected network.
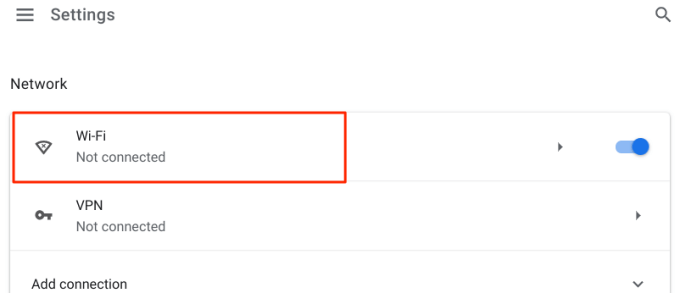
- Go to Settings > Network and select Wi-Fi.
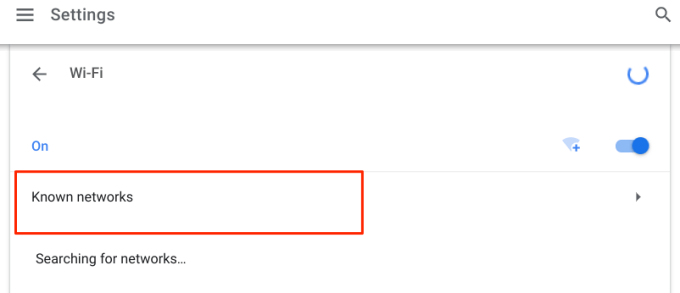
- On the Wi-Fi settings menu, expand the Known networks section.
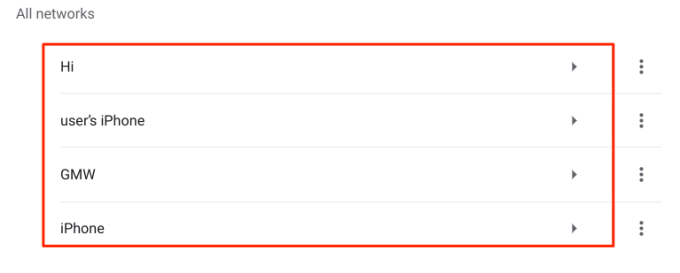
- Select the problematic Wi-Fi network in the “All networks” section.
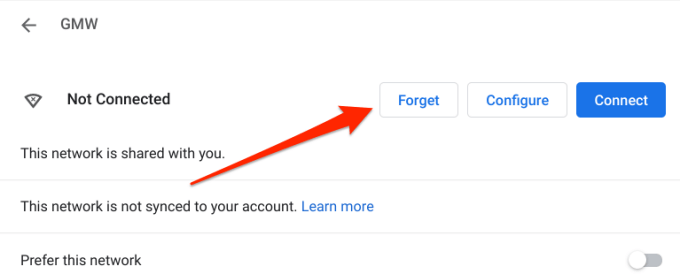
- Tap the Forget button.
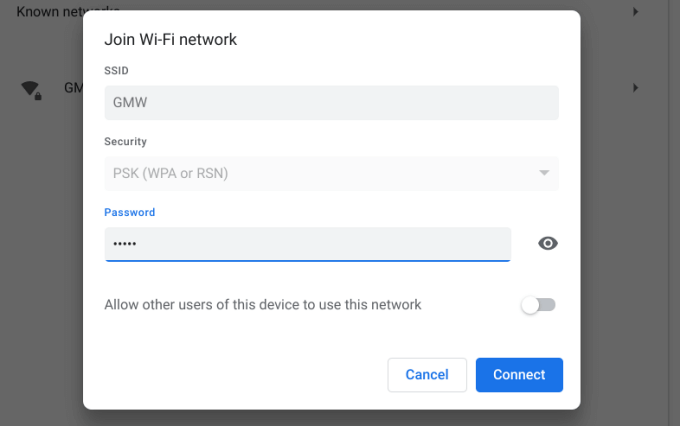
- Return to the Wi-Fi settings menu and select the Wi-Fi network.
- If the network is protected, enter the password and select Connect to proceed.
If this doesn’t fix the problem, your Chromebook is probably on the blacklist for the network. Jump to the next section to learn how to whitelist your Chromebook on a Wi-Fi network.
4. Whitelist Your Chromebook
Device blacklisting is an important layer of security on every Wi-Fi network. If your Chromebook is on a network’s blacklist, you won’t be able to connect to the Wi-Fi connection. If you have access to the router’s admin panel, head to the “WLAN,” “Security,” or “Device Management” section and remove your Chromebook from the network’s blacklist.
Otherwise, contact the network admin to whitelist or unblock your Chromebook.
5. Check for MAC Address Restriction
MAC Address Filtering is another network security mechanism that shuts out unauthorized or unwanted devices. If other devices but your Chromebook can join a Wi-Fi network, there’s probably a MAC address restriction on your device. Head to the router’s admin panel and check if your Chromebook is on the MAC address filter list. Delete your Chromebook’s Wi-Fi address from the MAC filter and try joining the Wi-Fi again.
But first, you’ll need to know your Chromebook’s MAC address. How how to check:
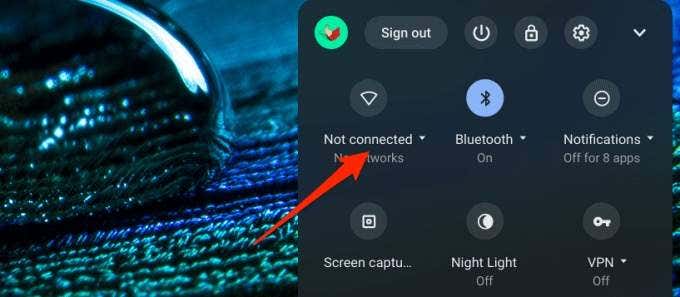
- Tap the time at the bottom-right corner of the screen to open your Chromebook’s notification area.
- Tap the drop-down button below the Wi-Fi icon.
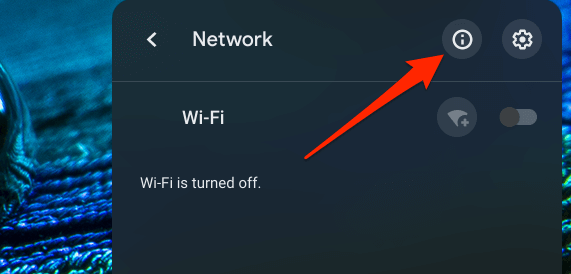
- Tap the info 🛈 icon in the Network title bar.
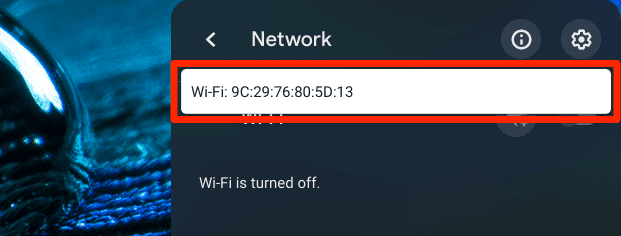
- The Wi-Fi address is your Chromebook’s MAC address.
6. Restart Your Chromebook
This is the next best troubleshooting step to take if everything looks fine with your router’s configuration but you still can’t establish a connection with the Wi-Fi network. Close all open applications (so you don’t lose unsaved data) and power off your Chromebook.
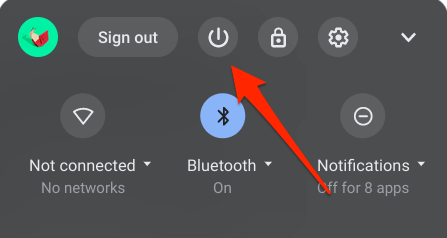
Hold the power button and select Power off on the screen, or open the notification area and tap the Power icon.
Wait for about 20-30 seconds for Chrome OS to shut down completely. Afterward, restart your Chromebook and try connecting to the Wi-Fi network.
7. Update Your Router’s Firmware
Firmware updates often ship feature improvements that enhance your router’s connection speed and fix technical issues. If your Chromebook and other devices can’t establish a connection with your Wi-Fi network, visit the router’s admin panel or the manufacturer’s website and check if there’s a firmware update for your router model.
8. Reset the Wi-Fi router
If you’re having issues joining or maintaining a wireless connection, hard resetting the router is always a good idea. But you should only consider a hard reset after exhausting all other options.
Look for a physical reset button on the router, or refer to the router’s instruction manual for accurate step-by-step instructions. This guide on resetting a wireless router has everything you need to know.
Note that resetting your router will also revert the connection’s password and other configuration to factory default.
Reach Out for Help
Contact your internet service provider to confirm if there’s a system glitch on their end. Additionally, confirm that you have an active internet plan.
You should also consider contacting your Chromebook’s manufacturer or visiting a nearby service center. Have them examine your Chromebook for possible damage to its network/Wi-Fi adapter. Your Chromebook will most likely be fixed for free if it’s still under warranty. You could get a replacement Chromebook if your unit is irreparably damaged.
Related Posts
Sodiq has written thousands of tutorials, guides, and explainers over the past 4 years to help people solve problems with Android, iOS, Mac, and Windows devices. He also enjoys reviewing consumer tech products (smartphones, smart home devices, accessories, etc.) and binge-watching comedy series in his spare time. Read Sodiq’s Full Bio


