Ntoskrnl.exe is a Windows system process that controls essential functions like memory management and hardware abstraction. If it’s causing high CPU usage or a blue screen of death (BSOD), fixes can include checking your PC’s memory, disks, updates, and system files.
What Is a System Process?
When you boot up a Windows PC or laptop, several system processes kick into action. They generate the user interface you use to sign in and begin working but are also responsible for various under-the-hood actions that you won’t even be aware of—like managing memory and communicating with other network devices.
Unfortunately, system processes like ntoskrnl.exe and csrss.exe can sometimes cause problems on your PC. Ntoskrnl.exe, in particular, is a major component of the Windows operating system. This can make it tricky to troubleshoot issues because it needs to load for you to be able to use Windows.
What Does ntoskrnl.exe Do?
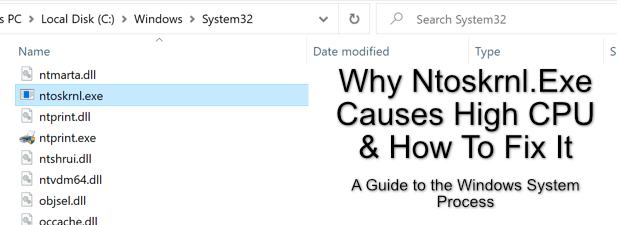
The ntoskrnl.exe system process is formally named the Windows NT operating system kernel executable (and referred to simply as System in the Windows Task Manager). It is arguably one of the most important processes that Windows has.
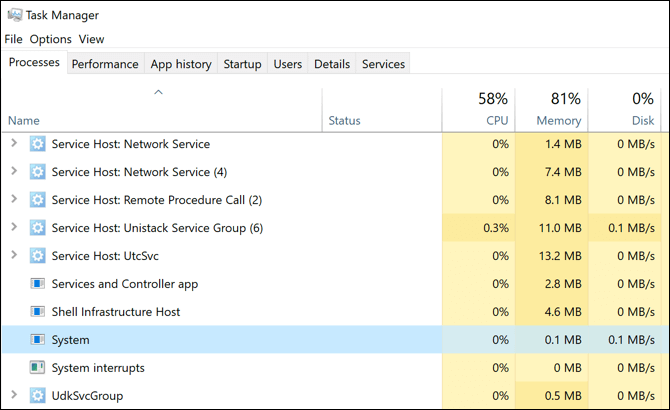
Ntoskrnl.exe is responsible for providing software access to attached components and peripherals, managing loaded software processes to ensure they interact with hardware correctly (and securely), and controlling how much memory is used (and remains available) on your PC, among other things.
What is a Kernel?
A kernel is code that provides the link between hardware and software. When an operating system like Windows loads, the Windows kernel (ntoskrnl.exe) sends instructions to components like your CPU to perform tasks and actions. Without the ntoskrnl.exe system process, your Windows PC just wouldn’t work.
Can I Disable ntoskrnl.exe?
While you can disable other system components, you can’t disable ntosknrl.exe in a Windows installation. If it is ever forced to stop, Windows will return an ntoskrnl.exe BSOD error, and you’ll need to restart your PC.
Why Does ntoskrnl.exe Cause Blue Screen (BSOD) Errors?
Now that you know stopping the ntoskrnl.exe process results in a BSOD, it shouldn’t surprise you that BSOD errors related to ntoskrnl.exe are related to the process stopping unexpectedly.
There are several reasons why this might happen, though:
- Corrupt or missing ntoskrnl.exe file
- Other corrupt or missing system files
- Corrupt boot volume or invalid boot.ini configuration
- A problematic Windows update
- Hard disk issues
- Memory issues
We’ll look at how to address these problems after discussing related high-CPU usage issues since the fixes are pretty much the same for both situations.
Why Does ntoskrnl.exe Cause High CPU Issues?
Unfortunately, there isn’t a clear answer as to why ntoskrnl.exe can cause high CPU usage in Windows Task Manager. The causes behind this issue can differ from PC to PC.
This is because ntoskrnl.exe is responsible for many Windows system actions or has a part in making other system actions happen via other processes. For example, the problem could be caused by the following:
- Another Windows service
- An installed app
- Corrupted ntoskrnl.exe or another system file
- Failing hard drive
- An attached peripheral with issues
As ntoskrnl.exe is partly responsible for memory management in Windows 10, you may find that another app or service interfacing with it is using more system resources, which is incorrectly reported as belonging to the ntoskrnl.exe process.
How to Fix ntoskrnl.exe BSOD or CPU Issues
The best way to resolve these issues is by checking your Windows system files, checking your disks and memory, scanning for malware or viruses, and updating your PC. You can also run Windows in “clean boot” mode to see if another app or installed service is causing the issue.
Run the Windows Memory Diagnostic Tool
Windows comes with a built-in tool for diagnosing memory problems.
- Open the Start menu, type “memory diagnostic,” and select the result.
- Choose Restart now and check for problems.
- When your PC restarts, the tool will run several memory tests (it can take a little while) and show you if any problems are found.
- When the test is finished, your PC restarts again and should show you the results of the diagnostic.
Note: If Windows doesn’t pop up a report on the scan after the restart, you might need to dig into Event Viewer to find it. Check out our full article on using the Windows Memory Diagnostic Tool for instructions.
If the scan does reveal memory problems, you’ll probably need to replace the memory on your PC.
Run SFC /Scannow and CHKDSK to Check and Repair Your System Files
Windows works well when all of its required system files are in place. If some of those files are corrupted, missing, or can’t be accessed, then your Windows 10 installation may start to become unstable, with ntoskrnl.exe BSODs and errors becoming more likely.
One possible way to fix this is by running the chkdsk and sfc command-line tools using Windows PowerShell.
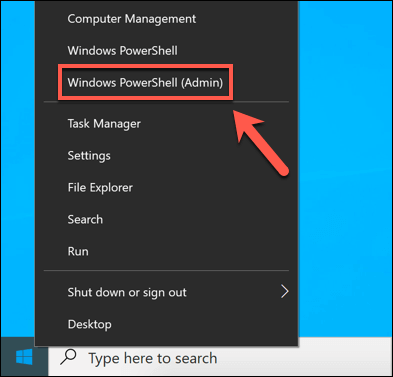
- To run Windows PowerShell, right-click the Start menu and select Windows PowerShell (Admin).
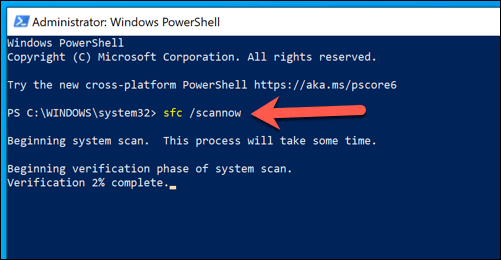
- In the PowerShell window, type sfc /scannow and press Enter to check the integrity of Windows system files. This should find and automatically fix any missing or corrupted files, but you may need to press Y to accept changes.
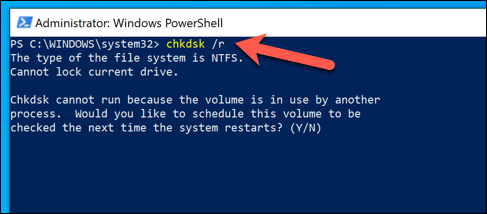
- Once sfc has finished, type chkdsk /r to schedule a boot scan to check your hard drive’s file system. You’ll need to confirm by pressing Y on your keyboard and then restarting your PC to run the scan.
These tools will check your installation and hard drive for missing or corrupt files. If ntoskrnl.exe issues continue, you’ll need to try one of the additional steps listed below.
Install Windows System and Driver Updates
Windows system updates come with fixes and upgrades that can help resolve more common issues that users report online, including BSOD errors and high CPU usage.
Making sure your PC is up-to-date by installing any available system and driver updates can sometimes resolve these issues.
- Right-click the Start menu and select the Settings option.
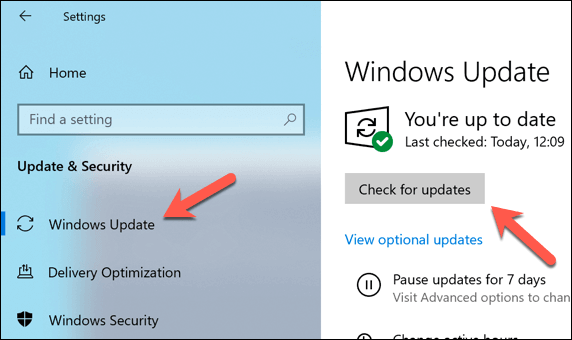
- In the Settings menu, select Update & Security > Windows Update > Download (or Download and Install) if updates are ready to install. Otherwise, select Check for Updates instead. This will automatically download and install any available system and driver updates.
If you’ve recently installed a new PC component or peripheral, you might want to check the manufacturer’s website for driver updates. This is particularly true for graphics cards, as manufacturers like NVIDIA regularly release brand-new drivers before they’re added to Windows Update.
Check for Viruses and Malware
Thanks to Microsoft Defender (previously Windows Defender), it’s never been easier to remove stubborn malware from a Windows 10 PC.
- Right-click the Start menu and select Settings. Next, go to Update & Security > Open Windows Security.
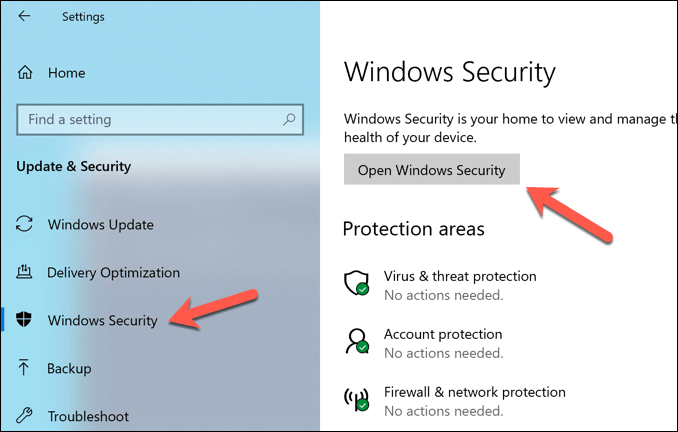
- In the Windows Security window, select Virus & Threat Protection > Scan Options, then select the Microsoft Defender Offline Scan option. This prepares a boot scan of your PC for malware. Select the Scan Now button to restart your PC and begin the scanning process.
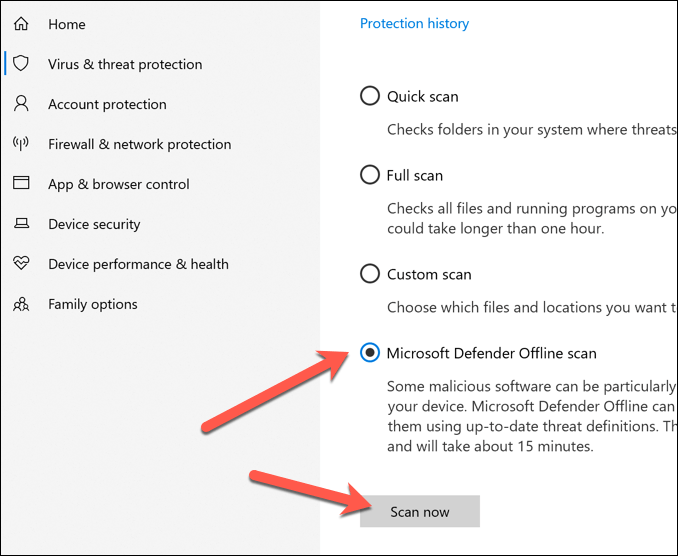
If Defender detects any malware, you’ll be asked whether you want to remove or quarantine it.
Run the BSOD Troubleshooter
If you’re experiencing a BSOD error, this built-in Windows troubleshooter might help.
- Right-click the Start menu and select Settings.
- Go to Update & Security > Troubleshoot in the left-hand pane.
- On the Troubleshoot page, find the Blue Screen option and select Run the troubleshooter.
- Step through the wizard and follow the instructions to troubleshoot the problem.
Troubleshoot Installed Apps and Services Using a Windows Clean Boot
Windows isn’t free from errors or bugs, but if your PC is up-to-date, and your system files are intact, then another app or installed service could be behind any potential ntoskrnl.exe issues.
To check this, you can run a clean boot, which will run Windows without third-party apps and services.
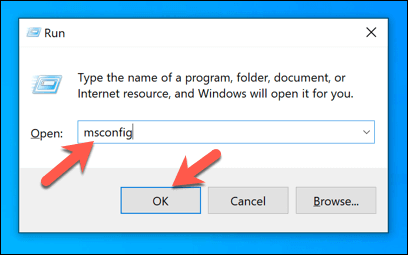
- To reboot Windows into a clean boot mode, right-click the Start menu and select the Run option (or press the Windows key + R on your keyboard). In the Run command box, type msconfig, then select OK to launch it.
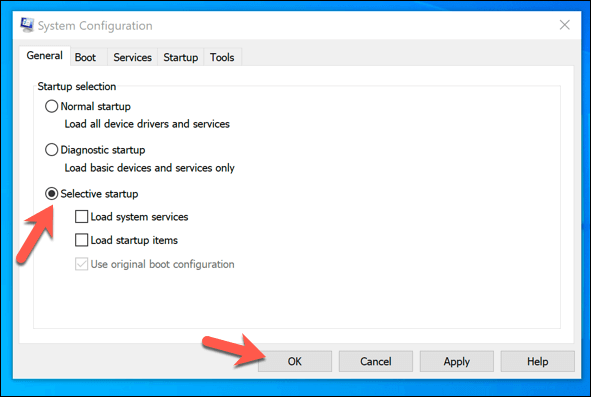
- In the General tab of the System Configuration window, select the Selective startup option, then uncheck the Load system services and Load startup items options. This will ensure that only Microsoft-issued services will load when you next reboot. Press OK to confirm, then reboot your PC.
- Once you’ve rebooted into a clean boot version of Windows, check your CPU usage. If the problem is fixed, this would indicate that one of the non-Microsoft services shown in the Services tab of the System Configuration window is behind the problem.
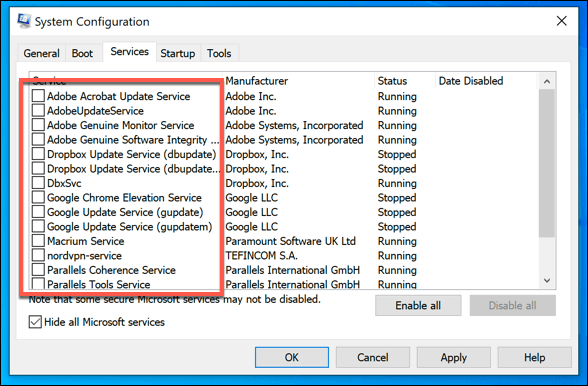
If that’s the case, you’ll need to investigate each service in turn to determine which may be causing high CPU usage. You can then disable any problematic apps or services permanently if you find a culprit.
Resolving Ntoskrnl.exe Issues
If the methods above don’t work, you might need to take more drastic action like wiping and reinstalling Windows. And if that still doesn’t resolve the problem, then you likely have a hardware problem that memory diagnostics and disk scans didn’t pick up.
Related Posts
- Preparing for Windows 10 End of Support: Upgrading to Windows 11
- How to Fix a “This file does not have an app associated with it” Error on Windows
- How to Fix an Update Error 0x800705b4 on Windows
- How to Resolve “A JavaScript error occured in the main process” Error on Windows
- How to Fix the Network Discovery Is Turned Off Error on Windows
Ben Stockton is a freelance technology writer based in the United Kingdom. In a past life, Ben was a college lecturer in the UK, training teens and adults. Since leaving the classroom, Ben has taken his teaching experience and applied it to writing tech how-to guides and tutorials, specialising in Linux, Windows, and Android. He has a degree in History and a postgraduate qualification in Computing. Read Ben’s Full Bio
