How to Create and Mount a Virtual Hard Disk in Windows 11 and 10

·
7 min read

Help Desk Geek is reader-supported. We may earn a commission when you buy through links on our site. Learn more.

You need to create or mount a virtual hard disk in Windows 11 or Windows 10, but the VHD and VHDX options are buried across several menus. Use VHDX for new disks unless an older system requires the VHD format. If you’re looking to convert your current PC into a VHD file, you can follow our guide.

Fix #1: Mount a VHD or VHDX from File Explorer

File Explorer is the quickest option when you already have a virtual disk file.

  1. Press Windows + E to open File Explorer.
  2. Browse to the .vhd or .vhdx file.
  3. Right-click the file and select Mount.
Windows 11 File Explorer showing a VHDX file with Mount highlighted in the right-click menu
  1. Open This PC and find the newly mounted drive.
Windows 11 File Explorer This PC view showing the mounted VHDX as a separate drive

Windows should assign a drive letter automatically. You can now browse and copy files as you would with a physical drive.

  1. When you’re finished, right-click the mounted drive and select Eject.

Ejecting the drive unmounts it without deleting the underlying VHD or VHDX file.

Fix #2: Mount a virtual disk with Disk Management

Disk Management provides a read-only option, which is useful when recovering files from a backup. It prevents accidental changes to the image.

  1. Press Windows + R, type diskmgmt.msc, and press Enter.
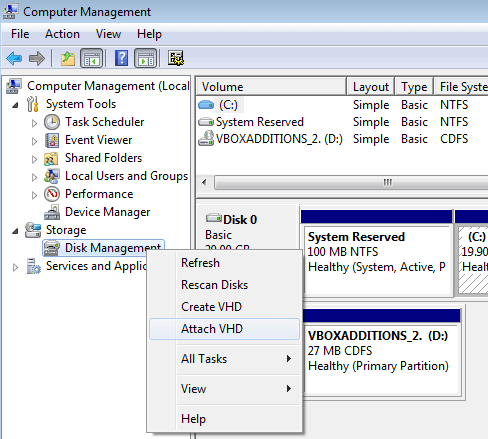
  2. Open Action and select Attach VHD.
Windows 11 Disk Management with the Action menu open and Attach VHD highlighted
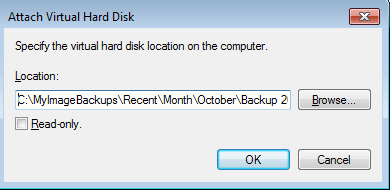
  1. Select Browse and choose your .vhd or .vhdx file.
Attach Virtual Hard Disk dialog showing the Browse button and Virtual hard disk location field
  1. Select Read-only if you don’t want Windows to modify the virtual disk.
  2. Select OK and wait for the disk to appear.
Windows 11 Disk Management showing an attached VHDX as an online basic disk with a healthy volume
  1. If the volume has no letter, right-click it and select Change Drive Letter and Paths.
  2. Select Add, choose an available letter, and select OK.

The virtual disk should now appear under This PC.

Windows 11 File Explorer showing the contents of an attached VHDX drive
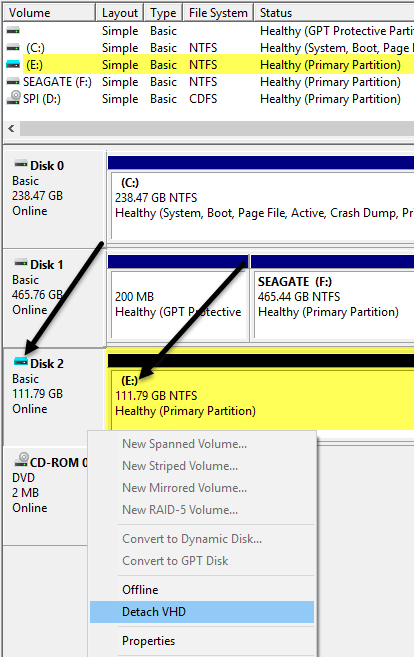
  1. To unmount it, return to Disk Management and right-click the disk label, such as Disk 2.
  2. Select Detach VHD, then confirm the action.

Don’t select any option that deletes the virtual hard disk file unless you no longer need its data.

Fix #3: Create a VHDX with Disk Management

These steps work in Windows 11 and Windows 10. A dynamically expanding VHDX starts small and grows as you add files, up to the limit you set.

  1. Press Windows + R, type diskmgmt.msc, and press Enter.
  2. Open Action and select Create VHD.
Windows 11 Disk Management with the Action menu open and Create VHD highlighted
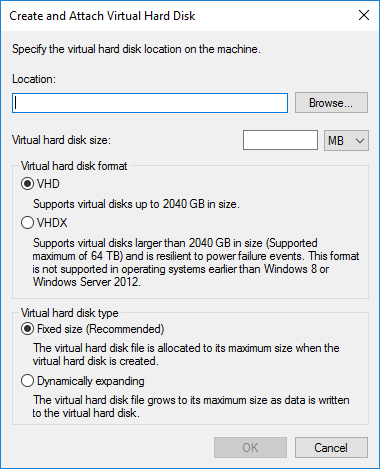
  1. Select Browse and choose where Windows should store the virtual disk file.
  2. Enter the maximum Virtual hard disk size.
  3. Select VHDX under Virtual hard disk format.
  4. Select Dynamically expanding under Virtual hard disk type.
Create and Attach Virtual Hard Disk dialog with a file location, disk size, VHDX format, and Dynamically expanding selected

Use VHD only when the disk must work with software that can’t open VHDX. Choose Fixed size when predictable disk performance matters more than the storage space used by the file.

  1. Select OK and wait for the new disk to appear as Not Initialized and Unallocated.
Windows 11 Disk Management showing a newly created virtual disk marked Not Initialized and Unallocated
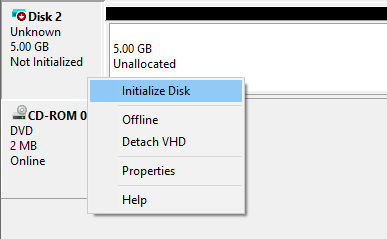
  1. Right-click the new disk’s label and select Initialize Disk.
Windows 11 Disk Management showing the right-click menu for a new virtual disk with Initialize Disk highlighted
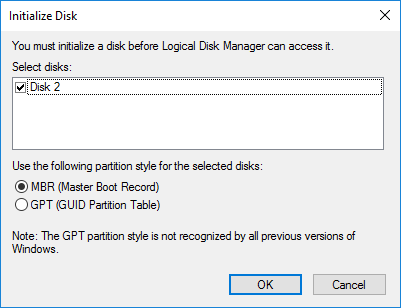
  1. Select GPT and then select OK.
Initialize Disk dialog with the new virtual disk selected and GPT partition style highlighted

GPT is the right choice for current Windows computers. Choose MBR only when you need compatibility with an older system or application. For more information on the difference between GPT and MBR, you can refer to this article.

  1. Right-click the disk’s Unallocated area and select New Simple Volume.
Windows 11 Disk Management showing unallocated VHDX space with New Simple Volume highlighted in the right-click menu
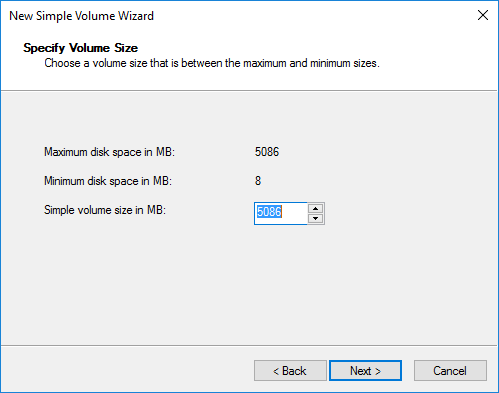
  1. Select Next, enter the volume size, and select Next.
New Simple Volume Wizard showing the Specify Volume Size page

You can use the full available size or leave space for another partition.

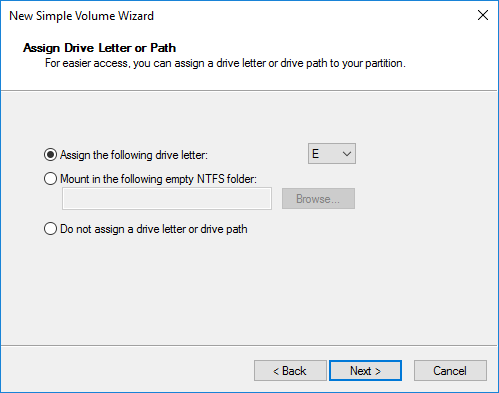
  1. Choose a drive letter and select Next.
New Simple Volume Wizard showing the Assign Drive Letter or Path page with a drive letter selected
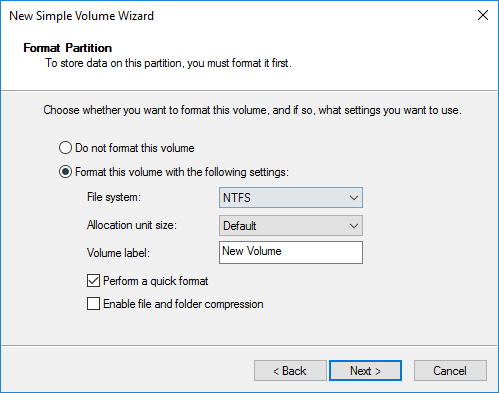
  1. Select NTFS, enter a volume label, and leave Perform a quick format selected.
New Simple Volume Wizard showing NTFS, a volume label, and Perform a quick format selected
  1. Select Next and then Finish.
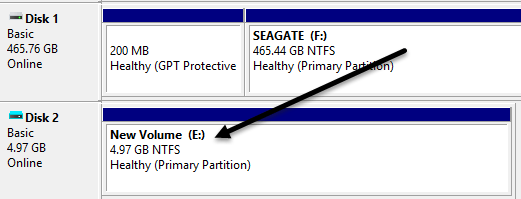
Windows 11 Disk Management showing the completed VHDX volume as Healthy with an assigned drive letter

The new drive should appear under This PC. Files copied there are stored inside the VHDX file.

Fix #4: Create a VHDX through Windows 11 Settings

Windows 11 can create virtual disks from the current Settings app. Windows 10 users should use Disk Management instead.

  1. Press Windows + I to open Settings.
  2. Select System > Storage.
  3. Expand Advanced storage settings and select Disks & volumes.
  4. Select Create VHD.
Windows 11 Settings at System > Storage > Advanced storage settings > Disks & volumes with Create VHD highlighted
  1. Enter a name and choose a location for the file.
  2. Set the virtual disk size.
  3. Choose VHDX as the format.
  4. Choose Dynamically expanding as the type.
  5. Select Create.
  6. Choose GPT when Windows asks for a partition style.
  7. Create and format the volume as NTFS, then assign a drive letter.

The mounted VHDX should appear in File Explorer. Right-click its drive and select Eject when you’re done using it.

Fix #5: Mount a VHDX with PowerShell

The Mount-DiskImage command works without Hyper-V cmdlets. Run it from an elevated terminal.

  1. Press Windows + X and select Terminal (Admin).
  2. Replace the example path below with the full path to your file:
Mount-DiskImage -ImagePath "C:\Path\YourDisk.vhdx"
  1. Press Enter and wait for the command to finish.
  2. Open This PC and confirm that the mounted drive appears.

To protect a backup image from changes, mount it read-only:

Mount-DiskImage -ImagePath "C:\Path\YourDisk.vhdx" -AccessType ReadOnly

To unmount the image, run:

Dismount-DiskImage -ImagePath "C:\Path\YourDisk.vhdx"

Mount-VHD is another option on computers with the Hyper-V PowerShell module installed:

Mount-VHD -Path "C:\Path\YourDisk.vhdx"

I’d use Mount-DiskImage unless you already manage virtual machines through Hyper-V. It has fewer prerequisites.

Fix #6: Recover files from a Windows system image

Backup and Restore (Windows 7) remains in Windows 10 and Windows 11, but its system-image function is a deprecated legacy feature. It’s best suited to opening or restoring an existing image.

  1. Connect the drive containing the WindowsImageBackup folder.
  2. Open that folder and locate the required .vhd or .vhdx file.
  3. Press Windows + R, type diskmgmt.msc, and press Enter.
  4. Select Action > Attach VHD.
  5. Browse to the image file and select Read-only.
Windows 11 Disk Management Attach Virtual Hard Disk dialog showing a VHDX inside a WindowsImageBackup folder with Read-only selected
  1. Select OK and open the mounted drive in File Explorer.
  2. Copy the required files to a different physical drive.
  3. Return to Disk Management and detach the VHD when the copy finishes.

Mounting the image avoids a full system restore, which would replace the current Windows installation and its files.

Creating a legacy Windows system image

The built-in system-image tool still appears under its Windows 7 name, even on Windows 11. I wouldn’t rely on it for a new backup plan because Microsoft no longer develops or supports system-image creation through this feature.

  1. Open Control Panel.
  2. Set View by to Large icons or Small icons.
  3. Select Backup and Restore (Windows 7).
Windows 11 Control Panel showing Backup and Restore (Windows 7) with Create a system image visible
  1. Select Create a system image.
  2. Choose an external hard disk, network location, or writable DVDs.
  3. Confirm the drives included in the image.
  4. Start the backup.

Windows creates a WindowsImageBackup folder containing the system image. You can mount its VHD or VHDX files later to recover individual files.

For new backups, use OneDrive or File History for personal files. Choose an actively maintained third-party disk-imaging application when you need a complete, restorable copy of Windows.

VHDX, VHD, fixed, or dynamic?

OptionUse it forMain tradeoff
VHDXNew virtual disks in Windows 10 or 11Older software may not recognize it
VHDCompatibility with older softwareSmaller capacity and less protection against corruption
Dynamically expandingGeneral file storage and test environmentsThe file grows as data is added
Fixed sizeWorkloads needing consistent disk performanceAllocates the full size immediately
GPTCurrent Windows systems and large disksOlder systems may require MBR
MBRLegacy compatibilityOlder partition format with stricter limits

VHDX with dynamic expansion and GPT is the sensible default for a new virtual disk.

Advanced uses in Windows 11

Windows 11 can place a Dev Drive inside a VHDX. Dev Drive is intended for development files and can be created from Settings > System > Storage > Advanced storage settings > Disks & volumes.

VHDX files are also used by Hyper-V virtual machines and test environments. Native boot from VHDX is supported, but configuring Windows boot entries carries more risk than mounting a data disk and falls outside this file-storage workflow.

When the virtual disk doesn’t appear

Return to Disk Management and check whether the disk is Offline, uninitialized, or missing a drive letter. Bring an existing disk online or assign its formatted volume a letter, but don’t initialize or format a VHD that already contains files. Either action can make recovery harder.

If attaching the image reports corruption or repeated I/O errors, make another copy of the VHD or VHDX before attempting repairs. Errors across several images stored on the same physical drive can point to a failing drive.

Conclusion

Fix #1, mounting the file through File Explorer, usually solves the immediate need to access a VHD or VHDX. For new virtual disks, Disk Management gives you the clearest control; repeated corruption or disappearing volumes suggests a problem with the physical storage holding the image.