

You’ve been struggling to remotely shut down or restart a Windows computer without sitting in front of it. Windows 10 and Windows 11 can handle this over a local network or VPN, but the target PC needs the correct permissions and firewall rules.
Fix #1: Prepare the target Windows computer
Complete these steps on the computer you want to control. Both PCs must be connected to the same local network or a VPN that provides access to that network.
- Sign in to the target PC using an administrator account.
- Open Settings > Accounts > Your info.
- Confirm that Administrator appears under the account name.

The account sending the shutdown command must have administrator rights on the target PC. On a work domain, use an authorized domain account instead.
- Press
Windows + R, typesysdm.cpl, and pressEnter. - Select the Computer Name tab.
- Write down the Full computer name.
You’ll use this name in the remote shutdown commands. An IP address also works if Windows can’t resolve the computer name.
- Open Settings > Network & internet.
- Select the active Ethernet or Wi-Fi connection.
- Set Network profile type to Private network.
Don’t use these remote-management rules on a public network.
- Search for and open Control Panel.
- Select Network and Internet > Network and Sharing Center.
- Select Change advanced sharing settings.
- Turn on Network discovery for private networks.
The target PC should now be discoverable by other devices on the private network.
- Search for and open Windows Defender Firewall.
- Select Allow an app or feature through Windows Defender Firewall.
- Select Change settings.
- Allow Windows Management Instrumentation (WMI) and Remote Service Management on Private networks.
The firewall should now accept the management traffic used by remote commands. Leave the Public checkboxes cleared.
- Press
Windows + R, typesecpol.msc, and pressEnter. - Open Local Policies > User Rights Assignment.
- Double-click Force shutdown from a remote system.
- Add Administrators or the specific administrator account that will send the command.
- Select OK.
The chosen account should appear in the policy list. Don’t add Everyone, because that grants remote shutdown rights too broadly.
Fix #2: Use the Remote Shutdown Dialog
The Remote Shutdown Dialog handles one or several computers without requiring you to remember every command switch.
- Open the Start menu and search for
Command Prompt. - Select Run as administrator.
- Enter
shutdown /?if you want to view the available command options.
You should see the supported switches for shutdown.exe.
- Enter
shutdown /iand pressEnter.
The Remote Shutdown Dialog should open.
- Select Add.
- Enter the target’s computer name or IP address.
- Select OK.
The computer should appear under Computers. Repeat these steps to add more PCs.
- Open the What do you want these computers to do? menu.
- Select Shutdown or Restart.
- Choose whether Windows should warn signed-in users.
- Set the warning duration if you enabled it.
- Select an appropriate reason.
- Enter a specific comment, such as
Restarting after Windows updates. - Select OK.
Windows should send the selected action to every listed computer. Unsaved work can be lost, so use the warning option when someone may be signed in.
Fix #3: Run a remote shutdown command
The direct command is faster when you already know the target computer’s name.
- Open Command Prompt as administrator.
- Run
ping ComputerName, replacingComputerNamewith the target’s name. - Confirm that the command returns replies from the target PC.
If name lookup fails, repeat the test with the target’s IP address. Check the network or VPN connection if neither responds.
- To shut down the target immediately, run
shutdown /m \\ComputerName /s /t 0. - Replace
ComputerNamewith the target’s actual name or IP address.
The target PC should begin shutting down immediately.
- To restart it instead, run
shutdown /m \\ComputerName /r /t 0.
The target should close Windows and restart.
These switches control the action:
| Switch | Action |
|---|---|
/m \\ComputerName | Selects the remote computer |
/s | Shuts down Windows |
/r | Restarts Windows |
/t 60 | Waits 60 seconds before acting |
/f | Forces open apps to close |
/c "Message" | Records a comment |
/d p:4:1 | Records a planned reason code |
/a | Cancels a pending shutdown |
/g | Restarts and reopens registered apps |
/sg | Shuts down, then signs in and restores registered apps |
/hybrid | Performs a shutdown prepared for Fast Startup |
Use /f carefully. It closes applications without giving users a chance to save their work.
- To schedule a restart with a warning, run
shutdown /m \\ComputerName /r /f /t 60 /c "Rebooting after updates".
The target should display the message and restart after 60 seconds.
- To cancel the scheduled action before its timer expires, run
shutdown /m \\ComputerName /a.
You should receive confirmation that the shutdown was canceled.
Fix #4: Create a batch file for multiple computers
A batch file solves the repetitive work of restarting the same group of PCs.
- Open Notepad.
- Enter one command per target computer:
shutdown /m \\PC1 /r /f /t 60 /c "Scheduled network restart"
shutdown /m \\PC2 /r /f /t 60 /c "Scheduled network restart"
shutdown /m \\192.168.1.10 /r /f /t 60 /c "Scheduled network restart"- Replace each sample name or IP address with a real target.
- Select File > Save As.
- Set Save as type to All files.
- Enter a filename ending in
.bat, such asRestart-Network-PCs.bat. - Select Save.
The saved file should have a Windows batch-file icon rather than a .txt extension.
- Right-click the batch file.
- Select Run as administrator.
Each reachable computer should receive the restart command. You can also configure the file in Task Scheduler, but unattended shutdowns need a warning period to protect unsaved work.
The existing guide to how to use batch files in Windows explains the file format in more detail.
Fix #5: Use PowerShell remoting
PowerShell handles remote shutdowns well on managed networks, especially when remoting is already configured.
- Open Windows PowerShell as administrator on the target PC.
- Run
Enable-PSRemoting. - Confirm the requested changes.
PowerShell should configure its remoting service and firewall access.
- Open an elevated PowerShell window on the controlling PC.
- Run
Stop-Computer -ComputerName "ComputerName" -Forceto shut down the target.
The remote PC should shut down.
- Run
Restart-Computer -ComputerName "ComputerName" -Forcewhen you need a restart instead.
The remote PC should restart. Authentication and firewall policies can still block these commands on workgroup or domain networks.
Fix #6: Shut down through Remote Desktop
Remote Desktop is a practical option when you need to inspect the PC before turning it off. The target must support incoming Remote Desktop connections and have the feature enabled.
- Search for and open Remote Desktop Connection.
- Enter the target computer’s name or IP address.
- Select Connect.
- Sign in with an authorized account.
- Open the Start menu inside the remote session.
- Select Power.
- Choose Shut down or Restart.
The Remote Desktop session should disconnect as the target performs the selected action.
Fix #7: Resolve “Access is denied (5)”
“Access is denied (5)” means the target rejected your account or stripped its administrator privileges during the remote connection.
- Confirm that your account is an administrator on the target PC.
- Confirm that the account appears under Force shutdown from a remote system in Local Security Policy.
- Confirm that WMI and Remote Service Management are allowed through the target’s firewall.
- Retry the shutdown command from an elevated Command Prompt.
If the error remains and you’re using a local administrator account, Windows’ remote UAC filtering may be blocking it. The following registry change relaxes that protection, so I’d skip this step unless the earlier checks fail.
- Open Registry Editor as administrator on the target PC.
- Go to
HKEY_LOCAL_MACHINE\SOFTWARE\Microsoft\Windows\CurrentVersion\Policies\System. - Right-click System and select New > DWORD (32-bit) Value.
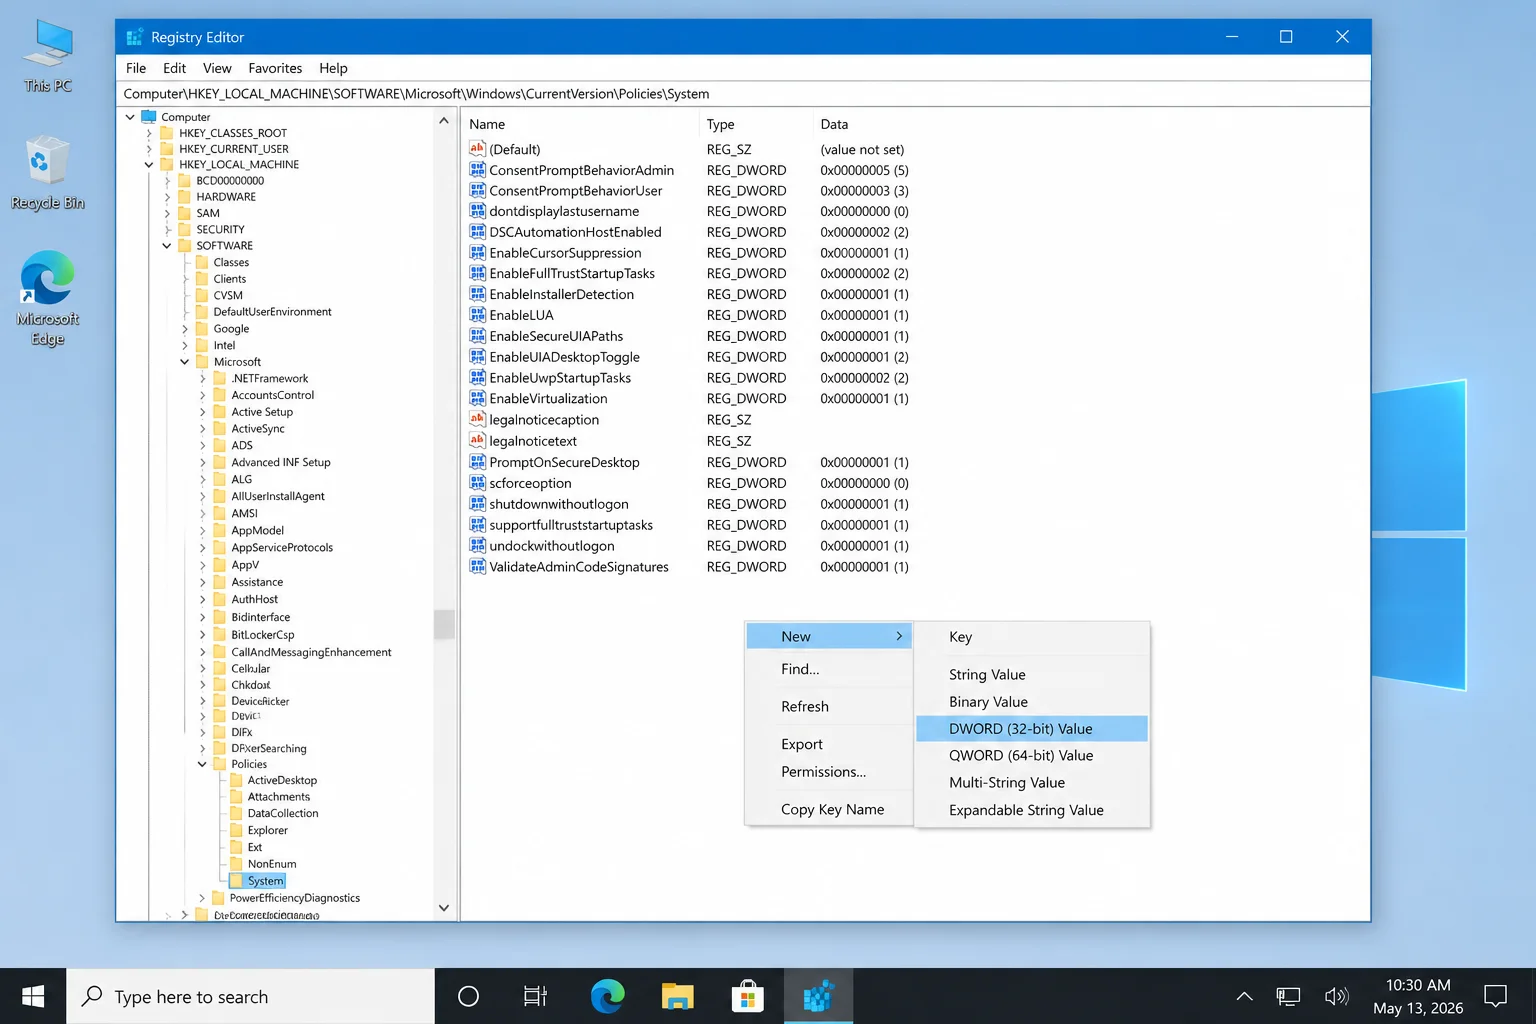
- Name the value
LocalAccountTokenFilterPolicy. - Double-click the new value.
- Set Value data to
1. - Select OK.
The local administrator account should retain its administrative token during remote operations. This setting weakens a remote UAC safeguard, so keep the firewall restricted to trusted private networks.
You can make the same change from an elevated Command Prompt by running:
reg add HKLM\SOFTWARE\Microsoft\Windows\CurrentVersion\Policies\System /v LocalAccountTokenFilterPolicy /t REG_DWORD /d 1 /fThe command should report that the operation completed successfully.
Fix #8: Resolve “The RPC server is unavailable”
“The RPC server is unavailable” means the controlling PC can’t reach the target’s Remote Procedure Call services.
- Run
ping ComputerNamefrom the controlling PC. - Retry with the target’s IP address if the name doesn’t respond.
- Confirm that both PCs are on the same private network or connected VPN.
- Open
services.mscon the target. - Confirm that Remote Procedure Call (RPC) is running.
- Recheck the firewall rules for Windows Management Instrumentation (WMI) and Remote Service Management.
- Retry the remote shutdown command.
The command should work after connectivity, name resolution, services, and firewall access are restored.
Don’t expose RPC or WMI ports directly to the internet. Use a VPN, Microsoft Intune, or an approved remote-management platform for computers outside your local network.
When the methods don’t work
Domain Group Policy can override local permissions and firewall settings. Ask the network administrator to check the remote-shutdown user right and applicable firewall policies if local changes keep reverting.
For managed Windows devices, Microsoft Intune provides a remote Restart action under the selected device’s controls. Sysinternals PsShutdown is another option for administrators who need scripting and multi-computer support.
Conclusion
Fix #2, using shutdown /i, usually works best once the target PC’s permissions and firewall rules are correct. Repeated “Access is denied (5)” or RPC errors point to account policy, UAC filtering, or network configuration rather than a broken shutdown command.