The Disk Management Tool is a useful, effective tool for managing your Windows disks and partitions, but it isn’t as powerful to use as Diskpart. This command-line tool lets you delete, create and modify partitions on any hard drives or USB storage your PC can detect.
We’d recommend using the Disk Management Tool for most situations, but if Windows isn’t starting up properly, or if you prefer to use the PowerShell terminal, Diskpart is the perfect alternative. Here are some of the more common Diskpart commands to help you learn how to use Diskpart effectively.
How To Use Diskpart
If you want to use Diskpart, you need to open up a Windows command line or PowerShell terminal. Diskpart is a destructive tool, so you’ll need to open a terminal window with the right administrative privileges.
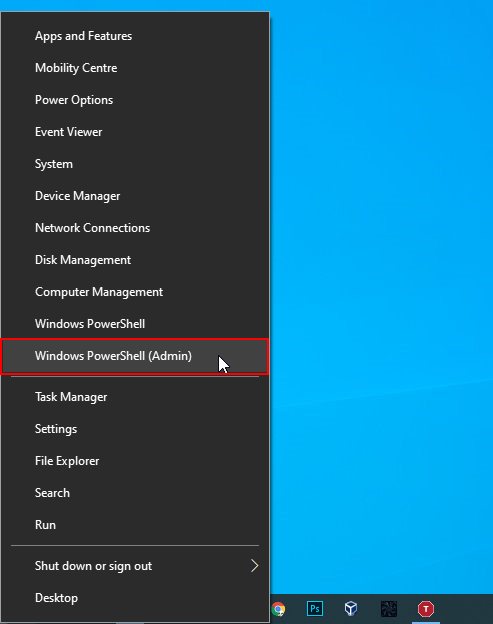
- To open Diskpart in Windows, right-click your Windows Start menu button and click Windows PowerShell (Admin).
- In your admin-level PowerShell terminal (or similar Windows command line), type diskpart and hit enter.
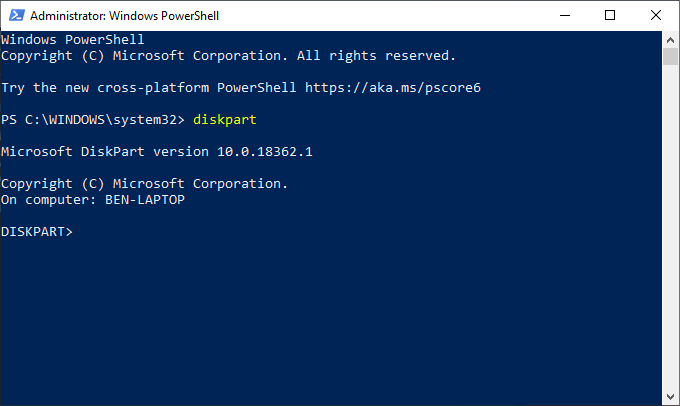
- The Diskpart tool will launch within the window, ready for you to use. Type exit at the “DISKPART>” prompt and hit enter once you’ve finished using it.
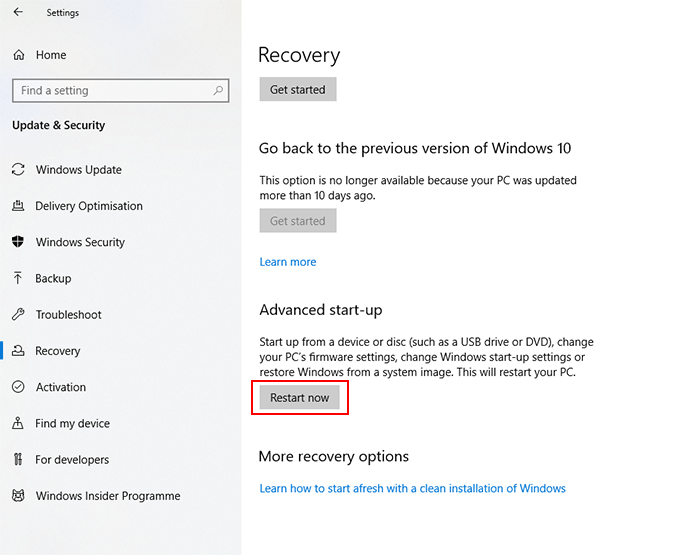
- Diskpart is also available for users booting into the Windows Recovery Environment, available when you boot your PC using the Advanced Startup mode in your Settings > Windows Update & Security > Recovery menu.
- Click Restart Now to boot to WinRE.
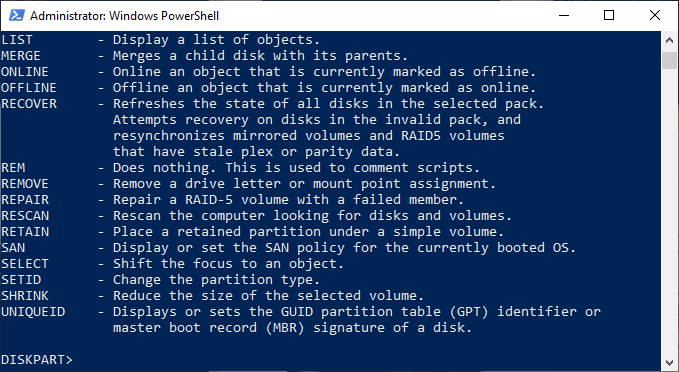
We’ll explore some of the most common Diskpart commands in this article, but if you want to quickly see the full list of available Diskpart commands, type help at the “DISKPART>” prompt and hit enter.
Listing Existing Hard Drives, Volumes & Partitions
Once Diskpart is open, the first thing you should do is check the current layout of your hard drives and attached storage.
- At the “DISKPART>” prompt, type list disk and hit enter. This will list all of the available storage drives (including hard drives, USB storage, SD cards, etc.) that your PC can currently detect.
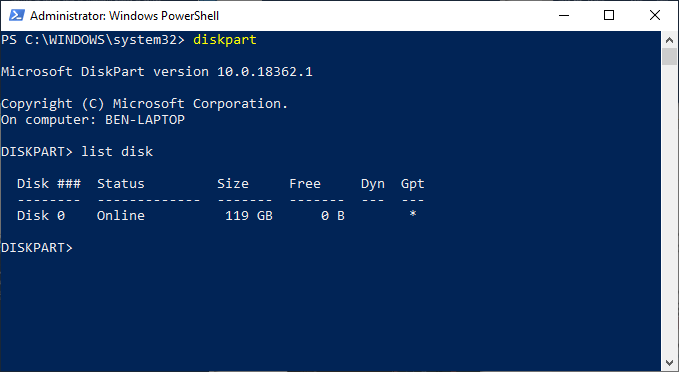
- Starting with the number zero, Diskpart will list any detected disks. You’ll need to remember the disk number (for instance, “0” for your Windows hard drive) to use with future Diskpart commands.
- Along with your list of disks, you can also ask Diskpart for a list of detected volumes. At the “DISKPART>” prompt, type list volume.
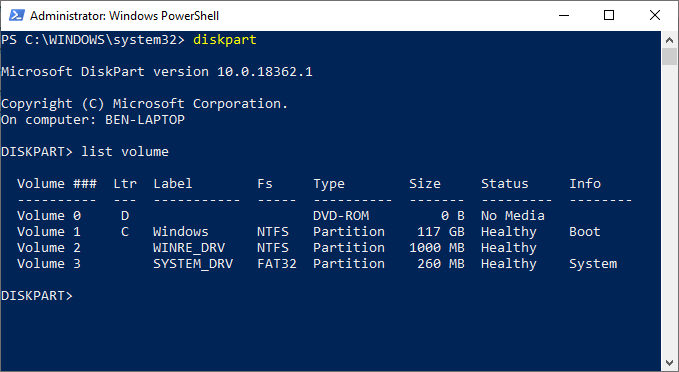
- Diskpart can also let you list individual hard drive partitions (some of which may match the volumes listed with the “list volume” command). You’ll need to select a hard disk first with the list disk command.
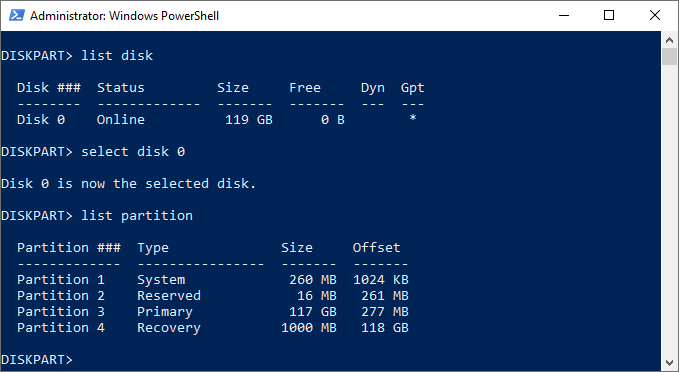
- At the “DISKPART>” prompt, type select disk followed by the disk number (for instance, select disk 0). Diskpart will confirm that the disk is selected at this point.
- Once a disk is selected, type list partition. This will list the current partitions on your drive. You’ll be able to delete or modify these partitions from here, using the partition number in a later Diskpart command.
Deleting a Hard Drive Partition Or Volume Using Diskpart
A hard drive (disk) is separated into partitions, which are often the same as listed volumes. If your hard drive is separated into several partitions or volumes, and you wish to delete one, you can do that using Diskpart commands.
- Select your hard drive using select disk.
- At the “DISKPART>” prompt, type list partition, then select partition #, replacing # with your partition number.
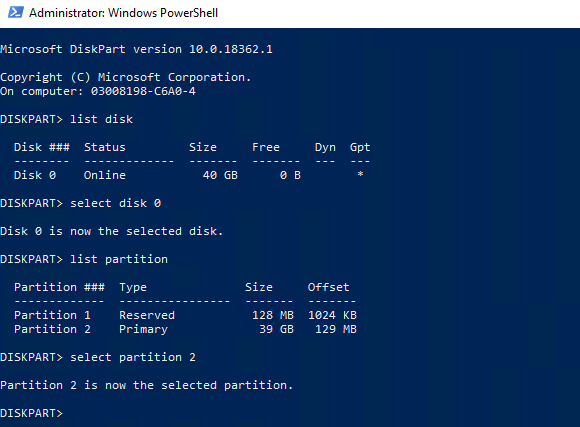
- Once a partition is selected, type delete partition. Diskpart will confirm whether or not the partition has been deleted afterward.
- You can also delete disk volumes directly if you’d prefer. Type list volume, locate your chosen volume number, then type select volume #, replacing # with your volume number.
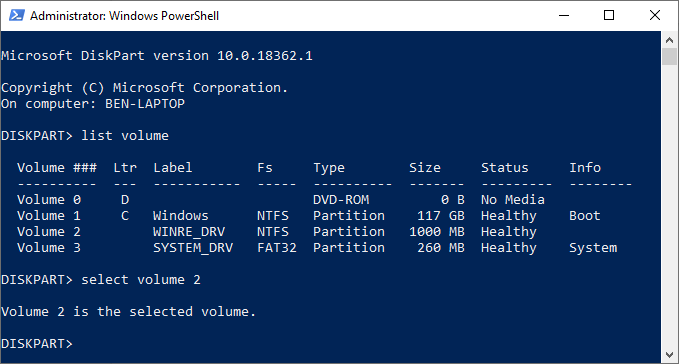
- Type delete volume to delete the volume completely. Diskpart will confirm if the command was successful or not afterward.
Wiping a Hard Drive Completely Using Diskpart Clean
Rather than removing individual volumes or partitions on a drive, you can wipe a hard drive completely using the Diskpart clean command. You can also use this command if you’re looking to wipe a USB flash drive, ready for formatting.
You won’t be able to do this on your system drive (nor would you want to!) unless you’re using Diskpart on a Windows installation
- At the “DISKPART>” prompt, select the disk you wish to wipe by typing select disk #, replacing # with your disk number. If you don’t know your disk number, type list disk first.
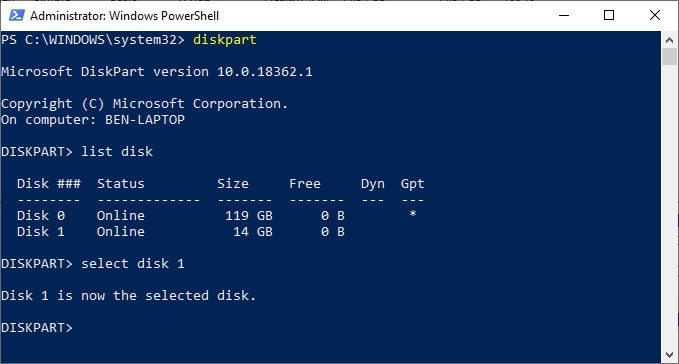
- If you’re sure you want to wipe the disk completely (deleting all drive volumes/partitions), then type clean and hit enter. You won’t be asked for confirmation, so be sure you wish to do this before you begin.
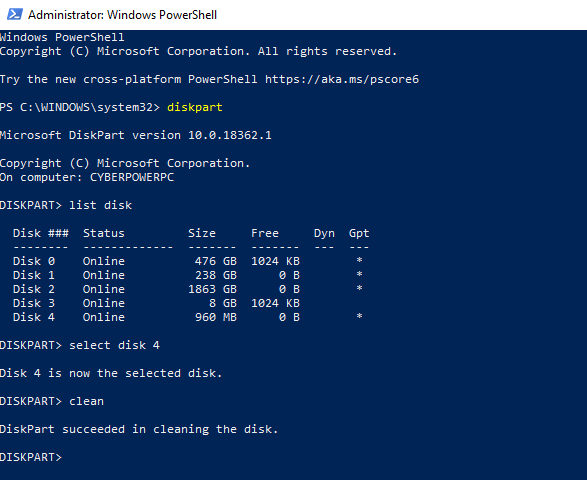
- Diskpart will confirm that the drive has been “cleaned”, ready for new partitions to be created.
Creating & Formatting New Hard Drive Partitions
With a “clean” drive, you’re ready to create a partition in the free space using the Diskpart create partition command. You can then format that new partition with a Windows-friendly file system like NTFS or FAT32 using the Diskpart format command.
- Start by selecting your chosen disk with select disk #, replacing # with your disk number (and using list disk to find your disk number, if you don’t know.)
- With your disk selected, type create partition primary to create a partition using the entire space on that drive.
- If you want to create a partition to take up only some of the free space (letting you create more than one partition), type create partition primary size=X instead, replacing X with the partition size, measured in megabytes (for example, size=1024 for 1GB of space).
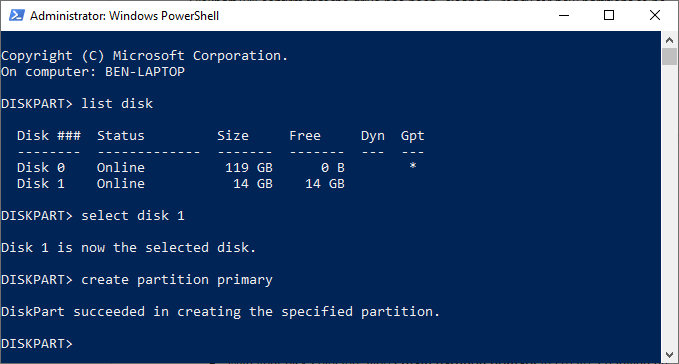
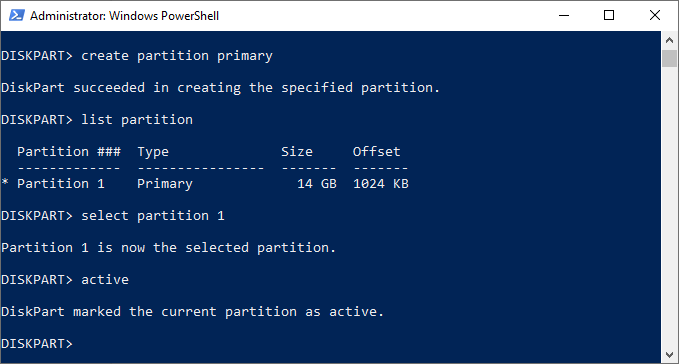
- Type list partition to make sure that your new partition is listed, then type select partition 1 to select it. Mark the partition as active by typing active at the “DISKPART>” prompt. This is necessary if you want to use it as a bootable drive.
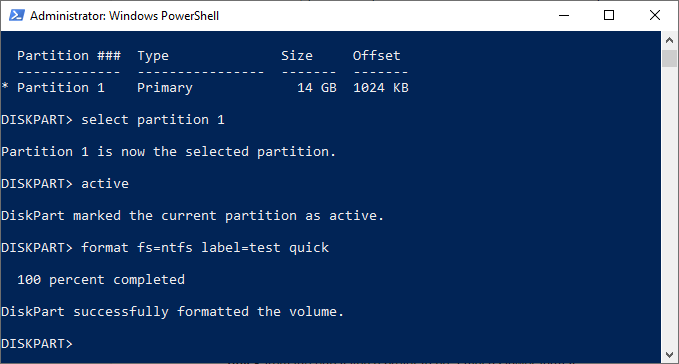
- To quickly format the drive with the NTFS file system, type format fs=NTFS label=Y quick. You can replace Y with any label you’d prefer to use.
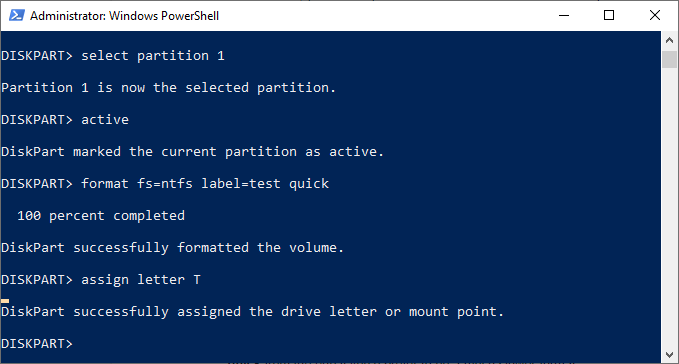
- Once formatted, Windows will likely assign a drive letter automatically. If it doesn’t, type assign letter Z, replacing Z with a free drive letter.
Extend a Hard Drive Volume
If you have an existing hard drive volume that doesn’t take up all of the free space on a drive, and you wish to enlarge it, Diskpart commands allow you to do that.
- Start by selecting your chosen disk with select disk #, replacing # with your disk number (and using list disk to find your disk number, if you don’t know.)
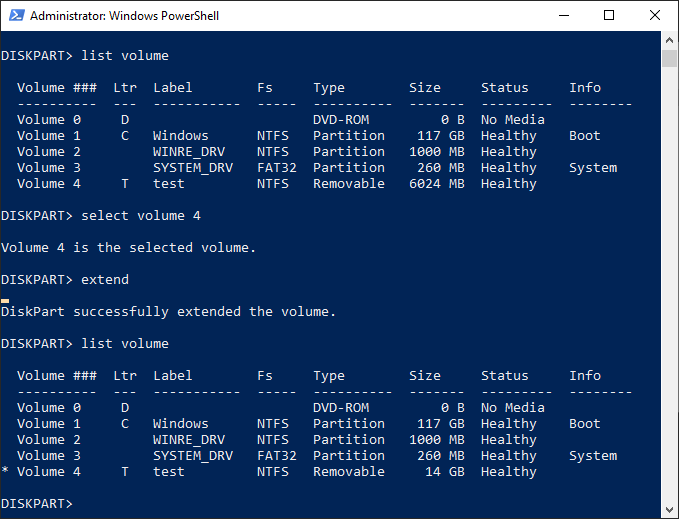
- Type list volume to list all the available volumes on your PC, then type select volume #, replacing # with the volume you’re looking to extend.
- Type extend to expand it to the maximum size available. Diskpart will confirm whether or not the extend command has worked correctly. Confirm the size of the volume has increased by typing list volume for a second time afterward.
Diskpart has other options available, as the help command briefly explains. If you need further information on how to use Diskpart, Microsoft has further Diskpart support information available.
Related Posts
- Preparing for Windows 10 End of Support: Upgrading to Windows 11
- How to Fix a “This file does not have an app associated with it” Error on Windows
- How to Fix an Update Error 0x800705b4 on Windows
- How to Resolve “A JavaScript error occured in the main process” Error on Windows
- How to Fix the Network Discovery Is Turned Off Error on Windows
Ben Stockton is a freelance technology writer based in the United Kingdom. In a past life, Ben was a college lecturer in the UK, training teens and adults. Since leaving the classroom, Ben has taken his teaching experience and applied it to writing tech how-to guides and tutorials, specialising in Linux, Windows, and Android. He has a degree in History and a postgraduate qualification in Computing. Read Ben’s Full Bio
