If you want to know how to add a font to Photoshop, you’ll need to choose between two different methods. The option you choose depends on what you need the font for.
For example, if you want your fonts added to all Adobe apps, you can use Adobe Creative Cloud. Otherwise, you can install fonts locally for use across all apps.
We’ll explain both methods below and offer some tips on how to find different fonts online.

Add A Font to Photoshop Through Adobe Creative Cloud
There is a feature available in Adobe Creative Cloud that allows you to download and add fonts to Photoshop directly using your Adobe account. The benefit of this is that you’ll be able to access your new fonts across all Adobe apps on all devices.
- To start, you must open Adobe Creative Cloud. You’ll also need an active subscription to one of Adobe’s apps, such as Photoshop. If you don’t have Adobe Creative Cloud, or use an older version of Photoshop, skip to the next section. If you do have a subscription, Adobe Creative Cloud provides free access to fonts for both commercial and personal use.

- Once you’re inside Adobe Creative Cloud, click the Italic F logo in the top right side of the interface. Once loaded, click Adobe Fonts, then click Browse All Fonts.

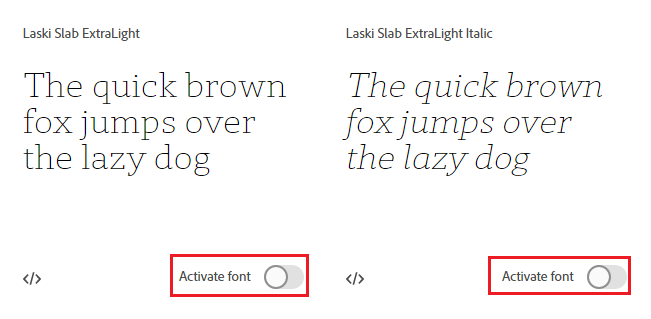
- You’ll be taken to a web page in your browser where you can search for fonts and font families. If you like a font, click View Family. On the next page you’ll have the option to Activate Fonts, which will activate all fonts in that family.

- Alternatively, you can scroll down and click on the slider for each font in that family to add them manually.

- Once you’ve activated a font, you’ll see the message: Font Activation Successful. To find your new fonts, simply open Photoshop and you’ll find them in the font list when using the text tool.
Add a Font to Photoshop Without Adobe Creative Cloud
If you want to add fonts to Photoshop without Adobe Creative Cloud, you’ll first need to find those fonts online. You can then download them and install them easily using the steps below.
First, make sure you read carefully about the licenses available for any fonts you download online. While some fonts may be free to download, you may only be able to use them freely for personal use. Font creators will often have a paid-for license for commercial use.
If you’d like free fonts for commercial use, you can try Google Fonts. All Google fonts here are open source. Alternatively, DaFont can be a great place to find a larger selection of fonts for free, personal use. We also have a great article on 8 safe sites to find more fonts.

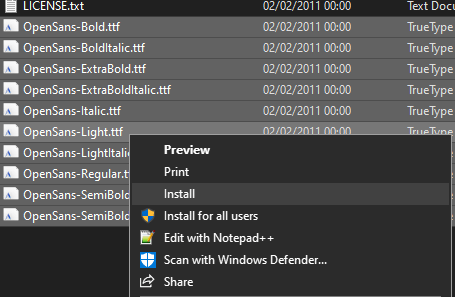
- When you download a font, you’ll get a .zip file in most cases. Extract your font to a new folder, then highlight all of the font types you’d like to install. Next, right click and select Install.
Note: On Mac, the process is similar. Simply extract the zip file and double click the extracted font files and you’ll have the option to install it in Font Book.

- Once your font has been installed, you should be able to find it in Photoshop. If you can’t see it, try restarting Photoshop again. The great thing about installing fonts with this method is that you’ll also find them in any other word processing apps you use, including Microsoft Office.
The biggest drawback with this approach is that your fonts will only be installed locally on your machine. This means you’ll need to install them again on other devices if you want to continue using them elsewhere.
How To Manage Your Fonts

You can manage your fonts through Adobe Creative Cloud or locally on your PC or Mac. This could be useful if you want to remove unused fonts or want to check if a font has been installed correctly.
How To Manage Adobe Creative Cloud Fonts:
- Open Adobe Creative Cloud.
- Click the italic F icon in the top right.
- Click Adobe Fonts.
- Click the name of each font to switch it on or off.
Note that these fonts will only work in Adobe apps that you have an active subscription for.
How To Manage Windows 10 Fonts:
- Press the Windows Key.
- Type Fonts.
- Click Font Settings.
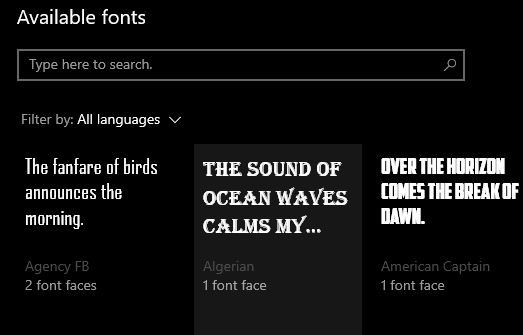
All installed fonts will appear here. Click on each font to uninstall it, change default settings or preview it. If a font doesn’t appear here, it’s likely that you didn’t install it correctly.
How To Manage Mac Fonts:
- Open Launchpad
- Search for Font Book
- Click Font Book in the search results to open it.
In Font Book, all installed fonts can be seen, previewed, and uninstalled here. If you cannot see a recently installed font, it might be because you haven’t installed it properly.
Summary
We hope that this guide has helped you to add fonts to Photoshop or remove fonts from your system. If you need any more help, you can reach out to us by leaving a comment below.
Related Posts
Ollie stumbled upon writing online whilst participating in a mobile network forum back in 2011. Since then, he has developed an incredible passion for writing about all sorts of tech from smartphones, PC hardware, software, and everything in between. Read Ollie’s Full Bio
