Makes it easy to share on almost any device
Google Maps’ map data format of choice is KML, but they do support many other formats including GPX.
GPX, also commonly referred to as GPS eXchange format, is an open standard XML type that contains Global Positioning System (GPS) coordinates on top of additional map data. The format has seen increased growth and is used by many manufacturers as their preferred native format no matter the device.

Think of GPX in the way that you would an image file format like JPG or PNG. There is no single universal standard for an image file but most would prefer the use of either JPG or PNG to any other format available. They’re easiest to use and readily accepted on almost all platforms.
GPX is essentially the JPG of the map data world. It makes it easy to share map data with an audience and allows that data to be viewed on almost any device they choose.
Although Google Maps does support GPX, the file will still need to be converted into the KML format. GPX is not considered to be one of the easier formats to import into Google Maps and can face difficulties depending on the amount of data moved.
Google Maps will convert the GPX file automatically to varying results, hence the mentioned difficulty, or you can choose to pre-convert the file yourself prior to the import. Regardless, GPX is still widely popular and universally accepted on almost all devices that can store map data.
Importing a GPX File Into Google Maps
The process isn’t overly complicated if all you want to do is load up a GPX file directly into Google Maps. It’s not an ideal situation as there is a chance that doing so directly could result in a loss of map data. The reason for this is that Google Maps will be forced to convert your GPX file into a KML file for use on the platform.
It can still work just fine but I felt it was pertinent information to have just in case there is a lot of data that needs converting. If all you need is a quick solution to pop over the GPX file into Google Maps, you can follow these steps.
- The first thing you’ll need to do is sign in to My Maps.
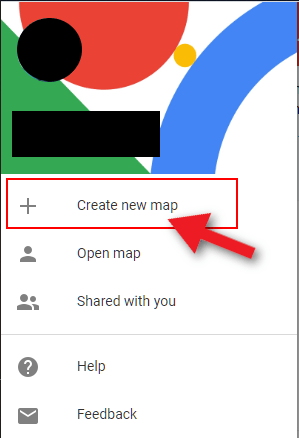
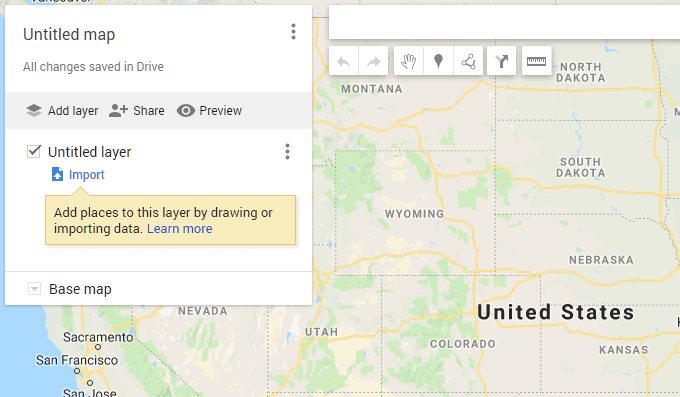
- Next, in the top-left corner of the screen, click on the menu icon and look for Create new map. Click on it to pull up a new map that should be centered on your current location.

- Then, follow this up by clicking on Add Layer. You can find this option in the menu on the left. Just under that layer, click the Import link.

- An option to import the GPX file from your computer will present itself. You can choose to do so or simply drag and drop the file directly into the area provided. Hit the Upload button and your map waypoints should be added to the new map, automatically.
It seems simple enough, right? The process really is. However, there is still that possibility your GPX file was not fully converted by Google Maps and didn’t produce all of the necessary data. It will benefit you more in the end if you decide to convert the map file to KML yourself, prior to uploading it to Google Maps.
How To Convert a GPX Into a KML
The best way to ensure that all data from a GPX file is properly imported into Google Maps is to first convert it to KML, Google’s preferred format. There is plenty of conversion software available to you online, which is likely the more convenient route to take. Just type GPX to KML converter into your search engine and you’ll receive plenty of results from which to choose.
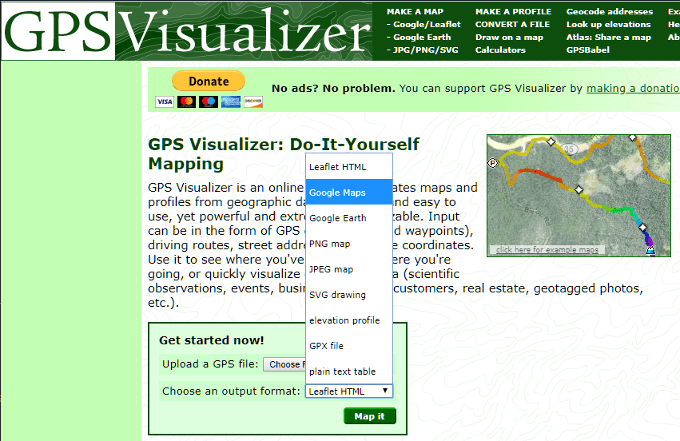
Typically, these programs will be free to use but some will require a quick installation. I would recommend gpsvisualizer.com as it is both lightweight and easy to use.

- Once you find the right one for you, simply upload your GPX file and select KML (or Google Maps) as your output format. Most conversions take very little time at all to complete so you should expect to have a fully converted file produced rather quickly.
- As soon as the file has been converted, download and save it to your system, then follow the steps detailed above on how to upload a file to Google Maps.
Taking an additional few moments to knock out this step will ensure that no data is lost during the upload. After the converted file has been uploaded to Google Maps, you can perform any of the necessary actions that you would normally when using the tool.
Already working on a map? If you’d like, you can save the recently imported data onto the currently viewed map as either a replacement of the current data or as an overlay.


