While it’s possible to access your Linux partitions in Windows, it’s a buggy solution at best. You can’t easily add or change your files without relying on software that’s no longer actively being developed.
Rather than risking your files, there’s an obvious solution for most users who need to share files on dual-boot PCs. Instead of relying on outdated software, you can create a shared “pooled” drive that both operating systems can safely access using the NTFS file system.
Before You Begin
While it’s true that you could use your existing Windows partition, this method has risks. You won’t be able to isolate your files if you need to erase that partition at a later date, which might be necessary if you end up infected with ransomware for instance.
With that in mind, it’s better to create a shared drive, isolated from the system files used by either operating systems.
Unless you already have space available, you’ll need to resize your existing partitions to create space for your shared drive. If you plan on creating this partition on another hard drive, and you plan on using all of the space on that drive, you won’t need to do this.
Before you start changing your drive partitions, you should consider the risks. Any alterations to your partition table could go wrong and result in data loss. Make sure that any critical files are backed up before you start.
Creating Your Shared Drive
There are two options for you when you’re looking to create your shared drive.
If you already have the space available to you on an existing hard drive, or if you’re using the entire space on a second hard drive, you can skip straight to our Creating Your Partitions section.
If you need to create space for your shared drive, whether it’s on the hard drive carrying on your system partitions or on an entirely separate drive, you’ll need to resize your partitions first.
Resizing Your Partitions
There are several tools for formatting and partitioning drives that you can use on Windows, but the easiest solution is to use one that’s already included – the Windows Disk Management tool.
If you’d prefer, you can create or resize your partitions with GParted instead. GParted can be run from removable media like a USB drive, or by installing it to your Linux system. It’s included as a package for installation in most Linux system repositories.
You will only be able to resize partitions that already use Windows-supported file systems like NTFS or FAT32 using the Disk Management Tool. If you need to resize Ext4 or other Linux file systems, switch to using GParted instead.
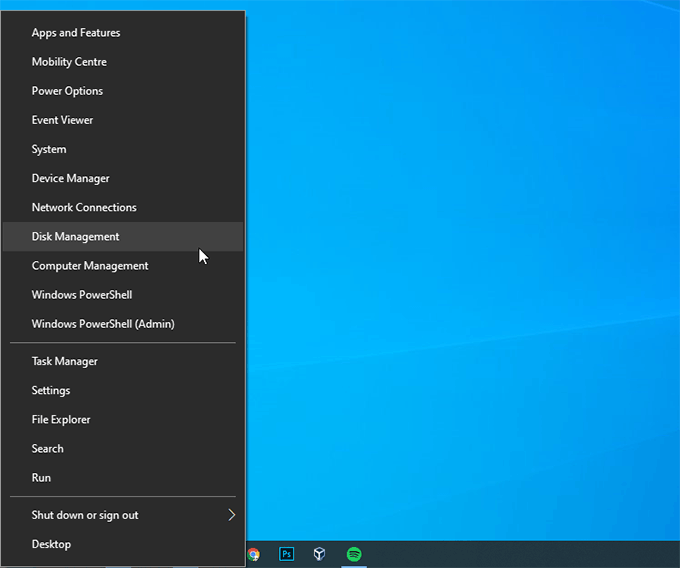
- You can access the Windows Disk Management tool by right-clicking the Windows Start button and clicking Disk Management.
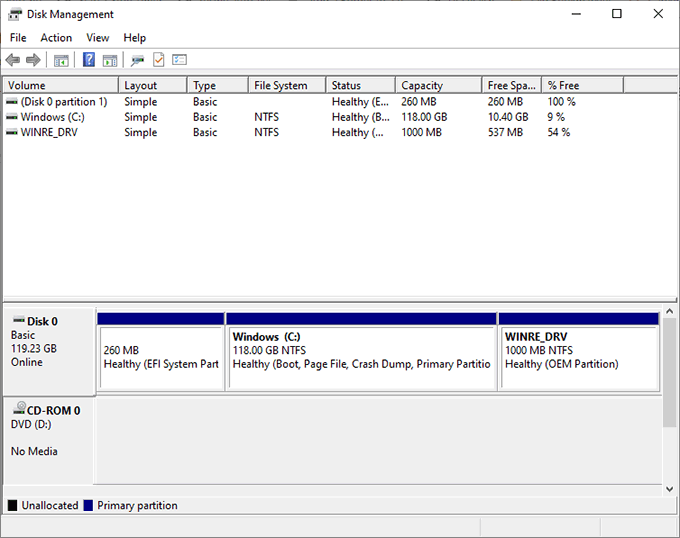
In Disk Management, you’ll see a split list of your drives. The top half will show the “volumes”, or partitions, available to you. The bottom half will show the partitions assigned to each drive in a more visual format.
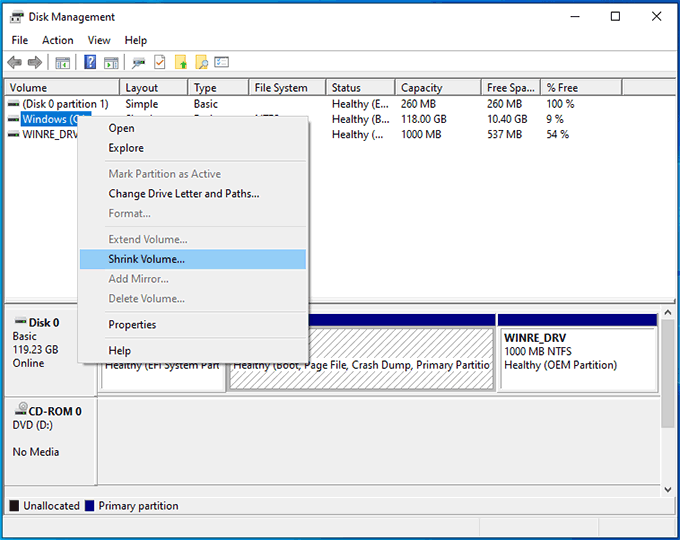
- To begin resizing, right-click on a large enough partition on your chosen drive. On a Windows partition, this is likely to be your Windows system (C:) drive.
- Click Shrink Volume.
Windows will analyze the drive first, which may take a minute. Once it’s completed, you’ll see a window, asking you to enter the amount of space you wish to free up in megabytes.
- Type in a suitable amount for your storage needs. Storage memory sizes are a little unusual, so remember that 1GB doesn’t equal 1000MB, but rather 1024MB.
- Once you’ve selected the amount of storage you’d like to free up, click Shrink.
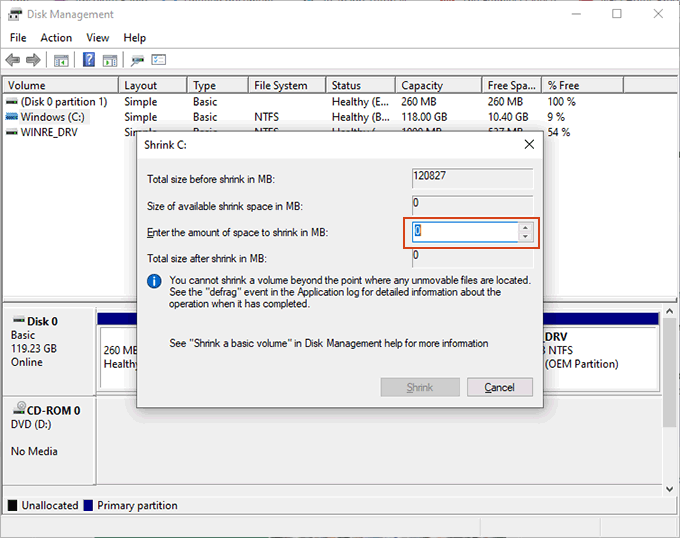
If you’re having trouble shrinking your partition (for instance, if the Shrink button is greyed out), you may need to temporarily disable hibernation. This is due to how Windows stores certain system files.
Creating Your Partitions
Once your hard drive has the necessary space, you can move to create your new shared drive partition.
- In Disk Management, you should see your available space labeled as “Unallocated”. Right-click it and, in the menu that appears, click New Simple Volume.
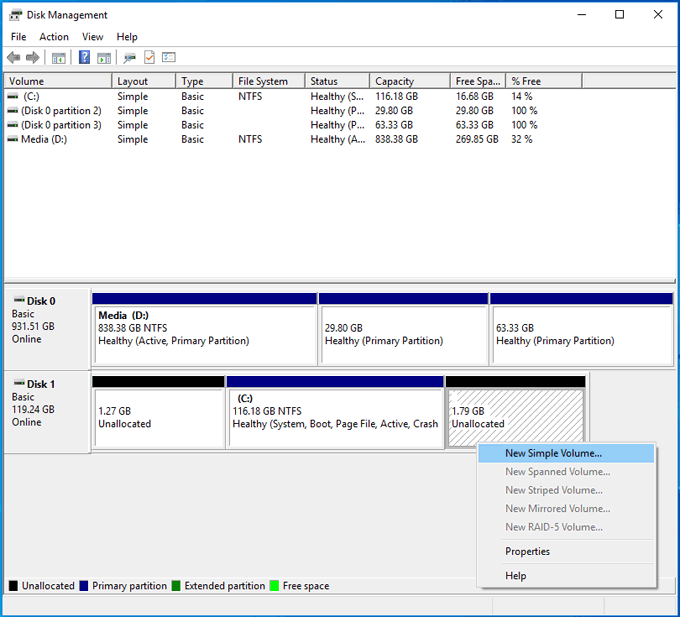
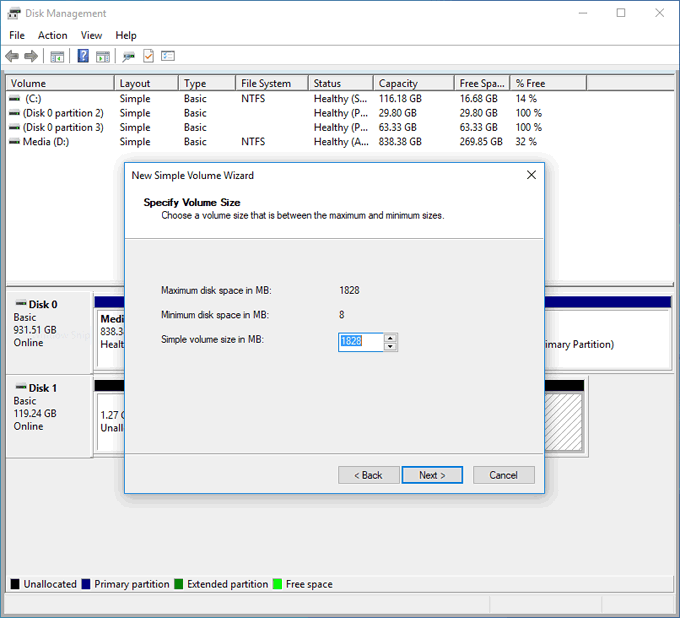
- Click Next to start. Insert the size of your new partition, using megabytes, before clicking Next.
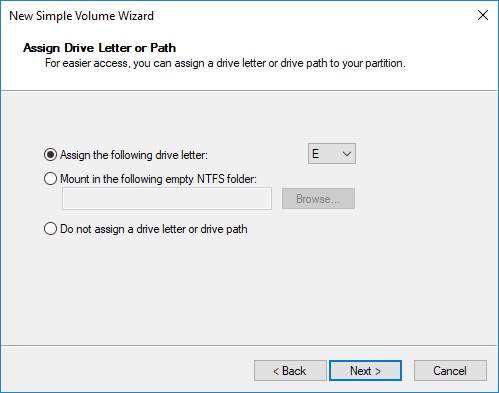
- Confirm the chosen drive letter for your new drive before clicking Next.
- The next stage will confirm the settings you need to format the partition once it’s created. The default settings should be fine, but make sure that NTFS is selected. Give the partition a name under the Volume Label section, and click Next to continue.
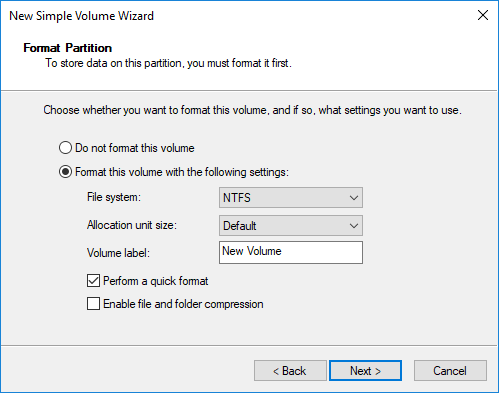
- At the final stage, click Finish to begin the process of creating and formatting your new drive partition.
If you’re using another hard drive, and need to delete or format any existing partitions, Disk Management will allow you to do so.
You can either right-click any existing partitions, click Delete Volume and then create a new partition in the “Unallocated” space, or you can choose Format to format an existing partition to the NTFS file system.
Accessing Your Shared Drive
Once you’ve created your new partition and formatted it, you should be able to access it in Windows File Explorer.
Most modern Linux distributions will be able to read partitions with NTFS file systems, thanks to the ntfs-3g driver package. This is pre-installed with recent Ubuntu and Debian releases, but you may need to install it yourself in other distributions like Arch Linux.
In most cases, you may need to give your distribution a “nudge” to mount the drive and allow you access. In Ubuntu, for instance, open your file manager and click Other Locations. Locate your partition by the label you gave it when you formatted it, then tap it.
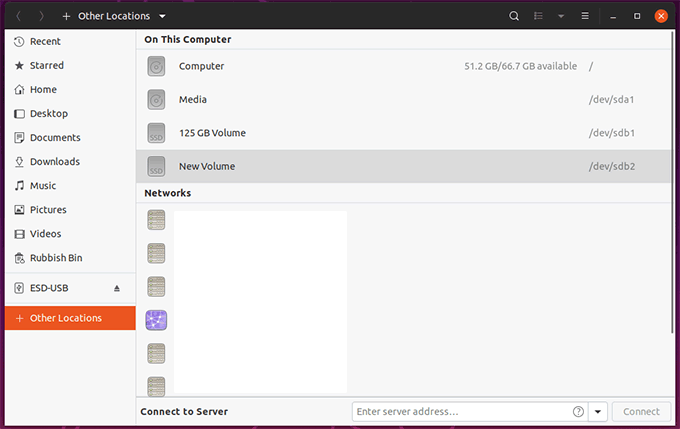
It should then mount and open, allowing you to access any files within, as well as add or delete them. Any files you add will then be accessible from within Windows the next time you switch systems.
Related Posts
- Sluggish Windows 11 PC? Try These 5 Windows 11 Tricks to Free up Virtual Memory
- macOS Tahoe Privacy Settings You Need to Secure Your Mac
- How To Turn Off Notifications On Windows 11?
- How to Recover Lost Files After Windows Update?
- Microsoft Is Shutting Down NTLM After 30 Years: Here’s Why Kerberos Replaced It
Ben Stockton is a freelance technology writer based in the United Kingdom. In a past life, Ben was a college lecturer in the UK, training teens and adults. Since leaving the classroom, Ben has taken his teaching experience and applied it to writing tech how-to guides and tutorials, specialising in Linux, Windows, and Android. He has a degree in History and a postgraduate qualification in Computing. Read Ben’s Full Bio
