Recording a Zoom meeting for future reference is a better way to preserve a record of a meeting than taking notes. Meetings can be recorded locally to your computer or to the Zoom cloud for licensed users.
After recording the meeting, how do you access the Zoom recordings and manage them?
How To View Previous Zoom Recordings
Free and paid Zoom subscribers can locally record the video and audio files from a recorded meeting. The Zoom recordings save automatically to a folder on your computer after the meeting.
In addition, you can upload recorded meetings to storage services and streaming services for sharing. Keep in mind that local recording isn’t supported on Android and iOS devices. To view your Zoom local recordings from the Zoom client, follow the steps below.
Note that this process will not show local Zoom recordings from a different computer, even for the same Zoom account.
- Log into the Zoom client, Meetings > Recorded
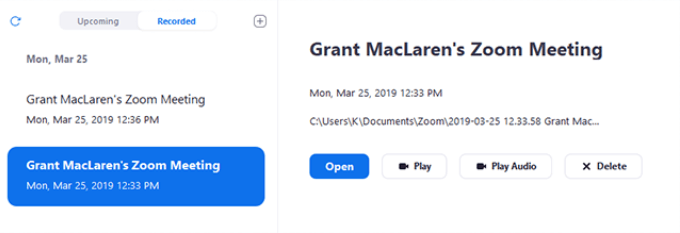
- Select the Zoom recording you want to view.

The options available are:
- Play the video file
- Play the audio file only
- Open the folder storing the recordings
- Delete this recording from the Zoom client (will still be stored on your computer)
By default, Zoom puts all Zoom recordings into a folder on your computer in the following locations:
- Mac: /Users/Username/Documents/Zoom
- PC: C:\Users\Username\Documents\Zoom
How to Share Local Zoom Recordings
Find the meeting video you want to share with those who joined in the meeting via the locations mentioned above on your computer. Upload it to a cloud storage service such as Dropbox or a streaming service like YouTube and share the link from there.
Or, if you can’t find the video file on your computer:
- Log into your Zoom account
- View a list of your local Zoom recordings and where they are on your computer
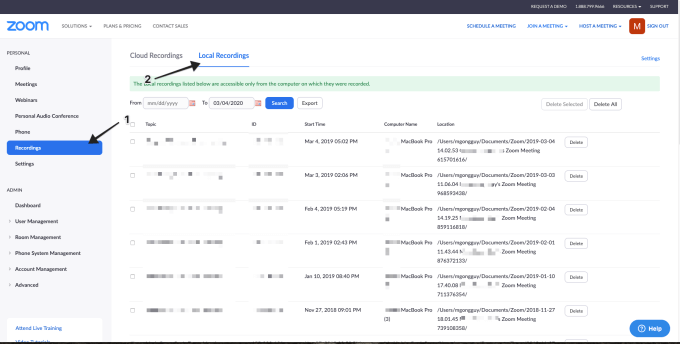
- Check off the meeting you want to share and click Export

- Note the location to where you are exporting the local Zoom meeting video file
- Upload the meeting mp4 video file to a cloud storage service or a streaming service and share the link from that location
How to Manage And Access Cloud Zoom Recordings
Account owners and admins can manage cloud Zoom recordings, including viewing, sharing, and deleting audio, video, chat, and transcript files.
Users can view, share, and delete their own cloud recordings.
To manage cloud recordings, you must have a premium Zoom account with cloud recording enabled. You also must have owner or admin privileges.
For Admins
- Sign in to the Zoom web portal
- Click Account Management from the navigation menu > Recording Management
- Select the status and date range
- Search by meeting ID, topic, host, or keyword

For Users:
- Sign into your Zoom web portal
- Click Recordings from the navigation menu
- You will see a list of the cloud recordings you created
- Choose the status and date range
- Search by topic, keyword, host, or meeting ID
Manage Cloud Recording Settings
- Click Account Management > Recording Management from the navigation menu
- Locate and click on the Zoom recording you want to view
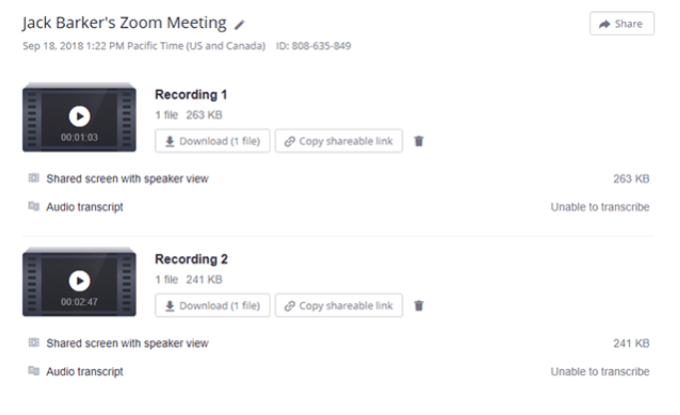
- Change the name of a Zoom meeting by clicking the pencil icon
- To play the video in your browser, click the button on the thumbnail
- Download the Zoom recording to your computer
- Click Share to show the recording link
- Set sharing options such as enabling or disabling downloads or requiring a password
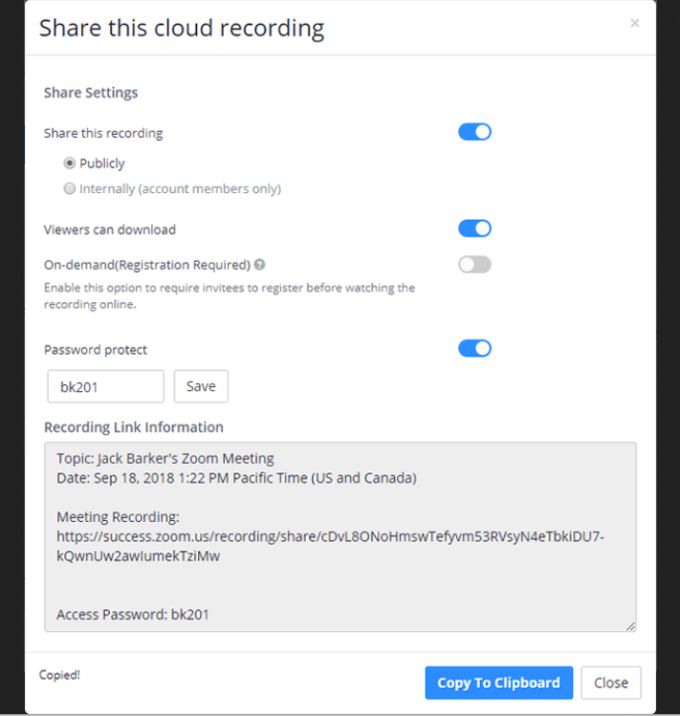
Set other sharing options, including:
- Making the link public or private
- Requiring viewers to enter name and email address
- Enabling others to view a shared screen portion of the recorded meeting

- You can also download the video file, copy the link to share it, or delete the file
For cloud Zoom recordings that include chat or audio transcripts, you can also download, copy, or delete the files using the same icons as above.

How to Export A List Of Cloud Recordings
Export a CSV file with details of your recorded cloud meetings, including meeting ID, meeting topic, the host’s email address, file size, start date, and time.
- Go to Recording Management from Account Management in the navigation menu
- Select your search criteria
- Click Export

How to View Cloud Recording Analytics
To see the page views and downloads for a cloud Zoom recording you have shared internally or externally, follow the steps below:
- Access Recording Management
- Click the topic you want to view
- Specify a date range from the drop-down menus at the top
- Click Search
- View filter data or a summary for a cloud meeting by clicking on one of the tabs
You will see the following metrics:
- The number of views on a Zoom recording page, not the number of times played or how many unique views
- How many downloads, but not if the process was completed
Protect Cloud Zoom Recordings With A Password
To manage who can view or download your recorded cloud meetings, use the password protect function by:
- Accessing Recording Management from Account Management in the navigation menu
- Find the recording you want to protect and click Share next to it
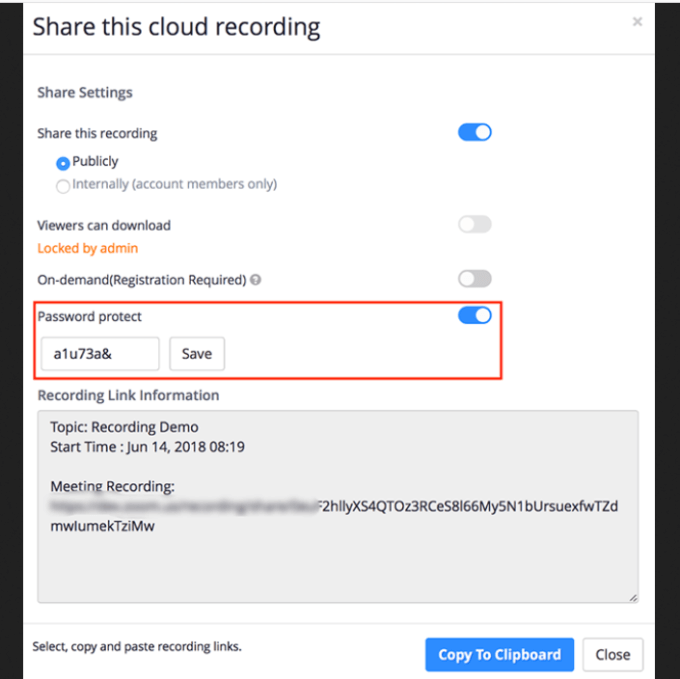
- Toggle the Password protect switch to the on position
- Enter a password and click Save
How to Delete Cloud Zoom Recordings
If you want, you can delete all your Zoom recordings or only some of them based on any criteria you choose. Deleted files will move to the trash file. They will remain in the trash for 30 days unless you permanently delete them manually.
Note that any files in your trash do not count as part of your cloud storage allotment.
- Navigate to Recording Management
- Click Delete All if you want to remove all Zoom recordings
- For specific recordings, change the date range and use the search criteria to select the files you want to delete
How To Recover Recordings From The Trash
Did you accidentally move a Zoom recording to the trash and want to get it back? No problem if it is within 30 days.
- Check the meetings you want to restore
- Click Recover at the top or next to the meeting to restore it

Being able to record Zoom meetings is a handy feature. Use it to review or share Zoom recordings later. Knowing how to manage your meeting history gives you more control over what information you save, how you save it, and who has access to it.
Related Posts
- How to Repair a Corrupted User Profile in Windows 11
- Preparing for Windows 10 End of Support: Upgrading to Windows 11
- How to Access and Change Your WiFi Router Settings (2025 Edition)
- How to Install the Latest Large Language Models (LLMs) Locally on Your Mac
- How to Find Circular References in Microsoft Excel