Want to know how to overclock your Intel processor? Take a read through our guide to learn how. We’ll offer step by step instructions to get overclocked and some guidance on how to keep things within a safe overclock level.
By the end of this article, not only will you know how to overclock your CPU, but you’ll feel confident when doing it. Make sure to also check out our accompanying guide on how to overclock your GPU.

Can I Overclock my Intel CPU?
Before we begin, you need to know whether it’s actually possible to overclock your specific Intel CPU. Thankfully, that’s very easy to find out. Essentially, there are two types of Intel processors – non overclocked versions, and the K or X variant, which is overclockable.
For example, I have the Intel I7-7700K, which is overclockable. The I7-7700, on the other hand, isn’t overclockable. If you aren’t sure what your model is, follow the steps below.
- Open the Windows Start Menu.
- Type ‘dxdiag’.
- Click on dxdiag.
- On the system tab, look for processor.
- You will see your processor name here
See K or X in your processor name? Then you’re good to go! If not, you’ll need to purchase an overclockable CPU before you can follow this guide.
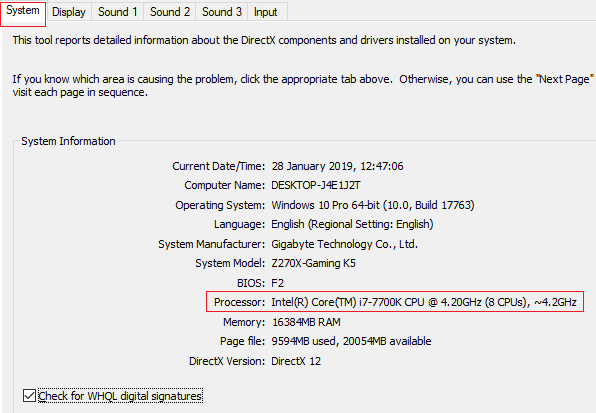
For reference, above is an example of what you should be looking for.
What You Need to Overclock Your Intel CPU
Before we begin, you’ll need some software and hardware to test everything is running in place. You’ll need the following.
- Prime95 for CPU stress testing.
- Core Temp for CPU temperature monitoring
- A better cooler for better temperature
The stock cooler that comes with your Intel CPU isn’t great, and it won’t do enough to keep your processor cool if you plan to overclock it. Because of this, it’s highly advised you purchase a good aftermarket cooler.
There are plenty of reasonably priced items on Amazon. One popular option is the air cooled Hyper 212 EVO. If you’d prefer to get lower temperatures, try the all in one water cooled Corsair Hydro H100. The Hyper 212 EVO costs $35 whilst the Hydro H100 will set you back $120.
Once you have a better cooler and the software downloaded from above, it’s time to run a stress test to ensure everything is stable. First, open Core Temp. Next, look in the far right corner of your taskbar – ‘click the show hidden icons button.’
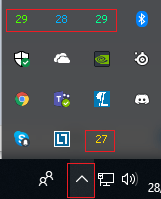
You will now see some fluctuating numbers – these show the temperature of the cores on your CPU. An example has been provided above.
When your CPU is idle, or isn’t running any incredibly demanding tasks, you should be aiming for temperatures between 25 and 35 degrees celsius. If you are getting higher temperature, you should consider cleaning your cooler or upgrading it before trying to overclock.
Overclocking your CPU will cause it to increase in temperature, but if it gets too hot its performance will be reduced to lower the temperature, or there could be stability issues that could crash your PC.
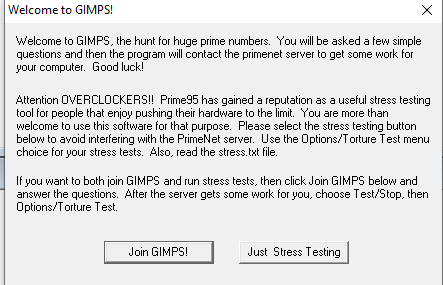
Next, open Prime95. When opening for the first time, click ‘just stress testing’ on the prompt that appears.
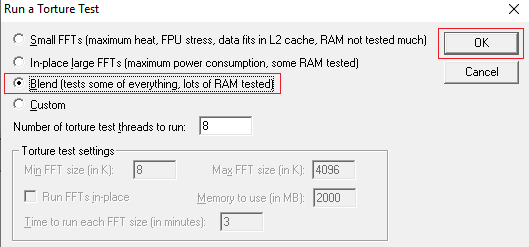
Choose ‘blend’ and then click OK. Your PC will now be put into a stress test. All other programs may run slowly during this test, so you should close everything down for the meantime.
It’s advised to run the stress test for 5-10 minutes. During this time, you should be monitoring your CPU temperature with Core Temp.
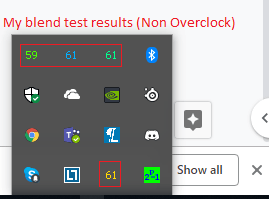
Your temperature should slowly rise as the blend test runs, but eventually it will hit a wall and level out. This will give you a rough idea about how far you can push your CPU overclock. Once this happens, you can stop the test. To stop the test, click ‘Test’ in Prime95 at the top left and then click ‘stop’.
Ideally, you do not want to be going higher than 70 degrees celsius. Realistically, you want to be going for as low as possible. Once you overclock your CPU, the temperatures will go higher than the temperature you have now.
Running Your First Overclock – The Easy Way
Now that your Prime95 test is complete, it’s time to run your first overclock. To do this, you must shut down your PC and open the BIOS settings. You’ll be given a number of options to choose on the bootup screen, and usually the BIOS setup key will be F1, F2, or Delete. Press it as soon as you spot which key it is.

Once you are in the BIOS, you can follow the steps below to make your first overclock. Please note that all BIOS menus are developed differently and some have more convenient overclocking features. You will need to find the equivalent options to what I suggest below – they should be quite easy to find.
First look for ‘Advanced frequency settings’ or similar.
In here, you’ll see a number of options. If you want the easiest solution, try ‘CPU Upgrade’ or Auto Overclock, or anything similar.
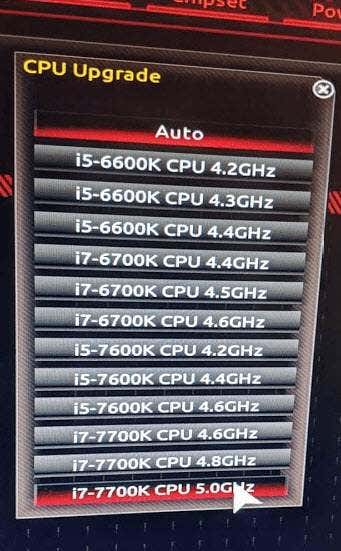
Take a look at the image above for an example. With such a feature, you can let your motherboard automatically overclock your CPU. For testing purposes, I tried to take my 4.2GHz processor and upgrade it to 4.8GHz.
For the next step, reboot your PC, then open Prime95 again. Run the same Blend test as before. Whilst running, check your processor clock speed by following the steps below.
Right click the Windows button at the bottom right.
Click ‘Task Manager’.
Click on the Performance tab on Task Manager.
Make note of your ‘Speed’ on the CPU tab.
If it worked successfully, you should see your new speed.
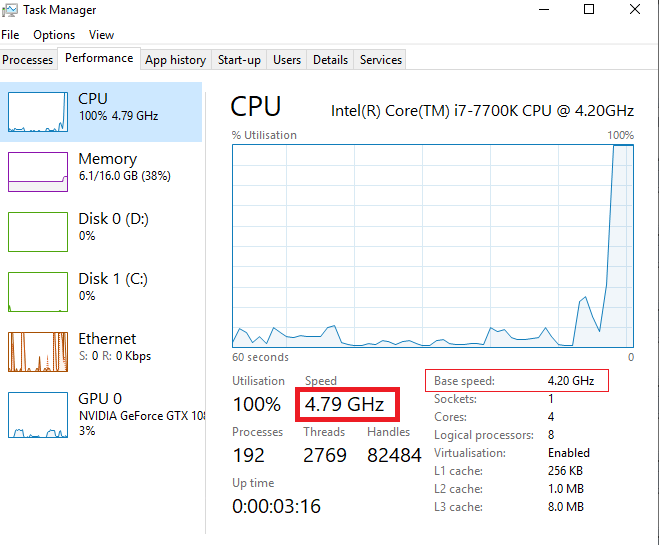
As you can see above, my speed shows 4.79GHz once under full load, despite my ‘Base speed’ still showing 4.2GHz.
You should now let the test run for at least 2 hours to test for stability issues. Whilst the test is running, keep an eye on your temperature regularly with Core Temp to see how things are performing. At the same time, do not open any background apps because your CPU will be pushed to the max.
After the test has run for 2 hours, you can ask yourself the following questions:
- Did you get any errors with Prime95?
- Did you get a blue screen?
- Were your temperatures on Core Temp above 80?
If the answer to all of the questions above is no, it’s time to test your CPU in games, streaming, or video editing. Hopefully, you shouldn’t run into any problems. If you do go above 80, blue screen, or get a Prime95 warning/error, try with a lower setting in the BIOS.
Pushing Your Overclock – The Manual Way
The following method should only be tried after you’ve tried the automatic method and you’re still not happy with your performance.
This method will require you to run Prime95 tests regularly as you incrementally increase your CPU voltage and max clock speed.
- For the first test, restart your PC.
- Enter the BIOS when prompted.
- Open the ‘Advanced frequency’ section or similar like before
In this tab, you’ll see information regarding to your current CPU performance.
The two important stats to make notice of are the CPU base clock (BCLK) and either the multiplier or Clock Ratio. It can differ on different BIOS menus.
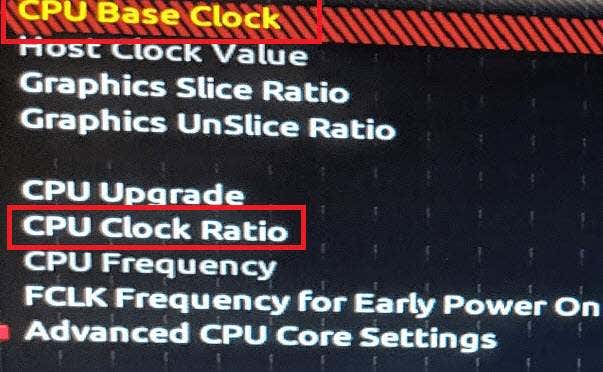
In my case, it’s CPU Base Clock and CPU Clock Ratio, as shown above. The CPU Base Block is multiplied by the ratio/multiplier to get your clock speed. For example, 42×100.00MHz. You should only increase your ratio/multiplier for stability reasons. We’d recommend starting with a change to 47 (4.7GHz).
Next, look for ‘Advanced Voltage’ settings or ‘CPU Voltage.’ Change this to 1.25, or, if it’s already defaulted at a higher value, leave it there.
Next, save and exit and then reboot your PC. Run Prime95 for 2 hours. Run Core Temp to monitor temperatures. If you blue screen, get warnings, or your temperature goes above 80, go back to your BIOS and change the multiplier down a little.
If you don’t run into any problems, you can try to push your performance a little further. Once in the BIOS again, move your voltage to 1.30 and try to push your multiplier to 49 (4.9GHz). Save and exit and run Prime95 again.
Realistically, you’ll be lucky to get your CPU performing higher than this unless you have a very good cooling system. You must increase your voltage to get higher clock speeds, but this increases temperature drastically.
We would advise not ever going above a 1.40 voltage, but 1.35 is reasonably safe. With this voltage, you may be able to push your CPU to 5.0GHz, 5.1GHz, or maybe even higher. Every time you increase your voltage and multiplier, you must run the Prime95 tests again. It’s important you test for stability before playing games or running other processor intensive tasks.
Summary
Thanks for reading our Intel overclocking guide. Did this guide help you? If not, or if you have any questions, leave a comment below and I’ll get back to you when I c
Related Posts
- How to Repair a Corrupted User Profile in Windows 11
- Preparing for Windows 10 End of Support: Upgrading to Windows 11
- How to Access and Change Your WiFi Router Settings (2025 Edition)
- How to Install the Latest Large Language Models (LLMs) Locally on Your Mac
- How to Find Circular References in Microsoft Excel