If you’ve been using OneNote for your important note taking, you might need to consider what happens to your notebooks if you delete them. Once a notebook is gone, is it gone forever?
The answer is complicated, but if you delete a OneNote notebook, you can recover it in a few different ways, depending on how you’ve been using the service. To recover a deleted notebook in OneNote, follow the steps below.
How to Restore Deleted Notes in OneNote
Let’s assume that you’ve accidentally deleted the notes from one of your notebooks and you’re looking to retrieve it. If you need to recover these, the easiest way to do it in OneNote is to use the built–in recycle bin feature. This keeps a copy of your deleted notes safe, but outside of your notebook, for up to 60 days.
To be clear, this will only work if the notebook itself is still open and available in OneNote. If you’ve deleted the OneNote notebook entirely, you’ll need to try one of the sections below instead.
To restore deleted notebooks using the Recycle Bin, follow these steps.
- Open the OneNote app on your PC or Mac.
- Next, open up the notebook where you’ve deleted a note previously.
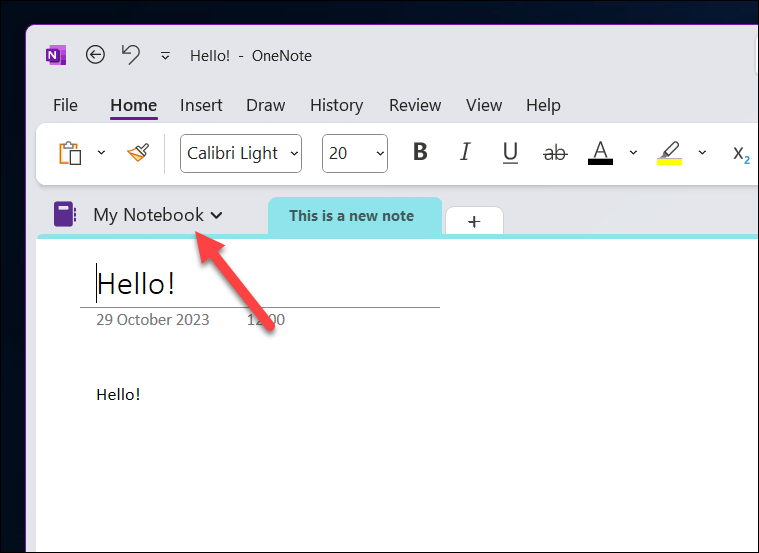
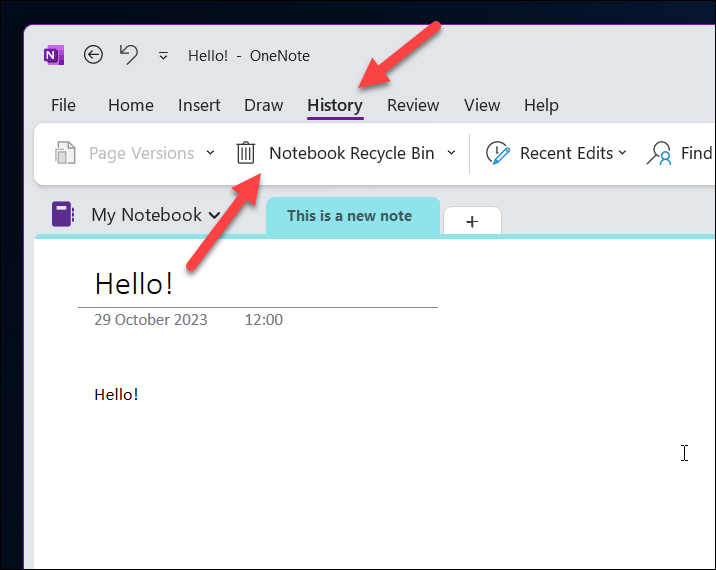
- Press the History tab on the ribbon bar and select the Notebook Recycle Bin button.
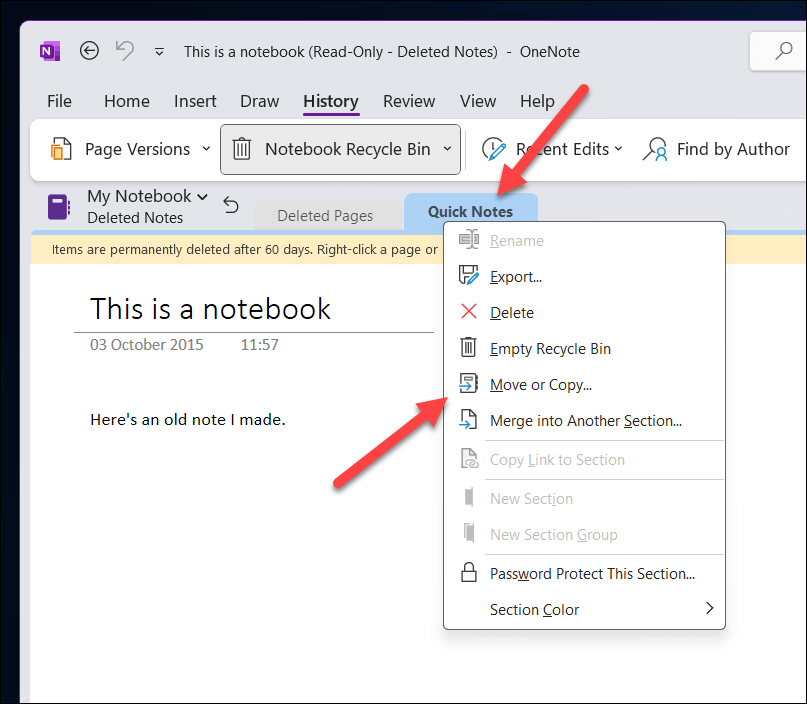
- With the recycle bin enabled, you’ll see a list of pages and sections that were deleted in the past 60 days as tabs—click any of them to view the deleted information.
- To restore any of these notes to your notebook, right-click the tab of the deleted content and press Move or Copy (or Merge into Another Section instead).
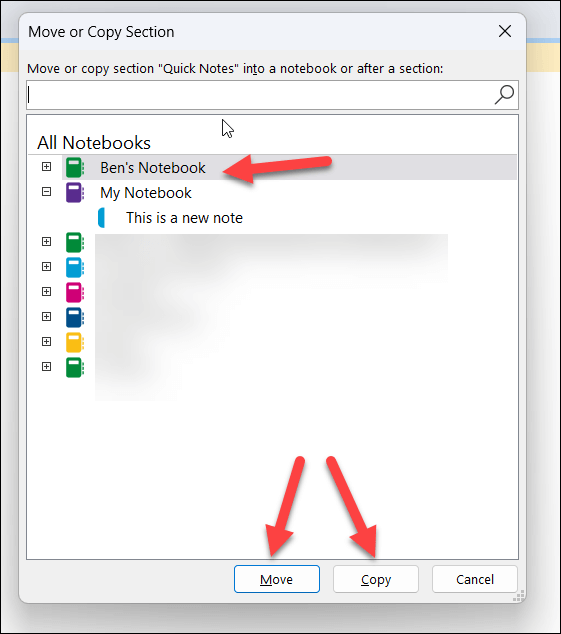
- Choose the notebook and section you want to restore it to and press Move or Copy. This doesn’t need to be the same notebook that the notes originally came from.
- Repeat this process for any other pages or sections that you want to restore.
How to Recover Closed Notebooks in OneNote
You can’t actively delete an entire notebook in OneNote itself. To prevent accidental deletion, OneNote will simply close the notebook file.
OneNote notebooks are stored as individual files using the .one file extension. If you close a notebook, it won’t delete it from your PC or from your OneDrive storage—the file should still be there. You can open it up again and access your notes again at any point (as long as you still have the file). To do this, follow these steps.
- Open the OneNote app on your PC or Mac.
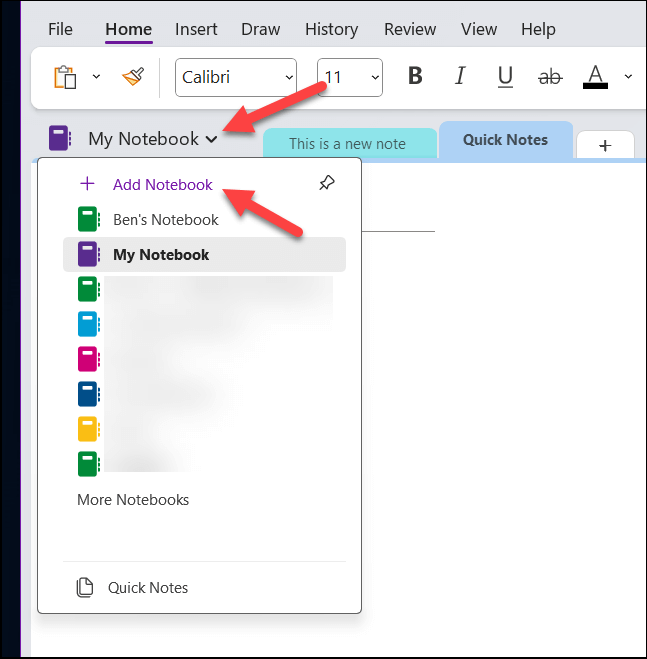
- Select the Notebooks tab on the ribbon bar.
- At the top of your list of notebooks, select the Add notebook option.
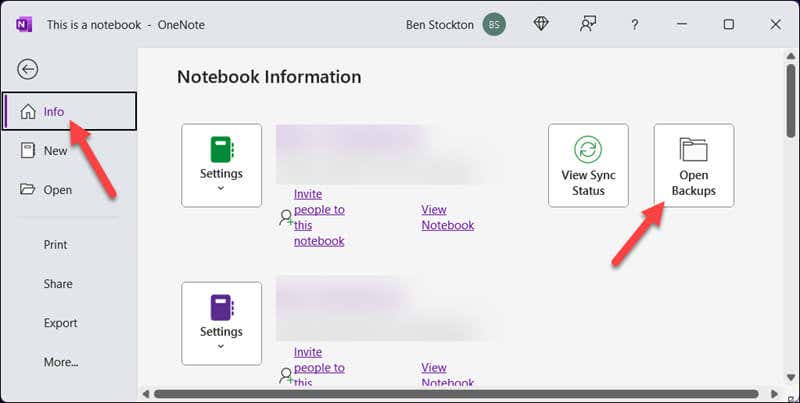
- Alternatively, press File > Info > Open Backups (or File > Open Backups on Mac).
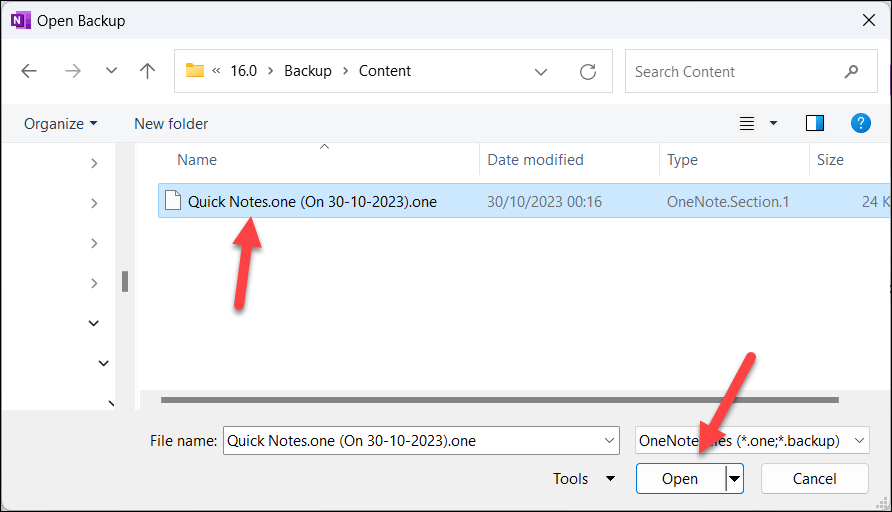
- In the menu that opens, locate your closed notebook file with the .one file extension. This will either be stored locally on your PC or Mac or stored in your OneDrive online storage.
- Select the notebook and press Open to open it again.
Once the file is opened in OneNote, your notebook will sync up and appear for you to use and edit. This will include all of the sections and individual notes that it included before you closed it.
How to Use the OneNote History Feature to Restore Previous Versions of Notebooks
Notebooks in OneNote are designed to be fluid, allowing you to add, change, and remove notes and other content when you need to. However, if you’ve made changes to your OneNote notes previously, you may be looking to restore a section of your notebook from an earlier time (or the notebook entirely).
If you have an earlier copy of the .one notebook file, you could use the steps above to achieve this. However, you can also use the built-in page versions feature in OneNote to view and potentially restore older versions of your notes.
To use the History feature to restore previous versions of notebooks, follow these steps.
- Open the OneNote app on your PC or Mac.
- Select a notebook, then open a page that you want to review the history of.
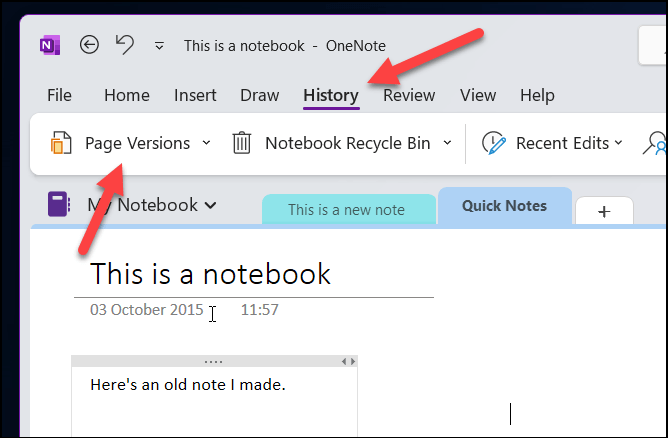
- Next, select the History tab on the ribbon bar and select the Page Versions button.
- In the panel on the right, older versions of the page will appear in green. These read-only copies will be time stamped to help you determine when the changes to your pages were made. Select any of these pages to view them—you can switch between them to view your notes in comparison to each other and make further changes.
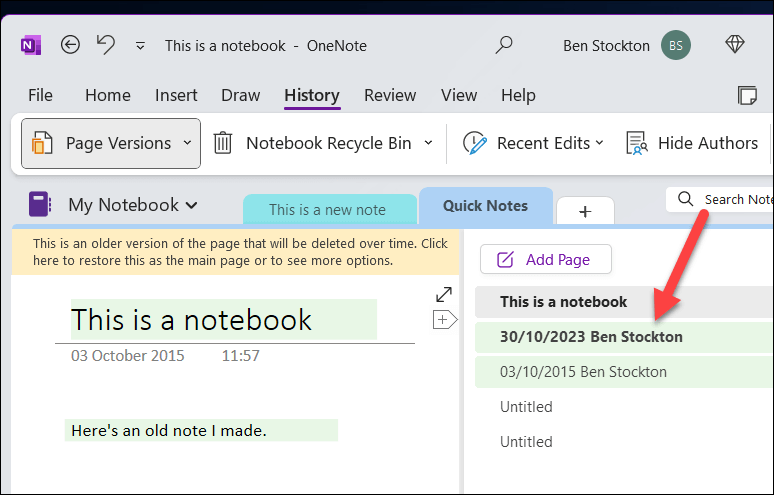
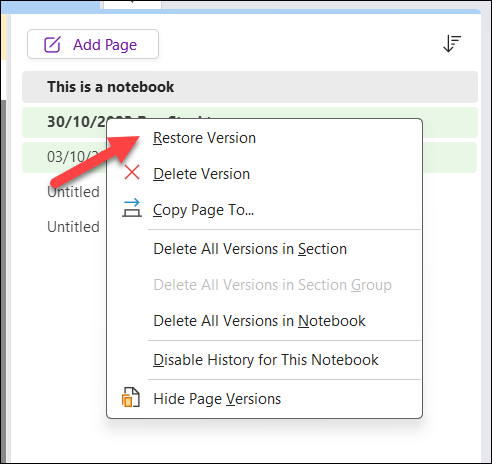
- If you want to restore the older page permanently, right-click the older version of the page you want to restore and press the Restore Version option. This will restore that version of your page as the main version in your notebook.
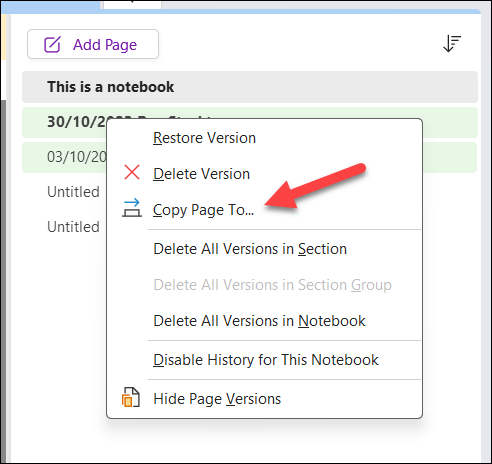
- You can also right-click a version of the page and press the Copy Page To option to make a new copy of that version of your page and store it alongside your main copy.
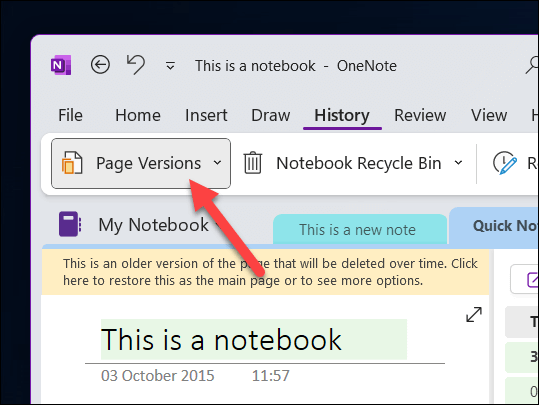
- When you’re finished, press the Page Versions button again on the ribbon bar to hide the older versions of your pages from view again.
How to Recover OneNote Notebooks Using OneDrive
Accidentally deleted your OneNote notebook file? Don’t panic, as you may still be able to recover the file from an older version of your OneDrive history. OneDrive allows you to remove any changes you’ve made to your storage to a point within the last 30 days.
There’s an obvious downside to this, however. While you may be able to restore your deleted OneNote notebooks if you deleted them from OneDrive in this time period, you’ll lose any changes you’ve made to your OneDrive storage since that point. OneDrive will roll back any changes you’ve made.
With this in mind, consider backing up any changes you’ve made to your OneDrive storage (such as creating new files) before you proceed with these steps. When you’re ready to recover your OneNote notebooks using OneDrive, follow the steps below.
- Open the OneDrive website in your web browser and sign in.
- Download or otherwise back up any files that you’ve added, removed, or changed after you deleted your notebook at this point—you’ll need to restore these manually afterward.
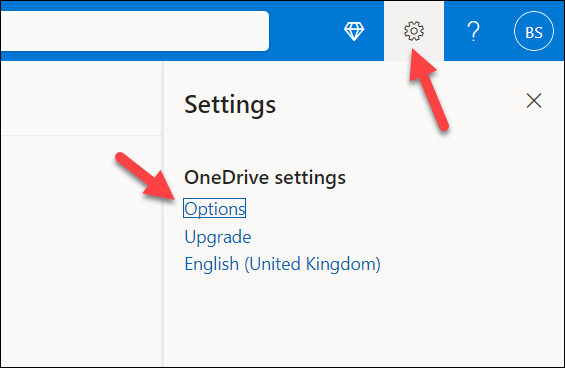
- Next, press the Settings icon in the top-right and select Options from the pop-up panel that opens.
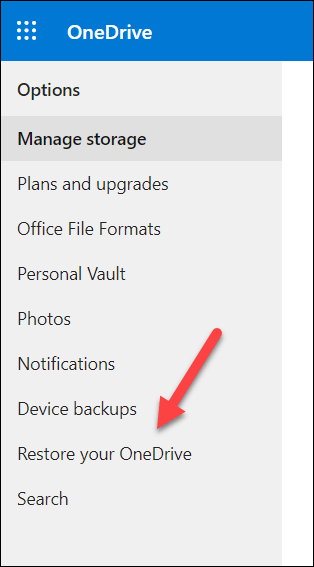
- In the Settings menu, select the Restore your OneDrive option on the left.
- You’ll be asked to verify your identity—press the Verify your identity button to complete this process and follow any on-screen instructions.

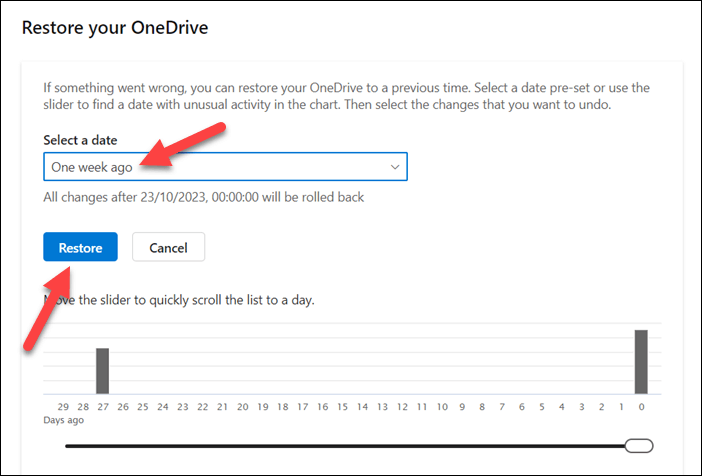
- Once you’ve verified your access, select a time period to view any changes you’ve made within the past 30 days from the Select a date drop-down menu.
- You’ll see a list of changes below. These will be automatically selected or, if you’ve selected Customized date and time, you’ll need to select them manually. Look out for the name of your deleted OneNote notebook file in the .one file format and make sure that it’s selected.
- Once the changes are selected, press the Restore button at the top of the page.
- Allow the process to complete—you’ll be prompted once the process is finished.
- Once it is, open OneNote and press File > Open Notebook.
- Select your OneDrive storage and locate your deleted .one notebook file. If the process was successful, you should see it restored and available to use.
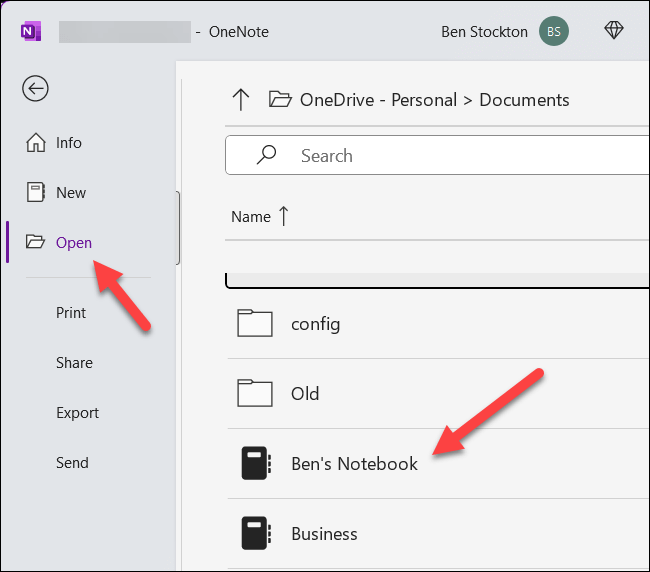
- Once you select the restored notebook file, OneNote will open it for you to view immediately.
Managing Your Notes in OneNote
Microsoft OneNote is designed to keep your notes safe, even when you make a mistake. You can use the steps above to help you recover your deleted notebooks in OneNote. Whether it’s a single note or an entire notebook that you’ve lost, restoring them should be easy—as long as you’re keeping your files backed up, that is.
Don’t have a good enough system for backing up your files? Make sure to start using your OneDrive storage effectively and avoid deleting any OneNote notebook files saved to your OneDrive storage automatically.
Don’t forget about your local backups, however. You can use backup software with your Windows PC to create a local backup of your files, including any OneNote notebooks that you’ve stored.
Related Posts
Ben Stockton is a freelance technology writer based in the United Kingdom. In a past life, Ben was a college lecturer in the UK, training teens and adults. Since leaving the classroom, Ben has taken his teaching experience and applied it to writing tech how-to guides and tutorials, specialising in Linux, Windows, and Android. He has a degree in History and a postgraduate qualification in Computing. Read Ben’s Full Bio

