Photoshop is the gold standard software for photo editing. It has the scope to allow you to quickly touch up an old photo or create entirely new designs with ease, with both basic and advanced features to serve many users. One way you can spruce up an old photo is to remove or replace the background in Photoshop.
Thankfully, Photoshop is now easier than ever to use, with basic photo editing like this made easy. If you want to know how to remove a background in Photoshop, you’ll need to follow these easy-to-follow steps. This guide will work best for the latest version of Photoshop, but may also work for older releases.

Removing A Background In Photoshop Using Background Eraser Tool
If you’ve ever cut an object from an image in Photoshop, you should be familiar with many of the steps used to manipulate images. For backgrounds, a special tool called the Background Eraser tool can be used to remove a background from an image in Photoshop.
This is the most well-known method for Photoshop background editing, and should work for older versions of the software.
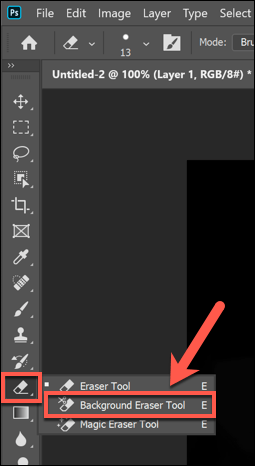
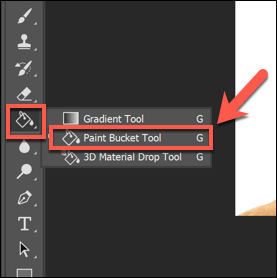
- This tool is one of the alternative Eraser tools in your Photoshop toolbox menu, visible on the left-hand side. You’ll need to press and hold the Eraser tool icon, then select the Background Eraser tool from the drop-down menu.
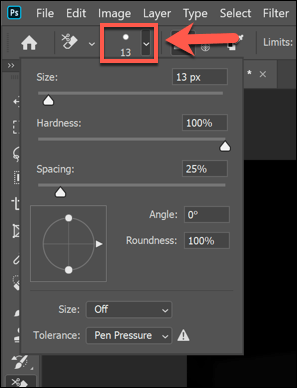
- You’ll need to adjust the sensitivity settings to be able to cleanly cut the background from the image. To do this, make sure that the Background Eraser tool is selected, then click the settings icon in the menu at the top. This will provide you with a drop-down menu containing options to control the size of the eraser, hardness, and tolerance of the tool.
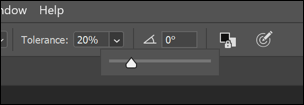
- One of the most important settings to change is the Tolerance percentage, which is visible in the top menu. A lower tolerance value will mean that the eraser focuses on a tighter set of colors, while a higher value will erase more colors at once. This gives you greater (or lower) accuracy, depending on the background you have and the image you’re working with.
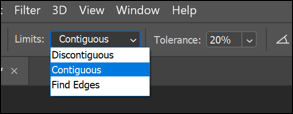
- You’ll also want to set the Sample value to Continuous for complex backgrounds. This means that the color Photoshop focuses on (and erases) changes as you hold and move the eraser tool around your image. If you have a more basic image with fewer colors, you may wish to set this to Discontinuous or Find Edges instead.
- Once you’re ready to begin removing the background in Photoshop, carefully use the eraser to brush between the main object of the image (that you’re looking to save) and the background (that you’re looking to remove). If the setting is correct, this should begin to erase the background while leaving the object intact.

This will require some finesse (and possibly trial-and-error) to remove the background successfully. If you’re having trouble with more complex backgrounds, you may wish to prefer to use the Select Subject tool instead.
Using The Select Subject Tool To Remove Photoshop Backgrounds
The Select Subject tool is a recent addition to the Photoshop toolbox that allows you to select the focus of an image. This is powered by built-in AI technology that can help to separate different elements of an image.
This is particularly useful for background removal. Rather than manually brushing away a background, you can select the main subject of an image that you’re looking to save to remove the background behind it.
- To use the Select Subject tool, make sure that the Select tool is active in the Photoshop toolbox menu on the left. Click the Select and Mask button in the top menu.

- In the Select and Mask mode, click the Select Subject button. The built-in AI will automatically select the main subject of the image, with a preview shown on the left. Adjust the settings on the right accordingly (although the default settings should work for most users), then click OK in the right-hand menu to confirm.
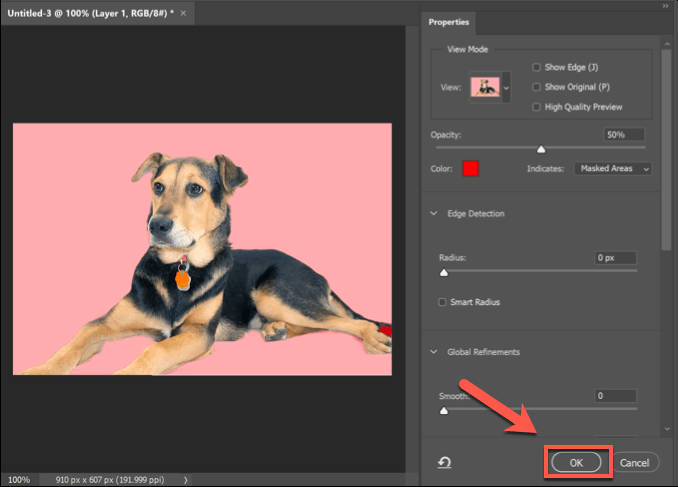
Once confirmed, the image background that the Select Subject tool detected will be removed and replaced with a white background. You can then replace the background according to your tastes.
Replacing A Background In Photoshop
You can replace the background of an image in Photoshop by first removing the background and leaving it transparent. You can then add a new layer to your image, placed behind the main subject, to create a new background.
If you use the Select Subject tool, this automatically creates a background layer that you can either edit or replace. This is the best method for replacing a background but, if you use the Background Eraser or alternative method for removing a background, you can add a new background layer in a similar way.
- Start by clicking Select > Select and Mask to be able to access the Select Subject tool. Once you’re in the Select and Mask menu, click Select Subject in the top menu.

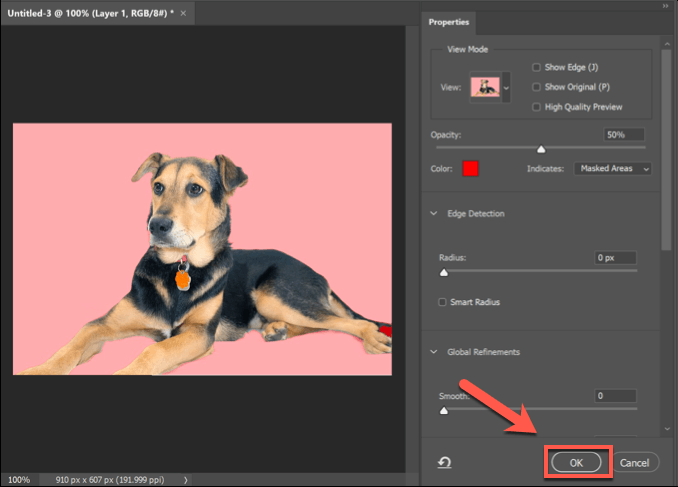
- The default settings in the Select Subject menu should be acceptable to most users, but you can tweak these if you’re having problems. Press OK to confirm once you’re ready.
- Once the background has been removed, you can edit or insert a new background layer. From the Layers tab, a layer named Background will be listed. You could, for instance, select this layer and use the Paint Bucket tool to replace the colour of the background with a single color.
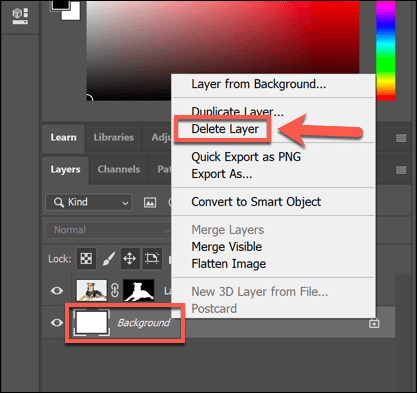
- If you want to delete the layer, right-click the Background layer and click the Delete Layer option.
- You can then insert another image as a layer (saved in your clipboard) by clicking Layer > New > Layer Via Copy. To create an entirely blank layer, click New Layer instead.
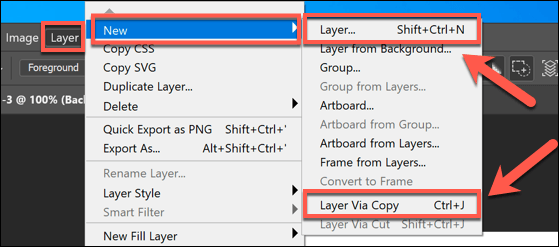
- If you decide to paste an image in your clipboard as a layer, you’ll be asked to name the layer first. Give the layer a name (for instance, New Background) then click OK to confirm.
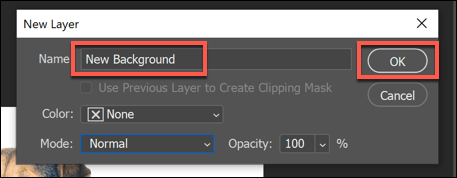
- If you want to create an entirely new layer, you’ll also need to provide a name for the layer. Click OK to add the layer.
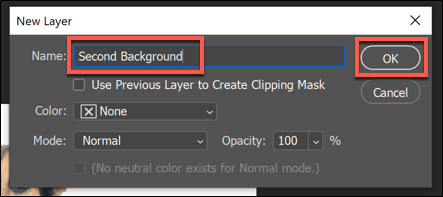
You can then manipulate the new layer you’ve inserted. By default, Photoshop should paste this at the bottom of your layered canvas. This means the background layer will be placed below the main subject, replacing the previous image background.
You can then make further changes to this layer (for instance, changing the color, or adding new elements to it) using the Photoshop toolbox menu on the left.
Using Alternative Photo Editing Tools
If you don’t have Photoshop installed, you may be able to remove a background from a photo using an alternative photo editor. This may be trickier to do, but the free and open-source GIMP photo editor should be able to do the job by using the magic wand tool.
If you’re a Mac user, you may be able to use a free Mac photo editor like Photoscape X to remove a background from a photo. If you’re struggling with Photoshop, GIMP or another photo editor, then you may be able to use an online service like Remove.bg to remove it instead.
Related Posts
- How to Stop Mac Malware Before It Steals Your Private Data
- How to Add Custom Fonts to PowerPoint: A Quick Windows & Mac Guide
- How to Clear Windows Update Cache On Windows 11?
- How To Fix GeForce Experience Error Code 0x0003 on Windows 11?
- How to Stop Laptop Battery Drain: 10 Pro Tips to Save Your Power
Ben Stockton is a freelance technology writer based in the United Kingdom. In a past life, Ben was a college lecturer in the UK, training teens and adults. Since leaving the classroom, Ben has taken his teaching experience and applied it to writing tech how-to guides and tutorials, specialising in Linux, Windows, and Android. He has a degree in History and a postgraduate qualification in Computing. Read Ben’s Full Bio
